I have been, or can be if you click on a link and make a purchase, compensated via a cash payment, gift, or something else of value for writing this post. As an Amazon Associate, I earn from qualifying purchases. Please read my full Affiliate Disclosure for more information.
Have you ever looked at that blank wall above your toilet and wondered how to turn it into a charming focal point? Decorating this often-overlooked space has become a popular trend, offering a fun and creative way to add personality and style to your bathroom.
In this article, you’ll find a variety of inspiring ideas to transform above your toilet wall—from vibrant artwork and clever shelving to quirky decor and greenery. Whether your style is modern, rustic, or eclectic, these tips will help you make the most of every inch, turning a simple wall into a delightful design feature.
1. Gallery Wall of Motivational Quotes in Stylish Frames
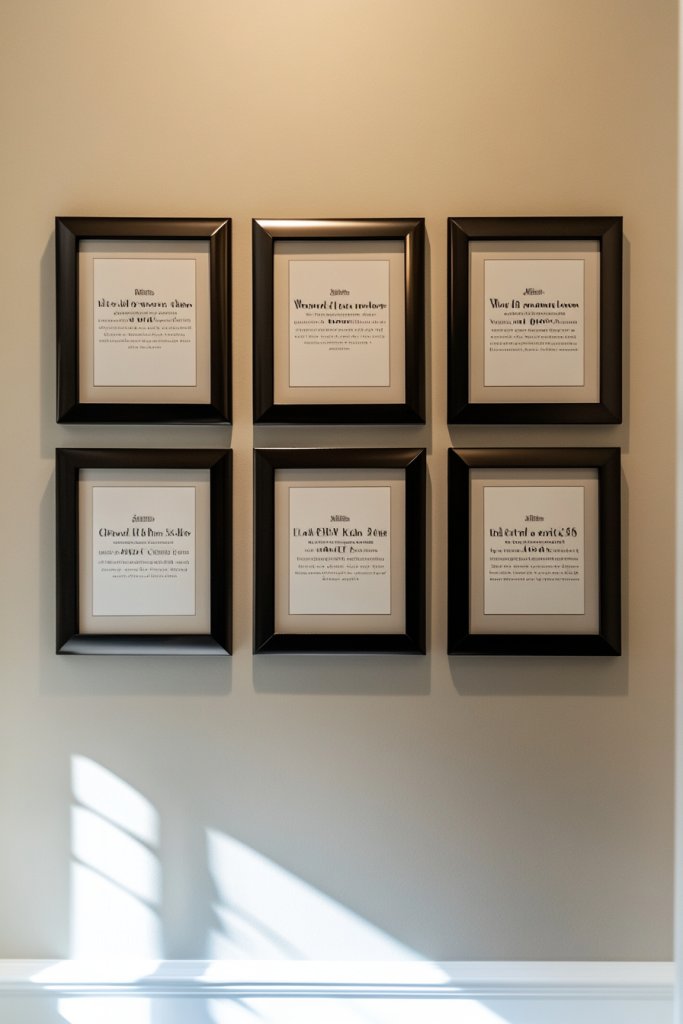
Ever feel like your bathroom walls are just there, kinda ignored and missing some personality? A gallery wall of motivational quotes brings life and inspiration to an overlooked space. It’s a simple way to uplift your mood every time you use the restroom. Plus, it adds a personal touch that makes your bathroom feel more like your own sanctuary.
Recommended Products to replicate this idea
| # | Preview | Product | |
|---|---|---|---|
| 1 |

|
Outus 9 Pieces Inspirational Phrases Posters Wall Decor Motivational Sayings Quote Positive Prints... | Check Latest Price |
| # | Preview | Product | |
|---|---|---|---|
| 1 |

|
Joysnana Bathroom Decor Wall Art Prints with Paper Frames; Funny Wall Signs Black and White Canvas... | Check Latest Price |
Imagine a wall filled with a mix of sleek typography prints and playful hand-lettered quotes, all framed in a variety of stylish frames. Soft pastel tones blend with bold monochrome designs, creating a dynamic visual contrast. The frames line up perfectly, giving a curated, gallery-like effect, with each quote offering encouragement or humor. It turns an ordinary wall into a source of daily motivation.
You can customize the style by choosing frames that match your decor, whether modern, boho, or industrial. For a seasonal update, swap out quotes with holiday-themed sayings or inspiring words for the new year. If space is tight, opt for a narrow strip of frames or a single large centerpiece. This idea scales easily and can be tailored to reflect your personality.
Start by selecting quotes that resonate with you—funny, inspiring, or both. Print them in high resolution and choose frames that complement your bathroom’s color scheme. Mount the frames in a balanced grid or an eclectic arrangement using wall hooks or adhesive strips. Make sure the wall surface is clean and dry before hanging. Use a level to keep everything aligned, and consider layering some prints for a more dynamic effect. This project requires minimal tools—mostly a measuring tape, level, and nails or adhesive strips.
Add variety with different frame styles or colors to create visual interest. Incorporate small decorative elements like metal accents or textured mats inside the frames. Personalize the quotes with your favorite sayings or affirmations, or include some with playful fonts for humor. You can also add small clips or string to hang additional notes or photos, blending motivational quotes with personal memories.
A motivational quote gallery turns your bathroom into a space of positive energy and self-love. It’s a simple update that lifts spirits daily and showcases your personality. Once you see how easy and impactful this is, you’ll wonder why you didn’t do it sooner. Time to get inspired and start creating your own wall of motivation!
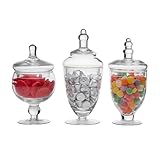
2. Decorative Wall Shelves with Chic Accessories
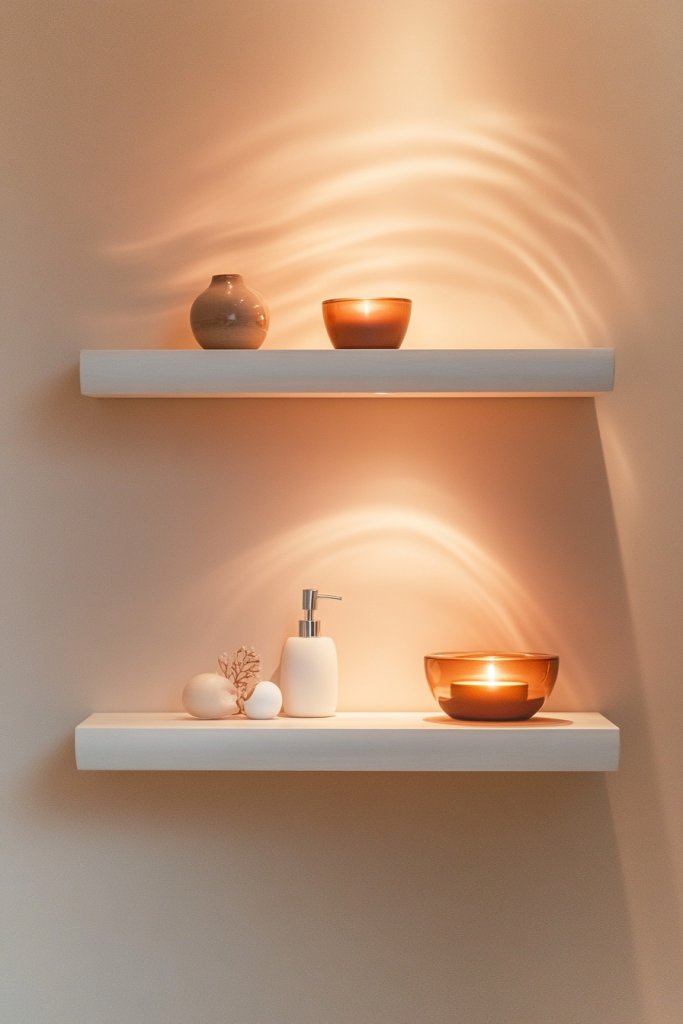
Are your bathroom walls feeling a little empty or plain? Decorative wall shelves are the perfect way to add style and function without cluttering up your space. They give you a place to display small accessories, making your bathroom look thoughtfully curated. Plus, they’re super versatile and easy to install.
Recommended Products to replicate this idea
| # | Preview | Product | |
|---|---|---|---|
| 1 |

|
QEEIG Bathroom Shelves Over Toilet - Wall Mounted Floating Shelves Toilet Paper Storage Small... | Check Latest Price |
| # | Preview | Product | |
|---|---|---|---|
| 1 |
|
ELEMENTS Set of 3 Clear Glass Apothecary Jars with Lids - 10, 9.5, 8.5 Inch Graduated Heights -... | Check Latest Price |
Picture a slim, floating shelf in matte black or warm wood, mounted just above the toilet. On it, you place candles in textured holders, small decorative jars, and a sculptural piece that catches the eye. The shelf creates a layered look, with items arranged at varying heights for visual interest. The soft glow of candles and the mix of textures make the wall inviting and cozy, even in the smallest bathrooms.
Choose shelves in different materials—metal, wood, or even acrylic—to match your overall decor. For a minimalist vibe, keep accessories simple and monochrome. For a more eclectic style, mix colorful ceramics or vintage-inspired trinkets. Change the accessories seasonally, swapping out lightweight objects for plush textiles or decorative stones during holidays or special occasions.
Select sturdy, floating shelves designed for bathroom humidity. Use a level and measuring tape to position them at your preferred height. Secure the shelves into wall anchors or studs for stability. Arrange your accessories thoughtfully—place taller pieces at the back or sides, and smaller items in front. Use candle holders and decorative jars with lids for a tidy look. Regularly dust and replace accessories to keep the display fresh.
Personalize your shelves with items that reflect your style—like antique jars, modern geometric decor, or even DIY crafted pieces. Incorporate functional items such as small storage baskets or toothbrush holders disguised as decor. Add a pop of color with vibrant accessories or metallic accents for a luxe feel. You can also add small framed quotes or artwork on the shelves for layered interest.
Styled correctly, wall shelves turn a dull bathroom wall into a statement piece with personality. They’re a practical way to keep essentials within reach while showcasing your favorite decor. Once you see how much character they add, you’ll be inspired to experiment with different arrangements. It’s a simple upgrade that makes your space uniquely yours.
3. Bold Peel-and-Stick Wallpaper for a Patterned Accent
Does your bathroom wall need a quick refresh but you’re not into heavy renovations? Peel-and-stick wallpaper is your best friend. It’s an easy, damage-free way to add a bold pattern or vibrant color that instantly changes the look of your space. Plus, it’s perfect for renters or anyone hesitant to commit.
Recommended Products to replicate this idea
| # | Preview | Product | |
|---|---|---|---|
| 1 |

|
tiptopcarbon Wallpaper Kit Wallpaper Smoothing Tool Wallpaper Tools for Peel and Stick on Contact... | Check Latest Price |
| # | Preview | Product | |
|---|---|---|---|
| 1 |

|
White Caulk Tape Self Adhesive Waterproof, Bathroom Peel & Stick Caulking Strip Floor Tile Wallpaper... | Check Latest Price |
Imagine a wall covered in a striking geometric pattern or delicate florals in rich hues. The wallpaper’s texture catches the light, creating depth and movement. The pattern draws your eye upward, giving the illusion of height. When paired with neutral fixtures and accessories, it becomes the star of the bathroom, transforming it from dull to dazzling in no time.
Choose from a wide array of patterns—bold geometrics for modern spaces, soft florals for romantic vibes, or minimalist textures for subtle elegance. For seasonal updates, try different colors or patterns to reflect holidays or new trends. You can also create a partial accent wall or use it as a border for a more understated look. The peel-and-stick format makes experimenting stress-free.
Start by thoroughly cleaning and drying the wall surface. Measure and cut the wallpaper to fit the space, leaving a little extra for trimming. Peel back the backing gradually while smoothing the adhesive onto the wall with a squeegee or credit card to avoid bubbles. Pay attention to alignments, especially with repeating patterns. Trim excess edges with a craft knife for a clean finish. No glue, no mess—just apply and admire.
Layer the patterned wall with complementary accessories like textured towels, woven baskets, or metallic fixtures to balance the visual impact. Use lighting to highlight the pattern, such as sconces or LED strips. For a more personalized touch, incorporate decals or small wall-mounted shelves nearby for displaying accents. Play with contrasts—pair busy patterns with simple, solid-colored fixtures.
A statement wall with peel-and-stick wallpaper is a game-changer that can completely redefine your bathroom’s personality. It’s a DIY project anyone can master, offering instant gratification. Once you see how much it elevates the space, you’ll be motivated to try more bold design ideas. It’s a quick, affordable way to make a big impact.
4. Vertical Strip of Mirrored Tiles for a Reflective Touch
Feeling like your bathroom could use a little more light or a sense of spaciousness? Mirrored tiles offer a sleek solution. They reflect light and open up the space, making even small bathrooms feel larger. Plus, they add a modern, polished look that’s hard to beat.
Recommended Products to replicate this idea
| # | Preview | Product | |
|---|---|---|---|
| 1 |

|
Ruomeng Home Gym Mirrors 12 Inch x 12Pcs Wall Mounted Mirror Glass Frameless Full Length Mirror... | Check Latest Price |
| # | Preview | Product | |
|---|---|---|---|
| 1 |

|
XIHACTY Peel and Stick Beveled Glass Tile. 6x2 Inch Mirror Backsplash Tiles. Cute Mirror Strip Tile... | Check Latest Price |
Visualize a narrow vertical strip of glossy mirror tiles running from floor to ceiling beside the toilet. The reflective surface captures the ambient light, bouncing it around the room and creating a bright, airy atmosphere. The sleek, uniform tiles give a minimalist feel, while the vertical orientation elongates the space visually. The overall effect is both functional and stylish, transforming the wall into a feature.
Choose reflective tiles in different shapes—square, rectangular, or staggered for a more dynamic look. For a subtle effect, use mirrored accents rather than a full wall. Incorporate lighting fixtures like sconces or LED strips adjacent to the mirror strip for extra brightness. This idea works well in contemporary, industrial, or even eclectic styles, depending on the framing or surrounding decor.
Start by measuring the wall area and selecting mirror tiles suitable for bathroom humidity. Prepare the wall by cleaning thoroughly; ensure it’s smooth and dry. Use specialized adhesive or peel-and-stick options designed for tiles. Carefully align each tile to maintain a seamless look, using spacers if needed. Secure the edges and check for bubbles or misalignments. Finish with silicone sealant if necessary for water resistance. Regular cleaning with glass cleaner keeps it sparkling.
Frame the mirrored strip with LED backlighting or install a sleek metallic border for a luxe touch. Pair it with textured wall paint or tiles in surrounding areas to add contrast. Keep clutter off the surface to maintain a clean aesthetic. Use the reflective surface to double as a utility mirror, and consider adding a small shelf nearby for essentials or decorative items that don’t detract from the mirror’s sleekness.
Vertical mirrored tiles are a smart, stylish upgrade that amplifies your bathroom’s brightness and size perception. They’re a modern solution that combines function with flair, perfect for a quick remodel. Once you see how much more spacious your bathroom feels, you’ll be eager to incorporate more reflective surfaces elsewhere. It’s a simple, impactful change that makes a big difference.
5. Artistic Wall Decals or Vinyl Stickers
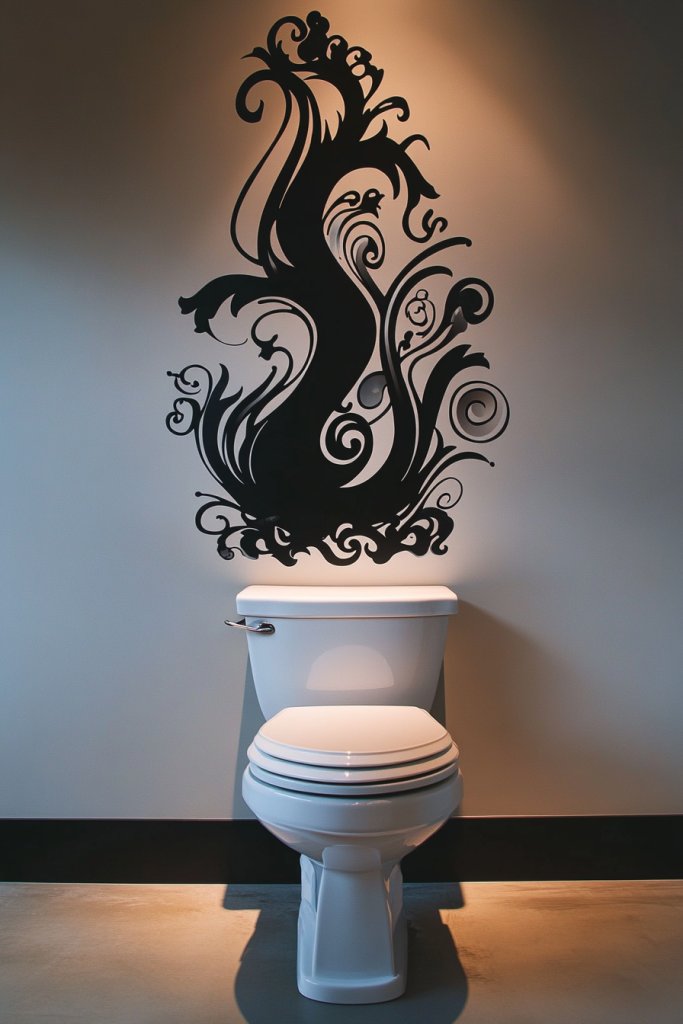
Tired of boring walls but hesitant to commit to permanent decor? Artistic wall decals or vinyl stickers are your answer. They’re removable, customizable, and add personality without the mess or damage. Ideal for renters or anyone who loves changing up their style frequently.
Recommended Products to replicate this idea
| # | Preview | Product | |
|---|---|---|---|
| 1 |
|
Zonon 6 Pcs Flowers Wall Decals Stickers Vinyl Removable Peel and Stick Colorful Dragonflies Floral... | Check Latest Price |
| # | Preview | Product | |
|---|---|---|---|
| 1 |

|
RoomMates Marvel Classic Avengers Peel and Stick Wall Decals, RMK4289SCS | Check Latest Price |
Picture a wall adorned with vibrant, playful decals—abstract shapes, nature motifs, or quirky characters—applied in a scattered or patterned arrangement. The decals add pops of color and depth, transforming plain paint into an artful backdrop. The textured surfaces catch the light differently, creating visual interest from every angle. These decals can be layered over painted walls or textured surfaces for a dynamic, modern look.
Choose decals that match your overall aesthetic—minimalist, boho, or whimsical. Use a mix of sizes and shapes for a lively effect, or keep it simple with bold statement pieces. Change the decals seasonally or whenever you feel like a refresh. They can also coordinate with other decor elements like towels, rugs, or storage bins for a cohesive style.
Clean the wall thoroughly to remove dust and oils. Plan your layout by arranging decals on the floor or a table before sticking. Peel off the backing slowly and press firmly onto the wall, smoothing out air bubbles with a squeegee or credit card. For intricate designs, use painter’s tape as a guide. Most decals are repositionable during the first few minutes; afterwards, they set firmly. They’re easy to remove without residue or damage.
Add decals that reflect your interests—flora, fauna, quotes, or geometric patterns. Layer decals over textured paint or wallpaper for a custom effect. Use contrasting colors to make decals pop or coordinate with your bathroom’s color palette. Incorporate small decals into your overall decor theme, like matching decals with your towels or shower curtain.
Wall decals are a playful, budget-friendly way to personalize your bathroom. They allow for quick updates that can dramatically change the vibe. Once you see how easy it is to add and remove decals, you’ll be inspired to experiment more. It’s an effortless way to keep your space fresh and fun.
6. DIY Canvas Art with Abstract or Modern Designs
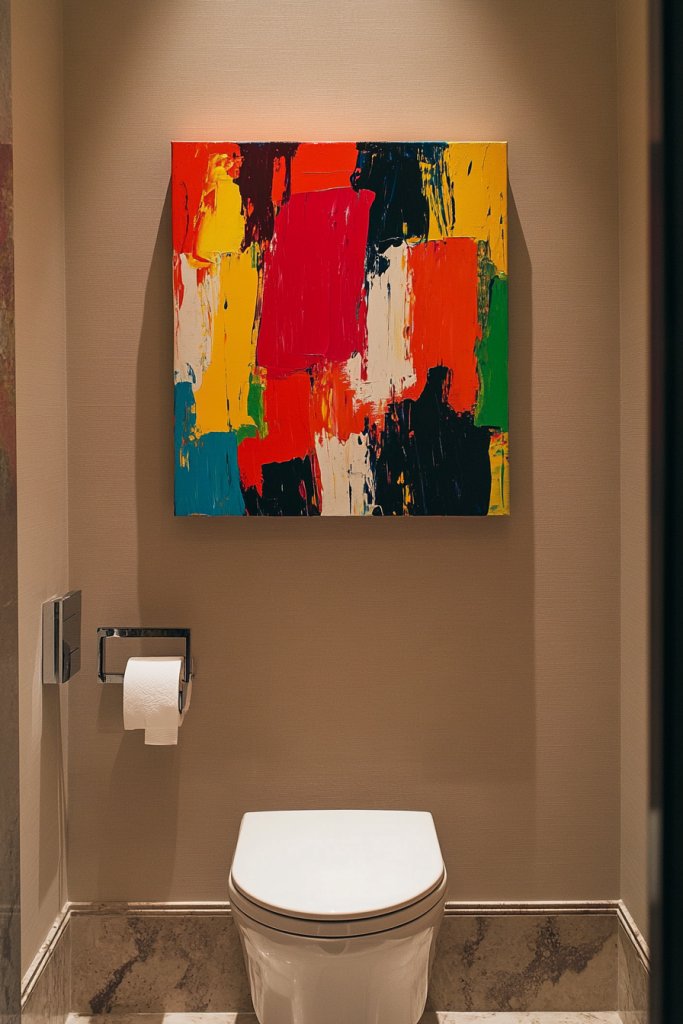
Looking for a way to add art without breaking the bank? DIY canvas art is a fun project that lets you create personalized pieces effortlessly. It’s perfect for adding color and personality to your bathroom walls. Plus, it feels great to hang something you made yourself, giving your space a genuine, handcrafted touch.
Recommended Products to replicate this idea
| # | Preview | Product | |
|---|---|---|---|
| 1 |

|
Stretched Canvas, 6x8, 8x10, 10x12, 12x16, 8 Set Artist Canvase Frame Board Panels, 100% Cotton... | Check Latest Price |
| # | Preview | Product | |
|---|---|---|---|
| 1 |

|
Apple Barrel, Vibrant Spectrum Collection Acrylic Craft Paint, PROMOABIII, 2 fl oz each, 16 assorted... | Check Latest Price |
Visualize a large canvas painted with bold, abstract strokes in vibrant hues—blues, reds, and yellows—creating a lively focal point. The textured brushstrokes add depth and movement, making the wall come alive. The simplicity of modern designs complements minimal fixtures, while the bright colors energize the room. This artwork becomes a conversation piece and a reflection of your creative spirit.
Choose your colors to match or contrast with your bathroom palette. For a calmer vibe, go for monochrome or pastel shades; for a bold statement, choose high-contrast hues or metallic accents. Experiment with different techniques like sponge painting, palette knives, or stenciling to add variety. You can also create a series of smaller canvases for a gallery wall effect, or stick with one large piece for impact.
Start by selecting your canvas size and preparing your paints and brushes. Sketch your design lightly with pencil, then fill in with your chosen colors. Use painter’s tape for clean edges or layered effects. Let each layer dry before adding details or additional colors. Seal the finished piece with a clear matte or gloss varnish for durability. Hang your art using simple hooks or wire, ensuring it’s securely mounted and level.
Infuse your style by adding metallic or glitter accents, or incorporate textured mediums like modeling paste. Personalize further with initials, meaningful symbols, or quotes painted directly onto the canvas. Mix mediums—add fabric, stickers, or other mixed media elements for a truly unique piece. Rotate your artwork periodically to keep your decor feeling fresh.
Creating your own canvas art is empowering and affordable. It allows you to develop a signature style and showcase your personality. Once you see how easy and rewarding it is, you’ll want to craft more pieces for different rooms. DIY art adds authenticity and warmth, making your bathroom a truly personal retreat.
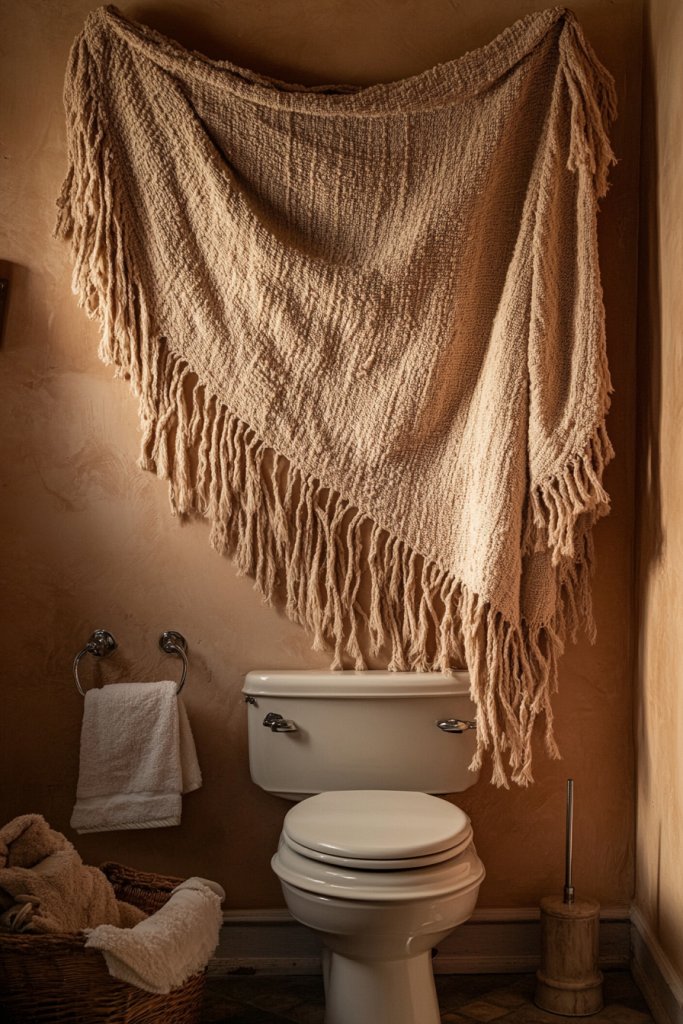
7. Decorative Woven Wall Hangings or Tapestries
Ever wish your bathroom had a cozy, inviting vibe? Woven wall hangings or tapestries add texture and warmth, making the space feel more lived-in and stylish. They’re an easy way to introduce tactile interest without permanent fixtures or expensive art. Plus, they can hide imperfections on the wall and soften the overall look.
Recommended Products to replicate this idea
| # | Preview | Product | |
|---|---|---|---|
| 1 |

|
Achart Macrame Wall Hanging Large- Boho Wall Decor- large wall art- Wall Decor Living Room- Macrame... | Check Latest Price |
| # | Preview | Product | |
|---|---|---|---|
| 1 |

|
AureoMadis Woven Tapestry Wall Hanging - Large Vintage Medieval Renaissance Victorian Art Home Decor... | Check Latest Price |
Picture a large, boho-inspired tapestry with tassels and intricate weaving patterns hanging just above the toilet. The fabric’s rich textures catch the light, creating shadows and depth. Earth tones or vibrant jewel hues can make the tapestry pop, adding visual weight and a cozy ambiance. The tactile fibers contrast with smooth tiles or painted walls, creating a layered, inviting aesthetic. It’s like wrapping your bathroom in a comfy blanket.
Choose tapestries in different materials—cotton, jute, or synthetic blends—to suit your decor. For a modern look, select geometric or minimalist woven designs; for boho, go for fringed or tasseled styles. Seasonal variations might include lighter fabrics in summer and thicker, textured weaves in winter. Hang the tapestry on a decorative rod or use wall hooks, ensuring it’s centered and smooth.
Measure your wall space and select a tapestry or weaving that fits well without overwhelming. Use command hooks or a sturdy rod to hang it securely. Smooth out wrinkles and ensure even spacing on all sides. You may want to add a thin lining or backing for extra structure, especially with thinner fabrics. Keep the fibers dust-free with gentle vacuuming or shaking. Regularly rotate or swap out the tapestry to refresh your decor.
Incorporate decorative elements like small LED lights or hanging charms for extra charm. Layer with other textiles like towels or shower curtains that echo the tapestry’s colors or textures. Personalize with embroidered initials or symbols that hold meaning for you. Use contrasting piping or frames for a tailored, finished look. The tapestry becomes a focal point that expresses your style.
Woven hangings turn a plain wall into a textured masterpiece that’s cozy and stylish. They’re affordable, easy to install, and highly customizable. Once you feel how much warmth they add, you’ll be inspired to incorporate more textiles into your home. It’s a simple upgrade that transforms the atmosphere and invites relaxation.
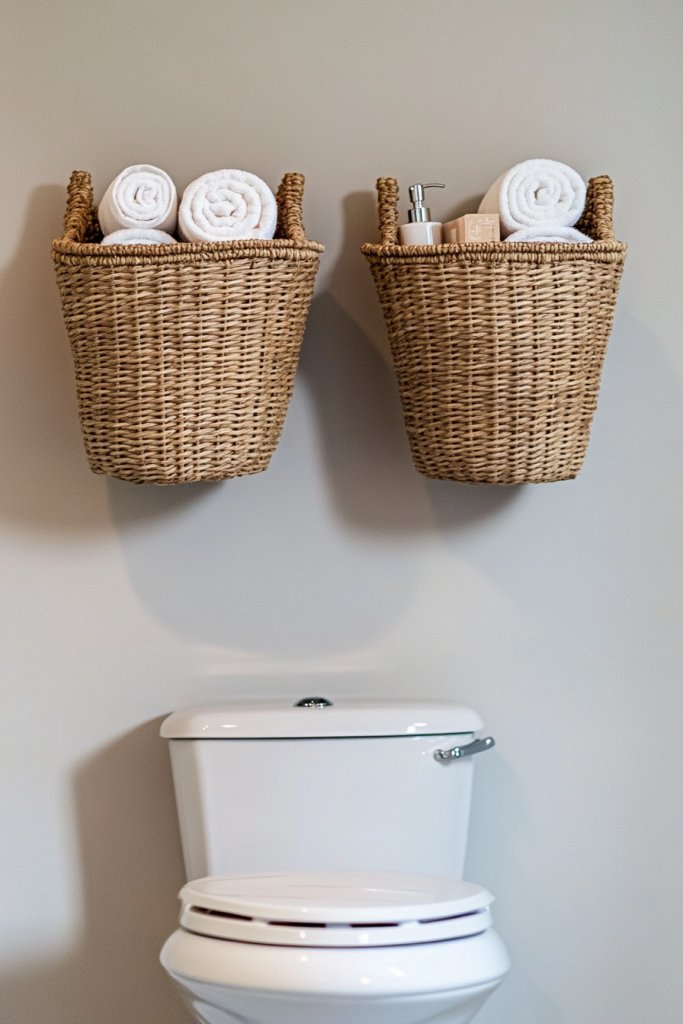
8. Hanging Baskets or Rattan Rounds for Functional Storage
Is your bathroom cluttered with tiny essentials that need organizing? Hanging baskets or rattan rounds are a stylish and practical solution. They keep your space tidy while adding a natural, textured element. Plus, they’re versatile enough to hold toiletries, towels, or decorative items, reducing visual chaos.
Recommended Products to replicate this idea
| # | Preview | Product | |
|---|---|---|---|
| 1 |
![4 Set [EXTRA LARGE] Hanging Wall Mount Storage Baskets with Adhesive Hooks & Steel Hooks, Multiuse Sturdy Wire Metal Organizing Baskets for Home Kitchen Bathroom Pantry Utility Organizer, Black](https://m.media-amazon.com/images/I/51OGDlLFdzL._SL160_.jpg)
|
4 Set [EXTRA LARGE] Hanging Wall Mount Storage Baskets with Adhesive Hooks & Steel Hooks, Multiuse... | Check Latest Price |
| # | Preview | Product | |
|---|---|---|---|
| 1 |

|
BEBE BASK Scalloped Wicker Hanging Basket - The Original Wicker Wall Decor - Hand Woven Wall Basket... | Check Latest Price |
Envision a set of small wicker baskets suspended in a row above the toilet, each one filled with neatly rolled towels or bath accessories. The natural tones and woven textures create a warm, inviting vibe. The baskets hang securely from decorative hooks or a wooden dowel, giving a rustic yet modern look. Light filters through the woven fibers, adding a subtle pattern to the wall.
Choose baskets in different sizes or shapes to suit your storage needs. For a boho aesthetic, opt for natural rattan or seagrass; for a sleek look, go for painted or lacquered baskets. Change contents seasonally—store bath salts in winter or skincare products in summer. Hang the baskets in a symmetrical pattern or asymmetrical for a more eclectic feel. Mix and match with other natural elements like wooden shelves or ceramic accents.
Secure sturdy hooks or wall brackets at the desired height, ensuring they can handle weight. Attach the baskets to the hooks, making sure they hang evenly. Arrange the contents thoughtfully for easy access and visual harmony. Use lightweight baskets for frequent items and heavier ones for bulkier supplies. Regularly clean the baskets with a damp cloth, and rotate stored items to keep everything fresh and accessible.
Add decorative elements like fabric liners or small charms to the baskets for extra flair. Label the baskets with handwritten tags or painted signs for organization. Coordinate their colors with your overall decor palette or go for a natural, neutral look. Incorporate small hanging plants or LED string lights nearby for added charm—just kidding, no plants! Keep the focus on functional beauty.
Hanging baskets combine practicality with style, making your bathroom more organized and appealing. They’re an easy DIY upgrade that adds warmth and texture. Once you see how much neater your space looks, you’ll want to add more functional decor everywhere. It’s a simple, effective way to elevate your bathroom’s design.
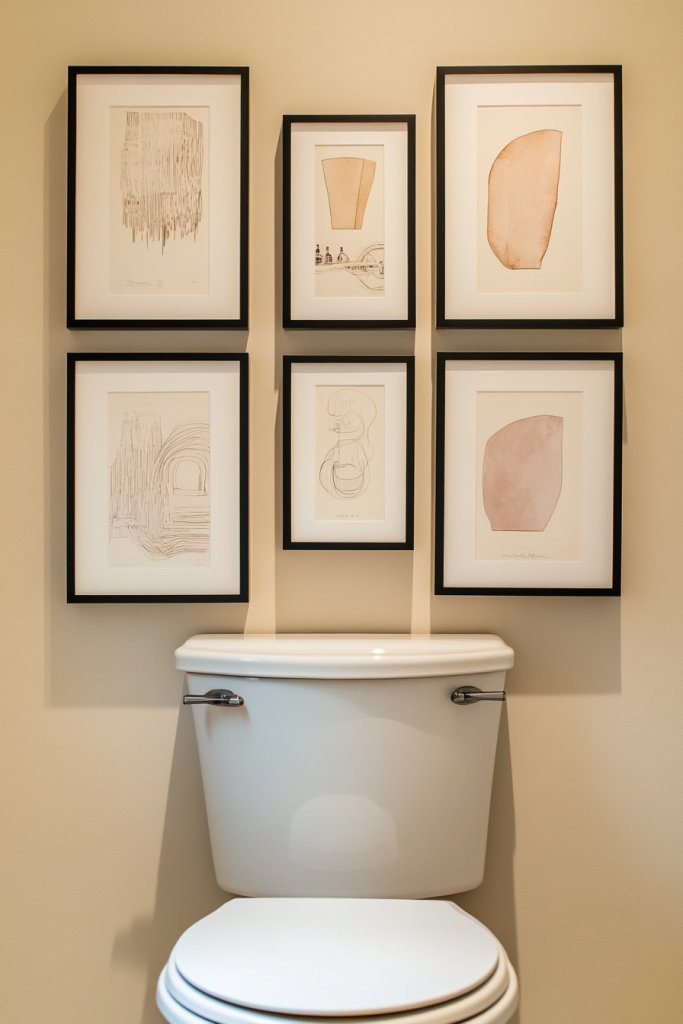
9. Clusters of Small Framed Illustrations or Prints
Do your walls feel a little empty or uninspired? Clusters of small framed illustrations or prints can fill that gap and add personality. They’re a great way to introduce color, theme, or a bit of whimsy without overwhelming the space. Plus, they’re easy to swap out whenever you want a fresh look.
Recommended Products to replicate this idea
| # | Preview | Product | |
|---|---|---|---|
| 1 |

|
HappyHapi 4x6 Picture Frames Set of 10, Tabletop or Wall Display Pictures 3.5x5 with Mat or 4x6... | Check Latest Price |
| # | Preview | Product | |
|---|---|---|---|
| 1 |

|
LANCHI95 15 Pcs Vintage Wall Art Decor, Vintage Posters for Room, Vintage Art Prints, Moody gallery... | Check Latest Price |
Imagine a grouping of tiny black-and-white sketches, colorful illustrations, or vintage prints arranged in a loose grid or organic pattern. The frames vary in size and style, creating an eclectic yet cohesive vibe. This arrangement draws the eye upward and adds visual interest, making the wall look curated but relaxed. The mix of images can tell a story or reflect your personal interests.
Opt for uniform frames in different finishes or a mix of vintage and modern styles for a more eclectic feel. Change the theme seasonally—floral prints for spring, abstract art for summer, or cozy illustrations for winter. Space out the frames for a breezy look, or cluster them tightly for a bold statement. This concept scales well from small to large walls.
Lay out your prints on the floor or a table to plan your design. Use painter’s tape on the wall to mark the placement, ensuring even spacing. Hang each frame with picture hooks or adhesive strips, starting from the center outwards. Adjust as needed for balance and symmetry. Keep the frames at eye level for optimal viewing and aesthetic appeal. Regularly dust and rotate the prints to keep the display fresh.
Add personal touches like handwritten labels, small decorative tags, or themed collections. Incorporate frames with different textures—wood, metal, or painted surfaces—to add depth. Mix in some small decorative objects or fabric swatches within the frames for a layered effect. Use bold mats or borders to highlight specific prints and tie your theme together.
A cluster of small prints creates a gallery vibe that’s both personal and stylish. It’s a flexible, budget-friendly way to decorate and express your personality. Once you see how easily you can change the theme or layout, you’ll be eager to refresh other areas of your home. It’s a fun project that results in a stunning visual impact.
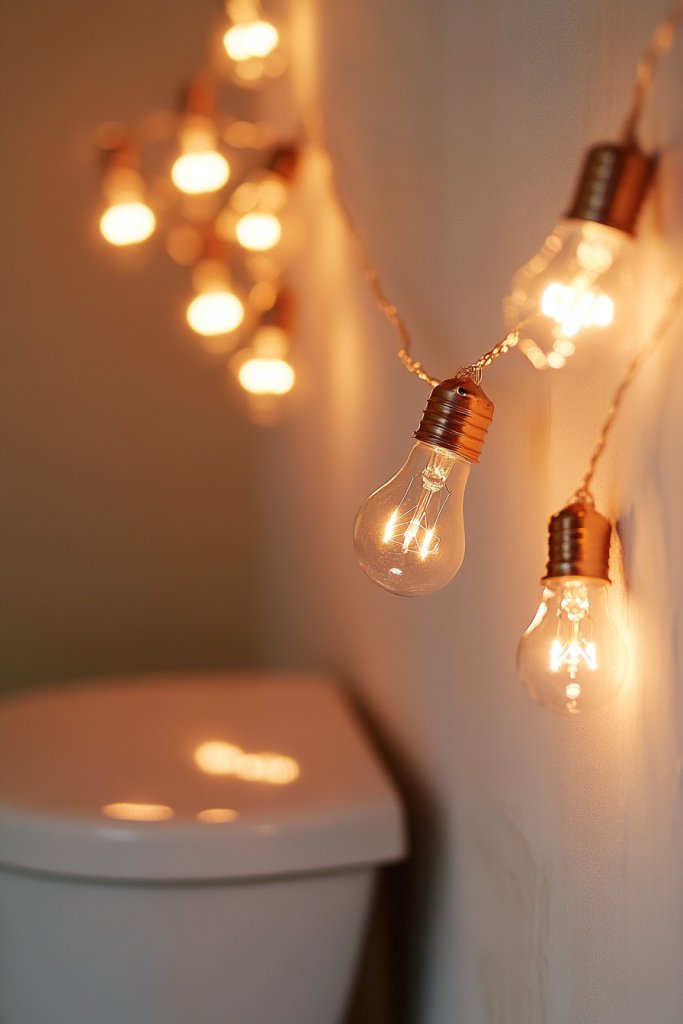
10. String Lights with Decorative Bulbs for Cozy Ambiance
Want to add a warm, inviting glow to your bathroom without installing permanent fixtures? String lights with decorative bulbs are a simple, fun way to create cozy ambiance. They’re perfect for relaxing baths or just making the space more inviting. Plus, they’re easy to install and can be taken down when needed.
Recommended Products to replicate this idea
| # | Preview | Product | |
|---|---|---|---|
| 1 |

|
BEEWIN Globe String Lights,10FT 30 LED Decorative Christmas Lights,8 Modes Crystal Crackle Ball... | Check Latest Price |
| # | Preview | Product | |
|---|---|---|---|
| 1 |

|
Brightown 12 Pack LED Fairy Lights Battery Operated String Lights - 7ft 20LED Waterproof Silver Wire... | Check Latest Price |
Visualize a string of warm LED bulbs draped across the wall above the toilet, softly glowing in amber or vintage styles. The gentle light reflects off the tiles, creating a soothing atmosphere. The string curves naturally, adding a playful or elegant element depending on your style. The ambient glow makes the bathroom feel more like a retreat, perfect for unwinding after a long day.
Choose bulbs in different shapes—Edison, globe, or vintage filament—for varied styles. Drape the string in a zigzag pattern, or run it straight across for a minimalist look. Use different colored bulbs to match seasonal themes or your decor palette. Incorporate dimmer switches or smart lighting options for adjustable brightness. This idea works well in modern, rustic, or eclectic styles.
Secure ceiling hooks or adhesive hooks along the desired path, ensuring they can handle the weight of the string and bulbs. Hang the string with clips or hooks, adjusting for the desired length and pattern. Plug into a nearby outlet and test the lighting. Use extension cords discreetly for a clean look. Keep the wiring neat and out of reach of humidity or water. Regularly check connections and replace bulbs as needed.
Add small decorative elements like paper lanterns or fabric banners along the string. Use colored or vintage-style bulbs for a nostalgic feel. Incorporate a smart dimmer to change the mood from bright to romantic. Pair with scented candles or diffusers for a multi-sensory experience. Personalize the look to match your favorite color themes or seasonal decor.
String lights are a simple, charming upgrade that makes your bathroom feel warm and inviting. They’re a quick fix with a big impact, perfect for creating a relaxing retreat. Once you see how cozy and magical your space becomes, you’ll be inspired to add lighting elements elsewhere too. It’s an easy, affordable way to elevate your bathroom ambiance.
11. Minimalist Metal Wall Art or Sculptural Pieces

Looking for a sleek, modern update that’s not cluttered or overwhelming? Minimalist metal wall art or sculptural pieces can add a sophisticated touch without crowding your space. They bring a sense of dimension and elegance, perfect for contemporary bathrooms. Plus, they’re a durable, low-maintenance decor option.
Recommended Products to replicate this idea
| # | Preview | Product | |
|---|---|---|---|
| 1 |

|
CHENGU 3 Pieces Metal Minimalist Abstract Woman Wall Art Line Drawing Wall Art Decor Single Line... | Check Latest Price |
| # | Preview | Product | |
|---|---|---|---|
| 1 |

|
Rajukit Modern Geometric Abstract Metal Wall Art – Black Wall Decor – Large Metal Wall Sculpture... | Check Latest Price |
Picture a single large, abstract metal sculpture mounted vertically above the toilet. The piece features clean lines and geometric shapes in matte black or brushed gold, adding a touch of luxe. The three-dimensional form casts subtle shadows, creating visual intrigue. The simplicity of the design complements sleek fixtures and neutral tones, elevating the overall aesthetic while maintaining a clutter-free vibe.
Choose from a variety of shapes—modern geometric patterns, organic forms, or linear art—to match your decor style. For a softer look, opt for curved or flowing designs; for more impact, go with bold, angular shapes. Mix and match several smaller pieces for a gallery feel or keep it simple with one statement sculpture. Adjust the placement and size based on your wall space.
Secure wall anchors suitable for metal art, ensuring they can support the weight. Use a level to hang the piece precisely where you want it, and attach with appropriate hardware—anchors, screws, or hooks. Clean the wall surface and the art piece before mounting to ensure a secure, dust-free installation. Consider LED accent lighting to highlight the sculpture at night. Regularly dust the art with a soft cloth to preserve its finish.
Personalize by choosing metal finishes that match your fixtures—brushed nickel, matte black, or polished chrome. Incorporate small complementary accessories like minimalist shelves, textured towels, or simple glass containers nearby. Use contrasting wall paint or textured backgrounds to make the sculpture stand out further. Keep the overall decor restrained to let the art be the focal point.
Minimalist metal art adds a refined, modern edge to your bathroom that’s both stylish and durable. It’s an easy way to introduce art into a space that typically lacks wall decor. When you see how effortlessly it elevates the look, you’ll want to explore more sculptural pieces in other rooms. It’s a chic, timeless choice for a polished finish.
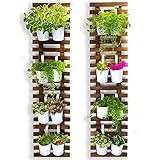
12. Vertical Garden with Faux or Real Succulents
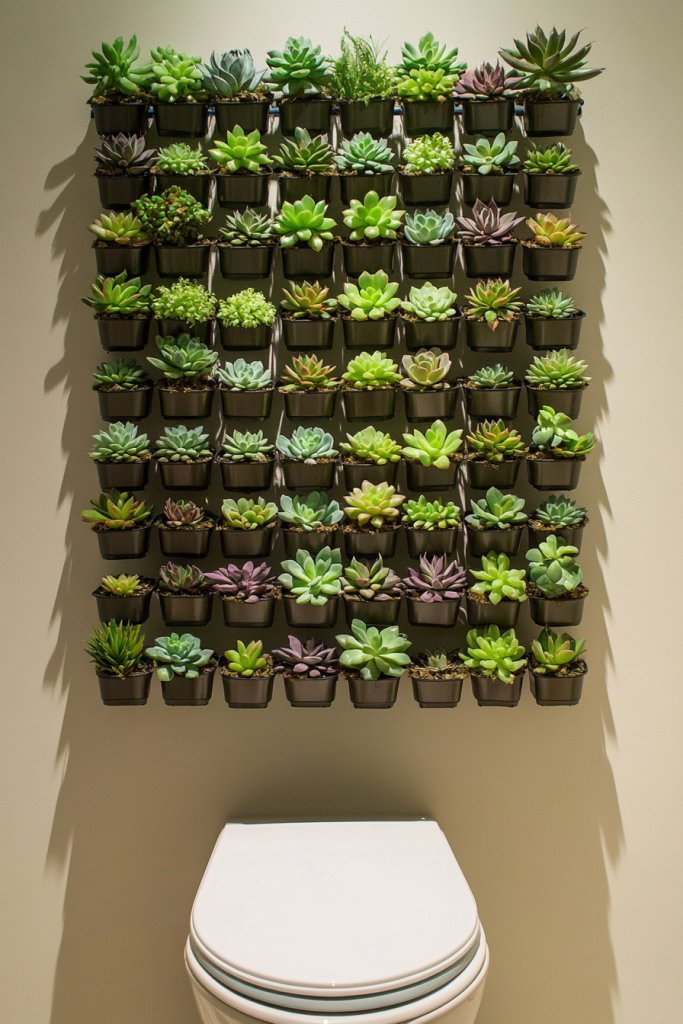
Craving a touch of nature without the maintenance? A vertical garden of faux or real succulents brings life and freshness to your bathroom walls. They add a lush, green element that’s surprisingly easy to care for—especially if you opt for faux plants. It’s a great way to introduce calming vibes into a small space.
Recommended Products to replicate this idea
| # | Preview | Product | |
|---|---|---|---|
| 1 |
|
ShopLaLa Wall Planter - 2 Pack, Wooden Hanging Large Planters for Indoor Outdoor Plants, Live... | Check Latest Price |
| # | Preview | Product | |
|---|---|---|---|
| 1 |

|
Vandue Modern Home 20" Square Vertical Hanging Artificial Succulent Wall Art - Wall Mount 3D Garden... | Check Latest Price |
Visualize a sleek wall-mounted grid or pocket system filled with tiny succulents in geometric pots. The varying shades of green and unique shapes create a textured, vibrant tapestry. When lit by ambient or task lighting, the plants seem to glow with vitality. The arrangement offers a natural focal point, bringing a soothing, spa-like atmosphere to the bathroom.
Choose between real and faux succulents depending on your level of commitment. Use modern, minimalist planters in concrete, ceramic, or metal for a clean look. For a more organic vibe, incorporate natural wood or woven baskets. Change the arrangement seasonally or for special occasions by swapping out pots or rearranging the plants. Vertical systems can be customized to fit small or large walls.
Install a wall-mounted planter system or wall pockets designed for small plants. If using real plants, ensure proper drainage and light; place near a window or add grow lights. Faux plants require minimal setup—simply attach the pockets or panels securely, then insert the plants. For real plants, water sparingly and ensure proper ventilation. Regularly dust faux plants, and prune real succulents to maintain their shape.
Decorate with miniature decorative stones or sand in the planters, matching your color scheme. Add small sculptures or decorative pebbles to enhance the display. Incorporate different plant varieties or colors to create visual interest. Use LED strip lighting behind the plants for a glowing, dramatic effect. Personal touches like engraved stones or customized pots make the garden truly yours.
A vertical succulent garden combines beauty and low-maintenance ease, making your bathroom more inviting and lively. It’s a natural upgrade that transforms a plain wall into a calming retreat. Once you see how simple it is to create and care for, you’ll be motivated to add more green touches throughout your home. Nature-inspired decor never goes out of style.
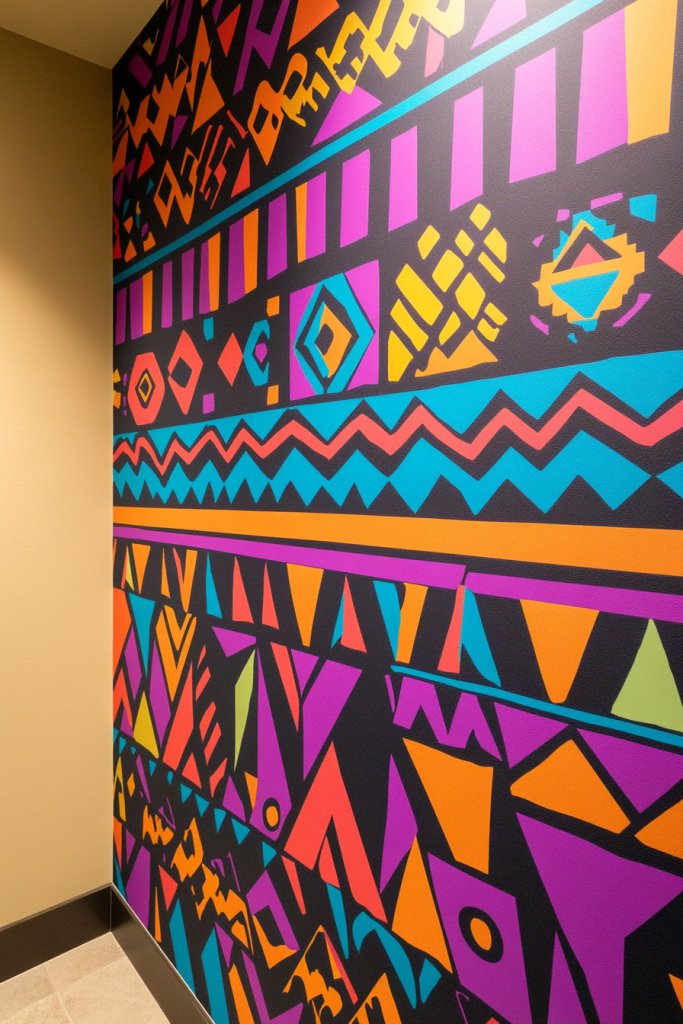
13. Patterned Wall Stencil or Paint Technique
Want to add a custom, artistic touch to your bathroom but unsure about wallpaper or decals? A patterned wall using stencils or special paint techniques offers a DIY-friendly way to create a unique backdrop. It’s perfect for expressing your style and making your space stand out without a big renovation. Plus, it’s a fun project that adds a personal touch.
Recommended Products to replicate this idea
| # | Preview | Product | |
|---|---|---|---|
| 1 |
|
18 Sheet Reusable Flower Stencils for Painting,Stencils for Painting on Wood,Large Floral Stencil... | Check Latest Price |
| # | Preview | Product | |
|---|---|---|---|
| 1 |

|
Dryzone Bathroom & Kitchen Paint (1 Quart) Brilliant White - 105 sq. ft to 130 sq. ft coverage | Check Latest Price |
Imagine a wall with bold, geometric shapes or organic motifs painted in contrasting colors or metallic finishes. The pattern repeats seamlessly or creates a more freeform design, adding visual rhythm to the space. The textured paint or matte stencil patterns contrast beautifully with smooth fixtures, adding depth. Light plays differently across the surface, giving the room a dynamic, artistic vibe.
Opt for modern, minimalist patterns like chevrons or stripes, or go for intricate floral or organic designs for a boho look. Use contrasting colors for a striking effect or keep it monochrome for subtle sophistication. You can also vary the scale—large patterns make a bold statement, while small, detailed stencils create a delicate look. Seasonal or thematic variations are easy by changing colors or motifs.
Start by cleaning and priming the wall. Use painter’s tape to outline your pattern or stencil placement. Apply the paint with a sponge, roller, or brush, following the stencil’s edges carefully. For clean lines, use painter’s tape and a steady hand. Multiple coats may be necessary for vibrant colors or opaque coverage. Finish with a clear sealant to protect your design from moisture. This technique requires patience but yields a highly personalized wall.
Layer additional details with metallic or glitter paints for a luxe effect. Incorporate hand-painted accents or small motifs for extra personalization. Coordinate your pattern with accessories like towels or rugs, and keep the color palette consistent. Use the pattern to guide other decor choices—like matching geometric tiles or textured paints elsewhere. It’s a great way to showcase your artistic side.
A patterned wall adds a high-end, customized look that’s entirely your own. It’s an affordable way to turn your bathroom into an artistic retreat. Once you see how achievable it is, you’ll want to experiment with more complex designs or even expand it to other walls. Personal touches like this make your space truly one-of-a-kind and inspire ongoing creativity.
14. Framed Black-and-White Photography for Classic Elegance
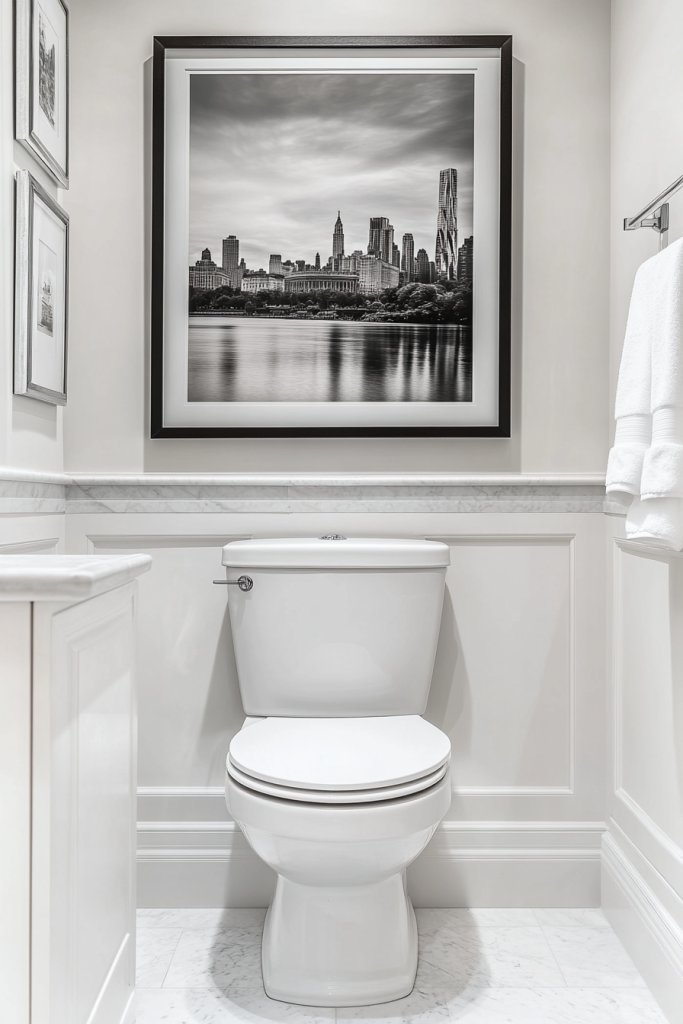
Craving a timeless, sophisticated vibe in your bathroom? Black-and-white photography adds classic elegance without overwhelming the space. It’s a simple way to introduce art that’s versatile and refined, elevating your decor instantly. Plus, monochrome images create a calm, neutral backdrop that complements any style.
Recommended Products to replicate this idea
| # | Preview | Product | |
|---|---|---|---|
| 1 |

|
Large Framed Black and White Abstract Wall Art for Living Room, 3 Piece Big Modern Canvas Prints... | Check Latest Price |
| # | Preview | Product | |
|---|---|---|---|
| 1 |

|
FIXSMITH 8x10 Picture Frame Set of 2, Photo Frame with HD Plexiglass, Display Pictures 5x7 with Mat... | Check Latest Price |
Picture a series of black-and-white landscape or cityscape photos arranged in a grid or linear fashion. The images’ contrast and texture draw the eye, adding depth to the wall. The simple frames in black, white, or metallic finishes keep the focus on the photos while blending seamlessly with various decor themes. The overall effect is a chic, understated gallery that lends a sense of history and sophistication.
Use a uniform frame style for a clean, modern look or mix vintage frames for a more eclectic vibe. Rotate the images seasonally or change themes—urban scenes, nature, or abstract textures—based on your mood. Keep the spacing consistent for a structured look or vary it for a more relaxed, artistic feel. This style easily adapts to different wall sizes and shapes.
Select high-quality prints or black-and-white photos that resonate with you. Frame them with matting if desired for a polished appearance. Measure and plan your layout using painter’s tape or paper templates. Hang with picture hooks, ensuring they’re level and spaced evenly. For a gallery effect, start from the center and work outward. Dust the frames regularly and rotate images to keep the display fresh.
Add personal touches by including photos of loved ones, pets, or meaningful places. Use frames with textures or finishes that match your bathroom fixtures—matte black, brushed silver, or vintage wood. Incorporate small decorative elements like metallic accents or textured mats. Keep the display cohesive by sticking to a monochrome palette or mixing in subtle color accents.
Black-and-white photography elevates your bathroom decor with timeless appeal. It’s a low-cost, high-impact upgrade that pairs well with various styles, from modern to vintage. When you see how effortlessly it adds character, you’ll want to expand your gallery with more images. It’s a classic choice that always looks elegant and stylish.
15. Colorful Chalkboard or Dry-Erase Panel for Notes & Doodles
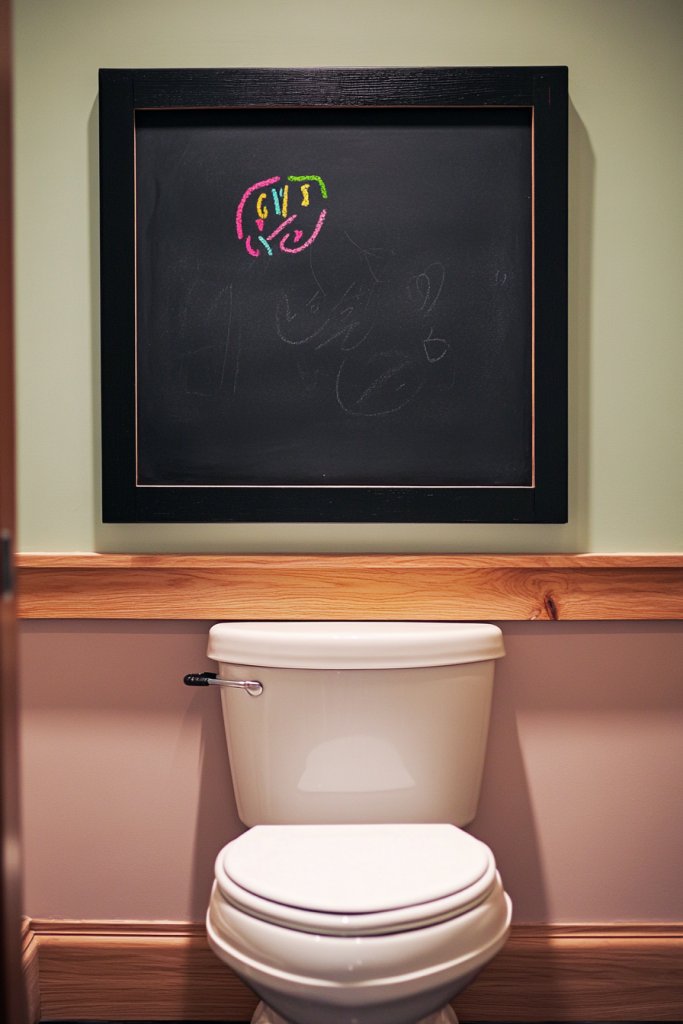
Ever wish your bathroom could be a bit more functional and fun? A chalkboard or dry-erase panel offers a playful way to leave notes, doodles, or reminders. It’s perfect for jotting down quick thoughts, daily affirmations, or funny jokes—making your bathroom more interactive and lively. Plus, it’s easy to update and change whenever inspiration strikes.
Recommended Products to replicate this idea
| # | Preview | Product | |
|---|---|---|---|
| 1 |

|
Excello Global Products 40" x 60" Wooden Wall Mounted Folding Chalkboard (Brown) | Check Latest Price |
| # | Preview | Product | |
|---|---|---|---|
| 1 |

|
VIZ-PRO Magnetic Dry Erase Board, 36 X 24 Inches, Silver Aluminium Frame | Check Latest Price |
Imagine a sleek black chalkboard with colorful chalk or a clean white dry-erase surface adorned with vibrant markers. You can write a daily affirmation, draw whimsical doodles, or leave a humorous message for yourself or guests. The surface becomes a canvas for your creativity, constantly changing and evolving. Brightly colored chalk or markers pop against the dark or white background, adding playful energy.
Choose between framed panels for a polished look or a simple mounted board for a more casual vibe. Change the color of markers or chalk for different seasons or themes. Incorporate small shelves or baskets nearby to hold markers, erasers, or cleaning supplies. Use decorative borders or stickers to personalize the panel further. This idea is highly adaptable to your style and mood.
Pick a suitable wall area that’s easy to access and visible. Mount the panel securely with appropriate hardware, ensuring it’s level. Keep your markers and erasers handy in a nearby container or tray. Encourage family members or housemates to participate by leaving notes or doodles. Regularly clean the surface with a damp cloth to keep it neat. Change the message or design to keep the space fresh and engaging.
Add decorative touches like colorful borders, themed stickers, or motivational quotes around the panel. Use different marker colors for variety and emphasis. Incorporate a small magnetic or pinboard section for additional notes or photos. Personalize it with your favorite colors or themes—like tropical, nautical, or minimalist. It’s a functional art piece that’s as playful as it is practical.
A chalkboard or dry-erase panel makes your bathroom interactive and fun, encouraging daily positive habits. It’s a simple tweak that boosts your space’s utility and personality. Once you see how much joy and organization it brings, you’ll be inspired to add similar features elsewhere. It’s a playful, stylish upgrade with endless possibilities.
16. Decorative Metallic or Textured Wall Panels
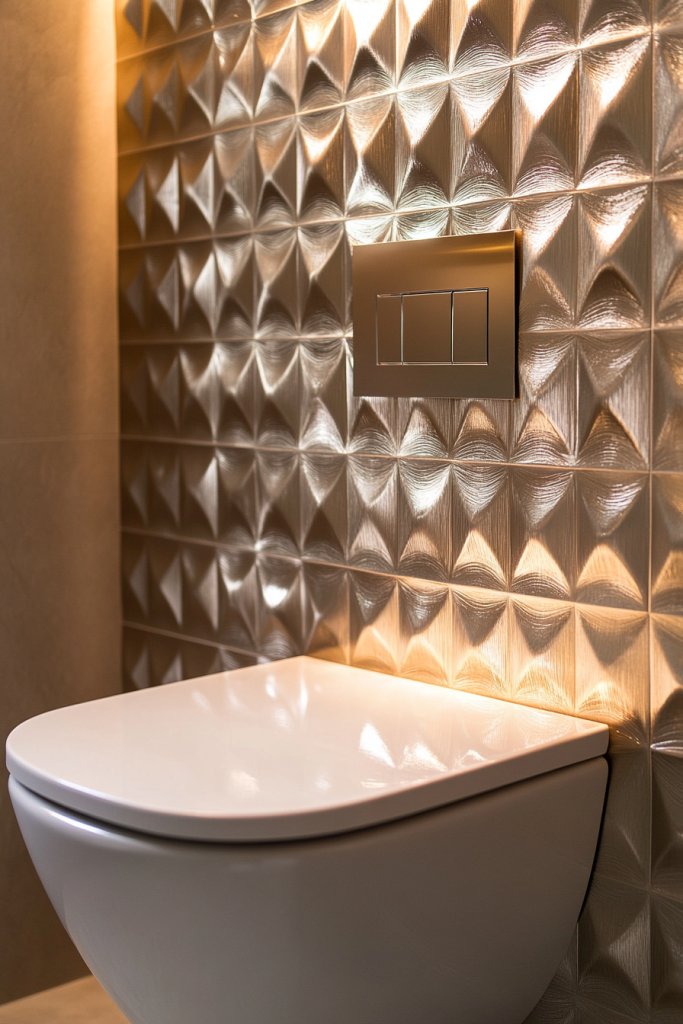
Craving a touch of luxury and texture in your bathroom? Decorative metallic or textured wall panels instantly elevate your space. They add visual interest, dimension, and a luxe feel without a full renovation. Plus, they’re durable and easy to maintain—ideal for high-moisture areas.
Recommended Products to replicate this idea
| # | Preview | Product | |
|---|---|---|---|
| 1 |

|
Art3d 102-Piece Peel and Stick Wall Tile for Kitchen Backsplash, Bathroom, Fireplace, 3in. × 6in.... | Check Latest Price |
| # | Preview | Product | |
|---|---|---|---|
| 1 |

|
Art3d 4-Pack Glue-On Six-Grid Wainscoting Panel for Interior Wall Decor - 104 x 12 Inch Polystyrene... | Check Latest Price |
Picture a wall clad in panels with a brushed gold finish or embossed geometric patterns. The reflective surfaces catch the light, creating a shimmering effect that adds depth and glamour. The textured patterns create shadows and highlights, making the wall dynamic and captivating. The panels transform a plain wall into a statement feature that oozes sophistication.
Choose from metallic finishes like bronze, copper, or chrome, or opt for textured panels with organic or geometric designs. Combine with smooth paint or tiles for contrast. Use different panel sizes or shapes to create a custom look—large sheets or smaller tiles. Incorporate lighting to accentuate textures and finishes, enhancing the visual impact.
Measure your wall area and select panels that suit your style. Prepare the surface by cleaning and leveling. Attach panels using appropriate adhesive or mounting systems, ensuring they’re securely fixed and aligned. For larger panels, consider professional installation. Add accent lighting or spotlights to highlight the textures and finishes. Maintain with gentle cleaning to preserve the surface sheen.
Layer with complementary fixtures—like sleek faucets, mirrors, or towel bars—to reinforce the luxe vibe. Use contrasting wall colors or lighting to make the panels pop. Incorporate small decorative elements like LED strips or wall sconces for added drama. Personalize the design with custom patterns or finishes that reflect your style—brushed, matte, or polished.
Metallic and textured wall panels bring a high-end, durable finish that transforms your bathroom into a modern retreat. They’re a simple, impactful upgrade that signals style and sophistication. Once you see how they elevate your decor, you’ll be motivated to incorporate similar luxe touches elsewhere. It’s a smart investment in your space’s aesthetic and value.
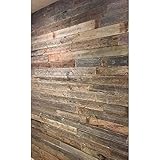
17. Vertical Art Installation with Reclaimed Wood or MDF
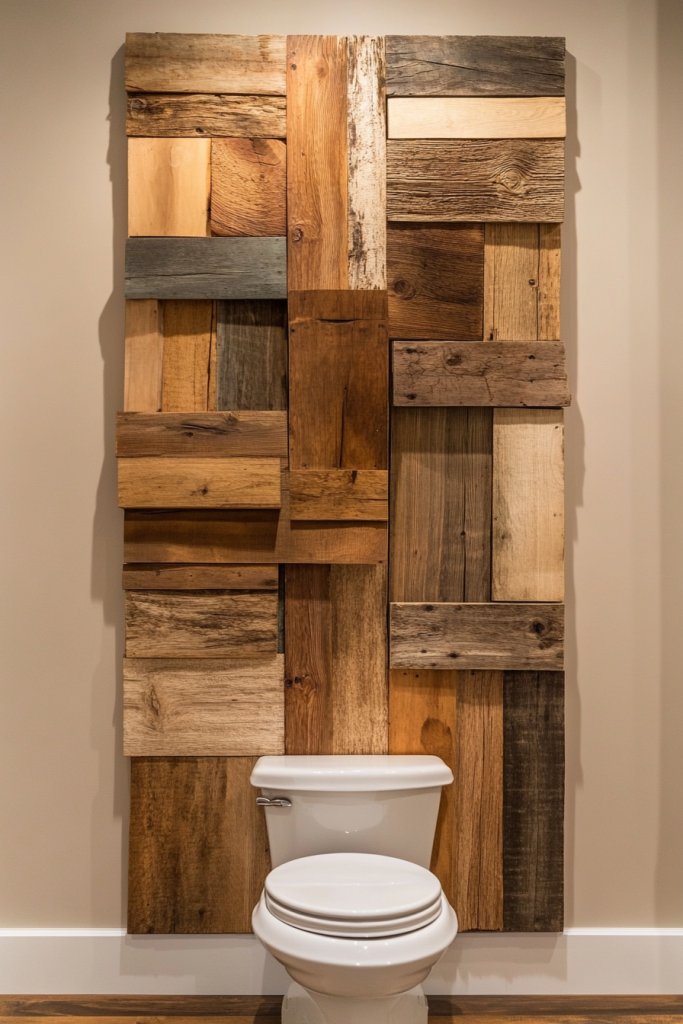
Looking to make a bold statement above your toilet? A vertical art installation using reclaimed wood or MDF can turn a dull wall into a stunning focal point. It combines rustic charm with modern flair and is surprisingly easy to assemble. Plus, it’s a great way to showcase your creativity and eco-friendly values.
Recommended Products to replicate this idea
| # | Preview | Product | |
|---|---|---|---|
| 1 |
|
Rockin' Wood Real Wood Nail Up Application Rustic Reclaimed Naturally Weathered Barn Wood Accent... | Check Latest Price |
| # | Preview | Product | |
|---|---|---|---|
| 1 |
|
(8-Pack) CalPalmy 11” x 14” MDF Boards - 1/4” Thick Boards for Carpentry, Interior Design,... | Check Latest Price |
Imagine a wall adorned with painted or stained reclaimed wood planks arranged in a geometric or staggered pattern. The natural grain and imperfections add character, while the stained or painted surfaces introduce color and contrast. The vertical layout emphasizes height, making your bathroom feel more spacious. Light plays across the textured surface, creating shadows and depth that change throughout the day.
Use different finishes—natural, stained, painted, or distressed—to match your decor. Create a pattern, such as herringbone or chevron, for visual interest. Mix reclaimed wood with MDF painted in bold hues for a contemporary twist. Adjust the installation height based on your ceiling and wall space. This installation can be a standalone piece or part of a larger feature wall.
Cut the reclaimed wood or MDF into planks of various lengths. Sand edges for safety and finish with sealant or paint. Attach the planks vertically to the wall using nails, screws, or adhesive, making sure they’re level and evenly spaced. Use spacers for consistent gaps. Seal the surface if stained or painted for moisture resistance. Consider adding a protective top coat for longevity. Regular dusting or wiping keeps it looking fresh.
Add personal touches by incorporating painted designs, stenciled patterns, or engraved initials on some planks. Pair with other natural elements like woven baskets or textured towels. Use contrasting colors or finishes to highlight certain sections. Incorporate subtle lighting underneath or above to accentuate the texture and pattern. Let your creativity guide the arrangement for a truly unique piece.
A reclaimed wood or MDF art installation creates a striking, personalized feature that’s both rustic and modern. It’s a cost-effective DIY project that adds warmth and character to your bathroom. Seeing this transformation will inspire you to explore more handcrafted decor ideas. It’s a bold statement that proves your space can be both stylish and environmentally conscious.
Conclusion
With a diverse array of decorating ideas—from bold art pieces to functional storage solutions—you can easily personalize the space above your toilet. Don’t hesitate to try out different styles and mix and match for a look that’s uniquely yours. Embrace your creativity and give your bathroom a fresh, inviting upgrade—your perfect wall transformation is just a few creative steps away!