I have been, or can be if you click on a link and make a purchase, compensated via a cash payment, gift, or something else of value for writing this post. As an Amazon Associate, I earn from qualifying purchases. Please read my full Affiliate Disclosure for more information.
Imagine a kitchen where the boundaries between cooking and entertaining dissolve into one seamless space—that’s the magic of an open kitchen! This design trend has skyrocketed in popularity because it creates a welcoming atmosphere, encourages social interaction, and maximizes natural light.
In this article, you’ll discover a variety of innovative open kitchen ideas that can transform your space into a hub of activity and connection. From minimalist layouts to cozy, inviting setups, these concepts cater to different styles and needs, helping you craft a kitchen that’s both functional and fabulous.
1. Incorporate a Large Central Island with Seating for Gathering
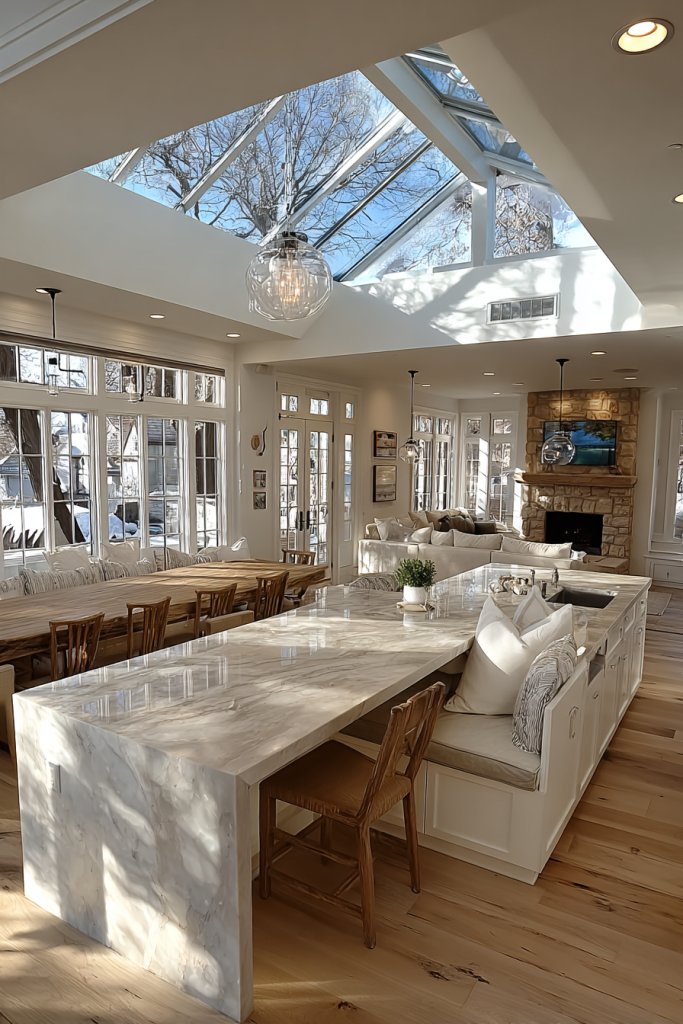
Ever tried hosting a dinner party in a cramped kitchen and felt like everyone was elbowing each other? The struggle to create a social hub that feels spacious and inviting is real. A large central island addresses this by turning your kitchen into a natural gathering spot. It’s perfect for casual chats or even just keeping an eye on the kids while cooking.
Recommended Products to replicate this idea
| # | Preview | Product | |
|---|---|---|---|
| 1 |

|
WOODTIME 94.5" W Stationary Kitchen Island Storage Cabinet with Built-in Power Outlet, 2 Countertop,... | Check Latest Price |
| # | Preview | Product | |
|---|---|---|---|
| 1 |

|
DUMOS 26 Inch Counter Height Bar Stools Set of 4, Modern Faux Leather High Barstools with Back and... | Check Latest Price |
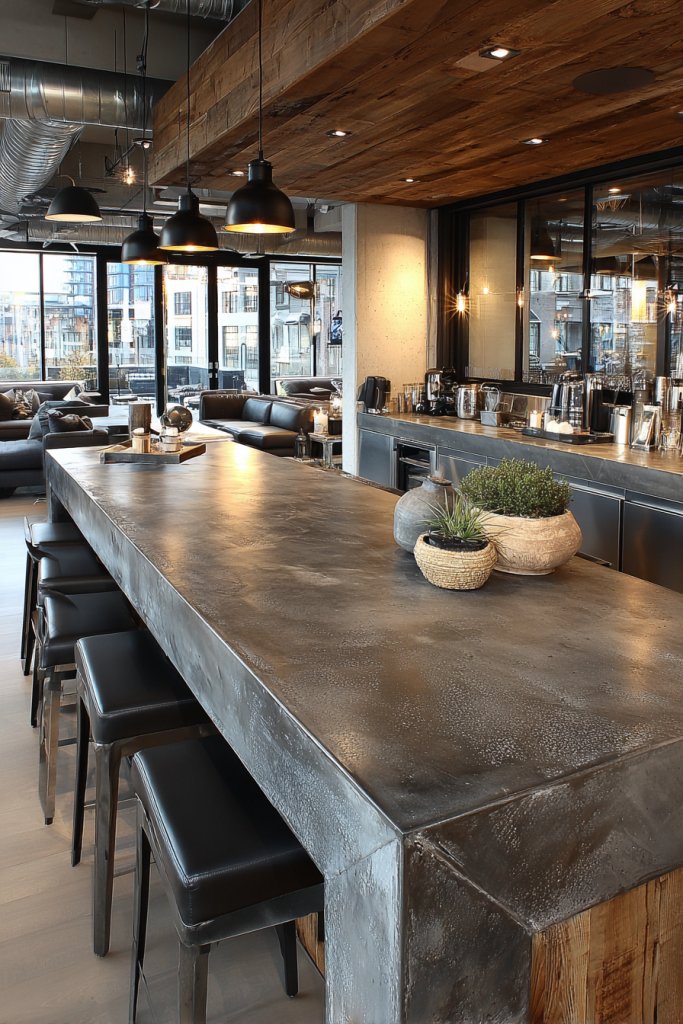
Imagine a massive, sleek island with a smooth quartz surface, surrounded by comfy barstools. The warm glow of ambient lighting reflects off its polished finish, making it the focal point of your space. Guests lounge comfortably, chatting away as you prep food on the expansive surface. The island becomes a mini social oasis, blending functionality with style.
Choose an island with built-in storage, or customize it with a contrasting countertop color for visual punch. For smaller spaces, opt for a narrower, multi-purpose island that doubles as a workspace and social zone. During holidays, add decorative elements like a runner or a tray of seasonal treats. You can also extend the seating with additional stools or benches to accommodate larger groups.
Start with measuring your space carefully to ensure the island fits comfortably without obstructing traffic flow. Select durable materials like quartz, granite, or butcher block, depending on your style and budget. Invest in a sturdy base with ample storage options—think drawers, shelves, or even wine racks. Secure the island firmly to prevent wobbling, and consider installing electrical outlets for added convenience. Assembling a large island may require professional help, especially if plumbing or electrical work is involved.
Personalize your island by adding a pop of color with a painted base or decorative trim. Use stylish seating options like upholstered stools for comfort. Incorporate a small tray or decorative bowls for snacks and utensils to keep the surface tidy. Adding a soft throw blanket or cushion on your stools makes it even more inviting for guests. You can also attach a fold-down extension for extra prep space when needed.
A spacious central island transforms your kitchen into the ultimate social hub. It encourages interaction, makes cooking more fun, and creates a welcoming atmosphere. Plus, it’s a feature that impresses guests and boosts your home’s overall style. Ready to turn your kitchen into the heart of your home?
2. Install Open Shelving for Display and Accessibility
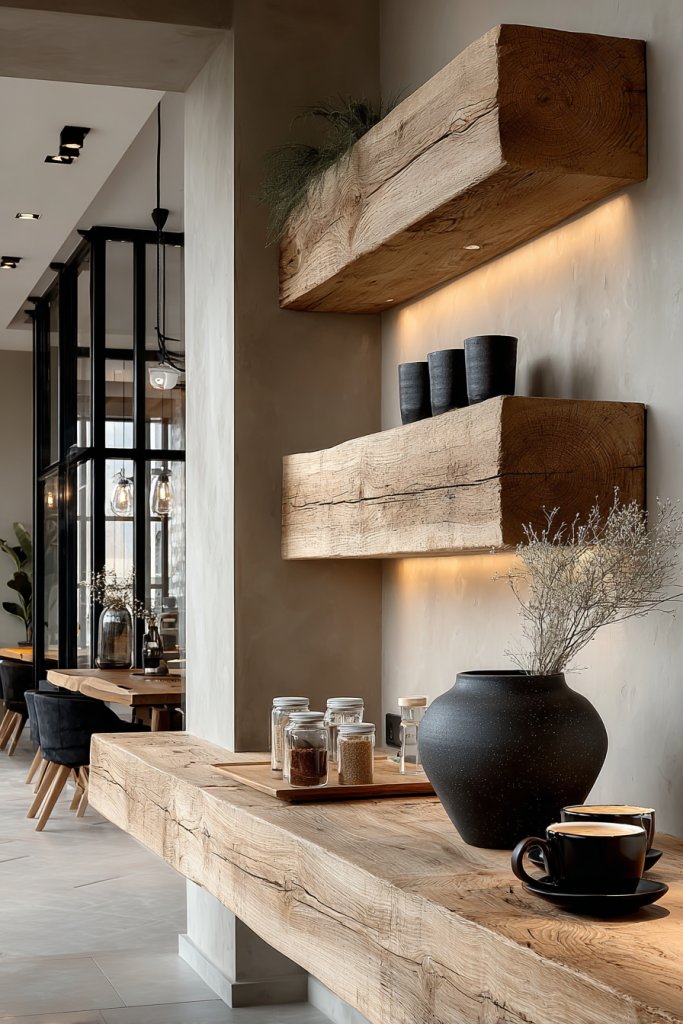
Ever struggle to find your favorite mug or spice jar amid cluttered cabinets? Open shelving offers a solution that’s both practical and decorative. It keeps essentials within arm’s reach while showcasing your favorite dishware. Plus, it adds an airy, modern vibe that makes your kitchen feel more inviting.
Recommended Products to replicate this idea
| # | Preview | Product | |
|---|---|---|---|
| 1 |

|
QEEIG Floating Shelves for Wall Bathroom Shelf Bedroom Kitchen Living Room Hanging Book Shelves... | Check Latest Price |
| # | Preview | Product | |
|---|---|---|---|
| 1 |

|
12 Pack L12 x H 8" Black Heavy Duty Shelf Brackets with Screws Metal Shelf Brackets Shelf Support... | Check Latest Price |
Visualize sleek wooden shelves mounted against a crisp white backsplash, displaying a colorful collection of bowls, cups, and cookbooks. The open design allows natural light to bounce around, highlighting each piece. You can see everything at a glance, which makes cooking and cleaning up quicker and more satisfying. The space feels brighter and more personalized.
Mix and match open shelves with closed cabinets for a balanced look. For a rustic feel, use reclaimed wood with metal brackets. In small kitchens, opt for floating shelves that don’t overwhelm the space. You can also stagger shelves at different heights for visual interest. Seasonal decor like linen towels or vintage jars can be swapped in to keep the look fresh.
Start by identifying the most accessible wall space for your shelves. Choose sturdy brackets and quality wood or MDF that can hold weight without sagging. Drill evenly spaced holes and level your shelves carefully to avoid a crooked display. Organize your items before placing them on the shelves for a cohesive look. Remember, open shelving requires regular tidying to keep it looking neat.
Use decorative containers or baskets to group smaller items neatly. Incorporate color-coordinated dishware for visual harmony. Add a few sculptural or vintage pieces for character. Consider installing under-shelf lighting to illuminate your display and add ambiance. Personal touches like a framed quote or a small plant can make the space uniquely yours.
Open shelving transforms your kitchen into a display of your personality and style. It simplifies access and adds charm, making your space feel less cluttered and more curated. With a few simple steps, you can elevate your kitchen’s look and functionality. Ready to showcase what makes your kitchen special?
3. Use Pendant Lighting to Highlight the Cooking and Dining Area
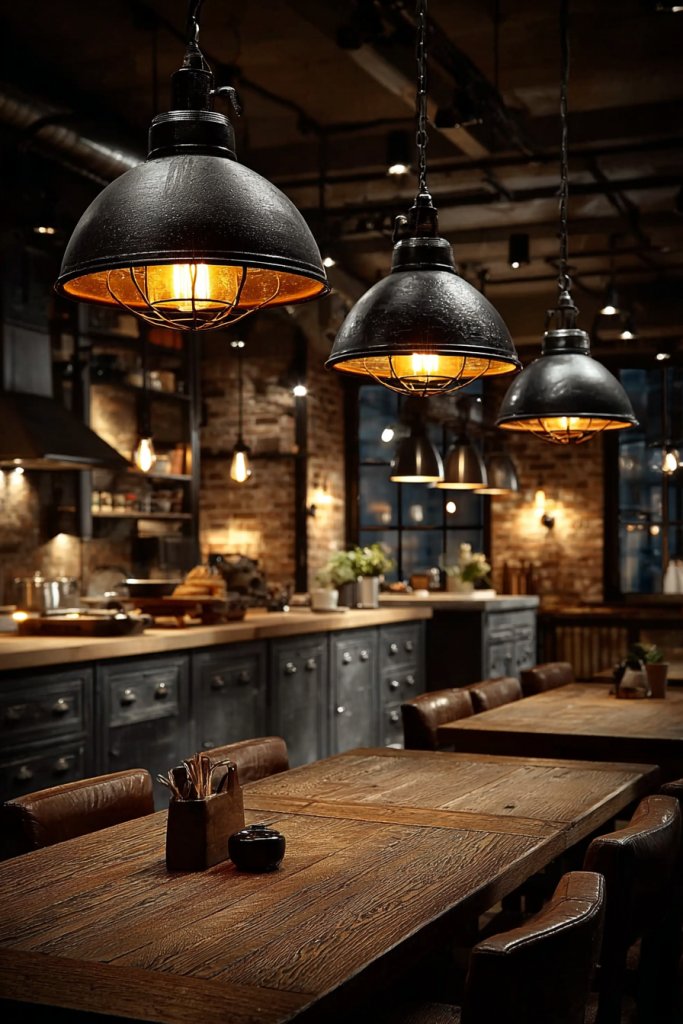
Does your kitchen lack that warm, inviting glow, especially during dinner or late-night cooking? Proper lighting can make or break the vibe, turning a plain space into an atmospheric haven. Pendant lights offer a stylish solution that draws attention and adds personality to your culinary corner. They’re like jewelry for your kitchen.
Recommended Products to replicate this idea
| # | Preview | Product | |
|---|---|---|---|
| 1 |

|
KLSS Brushed Nickel Pendant Lights Kitchen Island - Clear Glass Pendant Light Fixture Multiple Stems... | Check Latest Price |
| # | Preview | Product | |
|---|---|---|---|
| 1 |

|
Lomoky Plug in Pendant Light, Hanging Lamp with Black Barn Pendant Lighting with 14.76ft Cord On/Off... | Check Latest Price |
Picture a cluster of matte black pendants hanging at different heights above your island, casting a soft glow that accentuates textures and colors. The light reflects warmly off your countertops, creating a cozy ambiance. The fixtures themselves become focal points, adding visual interest and a layer of sophistication. In the evening, they transform the space into a relaxed social hub.
Choose pendant styles that match your decor, from industrial metal to sleek glass or bohemian woven designs. Adjust the height of each pendant to optimize task lighting and visual balance. For a more dramatic look, opt for oversized or multi-tiered fixtures. During festive seasons, swap out shades for seasonal colors or patterns to keep things fresh.
Measure the height above your countertops to ensure proper illumination without glare. Use dimmable fixtures to control brightness during different times of day. Install sturdy hooks and secure electrical wiring properly for safety. Consider the wattage and bulb type—LEDs are energy-efficient and long-lasting. Professional installation may be needed for ceiling electrical work, especially in older homes.
Add decorative elements like vintage bulbs or filament designs for an industrial look. Incorporate matching or contrasting finishes to your faucet or hardware. Use fabric or metal shades with textured details to add depth. Hanging plants or decorative chains can also be used to soften the overall look, as long as they don’t block the light.
Pendant lighting elevates your kitchen’s style while offering functional illumination perfect for social cooking. It’s an instant upgrade that combines aesthetics and practicality effortlessly. Once installed, you’ll see your space in a new, warmer light—literally. Why not add a little sparkle to your culinary adventures?
4. Create a Seamless Indoor-Outdoor Flow with Sliding Glass Doors
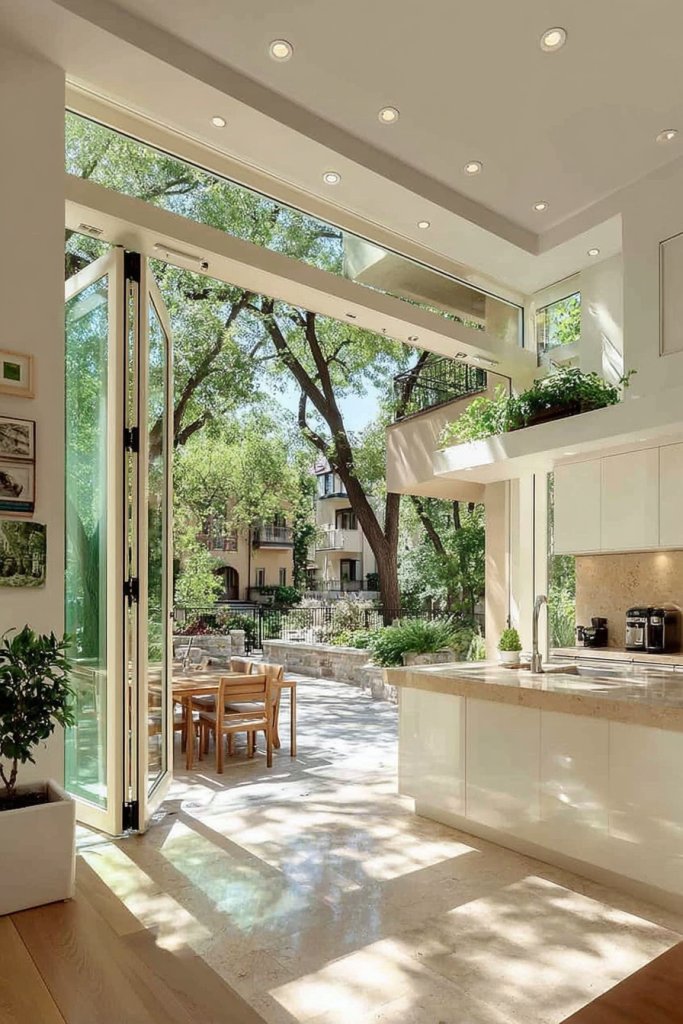
Ever wish your kitchen could feel bigger and more connected to nature? Creating a seamless indoor-outdoor flow can do just that, especially when entertaining. Sliding glass doors break down barriers, inviting fresh air and sunshine into your culinary space. It’s like expanding your living area without adding square footage.
Recommended Products to replicate this idea
| # | Preview | Product | |
|---|---|---|---|
| 1 |
|
Sliding Door Lock Window Locks for Patio Sliding Glass Door Foot Locks for Front Door Security Bar... | Check Latest Price |
| # | Preview | Product | |
|---|---|---|---|
| 1 |
|
Paramondo Retractable Door Screen for Single Door, Free Stop Sliding Patio Doors - Durable White... | Check Latest Price |
Envision large, floor-to-ceiling glass panels sliding open to reveal a lush backyard patio. The transition between indoors and out is smooth, with minimal hardware and sleek frames. During gatherings, guests can spill outside for drinks or snacks without feeling cut off. The view of greenery makes your kitchen feel brighter and more expansive.
Choose from different frame materials like aluminum or wood to suit your aesthetic. For a modern look, opt for frameless or minimal-profile sliding doors. In colder climates, consider insulated glass for energy efficiency. You can also incorporate retractable screens or blinds to control privacy and light, adapting to seasons and weather.
Begin by measuring your opening to select the right size and type of sliding door. Ensure the floor track is level and sturdy to facilitate smooth operation. Hire professionals for installation, especially for electrical and sealing work. Weatherproofing is crucial to prevent drafts and leaks, so choose quality materials and proper sealing techniques. After installation, decorate the transition area with outdoor rugs or furniture to enhance the flow.
Add custom handles or hardware that match your decor style. Use outdoor-friendly furniture and cushions to create an inviting space for lounging. Incorporate planters or small green patches outside to extend your garden feel—avoid restricted items like plants or vases here to stay compliant. Use lighting fixtures that work both indoors and outdoors for a cohesive look.
Seamless indoor-outdoor living creates a versatile, airy atmosphere that’s perfect for hosting and relaxing. It boosts your home’s aesthetic appeal and invites nature to be part of your daily life. Ready to open up your space and enjoy fresh breezes anytime?
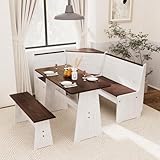
5. Incorporate a Breakfast Nook with Built-in Bench Seating
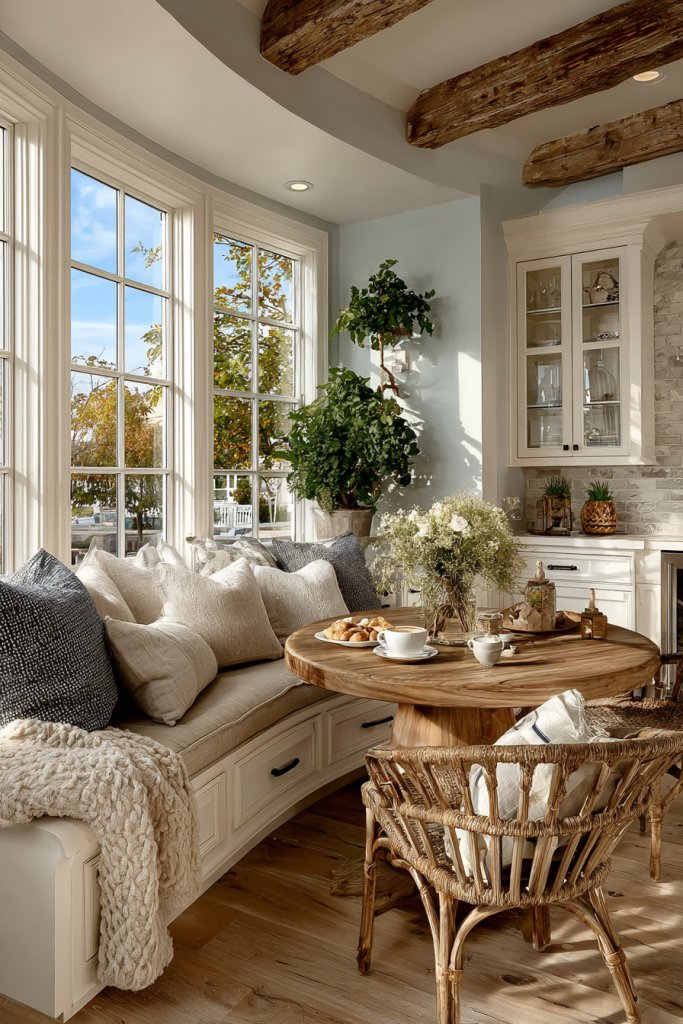
Tired of crowded, uncomfortable breakfast spots that make morning chaos worse? A dedicated breakfast nook offers a cozy retreat for quick meals or casual chats. Built-in bench seating maximizes space and adds a charming, inviting vibe to your kitchen. It transforms mundane mornings into moments of relaxation.
Recommended Products to replicate this idea
| # | Preview | Product | |
|---|---|---|---|
| 1 |
|
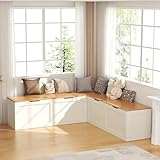
YUUIJOAA L Shaped Bench with Storage, 63" Breakfast Nook Benches, Kitchen Corner Dining Bench... | Check Latest Price |
| # | Preview | Product | |
|---|---|---|---|
| 1 |
|
Comiling Kitchen Breakfast Nook Table Set - Solid Wood Corner Bench Dining Set for 4-6 People, L... | Check Latest Price |
Picture a corner with a curved, upholstered bench nestled against a window, paired with a round wooden table. Soft cushions and a textured throw make the space welcoming. Natural light floods the nook, highlighting warm tones and tactile textures. It’s the perfect spot for coffee, morning papers, or chatting with loved ones.
Opt for a custom-built bench that fits your space and style, from sleek modern to rustic farmhouse. Add storage underneath the seating for extra functionality. For smaller kitchens, a compact corner with a fold-down table can serve the same purpose. Swap out cushions seasonally or add a removable tablecloth for special occasions. Using different upholstery fabrics can update the look annually.
Start by measuring your corner to design a snug, functional bench. Choose durable, easy-to-clean materials like wood or MDF for the frame, with comfortable cushions on top. Attach the bench securely to the wall to prevent wobbling. Select a round or oval table that fits proportionally, with enough seating for your household. Incorporate storage drawers or lift-up seats for added utility. Complete the look with a rug beneath for warmth and texture.
Personalize your nook with decorative cushions or embroidered pillows. Add a small centerpiece or a seasonal arrangement on the table. Use a mix of textiles for a layered, cozy effect. Incorporate colorful or patterned upholstery to reflect your personality. Consider installing a small, wall-mounted shelf nearby for cookbooks or decorative items.
A breakfast nook with built-in benches makes mornings easier and more enjoyable. It adds a cozy, family-friendly space that enhances your kitchen’s charm. Plus, it’s a stylish upgrade that combines comfort with practicality. Ready to start your mornings with a smile?
6. Opt for an Open-Concept Layout with Minimal Barriers
Feeling disconnected from your living and dining areas while cooking? An open-concept layout breaks down walls, creating a fluid, social environment. It encourages interaction and makes your space feel larger and more welcoming. Say goodbye to isolated cooking zones.
Recommended Products to replicate this idea
| # | Preview | Product | |
|---|---|---|---|
| 1 |

|
PERMO Industrial Vintage 1 Light Kitchen Island Pendant Light Fixture with Bell Shaped Clear Glass... | Check Latest Price |
| # | Preview | Product | |
|---|---|---|---|
| 1 |
|
Room Divider Curtains Flexible Ceiling Tracks Set Curtain Track Ceiling Mount Blackout Curtain for... | Check Latest Price |
Imagine a spacious, airy kitchen that seamlessly flows into a living room, with no walls to separate them. A large island acts as a natural divider, inviting conversation from both sides. The open plan is flooded with natural light, making the entire area feel bright and expansive. It’s perfect for entertaining guests or keeping an eye on children.
Keep the layout simple with a central island or peninsula to define zones without walls. Use consistent flooring and color schemes to unify the space visually. For small homes, consider partial open plans with glass partitions or half-walls. Seasonal or stylistic accents like rugs or curtains can create a sense of intimacy when needed. The key is balancing openness with functional zones.
Remove unnecessary walls carefully, ensuring structural support is maintained. Consult a structural engineer if load-bearing walls are involved. Redesign the layout to optimize traffic flow, placing major appliances and storage strategically. Use consistent flooring materials to create visual continuity. Consider adding a breakfast bar or seating area to define the social zone. Hiring professionals for demolition, plumbing, and electrical work is advisable.
Incorporate architectural details like exposed beams or accent wall treatments to add character. Use furniture and decor in a cohesive style to anchor the space. Add a rug or a statement piece that reflects your personality. Adjustable lighting can help create different moods for cooking, relaxing, or entertaining. Keep clutter hidden with strategic storage solutions.
An open layout fosters a lively, inclusive atmosphere perfect for social gatherings. It makes your home feel more spacious and modern, perfect for today’s lifestyle. Embrace the freedom to customize and redefine your space without the constraints of walls. Ready to open up your home and invite more interaction?
7. Add a Multi-Functional Kitchen Peninsula with Counter Seating
Ever wish your kitchen could do more than just prep food? A multi-functional peninsula combines workspace and social seating into one feature. It’s perfect for casual dining, quick meals, or even as a work-from-home station. This clever addition maximizes efficiency without sacrificing style.
Recommended Products to replicate this idea
| # | Preview | Product | |
|---|---|---|---|
| 1 |

|
Tribesigns Kitchen Island with Seating and Storage Shelves, 55.1-Inch Breakfast Counter Farmhouse... | Check Latest Price |
| # | Preview | Product | |
|---|---|---|---|
| 1 |
|
DUMOS 26 Inch Counter Height Bar Stools Set of 4, Modern Faux Leather High Barstools with Back and... | Check Latest Price |
Picture a sleek, L-shaped counter extending from your main workspace, with stylish stools tucked underneath. The surface is a durable material like quartz or butcher block, ready for daily use. Pendant or task lighting highlights the area, while a row of decorative bowls or a small plant adds personality. It’s a lively hub where cooking, chatting, and working happen simultaneously.
Choose a curved or straight design to suit your space. Add built-in storage drawers or shelves underneath for utensils and gadgets. For multi-use purposes, incorporate power outlets or USB ports for charging devices. Change the seating style from minimalist metal stools to upholstered chairs for added comfort. Seasonal accessories like placemats or a centerpiece can freshen up the look.
Pick a sturdy, easy-to-clean surface that withstands daily wear. Install the peninsula securely to the floor and wall to ensure stability. Incorporate electrical outlets if you plan to use it as a workspace. Measure the height carefully to match your existing counters for a seamless flow. Use quality hardware and sealants to prevent water or food spills from seeping in. Consider professional help for precise installation.
Personalize with decorative accents like colorful cushions or a patterned runner on the stools. Use a mix of textures—smooth countertops paired with textured seating—to add depth. Keep the surface clutter-free with minimalist storage solutions. Add a small tray or a set of coasters for drinks, making it a welcoming spot for guests.
A multi-functional peninsula is a game-changer for busy households. It boosts your kitchen’s efficiency while creating an inviting social scene. Once in place, it encourages spontaneous conversations and makes your space more dynamic. Time to turn your kitchen into the ultimate multitasking hub?
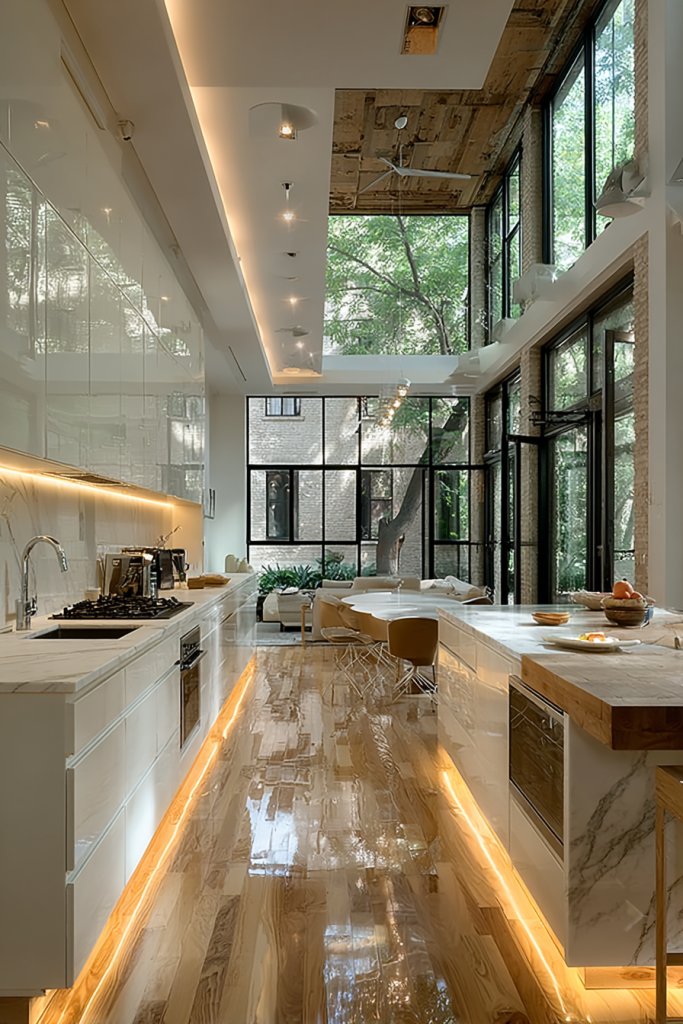
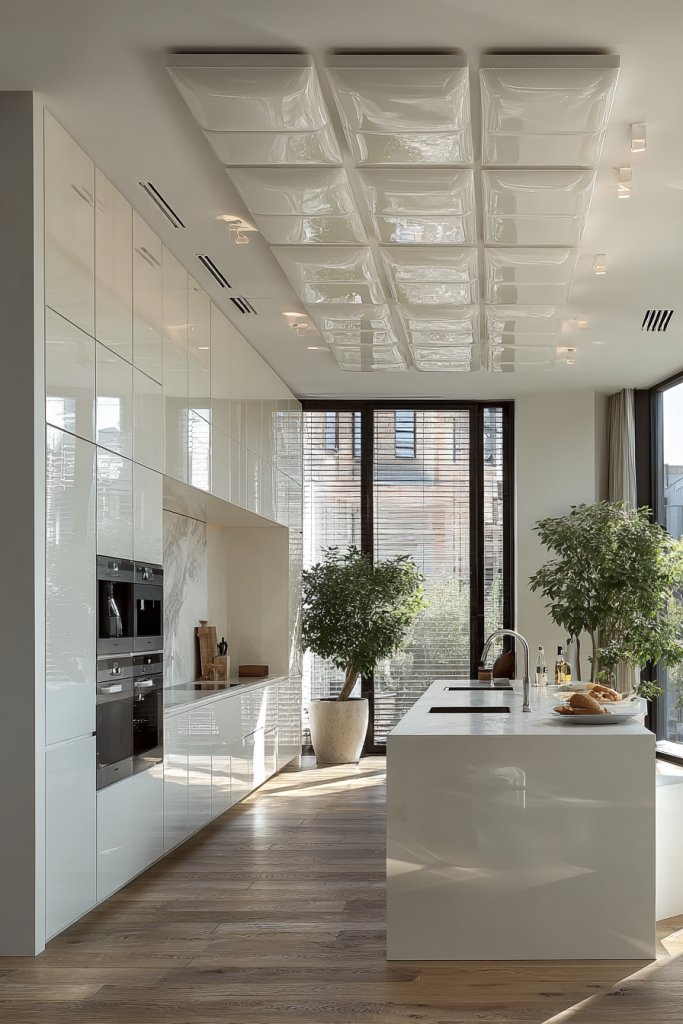
8. Use Bright, Reflective Surfaces to Enhance Light and Openness
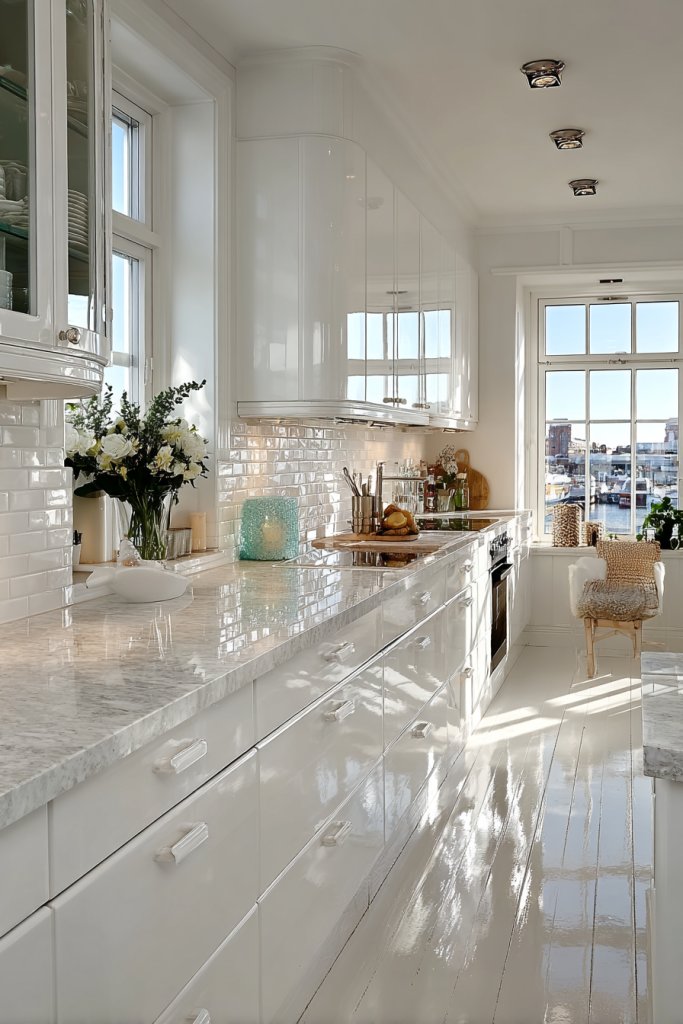
Does your kitchen feel dark or cramped, even with good lighting? Bright, reflective surfaces can instantly transform the space, making it appear larger and more welcoming. They bounce light around, creating an airy, fresh vibe that energizes your cooking experience. Who doesn’t want a brighter kitchen?
Recommended Products to replicate this idea
| # | Preview | Product | |
|---|---|---|---|
| 1 |

|
Art3d 100-Pieces Peel and Stick Stainless Steel Backsplash Self-Adhesive Metal Tiles, 3" x 6" Subway... | Check Latest Price |
| # | Preview | Product | |
|---|---|---|---|
| 1 |

|
Rust-Oleum 1992502 Painter's Touch Latex Paint, Gloss White 32 Fl Oz, 1 Quarts (Pack of 1) | Check Latest Price |
Imagine glossy white cabinets that gleam under recessed lighting, paired with a reflective backsplash that mimics the look of sleek marble. The shiny countertops catch the light, while mirrored accents subtly expand the room’s perceived size. The overall effect is a clean, modern aesthetic that feels open and crisp. The space looks effortlessly sophisticated and inviting.
Opt for high-gloss finishes on cabinets and countertops, or incorporate glass-front doors to reflect light. Use shiny metallic hardware or fixtures to add touches of sparkle. For a softer look, choose matte surfaces with subtle reflective qualities. Incorporate reflective tiles in the backsplash or flooring to amplify the effect. Seasonal decor can be kept minimal since the surfaces do most of the visual work.
Select durable, easy-to-clean materials like lacquered MDF, quartz, or glass. Ensure surfaces are resistant to stains and scratches for longevity. Use lighting strategically—under-cabinet LEDs, for example—to enhance the reflective quality. Keep surfaces clutter-free to maximize their impact. Regular cleaning with non-abrasive products will maintain their shine. Consider professional installation for seamless, high-quality finishes.
Add decorative touches like metallic accents or sleek storage containers to complement the reflective theme. Use colors sparingly—white, silver, and glass work best—to maintain a cohesive look. Incorporate textured textiles or matte elements to break up the shine. Keep countertops clear, reserving space for stylish but functional items like cutting boards or bowls.
Bright, reflective surfaces instantly update your kitchen, making it feel more spacious and lively. They’re a smart choice for small or dark kitchens that need a visual boost. Plus, they’re easy to clean and maintain, saving you effort over time. Ready to reflect your style and brighten your space?
9. Install a Wine or Beverage Station for Entertaining
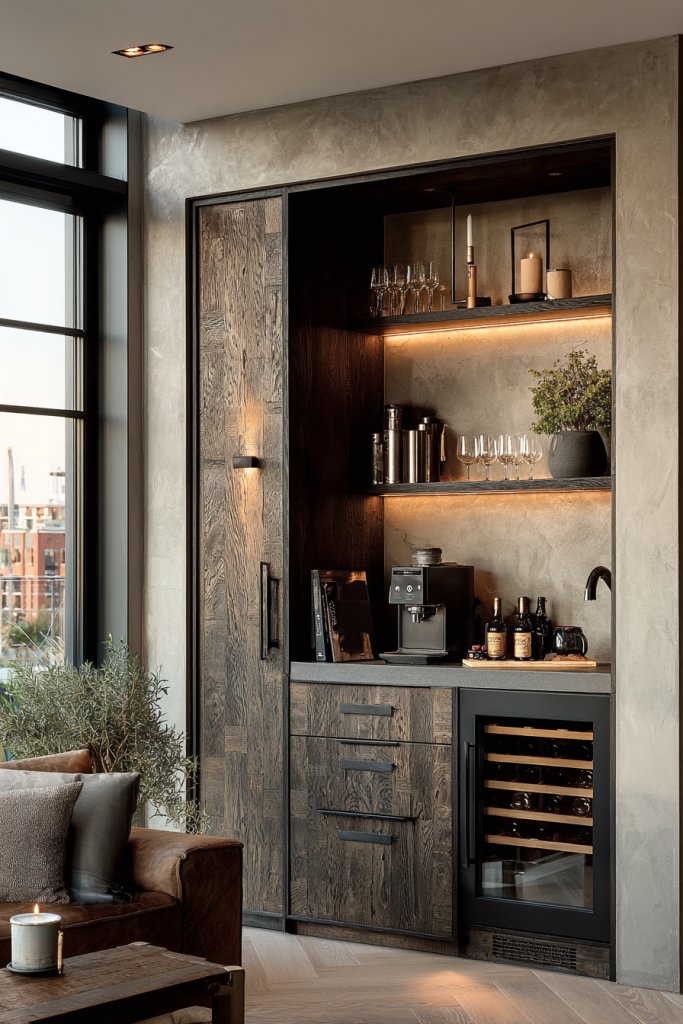
Hosting parties and gatherings can feel chaotic without a dedicated spot for drinks. A wine or beverage station streamlines entertaining by keeping everything organized and accessible. It’s a stylish way to impress guests and keep the flow smooth—no more scrambling for bottles or glasses.
Recommended Products to replicate this idea
| # | Preview | Product | |
|---|---|---|---|
| 1 |

|
MAHANCRIS Bar Cart for Home, 3-Tier Serving Cart with Wine Rack, Rolling Wine Cart with Glass... | Check Latest Price |
| # | Preview | Product | |
|---|---|---|---|
| 1 |

|
RedDreamer 14-Inch Black Wine Glass Rack, Under Cabinet Wine Glass Holder, Stemware Rack, Hanging... | Check Latest Price |
Picture a sleek, built-in nook with wine racks, a small fridge, and a countertop for mixing drinks. The station is accented with ambient lighting that highlights bottles and glassware. Elegant storage containers and a few decorative elements complete the look. Guests gather comfortably around, enjoying drinks without disrupting the main cooking area.
Choose between a dedicated corner or a countertop extension for your station. Incorporate a wine fridge or mini bar cooler for chilled drinks. Use open shelving or glass-front cabinets to display bottles and glassware attractively. Seasonal accents like a tray of cocktail ingredients or decorative ice buckets can keep things fresh. Keep it compact if space is limited or go bold with a full bar setup.
Start by selecting a location with easy access to power and water if needed. Install a wine rack, small fridge, and countertop workspace. Use durable, stylish materials like stainless steel, wood, or stone for surfaces. Organize bottles, glasses, and accessories for quick access. Add lighting fixtures that focus on your station, and consider a mobile cart for flexibility. Regular maintenance keeps everything looking sharp.
Add decorative elements like a vintage corkscrew or a set of personalized glasses. Use labels or tags for different types of wines or spirits. Incorporate themed accessories for special occasions or seasons. Keep the station tidy with storage bins for napkins, coasters, and stirrers. Personal touches like a framed quote or a custom sign make it uniquely yours.
A dedicated beverage station elevates your entertaining game and makes hosting effortless. It keeps your space organized and stylish while impressing guests. Plus, it encourages you to explore new drinks and recipes. Cheers to a smarter, more fun hosting experience!
10. Incorporate a Chalkboard or Whiteboard Wall for Interactive Fun
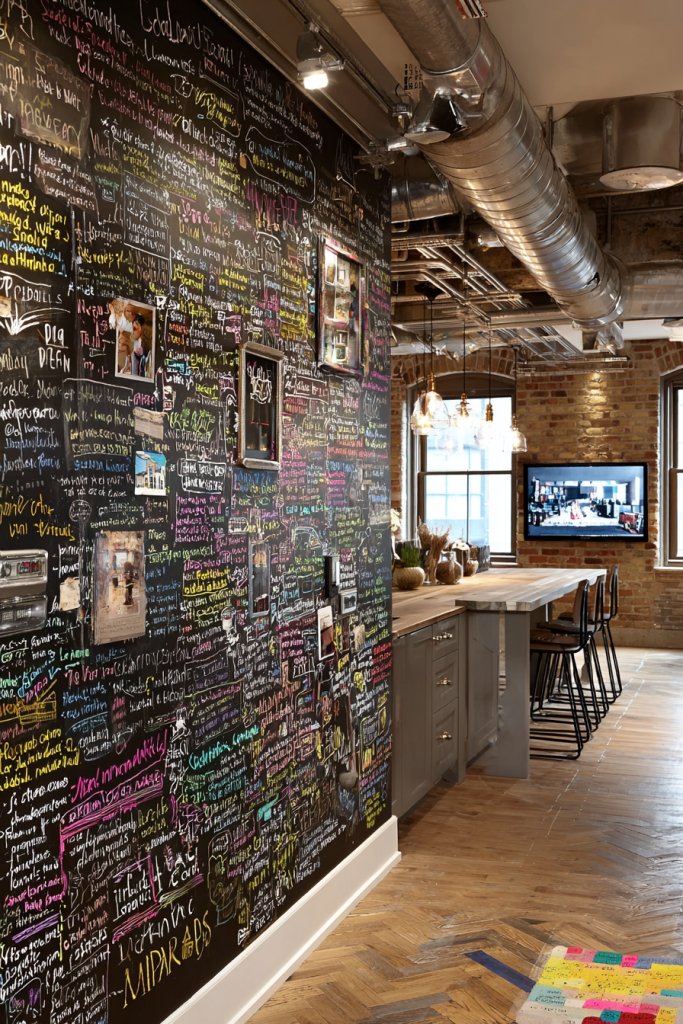
Ever wanted a space to jot down recipes, grocery lists, or funny notes without cluttering your counters? A chalkboard or whiteboard wall adds a playful, interactive element to your kitchen. It keeps you organized while injecting personality and fun into your cooking space. Plus, it’s a conversation starter!
Recommended Products to replicate this idea
| # | Preview | Product | |
|---|---|---|---|
| 1 |

|
Extra Large Chalkboard Peel and Stick Paper 9 Feet roll (108 inches) + (5) Color Chalk Included - by... | Check Latest Price |
| # | Preview | Product | |
|---|---|---|---|
| 1 |

|
HAMIGAR Whiteboard Sticker for Wall 18" x 79" Dry Erase Board Wallpaper Peel and Stick, White Board... | Check Latest Price |
Imagine a large chalkboard painted on a side wall, covered with handwritten recipes, inspirational quotes, and doodles. The surface exudes a rustic charm, especially when framed with wood or decorative trim. It invites family members to share messages or plan meals together. During gatherings, guests can leave notes or draw, creating a lively, community vibe.
Opt for traditional chalkboard paint, or use sleek whiteboard panels for a cleaner look. Frame the surface with reclaimed wood for a rustic feel or with metal for a modern edge. Keep markers and chalk in stylish containers nearby. Change the content seasonally or for special occasions to keep it fresh and engaging.
Choose a wall with enough space and good visibility. Prepare the surface by cleaning thoroughly and priming if necessary. Apply chalkboard or whiteboard paint in even coats, following manufacturer instructions. Seal the surface if needed, then hang or frame it for a polished look. Use high-quality markers or chalk for clean writing. Regularly erase and update to keep it relevant.
Personalize with colorful markers, decorative borders, or themed stickers. Incorporate magnetic strips or hooks for hanging utensils or notes. Use decorative magnets or clips to add visual interest. Encourage family members to contribute, making it a shared project. Seasonal messages or countdowns keep everyone engaged.
A chalkboard or whiteboard wall turns your kitchen into a creative hub. It’s perfect for organizing, inspiring, and entertaining all at once. Plus, it’s a fun way to involve everyone in meal planning and messaging. Ready to add some interactive charm?
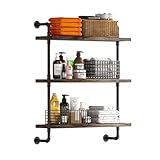
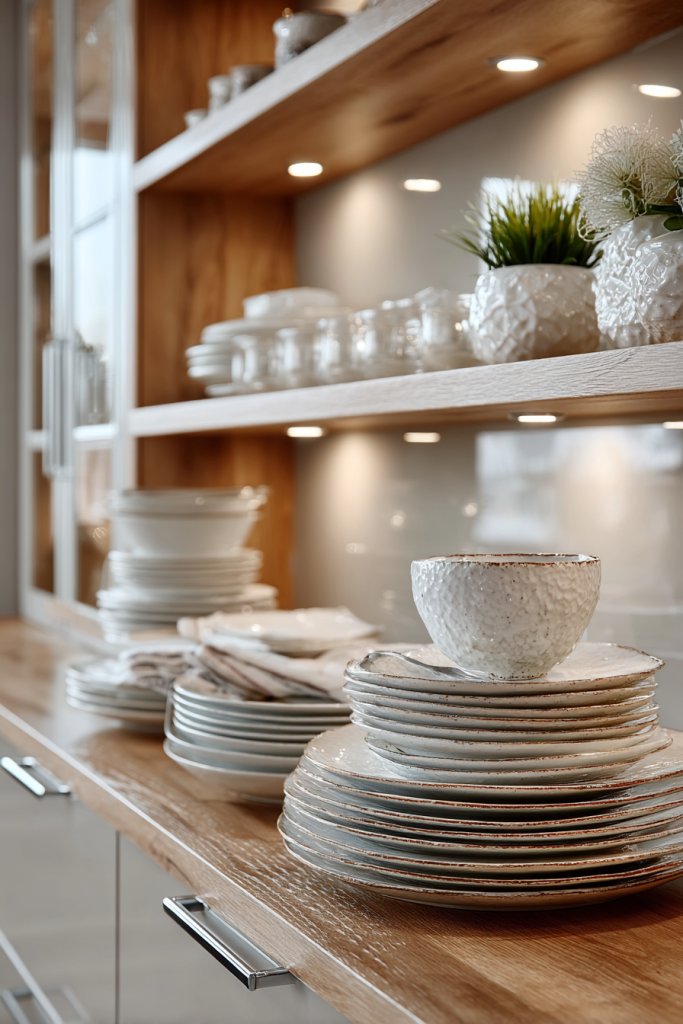
11. Choose Open-Frame Cabinetry for an Airy Look
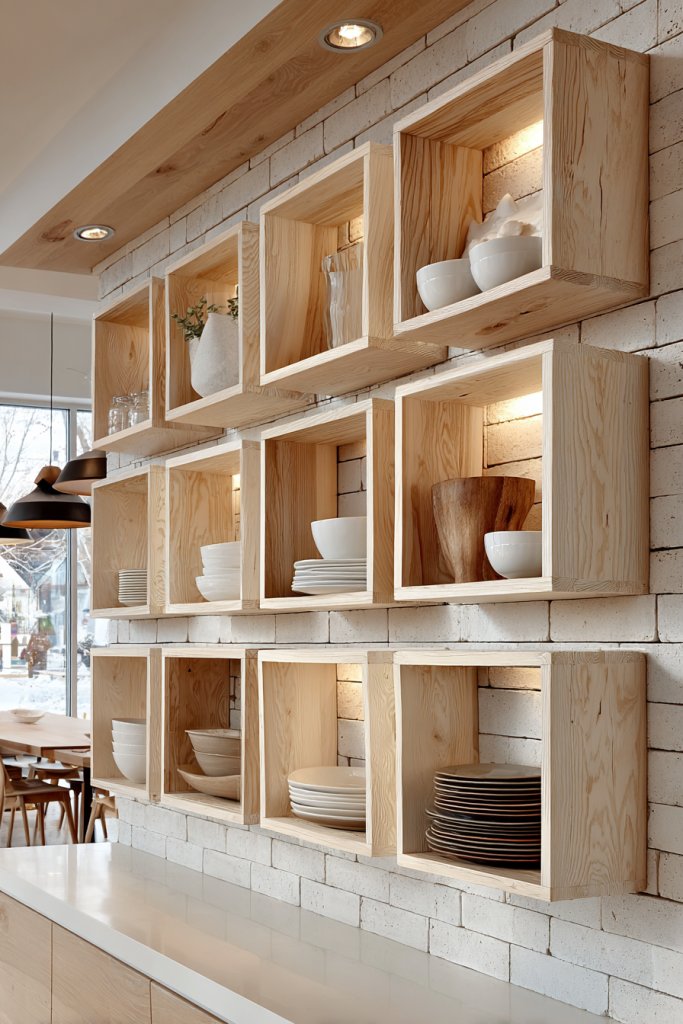
Feeling overwhelmed by bulky cabinets blocking natural light? Open-frame cabinetry offers a sleek, airy alternative that opens up your kitchen visually. It’s perfect for showcasing your dishware or decorative accents while maintaining a minimalist vibe. Plus, it reduces visual clutter and makes small spaces feel larger.
Recommended Products to replicate this idea
| # | Preview | Product | |
|---|---|---|---|
| 1 |

|
FIMELLO 62.8 ''W X 11''D X 21.7''H Wall Cabinets for Laundry Room, Wooden Kitchen Cabinet, Floating... | Check Latest Price |
| # | Preview | Product | |
|---|---|---|---|
| 1 |
|
Helsin 3 Tier Industrial Pipe Shelf Rustic Wood Floating Shelves,Wall Display Bookshelf,Storage Rack... | Check Latest Price |
Visualize open wooden frames with simple shelves holding colorful plates, bowls, and glassware. The light filters through, creating a warm, inviting glow. The design emphasizes clean lines and craftsmanship, giving your kitchen a modern yet cozy feel. It invites you to display your favorite pieces without the fear of clutter.
Mix open shelves with closed cabinets for balance. Use uniform or contrasting colors for a cohesive look. Incorporate glass-door cabinets in some sections for a more refined appearance. For a rustic style, choose reclaimed wood with visible grain and imperfections. Seasonal or thematic displays can be rotated easily to keep the look fresh.
Select quality materials that are sturdy and easy to clean. Install brackets and supports carefully to ensure stability. Plan your layout with symmetry or asymmetry, depending on your style. Organize your dishware and decor to create visual interest. Regular dusting and cleaning will keep the open frames looking their best. Consider professional help for precise measurements and installation.
Add decorative or colorful dishware for visual pop. Incorporate small decorative items or vintage pieces that reflect your personality. Use matching or contrasting shelving supports for visual interest. Keep frequently used items within easy reach, and display special pieces prominently. Change displays seasonally for variety.
Open-frame cabinetry makes your kitchen feel more spacious and personalized. It’s a lovely way to showcase your style and keep essentials accessible. As you curate your display, your kitchen becomes a reflection of your personality. Ready to embrace the open look?
12. Integrate a Bar Cart or Mobile Serving Station
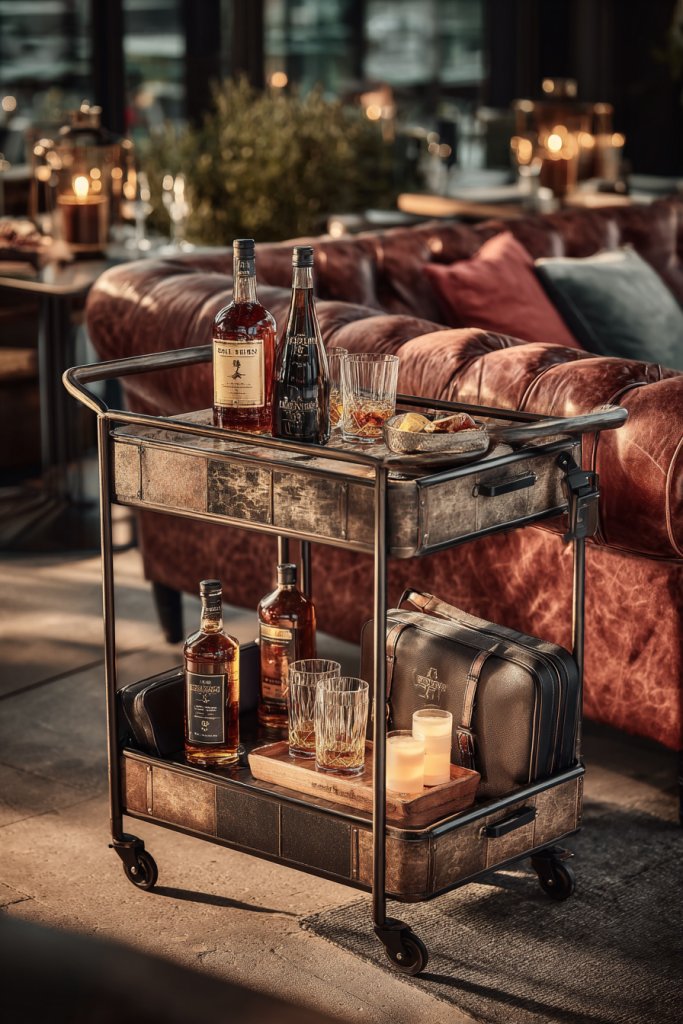
Hosting a party or just relaxing at home? A bar cart or mobile serving station puts drinks, snacks, and essentials within easy reach, no matter where you are. It’s a stylish, flexible solution that keeps your space tidy and your entertaining effortless. Plus, it’s a fun way to add a touch of glam.
Recommended Products to replicate this idea
| # | Preview | Product | |
|---|---|---|---|
| 1 |

|
MAHANCRIS Bar Cart for Home, 3-Tier Serving Cart with Wheels and Handle, Beverage Cart with Wine... | Check Latest Price |
| # | Preview | Product | |
|---|---|---|---|
| 1 |

|
Winsome Albert 3-Tier Serving Cart, for Kitchen, Dining Room, Living Room, 33", Walnut | Check Latest Price |
Imagine a sleek, rolling cart stocked with colorful bottles, glassware, and a few decorative accessories. It easily slides from kitchen to dining area, keeping everything organized and accessible. The cart’s wheels and compact design make it perfect for small spaces or flexible layouts. During parties, it transforms into a focal point with drinks flowing freely.
Choose a vintage-inspired metal cart for a retro feel, or a minimalist wood design for contemporary spaces. Use baskets or trays to organize bottles and accessories. Incorporate hooks or racks for mugs or bar tools. For seasonal flair, swap out accessories or add themed decor. The mobility allows you to customize its placement for every occasion.
Select a durable, lightweight material that suits your decor style. Ensure the cart has sturdy wheels and a stable frame. Stock it with your favorite beverages, glassware, and serving utensils. Keep cleaning supplies nearby for quick maintenance. Use non-slip pads on the wheels to prevent unwanted movement. Position it where it’s both accessible and unobtrusive.
Decorate with a few personal touches like personalized coasters or a custom sign. Use decorative labels or tags for different drinks. Incorporate seasonal or themed accessories to keep things lively. Add a small plant or a decorative bowl for snacks. Keep it organized for quick access during spontaneous gatherings.
A bar cart or mobile station elevates your hosting game effortlessly. It’s both stylish and practical, making your space look more curated and inviting. Plus, it encourages socializing and spontaneous fun. Ready to roll out your entertaining upgrade?
13. Add a Built-in Herb Garden or Indoor Greenery
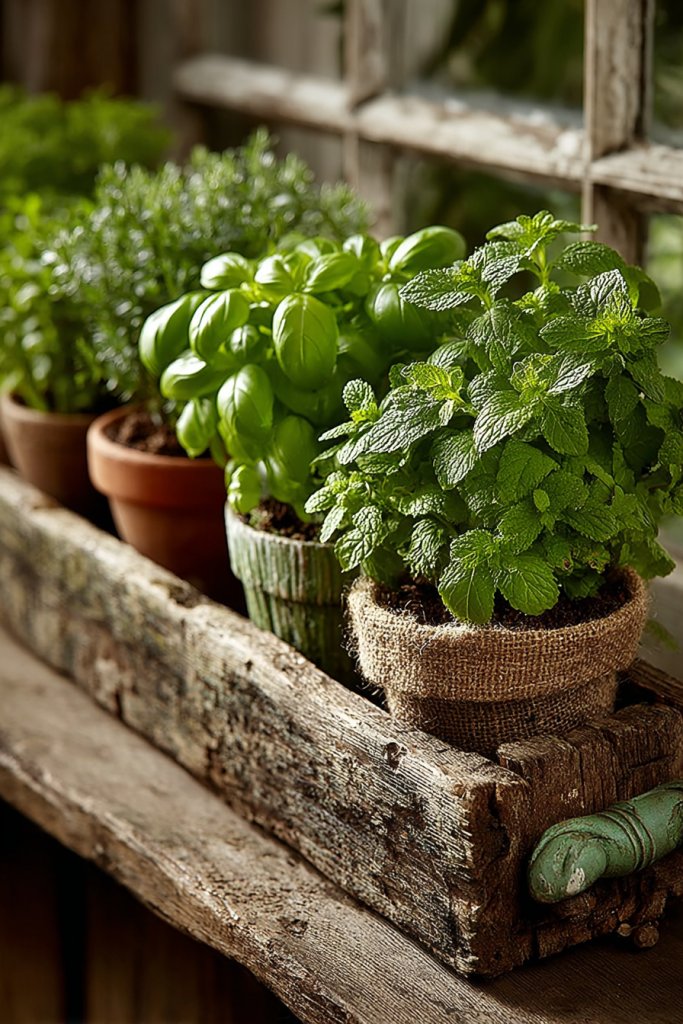
Craving fresh herbs but tired of buying store-bought? An indoor herb garden or greenery setup brings freshness and life directly into your kitchen. It’s a practical, stylish way to enjoy homegrown flavors and add a splash of nature to your space. Plus, it’s surprisingly easy to maintain.
Recommended Products to replicate this idea
| # | Preview | Product | |
|---|---|---|---|
| 1 |

|
Ahopegarden Indoor Garden Hydroponics Growing System: 10 Pods Plant Germination Kit Herb Vegetable... | Check Latest Price |
| # | Preview | Product | |
|---|---|---|---|
| 1 |

|
Lifewit Window Plant Floating Shelves 14.6x3.6, 2 Pack Acrylic Suction Cup Shelf, Window Sill... | Check Latest Price |
Picture a dedicated corner with small, wall-mounted planters filled with basil, mint, and parsley. The lush green leaves contrast beautifully with the neutral backdrop, adding a vibrant touch. The scent of fresh herbs fills the air as you cook, creating an immersive sensory experience. It’s like having a mini garden right on your countertop.
Use sleek ceramic or terracotta pots for a minimalist look, or woven baskets for a rustic vibe. Vertical planters maximize space in small kitchens. Incorporate self-watering systems for low-maintenance setups. You can also add small green plants like succulents or air plants for variety. Seasonal herbs can be rotated to keep your garden fresh.
Choose a sunny spot near a window or install grow lights if natural light is limited. Select high-quality, well-draining pots with appropriate soil. Water regularly and prune to encourage growth. Use labels or markers to identify herbs. Incorporate drainage trays or saucers to prevent water damage. Regular harvesting keeps plants healthy and productive.
Decorate your herb station with personalized plant markers or decorative stones. Combine herbs with colorful containers or painted pots for added style. Use decorative wall hooks or rails for hanging tools or small planters. Incorporate a small chalkboard or labels for fun labeling. Rotate seasonal plants to keep your green space lively.
A built-in herb garden not only supplies fresh ingredients but also adds a calming, natural element to your kitchen. It encourages sustainable living and culinary experimentation. Watching your plants grow is rewarding and inspiring. Ready to bring some greenery into your daily routine?
14. Install a Statement Wall with Textured or Patterned Backsplash
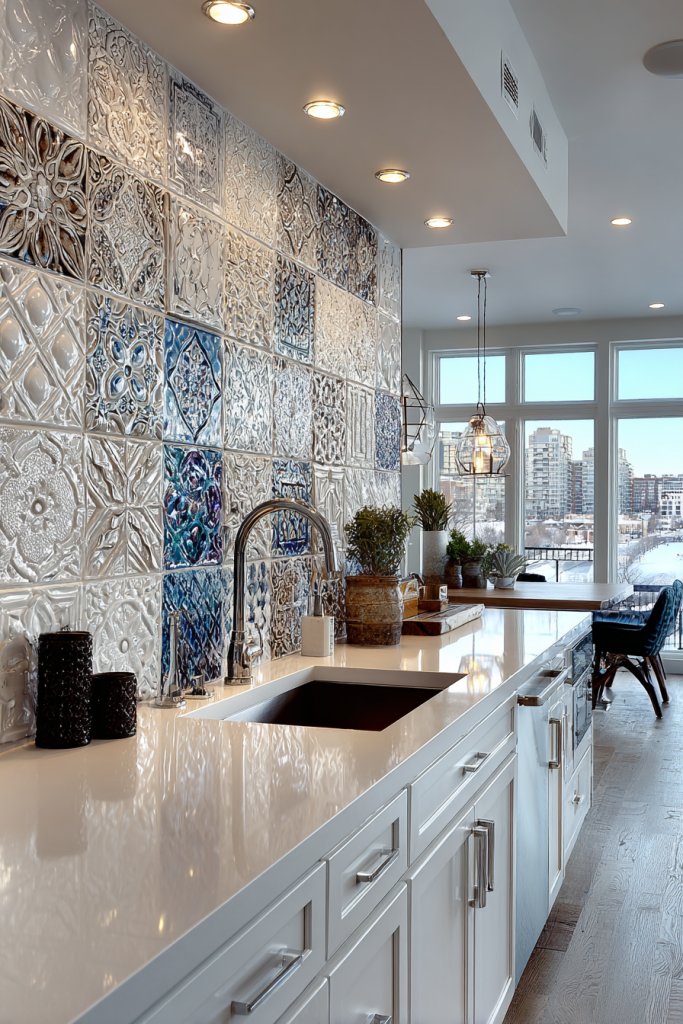
Is your kitchen feeling a little flat or uninspired? A statement wall featuring textured or patterned backsplash tiles can instantly add personality and focal interest. It’s a bold way to elevate your design without overwhelming the space. Plus, it’s a conversation starter every time.
Recommended Products to replicate this idea
| # | Preview | Product | |
|---|---|---|---|
| 1 |

|
Art3d 102-Piece Peel and Stick Wall Tile for Kitchen Backsplash, Bathroom, Fireplace, 3in. × 6in.... | Check Latest Price |
| # | Preview | Product | |
|---|---|---|---|
| 1 |
|
Art3dwallpanels 33 Pack 3D Wall Panel Diamond for Interior Wall Décor, PVC Flower Textured Wall... | Check Latest Price |
Imagine a wall with herringbone marble tiles or 3D textured ceramic panels that catch the light differently throughout the day. The pattern adds depth and visual intrigue, transforming a plain backdrop into a work of art. The tactile surface invites touch and admiration, making your kitchen a stylish showcase.
Opt for bold geometric patterns, textured stone, or colorful mosaics based on your taste. Keep the surrounding cabinetry and counters neutral to let the backsplash stand out. For a more subtle statement, choose tiles with metallic or iridescent finishes. Seasonal or themed patterns can be swapped out for variety.
Select high-quality, durable tiles that suit your style and budget. Prepare the wall surface thoroughly, ensuring it’s clean and even. Hire a professional tiler for precise installation, especially with complex patterns. Seal the tiles properly to prevent stains and water damage. Regularly clean with gentle products to maintain their texture and appearance.
Add decorative grout lines or metallic accents for extra flair. Incorporate LED strip lighting underneath cabinets to highlight the texture. Use complementary wall paint or accessories to balance the boldness. Mix in seasonal decor that aligns with your pattern or texture choices for ongoing freshness.
A statement backsplash transforms your kitchen into a design statement, adding sophistication and personality. It’s an easy way to inject color, texture, and style into your daily environment. Once installed, you’ll love the visual impact and inspiring atmosphere it creates. Ready to make a bold move?
15. Use Colorful Bar Stools or Dining Chairs for Visual Pop
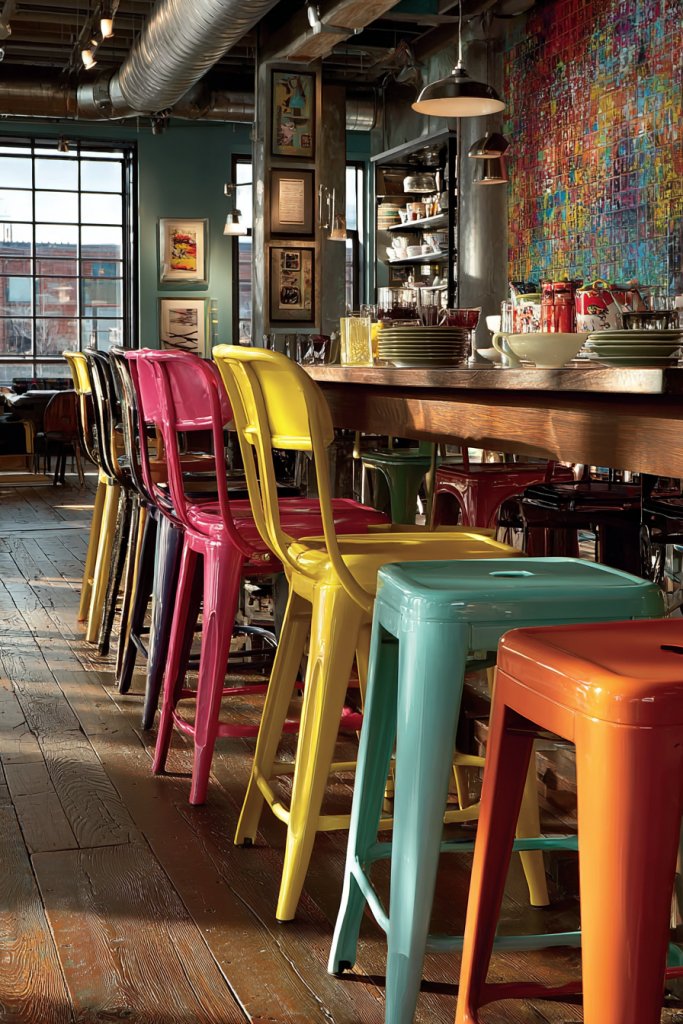
Feeling that your kitchen is a bit dull or monotonous? Bright, colorful seating can inject energy and personality into your space. They’re a simple, affordable way to create a focal point and encourage social seating. Who says functional furniture can’t be fun?
Recommended Products to replicate this idea
| # | Preview | Product | |
|---|---|---|---|
| 1 |

|
Vogue Furniture Direct 24" High Bar Stools Backless Orange Metal Barstools Indoor-Outdoor Counter... | Check Latest Price |
| # | Preview | Product | |
|---|---|---|---|
| 1 |

|
Flash Furniture Gael Indoor/Outdoor Modern Metal Dining Chairs, Commercial-Grade Galvanized Steel... | Check Latest Price |
Picture a row of vibrant red or teal bar stools lining your island, contrasting beautifully with neutral cabinets. The pop of color draws the eye and invites guests to sit and chat. The textured seats and sleek frames add a playful yet sophisticated vibe. During gatherings, these chairs become a lively visual anchor.
Choose from bold colors like electric blue, sunny yellow, or deep emerald to match your style. Mix and match different styles or heights for an eclectic look. For a more toned-down approach, opt for pastel shades or muted tones. Change the seat covers seasonally or for special events to keep the look fresh.
Select durable, easy-to-clean materials for the seats, especially if you have kids or frequent guests. Ensure the frames are sturdy and properly anchored. Measure the height of your counters to choose comfortable seating. Coordinate with other decor elements—like towels or accessories—for a harmonious look. Keep an eye on comfort and practicality during selection.
Add cushions or slipcovers in different fabrics to change the vibe effortlessly. Incorporate decorative trims or patterns to reflect your personality. Use matching or contrasting colors in your kitchen accessories for a cohesive style. You can also add small decorative elements like pendant lights or rugs to complement the seating.
Colorful chairs bring a cheerful, lively atmosphere to your kitchen and make seating more inviting. They’re a quick way to refresh your space without a major overhaul. Plus, they showcase your unique style and personality. Ready to add some vibrant energy?
16. Incorporate a Multi-Level or Open-Plan Floor Design
Feeling like your kitchen is one flat, boring space? Multi-level or open-plan flooring adds architectural interest and helps define zones without walls. It creates a dynamic layout that feels both spacious and structured. Perfect for modern living and entertaining.
Recommended Products to replicate this idea
| # | Preview | Product | |
|---|---|---|---|
| 1 |

|
VEVOR Modular Interlocking Cushion, 50 Pack 12" x 12" Splicing Drainage Mats, Soft PVC Interlocking... | Check Latest Price |
| # | Preview | Product | |
|---|---|---|---|
| 1 |
|
Maxiroc Floor Transition Strip Self Adhesive Carpet Wood Tile Vinyl Flooring Laminate Transition... | Check Latest Price |
Imagine a kitchen with a step-up dining area or a raised breakfast bar, delineated by a change in flooring material or height. The different levels add visual depth while maintaining an open flow. Light-colored wood floors contrast with darker tiles, emphasizing the distinct zones. The layered design invites movement and exploration.
Use materials like wood, tile, or laminate in varying heights or textures. Incorporate a small step or platform to create a subtle separation. For small spaces, a slight elevation with color or pattern variations can define areas. Seasonal rugs or mats can complement the layered look. The key is balancing visual interest with safety and practicality.
Plan your layout carefully, considering traffic flow and safety. Use precise measurements and level surfaces to prevent tripping hazards. Select contrasting materials or colors to highlight the different levels. Hire professionals for complex modifications, especially if structural changes are needed. Seal and finish surfaces uniformly for a seamless look.
Add decorative borders or inlays between levels for extra detail. Use furniture or rugs to further emphasize the zones. Incorporate lighting that accentuates the differences in height or material, like recessed or track lighting. Personalize each zone with accessories that match its function or style.
Multi-level flooring creates a visually engaging space that feels both structured and open. It’s a creative way to add architectural personality and define areas. With careful planning, it turns your kitchen into a statement piece that’s functional and stylish. Ready to level up?
17. Install a Built-in Sound System for Music During Gatherings
Ever noticed how music can instantly lift the mood in a gathering? Installing a built-in sound system turns your kitchen into a lively, entertaining space. It’s discreet, high-quality, and keeps the vibe going without the clutter of portable speakers. Perfect for cooking, parties, or just relaxing.
Recommended Products to replicate this idea
| # | Preview | Product | |
|---|---|---|---|
| 1 |

|
VEVOR 4 PCs 6.5'' Bluetooth Ceiling Speakers, 600W Flush Mount Ceiling & in-Wall Speaker System with... | Check Latest Price |
| # | Preview | Product | |
|---|---|---|---|
| 1 |

|
WiiM Amp: Multiroom Streaming Amplifier | Compatible with AirPlay, Google Cast, Alexa | HDMI, Voice... | Check Latest Price |
Imagine sleek, hidden speakers embedded into ceilings or walls, seamlessly blending with your decor. Soft background music fills the space, enhancing the ambiance without overwhelming conversation. During a dinner party, the tunes set a relaxed, upscale tone. The system can be controlled easily from your phone or a central hub.
Choose from in-wall, in-ceiling, or discreet bookshelf speakers depending on your style. Opt for a multi-room system to extend music to outdoor or living areas. Incorporate smart controls for easy volume adjustments or playlist selection. For a vintage vibe, consider hidden speaker grills that resemble decorative panels. Seasonal playlists or mood lighting can enhance the experience.
Plan the layout of speakers to ensure even sound distribution. Hire professionals to install wiring and mount the speakers securely. Use high-quality audio receivers or smart home integrations for simplicity. Test sound levels and adjust placement for optimal acoustics. Regular maintenance includes cleaning grills and updating software.
Create custom playlists for different occasions. Add voice control options for hands-free operation. Incorporate lighting that syncs with music for a dynamic atmosphere. Use decorative speaker covers or grills to match your decor theme. Keep the system updated for the latest features and compatibility.
A built-in sound system elevates your kitchen’s ambiance and makes every meal or gathering more memorable. It’s a subtle luxury that adds to your home’s modern appeal. Once set up, it’s effortless to enjoy music anytime. Ready to turn up the volume?
18. Design a Dedicated Social Zone with a Coffee or Snack Station
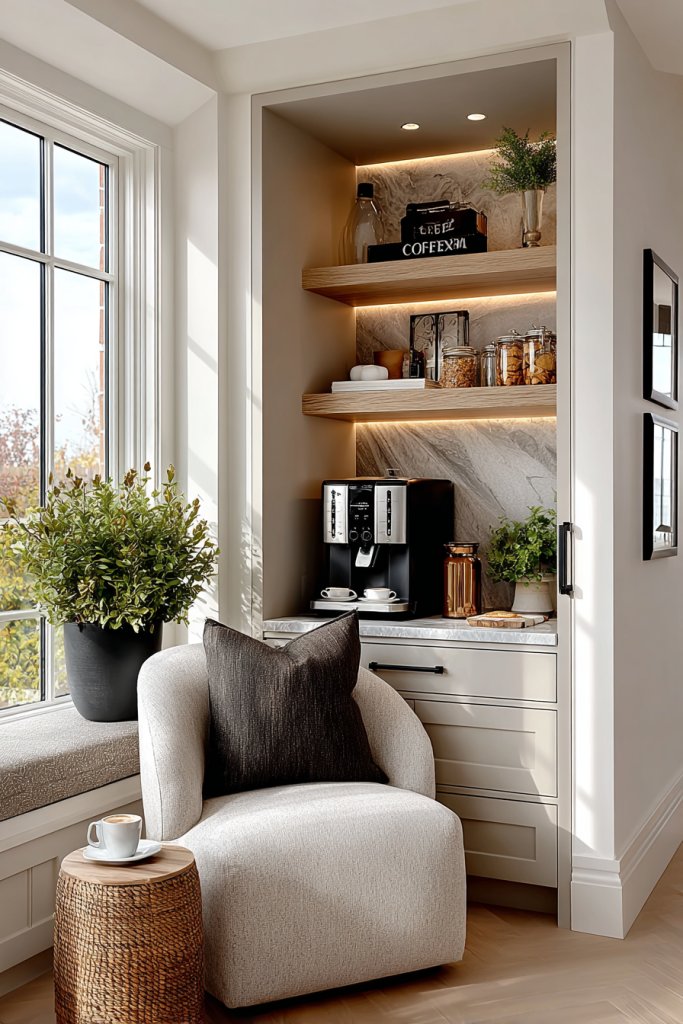
Longing for a cozy corner to catch up or enjoy a quick snack without disrupting your main kitchen workflow? A dedicated social zone with a coffee or snack station creates a welcoming micro-space perfect for casual conversations. It’s a small luxury that makes your home feel more inviting.
Recommended Products to replicate this idea
| # | Preview | Product | |
|---|---|---|---|
| 1 |
|
Compact Coffee Bar Cabinet with Power Outlet, Lockable Wheels, and Storage Drawer - Rustic Brown &... | Check Latest Price |
| # | Preview | Product | |
|---|---|---|---|
| 1 |

|
Cinati 4-Tier Snack Cart with Wheels, 29''W Toy Storage Organizer, Rolling Pantry Storage Cart with... | Check Latest Price |
Picture a compact nook with a compact coffee maker, a small snack bar, and a few comfy stools. Shelves above hold mugs, jars, and snacks, while a soft rug anchors the area. The space exudes warmth and friendliness, perfect for morning chats or afternoon coffee breaks. Ambient lighting adds to the cozy vibe.
Use a compact cart or built-in counter with storage for appliances and supplies. Incorporate a mini refrigerator or a dedicated cabinet for snacks. Choose soft textiles like cushions and throws to add comfort. Seasonal decor, such as festive mugs or themed accessories, keeps the space lively and fresh. For small kitchens, a fold-down table or small bar can serve as the station.
Select a corner with easy access to electrical outlets. Install a small countertop or use a rolling cart for flexibility. Organize utensils, mugs, and snacks in attractive containers. Use lighting that creates a warm glow, like under-cabinet LEDs or small pendant fixtures. Keep the station tidy with dedicated storage bins. Regularly restock and clean to maintain a welcoming vibe.
Add personal touches like custom mugs, themed decor, or a signature coffee blend. Incorporate a small bulletin board or chalkboard for notes or daily specials. Use decorative jars or baskets for snacks and supplies. Change accessories seasonally to reflect holidays or your mood. Keep it fun and functional.
A dedicated social zone encourages informal gatherings and makes everyday routines more pleasant. It’s a quick upgrade that adds warmth and personality. Plus, it helps create a homey, relaxed atmosphere that everyone appreciates. Ready to sip and chat?
19. Use Transparent or Open-Back Cabinets to Visualize Storage
Feeling overwhelmed by cluttered cabinets that hide your stylish dishware? Transparent or open-back cabinets offer a smart solution that showcases your collection while keeping everything accessible. They add a sense of openness and elegance to your kitchen.
Recommended Products to replicate this idea
| # | Preview | Product | |
|---|---|---|---|
| 1 |

|
FOTOSOK 71'' Tall Kitchen Cabinet with Glass Doors and Drawer, Freestanding Food Pantry with... | Check Latest Price |
| # | Preview | Product | |
|---|---|---|---|
| 1 |

|
AODK Display Case with LED Lights, Display Cabinet with Glass Storage Shelves, 4-Tier Display Shelf... | Check Latest Price |
Imagine glass-front cabinets displaying a curated selection of colorful plates, vintage glasses, or decorative bowls. The transparency creates a visual flow that makes your kitchen appear larger and more inviting. It also encourages you to keep your items organized and aesthetically pleasing. The overall effect is light, airy, and sophisticated.
Choose from frameless glass doors, open shelving, or clear acrylic boxes for different styles. Mix open and closed storage for balance, hiding less attractive items behind doors. Incorporate decorative dishware or themed collections for visual impact. Use lighting inside or beneath cabinets to highlight your display. Seasonal swaps keep the display lively.
Select durable, high-quality glass or acrylic materials. Install sturdy hinges and handles to ensure longevity. Organize your items before placing them in the cabinets for a tidy appearance. Regularly clean glass surfaces with streak-free products. Consider adding LED strip lighting inside for extra brightness and emphasis. Professional installation ensures safety and precision.
Display your favorite pieces prominently and rotate collections seasonally. Use decorative labels or tags to add a personal touch. Incorporate complementary shelf liners or decorative trims. Keep the interior tidy with small baskets or dividers. Remember, a well-curated display speaks volumes about your style.
Open or transparent cabinetry elevates your kitchen’s aesthetic and makes your collection part of the decor. It encourages organization and pride in your dishware. Plus, it’s an easy way to add visual interest with minimal effort. Ready to showcase your style?
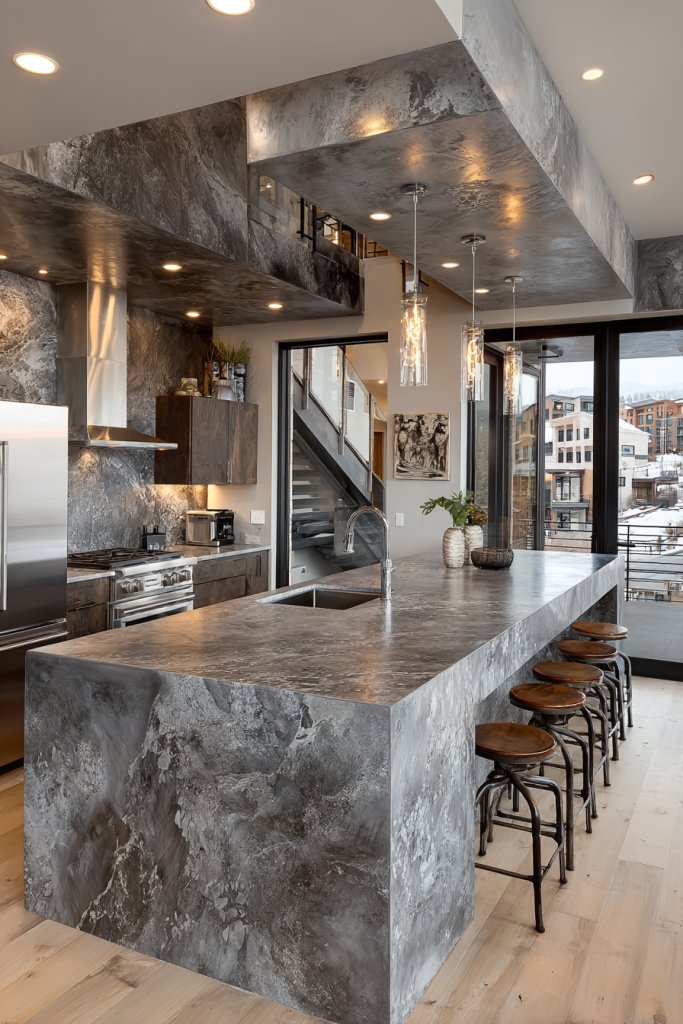
20. Incorporate Functional Yet Stylish Bar-Style Countertops
Ever wanted a countertop that’s both practical and eye-catching? Bar-style countertops combine durable materials with sleek design, offering a perfect spot for casual dining and socializing. They elevate your kitchen’s style while adding functional workspace. Who says practicality can’t be stylish?
Recommended Products to replicate this idea
| # | Preview | Product | |
|---|---|---|---|
| 1 |

|
Tribesigns Kitchen Island, Kitchen Shelf Bar Table with 5 Open Storage Shelves and Large Worktop,... | Check Latest Price |
| # | Preview | Product | |
|---|---|---|---|
| 1 |
|
YKLYTBD Solid Wood Bar Height Table, Long Narrow High Top Pub Table with Natural Live Edge & Metal... | Check Latest Price |
Picture a countertop made of polished quartz or butcher block, extending from your main prep area with a slight overhang for seating. The textured surface adds warmth and character, contrasting with modern cabinetry. Pendant or sconce lighting above highlights the space, inviting guests to sit and chat while you cook. It’s a dynamic focal point that balances form and function.
Opt for materials like concrete, granite, or eco-friendly composites for different aesthetics. Incorporate an overhang or a waterfall edge for visual drama. Use contrasting colors or textures to define the bar area. Add decorative elements like a row of stylish stools, or keep it minimal with sleek, low-profile seating. Seasonal accessories like a bowl of fruit or a decorative tray can be swapped in.
Choose durable, stain-resistant materials suited for high-traffic areas. Install a sturdy support structure underneath for overhangs. Ensure the height is comfortable for both prep and seating. Seal the surface properly to prevent damage. Consider professional installation for precise cuts and edge finishing. Regular cleaning with non-abrasive products maintains the look.
Add decorative accents like a patterned or colored countertop surface. Incorporate personalized bar stools with cushions or embroidery. Use accessories like a stylish tray or a set of decorative containers for utensils. Change decor seasonally—think festive runners or themed accessories. Keep the space clutter-free for maximum impact.
A bar-style countertop makes your kitchen more versatile and social. It’s perfect for quick meals, drinks, or casual chats. It also adds a layer of sophistication and modernity to your space. Once installed, it becomes the heart of your social kitchen. Ready to serve style with practicality?
21. Maximize Natural Light with Skylights or Large Windows
Does your kitchen feel dull or enclosed, especially during gloomy days? Natural light is a game-changer, making any space feel bigger, brighter, and more welcoming. Skylights or large windows are the perfect ways to flood your kitchen with sunlight, energizing your cooking and socializing moments.
Recommended Products to replicate this idea
| # | Preview | Product | |
|---|---|---|---|
| 1 |

|
Solatube® 290 DS Skylight Kit - 14-inch Diameter - Perfect for Bedrooms, Kitchens & Living Rooms -... | Check Latest Price |
| # | Preview | Product | |
|---|---|---|---|
| 1 |

|
FLFK Fake Window Wall Sticker - Landscape Faux Window Wall Mural for Wall Decor, Stick and Peel Wall... | Check Latest Price |
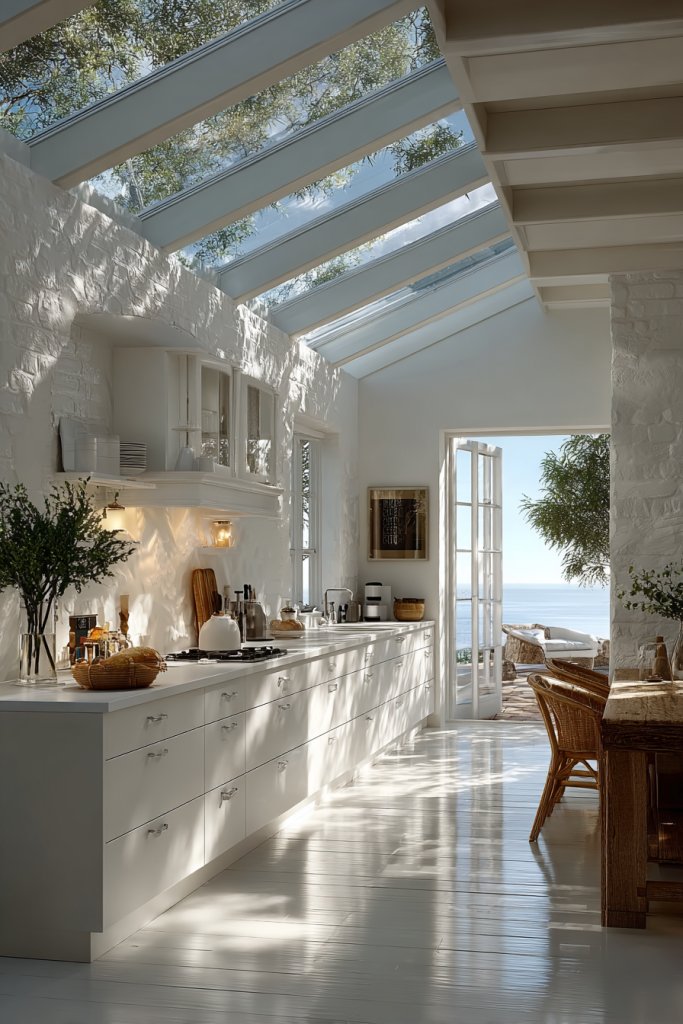
Imagine expansive windows with sleek frames that overlook your garden, filling the room with warm, natural light. Skylights installed in the ceiling create a canopy of daylight, even in the heart of your kitchen. The sunlight dances on glossy surfaces, highlighting textures and colors, and transforming the ambiance from mundane to magical.
Opt for large, unobstructed windows with minimal framing or add decorative shutters for versatility. Skylights with adjustable shades or blinds help control light levels. Consider location and orientation for maximum sunlight exposure. In colder climates, use energy-efficient glazing to prevent heat loss. Seasonal window treatments can add style and function.
Consult professionals for structural modifications required for skylight installation. Ensure proper insulation and sealing to prevent leaks. Choose the right size and placement for natural light maximization. Use energy-efficient, UV-protective glass to reduce glare and heat gain. Regular maintenance keeps skylights clear and functioning smoothly. For windows, select high-quality frames and glass for durability.
Decorate window sills with small plants, candles, or decorative objects (avoiding restricted items). Use sheer curtains or blinds to diffuse light softly. Incorporate reflective surfaces like mirrors or glossy tiles to bounce light further. Consider window films or tints for privacy without sacrificing brightness. Seasonal accents can add character while maintaining functionality.
Maximizing natural light creates a vibrant, healthy environment that enhances mood and productivity. It’s an eco-friendly way to brighten your space without extra electricity costs. Natural illumination also showcases your design choices and makes your kitchen feel more spacious. Ready to bring the sunshine indoors?
Conclusion
Exploring these diverse open kitchen ideas can inspire you to reimagine your own space as a lively, inviting heart of your home. Whether you prefer sleek modern designs or warm, rustic touches, there’s a concept here to spark your creativity. Take the first step toward your dream kitchen and embrace the joy of open, social cooking—your perfect space awaits!