I have been, or can be if you click on a link and make a purchase, compensated via a cash payment, gift, or something else of value for writing this post. As an Amazon Associate, I earn from qualifying purchases. Please read my full Affiliate Disclosure for more information.
Imagine turning blank walls into captivating works of art that truly showcase your personality and creativity. Mixed media wall art ideas have surged in popularity because they allow for endless experimentation, combining different textures, materials, and techniques to create visually stunning displays.
In this article, you’ll discover a variety of inspiring mixed media wall art ideas that cater to every style and space. Whether you’re into bold, colorful compositions or subtle, textured pieces, these ideas will spark your imagination and help you craft unique, eye-catching displays that breathe life into any room.
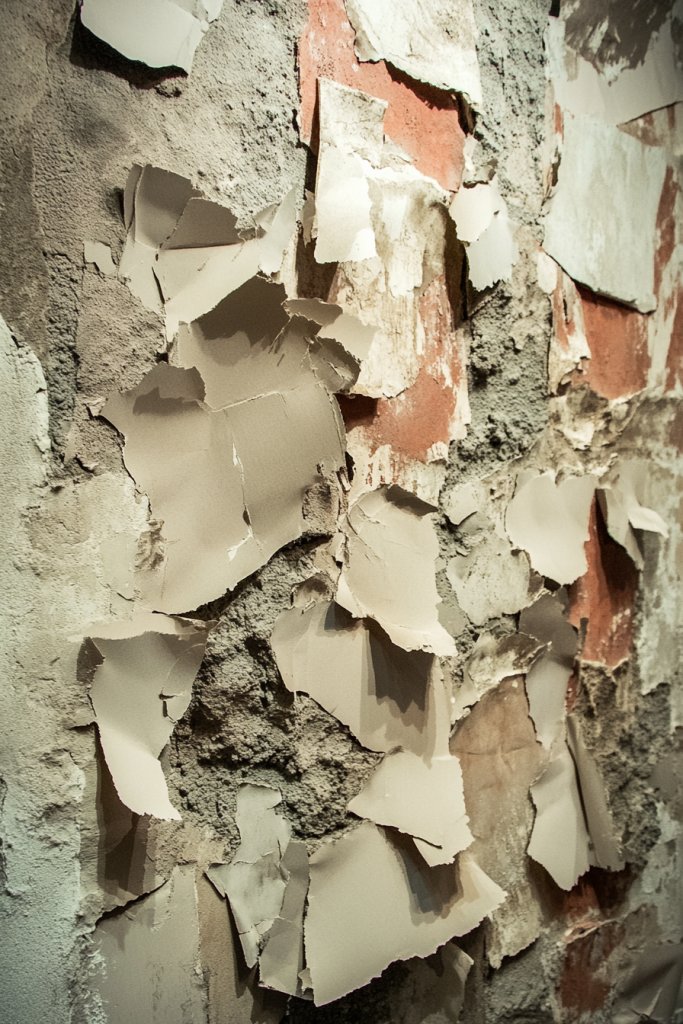
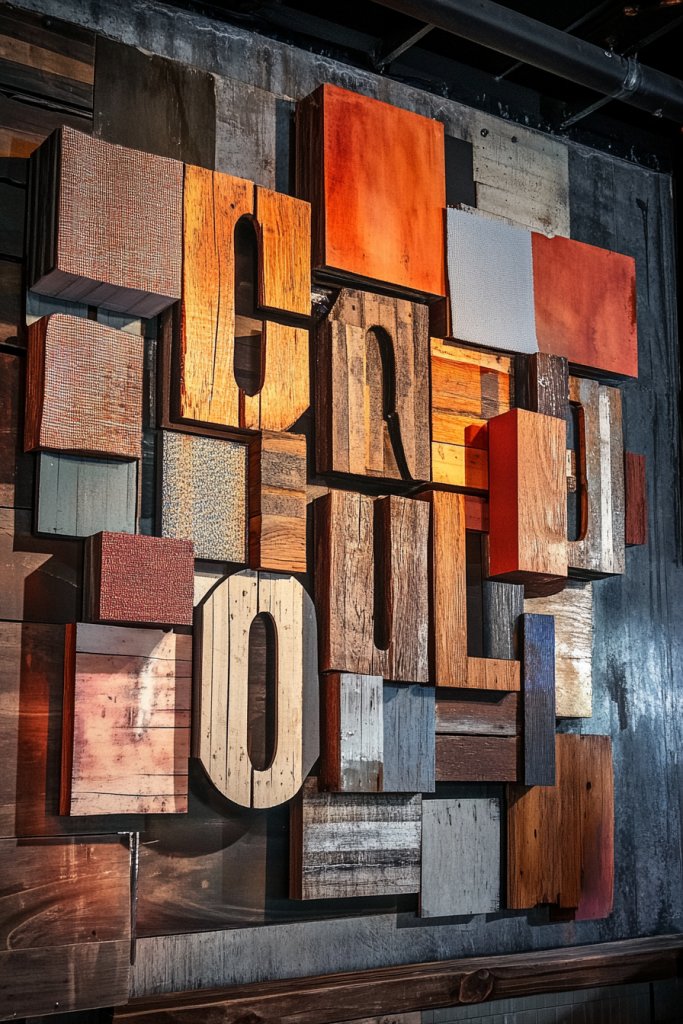
1. Rustic Wood and Metal Combo Art for Industrial Charm
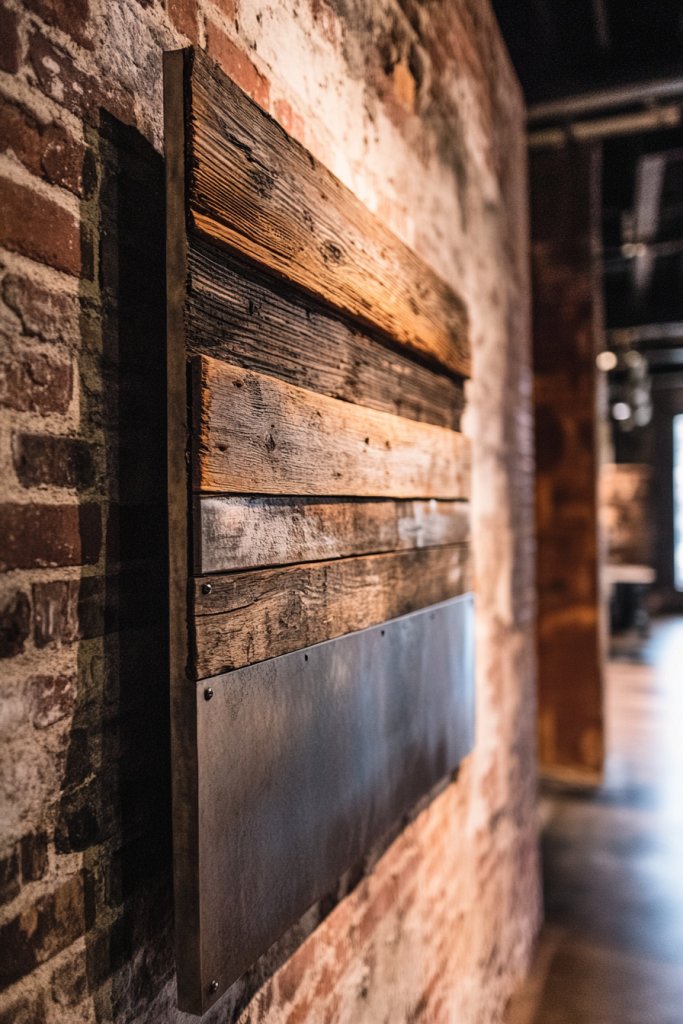
Ever felt your space needs that extra punch of personality but struggle to find art that matches your industrial or rustic vibe? Combining reclaimed wood with metal accents can instantly add that edgy, rugged charm you crave. It’s the perfect way to elevate a plain wall without going overboard with traditional decor. Plus, it offers a chance to showcase your style in a way that feels authentic and bold.
Recommended Products to replicate this idea
| # | Preview | Product | |
|---|---|---|---|
| 1 |

|
Uttermost 04014 Rennick - 21 inch Wall Art | Check Latest Price |
| # | Preview | Product | |
|---|---|---|---|
| 1 |

|
ESTART Metal Birds Wall Art, Metal Vivid Birds on Branch Silhouette Wall Decor Black Leaves with... | Check Latest Price |
Imagine a wall featuring weathered wood panels with raw, uneven textures, contrasted by sleek, shiny metal pieces that catch the light. The roughness of the wood pairs beautifully with the smoothness of brushed steel or oxidized copper. The interplay of textures creates visual interest and a tactile experience, making the wall feel alive and inviting. Subtle hints of rust or patina add layers of depth, turning your wall into a piece of art that tells a story.
This combo works well in various settings, from urban lofts to farmhouse kitchens. You can opt for a large, single statement piece or a gallery of smaller mixed media panels. Seasonal tweaks, like adding a splash of paint or incorporating LED strip lighting, can refresh the look. For smaller spaces, use a few key pieces with strong textures to avoid overwhelming the room. The beauty lies in mixing materials and finishes to match your evolving taste.
Start with reclaimed wood planks or panels—sourcing can be local or online. Choose metal accents such as brackets, geometric shapes, or cutouts made of steel, copper, or aluminum. Use heavy-duty adhesive or screws to secure your elements, ensuring they’re flush and stable. Consider a base board or backing to keep everything aligned during installation. Play with arrangements before fixing to find the most dynamic layout. Remember, this art isn’t just decorative; it’s meant to be rugged and imperfect.
Add a personal touch by incorporating metal initials, vintage hardware, or custom-cut shapes. You could also introduce small shelves or hooks to hold functional items like keys or tools, blending art with utility. Experiment with paint finishes—maybe a matte black frame or a distressed look that complements the wood. Mixing in some LED lighting behind or around the piece can add a modern twist while highlighting the textures.
This style proves that you don’t need perfection to create something stunning. Your walls can become a reflection of your personality—bold, textured, and full of character. It’s a look that’s trending in modern industrial decor and can be effortlessly adapted to suit your space. Once you see how easy it is to combine these materials, you’ll want to craft more personalized statement pieces for your home or office.
2. Textured Fabric and Canvas Collage
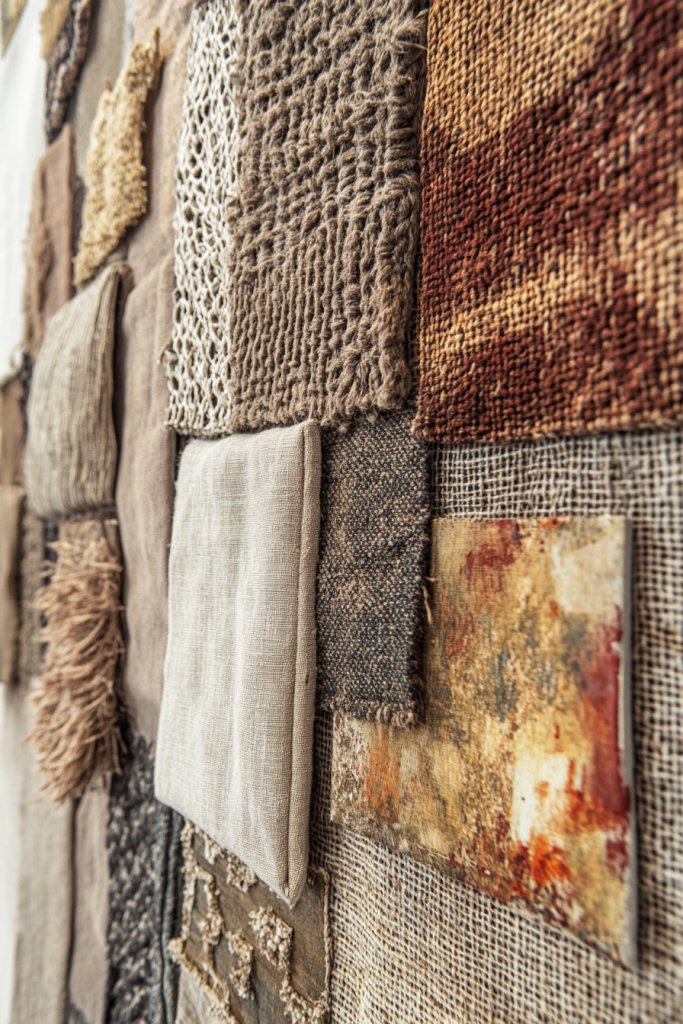
Feeling like your walls are missing that cozy, inviting vibe? A textured fabric and canvas collage can turn a bland wall into a tactile masterpiece that invites touch and admiration. It’s a fantastic way to add warmth and personality without relying on traditional framed art. Plus, it’s a super customizable project for any skill level.
Recommended Products to replicate this idea
| # | Preview | Product | |
|---|---|---|---|
| 1 |

|
Stretched Canvas, 6x8, 8x10, 10x12, 12x16, 8 Set Artist Canvase Frame Board Panels, 100% Cotton... | Check Latest Price |
| # | Preview | Product | |
|---|---|---|---|
| 1 |
|
60 Pcs 4" x 4"(10cm x 10cm) Assorted Craft Fabric Bundle Squares Patchwork Fabric Sets for DIY... | Check Latest Price |
Picture a large canvas layered with burlap, linen, and velvet textiles, each adding different textures and shades. These fabrics are arranged in overlapping patterns, some frayed at the edges for that rustic charm. The tactile diversity creates depth, while the natural fibers add warmth and softness to your space. Small details like stitched accents or decorative trims can make the collage pop even more.
This idea adapts well to bedrooms, living rooms, or even entryways. Swap fabrics seasonally—think cozy flannel in winter or light cottons in summer—to keep the look fresh. For a more refined appearance, stretch the fabrics onto canvas frames or attach them directly to a backing board. You can also incorporate embellishments like beads, lace, or embroidered patches for extra flair. The key is to match textures to your decor style.
Gather a variety of fabrics in different textures and colors. Cut them into shapes or strips, then arrange on a large canvas or board. Use strong fabric glue or staple gun to secure them, layering for dimension. For a more permanent setup, sew or staple fabrics onto a backing fabric that’s stretched over a frame. Play with the layout beforehand to ensure balance and visual interest. Add decorative stitches or trims for finishing touches.
Personalize by embedding small objects like buttons, vintage jewelry, or charms into the fabric layers. Incorporate meaningful textiles—such as a piece of a favorite shirt or scarf—to evoke memories. Use contrasting stitching or painted accents to highlight certain areas. You could even add LED fairy lights behind the collage for a soft, ambient glow.
This textile collage approach proves that wall art can be both beautiful and functional. It offers a tactile experience and a chance to showcase your personal style with fabric and craft supplies. It’s perfect for those who love DIY projects and want a warm, inviting atmosphere. Once you get started, you’ll see that creating textured art is both fun and rewarding.
3. Abstract Acrylic and Metallic Leaf Accents
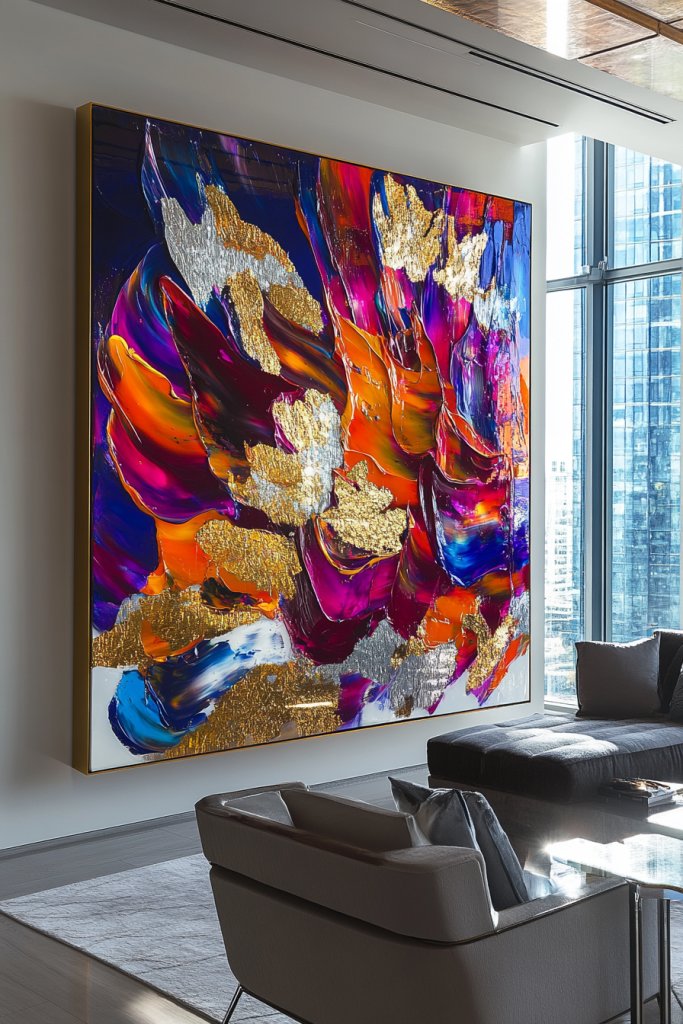
Craving a bold statement piece that screams modern luxury? Abstract acrylic paintings paired with metallic leaf accents can elevate your wall from bland to breathtaking. This combo offers vibrant colors combined with luxe metallic finishes that instantly catch the eye. It’s a surefire way to add sophistication without going full gallery wall.
Recommended Products to replicate this idea
| # | Preview | Product | |
|---|---|---|---|
| 1 |

|
Empire Art Direct Abstract Art,Blue Frameless Tempered Glass Panel,Contemporary Wall Decor Ready to... | Check Latest Price |
| # | Preview | Product | |
|---|---|---|---|
| 1 |

|
INSPIRELLE 5.5" x 5.5" Imitation Gold Foil Variegated Metallic Leaf 25 Sheets for Arts and Gilding... | Check Latest Price |
Visualize a large canvas with swirling, fluid acrylics in vivid hues—think deep blues, fiery reds, or shimmering golds. Overlaid with delicate gold or silver leaf, the artwork gains a shimmering depth that changes with the light. The abstract nature invites interpretation, while the metallic details add a touch of glamour. The textured acrylics contrast beautifully with the smooth, reflective metallic accents.
This style adapts well in contemporary living rooms, offices, or minimalist bedrooms. You can opt for a single large piece or a series of smaller abstracts with metallic highlights. For seasonal variation, incorporate different color schemes—cool tones for winter, bright pastels for spring. Metallic leaf can also be applied to other surfaces like wooden panels or even decorative boxes for a cohesive look.
Start with high-quality acrylic paints and a variety of brushes for blending. Use painter’s tape or stencils to create abstract shapes or swirls. Once dry, apply metallic leaf using adhesive size or glue, carefully pressing it into place for a seamless shimmer. Seal the leaf with a protective varnish to prevent tarnishing. Mount your finished piece on a sturdy backing for wall hanging. For added drama, frame or mount on a deep, shadow-box style frame.
Experiment with different metallic finishes—matte, shiny, distressed—to match your decor. Incorporate your favorite colors into the acrylic base to personalize the piece. Use textured brushes or palette knives to add extra dimension. You can also embed small decorative elements like beads or stones within the acrylic layers for a mixed media effect.
This art style proves that combining bold colors with metallic accents can create a luxe, modern aesthetic that’s both striking and personal. It’s easy to adapt for any space and style, making it a versatile choice for DIY enthusiasts. Once you see how vibrant and sophisticated your abstract creation looks, you’ll be inspired to explore even more artistic experiments.
4. Layered Paper and Paint Mixed Media Panel
Looking for a way to add depth and vibrancy to your walls without the expense of traditional art? A layered paper and paint mixed media panel offers a playful, dynamic alternative that’s full of texture and color. It’s perfect for those who love collage and want a piece that’s constantly evolving with your creativity. Plus, it’s surprisingly easy to customize.
Recommended Products to replicate this idea
| # | Preview | Product | |
|---|---|---|---|
| 1 |
|
Unfinished Wood Canvas Boards for Painting - Blank Square Cradled Panels for Mixed-Media Craft & Art... | Check Latest Price |
| # | Preview | Product | |
|---|---|---|---|
| 1 |

|
Apple Barrel, Vibrant Spectrum Collection Acrylic Craft Paint, PROMOABIII, 2 fl oz each, 16 assorted... | Check Latest Price |
Envision a canvas covered with torn or cut-out papers—scrapbook elements, vintage maps, or bold graphic prints—layered with thick, textured paint. The paint adds dimension, creating raised areas that catch the eye and invite touch. Bright colors or subtle earth tones can be combined to match your mood or decor. The overlapping layers produce a lively, energetic effect that transforms flat surfaces into visual stories.
This technique adapts to various styles—from playful and eclectic to sleek and modern. Use patterned or textured papers for an artsy vibe, or opt for monochromatic layers for a more subdued look. Incorporate metallic or glitter accents for extra sparkle. You can also change the size and shape of the panel to suit your space—large focal points or smaller, modular pieces.
Start by selecting your papers—think textured, glossy, or matte. Tear or cut them into interesting shapes or strips. Apply a layer of thick, textured paint with a palette knife or brush, then press or glue the papers onto the surface in overlapping layers. Use a clear sealant or varnish to protect your work. Add details like ink doodles or highlights with metallic pens. Mount your panel on a sturdy backing, ready to hang.
Personalize by adding quotes, initials, or small photographs embedded within the layers. Use contrasting colors or metallic paints to highlight certain areas. Incorporate different textures—like fabric scraps or textured papers—into the collage. Experiment with layering thicknesses for a more three-dimensional effect, creating a truly unique piece.
This layered paper and paint approach encourages creative freedom and playful experimentation. It’s a fantastic way to turn simple materials into a vibrant, textured masterpiece. Once you see how lively and unique your panel looks, you’ll be inspired to keep exploring mixed media art and craft projects.
5. Botanical-Inspired Collage Using Natural Elements
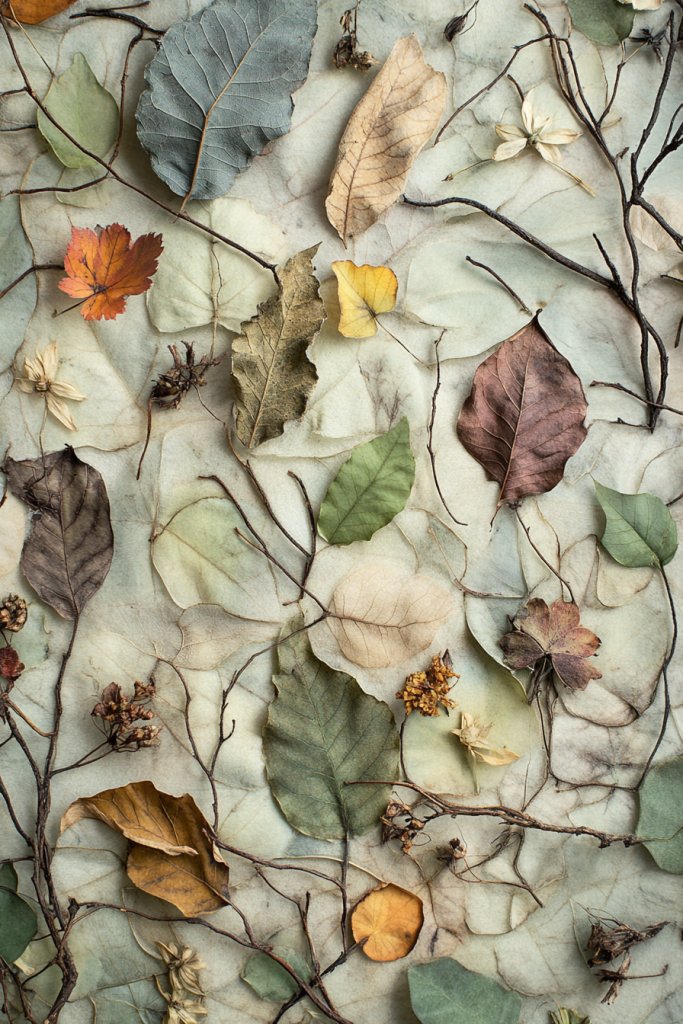
Craving an earthy, calming vibe in your home? Botanical-inspired collages with natural elements bring the outdoors inside in a subtle, artistic way. They’re ideal for nature lovers who want to create a peaceful retreat without relying on actual plants. Plus, they add texture and color that evolve over time.
Recommended Products to replicate this idea
| # | Preview | Product | |
|---|---|---|---|
| 1 |

|
97 Decor Vintage Botanical Wall Collage Kit - 40 Unframed Mini Posters (4x6) for Bedroom, Living... | Check Latest Price |
| # | Preview | Product | |
|---|---|---|---|
| 1 |

|
nisetten 110+PCS Pressed Flowers for Resin molds Real Dried Flower Leaves for Resin Jewelry Making... | Check Latest Price |
Imagine a canvas dotted with pressed leaves, dried flowers, and botanical illustrations arranged in a harmonious composition. The natural textures—fragile petals, veined leaves—contrast beautifully with painted or printed backgrounds. This layered approach creates depth and invites viewers to explore every detail. The muted tones of dried flora evoke a sense of tranquility and connection to nature.
Adapt this idea for various spaces—from rustic kitchens to elegant bedrooms. Use a mix of real pressed botanicals and artistic representations for a contemporary look. Switch up the color palette seasonally—warm earth tones in fall or cool greens and blues in spring. Incorporate framing options like shadow boxes or collage panels for a more finished appearance.
Start by collecting pressed and dried botanicals—press leaves ahead of time using a heavy book or a flower press. Mount them on a sturdy canvas or board, arranging them in a pleasing composition. Use clear-drying glue or adhesive to secure each element, avoiding excess. Add painted backgrounds or botanical prints to complement the natural materials. Seal with a protective varnish to preserve the elements. Finish by framing or mounting for display.
Personalize your collage with handwritten labels, dates, or favorite quotes about nature. Mix in other natural elements like feathers, bark, or small twigs for added texture. Use metallic or iridescent paints to give certain elements a subtle shimmer. Incorporate your own botanical sketches or watercolor paintings for a combined artistic effect.
Creating botanical collages connects you with nature and enhances your artistic skills. It’s a calming, rewarding process that results in a truly unique piece. You’ll gain confidence in working with natural materials and layering techniques, inspiring you to explore even more organic-inspired decor ideas.
6. Vintage Book Pages and Ink Drawings on Canvas
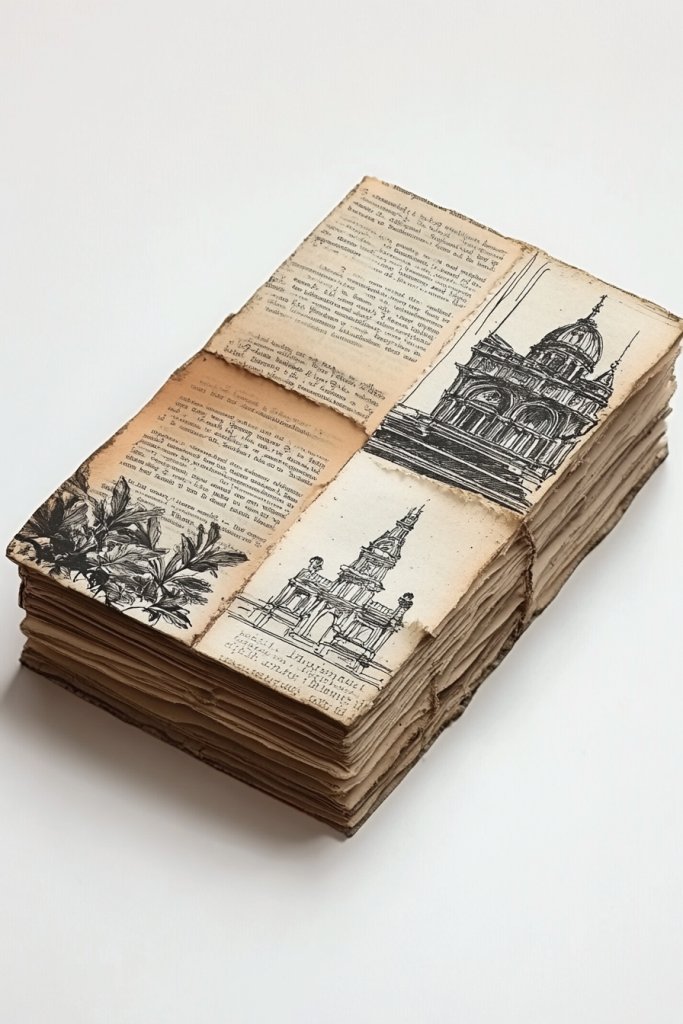
Ever wanted to add a literary or vintage touch to your decor? Using vintage book pages combined with ink drawings creates a timeless, artistic statement that’s both nostalgic and sophisticated. It’s perfect for book lovers or anyone craving a shabby-chic aesthetic that’s full of character.
Recommended Products to replicate this idea
| # | Preview | Product | |
|---|---|---|---|
| 1 |

|
WLZWD Antique Retro Library Reading Card Wall Art Vintage Book Due Date Poster Unique Neutral Rustic... | Check Latest Price |
| # | Preview | Product | |
|---|---|---|---|
| 1 |

|
ESRICH Canvas Boards for Painting, 5 Pack Canvases for Painting 8x10 Cotton Primed Acid Free Blank... | Check Latest Price |
Visualize a canvas covered with pages from old books—some torn, some carefully cut—and layered with intricate ink sketches or calligraphy. The delicate lines of the drawings contrast beautifully with the aged paper’s texture and tone. The overall effect is a curated, storybook feel that adds depth and personality to your space. It’s like having a piece of history hanging on your wall.
This concept adapts well in eclectic or vintage-inspired interiors. Incorporate handwritten quotes, botanical sketches, or city maps. Use sepia-toned pages for a warm, antique look or black-and-white pages for a cleaner aesthetic. Frame individual pages or create a large collage for a statement piece. Mix in small decorative elements like vintage keys or stamps for extra charm.
Start by selecting interesting vintage book pages—scanning or photocopying if needed. Carefully decoupage the pages onto a canvas or sturdy backing, arranging them in a layered collage. Use matte or glossy varnish to protect the pages and drawings. Add ink sketches or calligraphy using fine liners or brush pens for detail. Mount your finished piece on a frame or directly on the wall, making sure everything is smooth and secure.
Personalize by adding handwritten notes, names, or favorite quotes in ink. Incorporate small vintage ephemera—like tickets, postcards, or pressed flowers—into the collage. Use metallic ink or paint for highlights or accents. You can also create a series of smaller pieces to form a gallery wall, each telling a different story.
This vintage book page collage technique is a creative way to showcase your love for literature and history. It transforms old pages into art that sparks conversations and admiration. Plus, it’s accessible for beginners and highly customizable, so you’ll feel confident exploring similar mixed media ideas for your home.
7. Fiber and Yarn Textured Wall Hangings
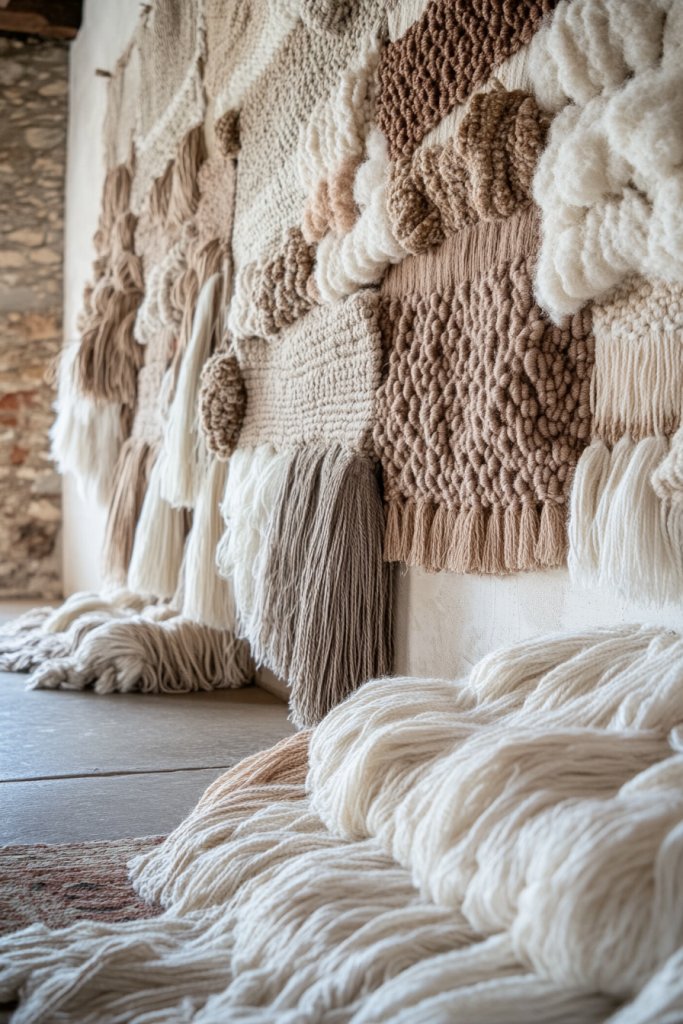
Looking to add a tactile, cozy element to your walls? Fiber and yarn wall hangings are an easy way to infuse warmth and texture into any space. They’re highly customizable, affordable, and can be tailored to match any decor style—boho, modern, or rustic. Plus, they’re super fun to make yourself.
Recommended Products to replicate this idea
| # | Preview | Product | |
|---|---|---|---|
| 1 |

|
FREEBLOSS DIY Macrame Leaf Wall Hanging Beginners Macrame Kit Leaf Woven Tapestry Feather Wall... | Check Latest Price |
| # | Preview | Product | |
|---|---|---|---|
| 1 |

|
Wooden Dowel, 4PCS Dowel Rod Wood Sticks Round Sandalwood 12in 9in Decoration Doweling Rods for Home... | Check Latest Price |
Picture a wall adorned with hanging strands of thick yarn, braided ropes, and woven fibers in earthy tones or vibrant hues. Layered textures create visual depth, with some yarns looping, twisting, or tasseling for extra dimension. The tactile quality invites viewers to reach out and feel the softness and intricacy of the craftsmanship. The movement of the fibers adds a lively, dynamic touch.
This idea works wonderfully in living rooms, bedrooms, or even entryways. Choose between wall-mounted pieces or free-hanging designs with multiple strands. Switch up the color palette seasonally or to match current trends—think muted neutrals or bright, playful shades. Incorporate decorative elements like beads, shells, or feathers for added interest. Sizes can range from small accent pieces to large statement hangings.
Gather various fibers, yarns, and textiles—wool, cotton, jute, or synthetic fibers. Use a wooden dowel or metal rod as a base; attach fibers with a simple knot, braid, or weaving technique. Experiment with different patterns—spirals, chevrons, or tassels—to create unique textures. Secure the fibers tightly to prevent unraveling. For a polished look, trim uneven ends and add decorative accents.
Personalize by incorporating favorite colors, textures, or even small charms. Mix in metallic or shiny threads for a subtle shimmer. Create asymmetrical or symmetrical designs depending on your style. You can also add LED fairy lights behind the fibers for a soft glow or embed small objects for a more eclectic feel. The goal is to make each piece reflect your personality.
Fiber and yarn wall hangings are a testament to the beauty of handmade craftsmanship. They’re perfect for adding a relaxed, inviting vibe and are surprisingly easy to customize. Once you master basic techniques, you’ll feel confident experimenting with more complex weaves and textures to truly make your walls stand out.
8. Geometric Shapes with Mixed Media Materials
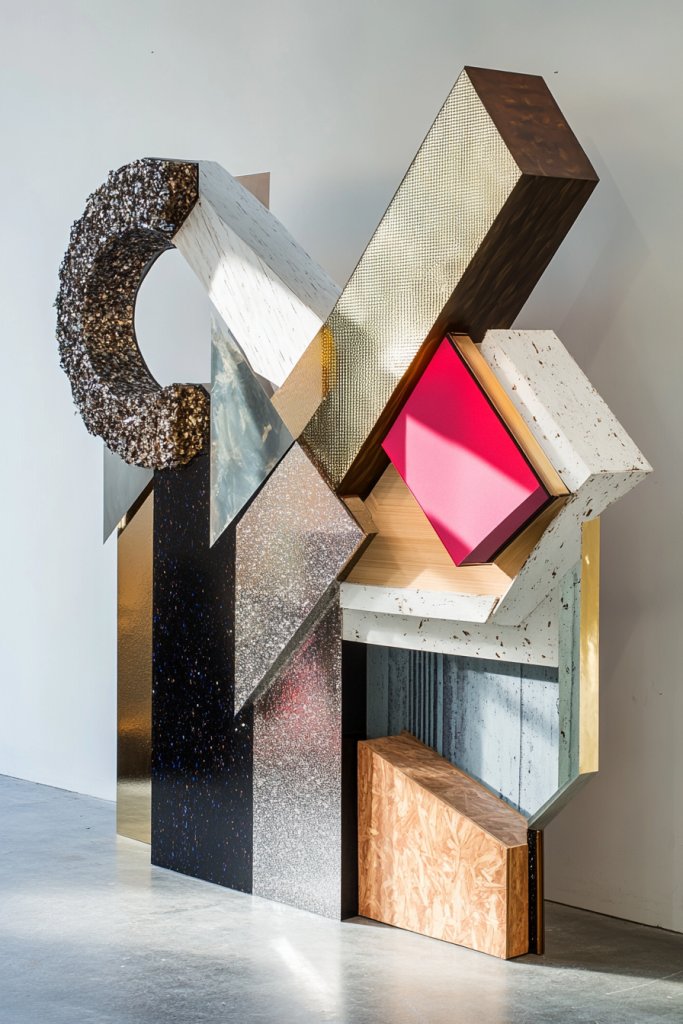
Tired of plain, boring walls? Geometric shapes made from mixed media materials can instantly add a contemporary, structured feel to your space. They’re perfect for clean-lined interiors or for adding a pop of visual interest to minimalist decor. Plus, creating geometric art is surprisingly straightforward, even for beginners.
Recommended Products to replicate this idea
| # | Preview | Product | |
|---|---|---|---|
| 1 |

|
15 Pcs Geometric Stencils, Reusable Abstract Texture Stencils for Painting and Mixed Media Art... | Check Latest Price |
| # | Preview | Product | |
|---|---|---|---|
| 1 |

|
Musanpou Wooden Geometric Home Wall Decor Slatted Wood Design Wall Sculpture,Set of 3 Wood Wall... | Check Latest Price |
Imagine a series of interlocking triangles, hexagons, or squares crafted from painted wood, metal, and textured modeling paste. The precise edges contrast with organic textures of the paste or rough wood, creating a balanced composition. The use of different materials adds depth and dimension, while the geometric forms lend a modern, orderly aesthetic. Colors can be bold or subdued, depending on your style.
This concept suits modern, Scandinavian, or industrial spaces perfectly. Mix large shapes with smaller, intricate ones for variety. Seasonal color schemes—such as icy blues and whites or warm earth tones—can update the look. Incorporate metallic accents or glossy finishes for added sophistication. Use a grid layout or freeform arrangement to match your room’s vibe.
Cut geometric shapes from plywood, acrylic sheets, or metal sheets. Paint or finish each piece with textured or glossy coatings. Use strong adhesive or screws to attach elements onto a backing board or directly onto the wall. Play with overlapping or spacing for visual rhythm. Seal the surfaces for durability, especially if using textured paste or metal.
Customize with your favorite color palettes, metallic details, or even embedded small objects like nuts or screws within the textured paste. Group shapes into a pattern or scatter them randomly for a more dynamic look. Add subtle lighting—such as LED strips behind the shapes—to emphasize their form and depth. The possibilities are endless.
Geometric mixed media art proves that structure and creativity can coexist beautifully. It offers a sleek, modern vibe that’s easy to adapt and personalize. Once you see how striking simple shapes can be, you’ll be inspired to explore more complex geometric designs and even 3D structures for your walls.
9. Sculptural Wire and Painted Canvas Art
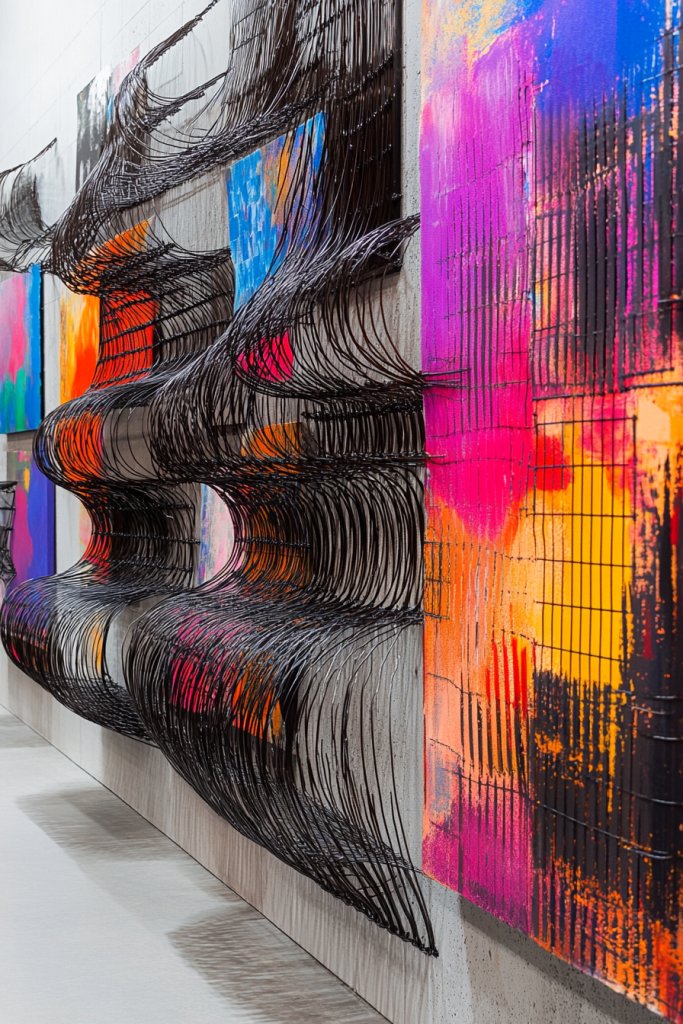
Want to add dimension and movement to your wall decor? Sculptural wire combined with painted canvases creates a one-of-a-kind art piece that’s both modern and dynamic. It’s perfect for adding an artistic, almost architectural element to your space. Plus, it’s a fun challenge for those looking to step outside traditional art boundaries.
Recommended Products to replicate this idea
| # | Preview | Product | |
|---|---|---|---|
| 1 |

|
KUWIVO Lechesis 24" Metal Flower Scroll Wall Art Decor Sculptures with Rust Leaf for Living Room... | Check Latest Price |
| # | Preview | Product | |
|---|---|---|---|
| 1 |
|
Stretched Canvas, 6x8, 8x10, 10x12, 12x16, 8 Set Artist Canvase Frame Board Panels, 100% Cotton... | Check Latest Price |
Visualize a flat canvas painted with abstract or geometric designs, with wire sculptures extending outward in flowing or angular forms. The wire forms might resemble flowers, waves, or organic shapes, casting shadows that change throughout the day. The painted background anchors the piece, while the 3D wire adds movement and depth. This interplay makes the artwork lively and engaging.
This idea suits modern or eclectic interiors, especially when you want a statement piece. Use different wire gauges and finishes—brushed, shiny, or painted—to match your decor. Experiment with abstract shapes or representational forms, depending on your taste. Mount the canvas with the wire sculpture extending outward for a dramatic effect. Change up the composition for seasonal updates.
Start with a sturdy canvas or wooden panel, then paint your design using acrylics or spray paint. Shape wire into your desired forms—curves, spirals, or geometric figures—using pliers. Attach the wire securely to the canvas with strong glue or small hooks, ensuring stability. Play with the positioning before fixing everything in place. Finish with a clear sealant if needed to prevent tarnishing.
Add color to the wire with metallic or bright spray paints to match your palette. Incorporate small decorative elements like beads or small shells into the wire sculptures for texture. Create different sizes and shapes for a more organic, natural feel. You can also incorporate LED lights along the wire for a subtle glow at night.
This technique demonstrates how combining different materials can produce stunning 3D art. It’s a creative way to explore sculpture and mixed media, giving your walls a fresh, contemporary edge. Once you see how easy it is to build and attach these forms, you’ll be inspired to experiment with your own designs and elevate your decor game.
10. Mirror and Glass Fragment Mosaic
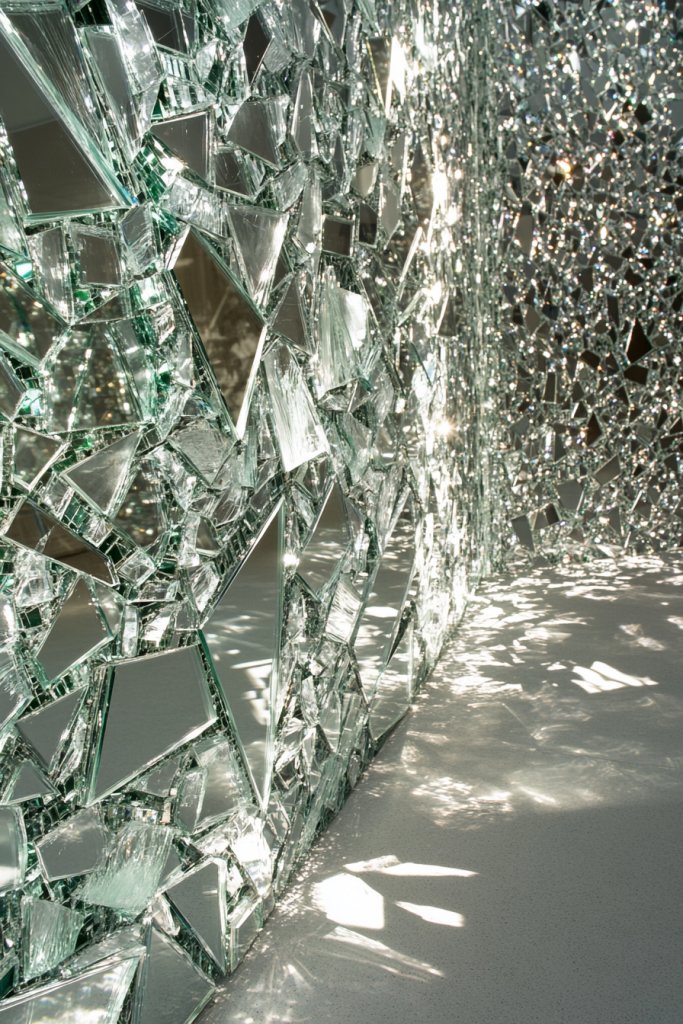
Looking to add light and a sense of space to your room? A mirror and glass fragment mosaic can do just that by creating a shimmering, reflective wall installation. It’s an eye-catching way to make your space feel larger and more luminous without needing additional lighting fixtures. Plus, it’s a surprisingly simple DIY project.
Recommended Products to replicate this idea
| # | Preview | Product | |
|---|---|---|---|
| 1 |

|
Mirror Tiles Self Adhesive, 5100 Pieces Mosaic Tiles Sheet, Disco Ball Tile Stickers, Square Mosaic... | Check Latest Price |
| # | Preview | Product | |
|---|---|---|---|
| 1 |

|
WATHFKCU 4 Sets DIY Glass Mosaic Tiles for Crafts,Mixed Color Mosaic Kits with Wooden Coaster for... | Check Latest Price |
Imagine broken mirror shards and colored glass pieces arranged in an intricate mosaic pattern. The reflective surfaces bounce light around the room, creating a dynamic, sparkling effect. When sunlight hits the mosaic, it casts colorful glints and enhances your decor’s vibrancy. The irregular shapes and textures add depth and movement, making the wall come alive.
This mosaic works beautifully in entryways, bathrooms, or feature walls in living rooms. Use a monochrome palette for a sleek, modern look or incorporate colored glass for a playful, artistic effect. Apply to a large backing panel or directly onto the wall, depending on your preferred style. Seasonal or thematic variations—like icy blues or fiery reds—can keep the look fresh.
Start by collecting broken mirror shards and colored glass, ensuring safety during handling. Arrange pieces on a waterproof backing or directly on a prepared wall surface. Use specialized glass adhesive or grout to secure each piece, filling gaps for a seamless appearance. Be sure to wear gloves and protective eyewear. Seal with a clear, protective coating for longevity. Use spacers or guides to maintain consistent gaps if desired.
Add small decorative elements such as metallic foils or textured glass for extra dimension. Create patterns or abstract designs tailored to your space. Incorporate LED strip lights behind the mosaic for a backlit effect. For a more artistic touch, embed small objects or tiles that hold personal significance. The mosaic can be a focal point that captures attention and sparks conversation.
Glass and mirror mosaics prove that even broken pieces can create stunning art. They offer a way to repurpose materials creatively while enhancing your space’s brightness. Once you see the stunning effects, you’ll be motivated to explore other reflective and textured wall ideas, transforming your decor into a gallery of light and color.
11. Mixed Media Typography with Layered Materials
Want a bold, personalized statement on your wall? Mixed media typography allows you to showcase inspiring words or quotes with a creative twist. Layering different materials—wood, paper, fabric—adds depth and texture that makes your message stand out. It’s a fun way to combine art and motivation in one piece.
Recommended Products to replicate this idea
| # | Preview | Product | |
|---|---|---|---|
| 1 |

|
14 Inch wood Letters for Wall Decor - Letter A for Hanging - Unique Blend of Rustic Vintage Western... | Check Latest Price |
| # | Preview | Product | |
|---|---|---|---|
| 1 |

|
Diuhofart Vintage Scrapbooking Supplies Kit, 185pcs Junk Journal Kit with Scrapbook Paper A6... | Check Latest Price |
Visualize oversized words cut from painted wood, layered onto a textured background made of layered papers or fabric. The letters have a tactile quality, with some surfaces smooth and others rough or patterned. The background’s layers create a sense of movement and energy, emphasizing the message. The combination of materials adds richness and makes the typography feel alive.
This concept adapts to various decor styles—from rustic farmhouse to sleek modern minimalism. Use bold fonts or handwritten styles depending on your vibe. Add color pops with paints or patterned papers, or keep it monochrome for elegance. Change the size and layout for different wall spaces—large centerpieces or smaller accent pieces. Incorporate decorative elements like metallic accents or textured paints.
Start by designing your quote or word layout. Cut or carve letters from painted or stained wood, or use pre-made wooden letters. Layer papers, fabrics, or textured materials behind and around the letters for depth. Use strong adhesive or nails to secure everything in place. Finish with a clear sealant to protect the surface. Mount on a wall with appropriate hardware, ensuring straight alignment.
Add personal touches like your favorite colors, metallic foils, or glitter accents. Incorporate small decorative elements—like charms or small objects—that relate to the quote. Use contrasting textures to make the words pop. Change out the background materials seasonally or for special occasions to keep the piece fresh and relevant.
Typography art with layered materials is a powerful way to combine words and art into a personal statement. It’s an accessible project that lets your creativity shine. Seeing your own message beautifully crafted on the wall boosts confidence in your artistic skills and encourages further experimentation with mixed media.
12. Vintage Frames Filled with Mixed Media Art
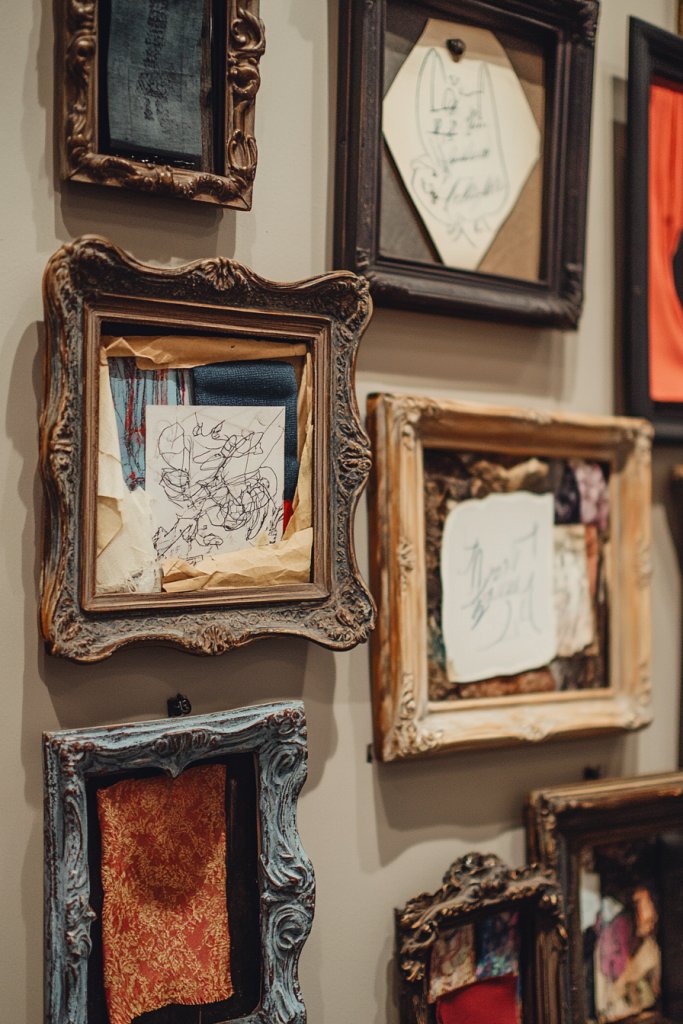
Looking for a way to add charm and character to your walls? Vintage frames—whether ornate or simple—can become the perfect container for eclectic mixed media art. Filling these frames with layered textures, fabrics, papers, and small objects creates a curated, gallery-like display. It’s an easy upgrade from plain wall hangings.
Recommended Products to replicate this idea
| # | Preview | Product | |
|---|---|---|---|
| 1 |

|
Chunful 2 Pcs Gold Picture Frames Vintage Antique Ornate Resin Photo Frames with Acrylic Front for... | Check Latest Price |
| # | Preview | Product | |
|---|---|---|---|
| 1 |

|
Ranger Texture Paste, 3.9 fl oz | Check Latest Price |
Envision a collection of vintage frames, each housing a different textured art piece—some with layered papers, others with fabric, small trinkets, or painted backgrounds. The frames act as windows into a world of varied textures and stories. The juxtaposition of old frames with contemporary mixed media art creates a striking contrast that draws viewers in. The overall effect is nostalgic yet modern.
This idea suits eclectic, shabby chic, or vintage-inspired interiors. Mix ornate gilded frames with distressed wood ones for visual interest. Use different sizes and shapes for a dynamic gallery wall. Change the contents seasonally or to reflect current themes—like holidays or personal milestones. Incorporate small objects, fabric swatches, or painted elements to enhance the visual richness.
Start by sourcing vintage or antique frames—thrift stores or online marketplaces are goldmines. Remove the glass if necessary and prepare the frame surface. Fill each frame with your layered art: glue or staple fabrics, papers, and small found objects onto a backing board, then place inside the frame. Seal or finish the artwork if needed. Arrange the frames on your wall, balancing sizes and styles for a curated look. Hang securely with appropriate hardware.
Personalize each piece by adding handwritten quotes, images, or meaningful objects. Use metallic or glossy paints to highlight certain areas. Incorporate small vintage finds like keys, jewelry, or buttons into the collages. Swap out artwork seasonally or for special occasions to keep the display fresh and engaging.
Vintage frame displays remind us that art and decor can be both nostalgic and contemporary. They’re easy to customize, making your space uniquely yours. Once you see how a collection of frames can tell a story, you’ll be motivated to expand your gallery and explore new mixed media techniques.
13. Abstract Ink and Watercolor Washes with Textured Accents
Craving a soft, artistic touch that adds calm and sophistication? Abstract ink and watercolor washes combined with textured accents create mesmerizing wall art that’s both subtle and striking. It’s ideal for adding a calming presence while showcasing your artistic side. Plus, it’s a forgiving medium perfect for beginners.
Recommended Products to replicate this idea
| # | Preview | Product | |
|---|---|---|---|
| 1 |

|
Large Framed Abstract Nature Landscape Wall Art for Living Room, 3 Piece Blue Watercolor Canvas... | Check Latest Price |
| # | Preview | Product | |
|---|---|---|---|
| 1 |

|
Funto Textured Acrylic Paint Set, 12 Colors, Complete Painting Kit with Tools and Canvases,... | Check Latest Price |
Visualize a canvas with gentle, flowing watercolor washes in shades of blue, pink, or gray, overlaid with ink splatters and fine lines. The watercolor creates a soft, dreamy background, while the ink adds sharp, contrasting details. Textured accents, like thick modeling paste or embossed elements, add tactile depth. The result is an abstract piece that feels fluid yet grounded, inviting viewers to interpret it.
This style suits contemporary, boho, or minimalist interiors. Use monochromatic washes for a serene look or bold, contrasting colors for drama. Incorporate metallic or iridescent accents for a hint of shimmer. Vary the scale—large statement pieces or smaller, grouped works—to fit your space. Seasonal color adjustments can keep the artwork relevant.
Begin with high-quality watercolor paper or canvas. Use diluted watercolor paints to create soft washes, layering for depth. Add ink splatters or fine lines with waterproof ink pens or brushes. For textured accents, apply modeling paste or thick mediums with a palette knife before or after painting. Once dry, seal with a spray varnish for protection. Mount on a simple frame or stretch the canvas for a clean finish.
Enhance with metallic or iridescent paints on certain areas to catch the light. Use contrasting ink colors to emphasize lines or splatters. Incorporate small textured elements—like fabric scraps or embossed patterns—for extra dimension. Play with layering different watercolor techniques to evoke different moods or themes. Personal touches make the art uniquely yours.
This abstract ink and watercolor technique encourages experimentation and intuition. It’s a beautiful way to bring a soft, artistic vibe into your home while honing your skills. Seeing your own fluid, textured art can inspire confidence to explore more complex mixed media projects, making your walls a canvas of your creativity.
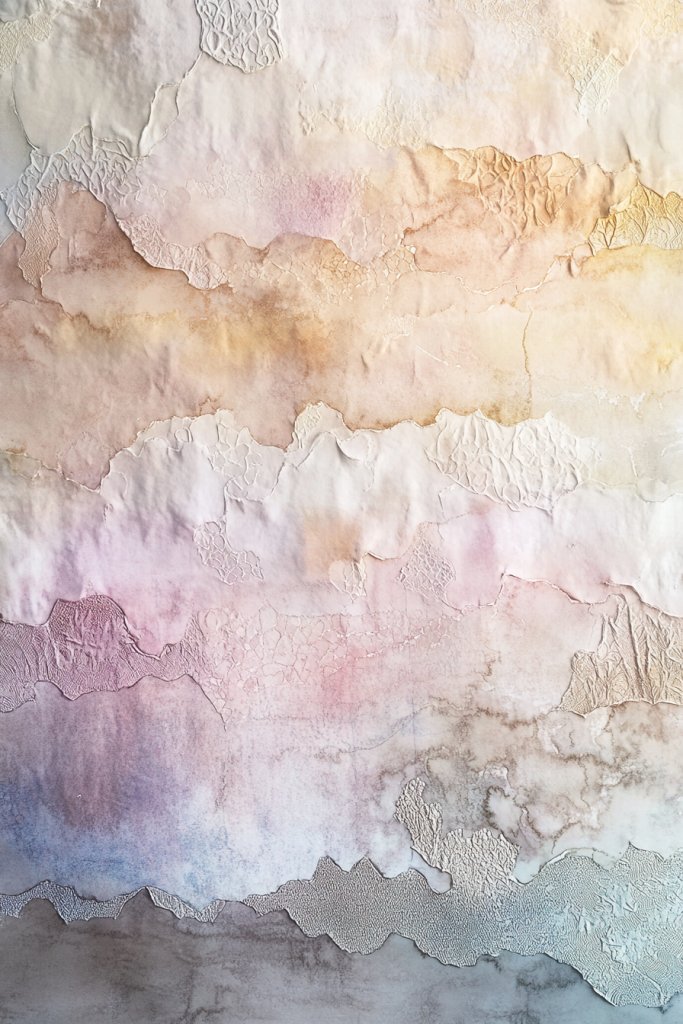
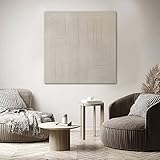
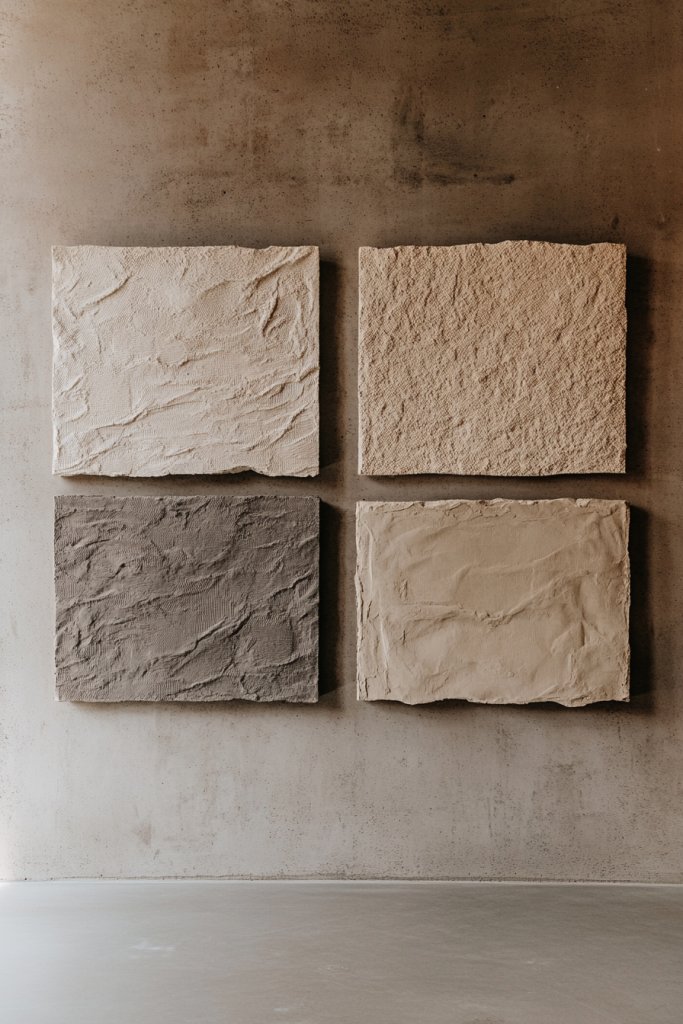
14. Monochrome Textured Wall Art with Layered Materials
Ever wish your walls could deliver more than just a blank canvas? Monochrome textured wall art offers a sophisticated way to add depth without overwhelming your space. It’s perfect for those who love subtlety but crave visual interest. Plus, it’s an easy way to elevate your decor without clutter.
Recommended Products to replicate this idea
| # | Preview | Product | |
|---|---|---|---|
| 1 |
|
SHEYOYE 40x40 Inch Neutral Abstract Wall Art – Beige and Cream Geometric Square Canvas Artwork for... | Check Latest Price |
| # | Preview | Product | |
|---|---|---|---|
| 1 |

|
Art3d 20 Pack Decorative 3D Wall Panels for Interior Wall Decor Living Room, 11.8"x11.8" Cover 19... | Check Latest Price |
Imagine a large, soft canvas painted in shades of gray, with layers of textured plaster and fabric glued in abstract patterns. The surface varies from rough patches to smooth, creating a tactile experience that invites touch. Light reflects differently across each layer, giving the piece a dynamic, almost living quality. It’s like a piece of the sky captured on your wall.
You can adapt this idea by choosing different monochrome shades to match your room’s palette. Combining materials like linen, burlap, or even faux leather enhances texture variety. For a more minimalist look, keep the textures subtle; for bold statements, use thick layers or mixed media elements. Seasonal tweaks might include adding metallic accents or changing surface finishes.
Start with a sturdy base like a stretched canvas or a wooden panel. Use modeling paste, textured gels, or thick paint to build layers. Incorporate materials such as fabric strips or textured paper, pressing them into the paste before it dries. Once dry, sand lightly for a cohesive look, or leave rough patches for added grit. Finish with a sealant to preserve the textures.
Personalize by adding your favorite shades of gray or black. Incorporate metallic foils or mica powders for a subtle shimmer. Experiment with different textures in specific areas to create focal points. You could also embed small objects or patterns that hold personal significance, making it uniquely yours.
This minimalist textured art proves that less is more. It suits modern, Scandinavian, or industrial interiors beautifully. With a few simple tools and materials, you can craft a piece that feels both refined and inviting. Ready to turn your wall into a statement of understated elegance?
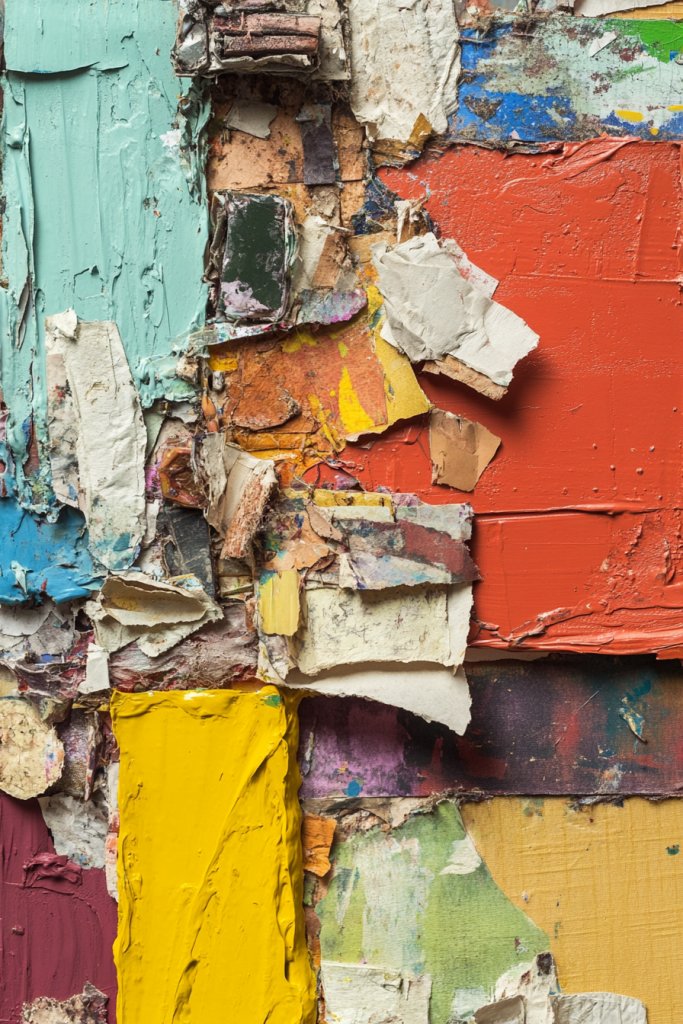
15. Upcycled Palette Knife and Collage Art
Feeling bored with traditional wall art? Upcycled palette knife and collage art breathe new life into your space with bold textures and eco-friendly vibes. It’s a fun way to showcase your creativity while repurposing old materials. Plus, it’s perfect for adding a raw, artsy touch to any room.
Recommended Products to replicate this idea
| # | Preview | Product | |
|---|---|---|---|
| 1 |

|
10PCS Palette Knife, Stainless Steel Painting Knife Set, Flexible Spatula Pallet Knife, Metal Artist... | Check Latest Price |
| # | Preview | Product | |
|---|---|---|---|
| 1 |

|
Esweny 200PCS Vintage Scrapbooking Supplies Kit for Journaling, Junk Journal Planners Aesthetic... | Check Latest Price |
Picture a vibrant wall piece with thick, sweeping strokes of acrylic paint applied with a palette knife. Intertwined with torn pages, fabric scraps, and bits of recycled paper, it creates a layered, multidimensional scene. The rough edges and textured surfaces invite viewers to explore the story behind each element. The colors pop against the rough texture, making the piece lively and energetic.
You can adapt this style by changing color schemes to match seasons or moods. Use vintage book pages for a nostalgic feel or bold, modern graphics for a contemporary look. Incorporate different collage materials like metallic foil, pressed flowers, or textured tapes to diversify textures. It’s also flexible for small or large surfaces—scale up or down based on your space.
Begin with a sturdy backing like plywood or a canvas panel. Apply thick layers of acrylic with a palette knife, creating dynamic strokes. Embed torn paper or fabric into the wet paint, pressing it gently to ensure adhesion. Layer additional paint and collage elements as desired. Seal the finished piece with a varnish to protect the textures and colors. Use a variety of tools to add different marks and textures.
Customize your collage with personal memorabilia or favorite color accents. Mix media like metallic paints or gloss varnishes for contrast. Play with different knife techniques to create varied textures. Add small decorative details like stitched lines or embedded beads for added depth. It’s your chance to turn recycled materials into a personalized masterpiece.
This approach proves that art can be both eco-conscious and expressive. It fits well in eclectic, boho, or industrial interiors. With some patience and a few supplies, you can craft a striking piece that’s full of personality. Your walls will thank you for the creative upgrade!
16. Framed Mixed Media Mini Art Panels
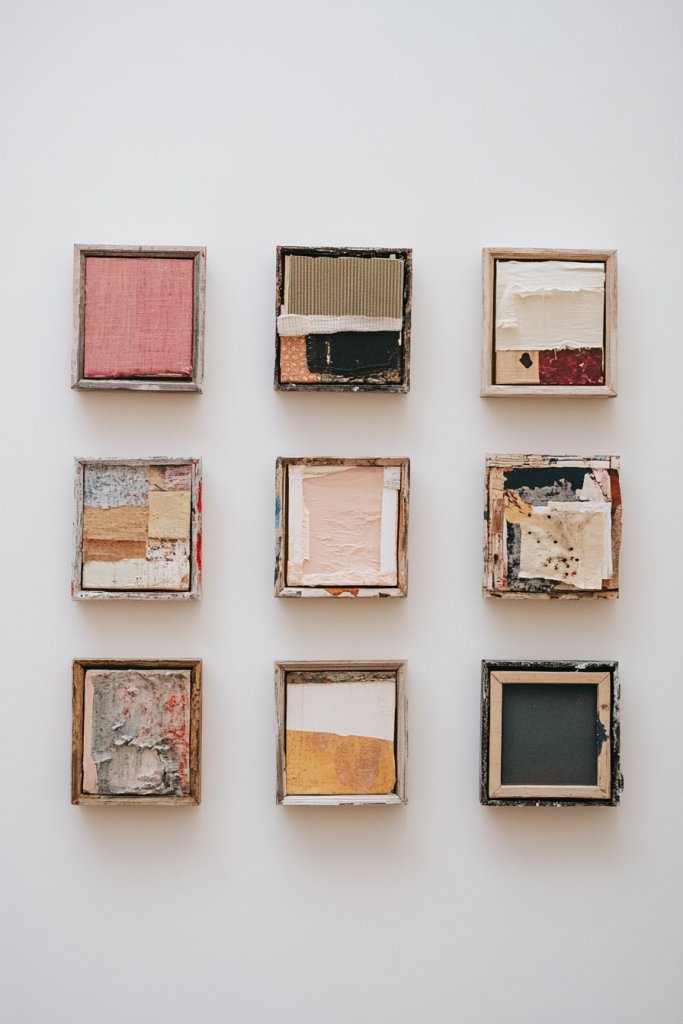
Looking for a way to add interest without overwhelming your wall space? Framed mini art panels offer a charming, modular approach to decorating. They’re perfect for creating a gallery feel that’s both cohesive and flexible. Plus, small-scale art is easier to switch out or update over time.
Recommended Products to replicate this idea
| # | Preview | Product | |
|---|---|---|---|
| 1 |

|
Outus 12 Pack Small Canvases for Painting Mini Canvas Boards Cotton Painting Panels for Christmas... | Check Latest Price |
| # | Preview | Product | |
|---|---|---|---|
| 1 |

|
187Pcs Professional All-in-One Art Painting Kit with Aluminum & Beech Wood Easel, 96 Acrylic,... | Check Latest Price |
Imagine a series of tiny panels, each with a mix of painted backgrounds, textured elements, and small collage pieces. Framed in sleek or vintage styles, they hang side-by-side, forming an eye-catching mosaic. The textures vary from glossy varnishes to matte paint, while the collage adds layers of dimension. The overall effect is dynamic yet balanced, inviting viewers to explore each piece individually.
You can customize these mini panels to match your decor style—minimalist, boho, or eclectic. Use different color schemes or themes within each panel for variety. Switch frames between metallic, wood, or painted finishes to reflect your taste. For seasonal updates, replace a few panels or swap out the collage elements.
Start with small canvases or wooden panels, then add your mixed media elements: paint, textured gels, fabric, or paper. Use a variety of brushes and palette knives for different effects. Arrange your panels on a flat surface before framing, to ensure visual harmony. Mount the finished pieces with nails or adhesive strips, spacing them evenly. Consider using frames with depth to contain textured layers.
Personalize by choosing themes that resonate—travel, nature, abstract. Incorporate symbols or colors meaningful to you. Mix media like gold leaf accents or glossy varnish for shine. Play with asymmetrical arrangements for a more contemporary vibe. These small pieces can easily evolve as your style changes.
Mini art panels allow you to create a versatile, ever-evolving gallery wall. They’re a fun project that doesn’t require huge commitment or expensive materials. With each addition, your space feels more curated and personal. Ready to design your own mini masterpiece collection?
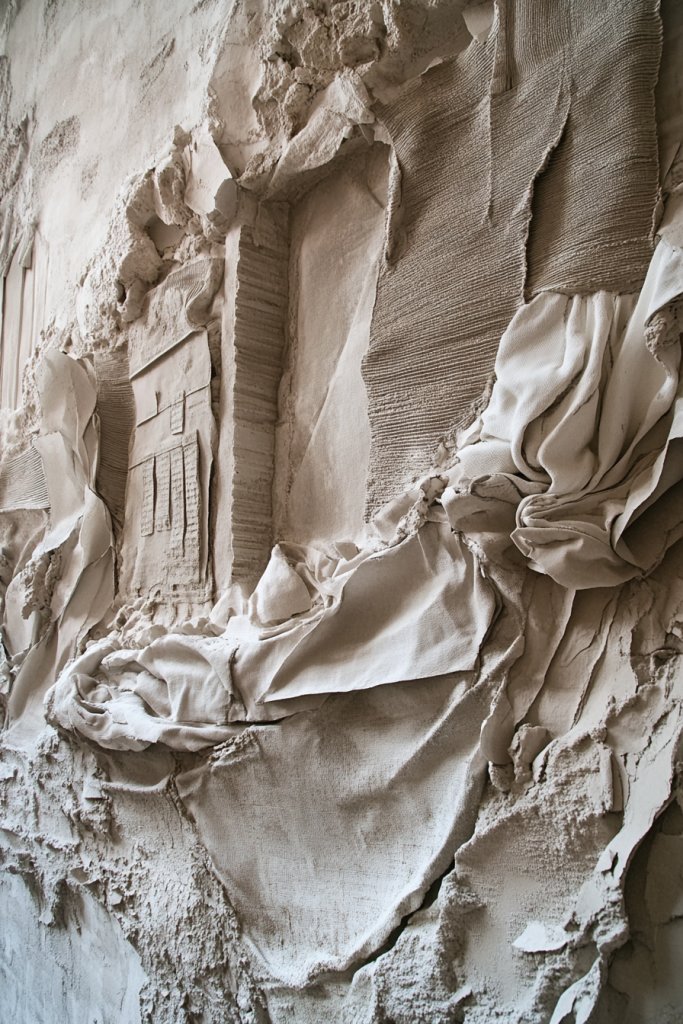
17. 3D Papier-Mâché and Painted Elements
Want to transform your plain wall into a playful, sculptural display? Papier-mâché combined with painted elements delivers a tactile, three-dimensional effect that’s impossible to ignore. It’s an affordable way to add fun and texture, especially if you love DIY projects. Plus, it’s a great way to unleash your inner artist.
Recommended Products to replicate this idea
| # | Preview | Product | |
|---|---|---|---|
| 1 |
|
décopatch Papier Mache Animal kit, Brown, 3.5x19x13.5cm | Check Latest Price |
| # | Preview | Product | |
|---|---|---|---|
| 1 |
|
Apple Barrel, Vibrant Spectrum Collection Acrylic Craft Paint, PROMOABIII, 2 fl oz each, 16 assorted... | Check Latest Price |
Picture a wall adorned with abstract papier-mâché forms, painted in vibrant hues or metallic finishes. The shapes extend outward, creating shadows and depth that change with the light. Some pieces might resemble organic forms, while others are geometric. The painted surfaces contrast with the textured, sculptural parts, making each element pop. It’s as if your wall becomes a piece of modern sculpture.
Adjust the size and shape of your papier-mâché pieces to suit your space—large, bold forms for a statement wall or smaller, intricate shapes for more subtlety. Choose color schemes that complement your decor—bright and playful or sleek and monochrome. Incorporate metallic paints for a luxe touch or matte finishes for a more subdued effect. Mix with other textured elements for variety.
Create your forms using balloons, cardboard molds, or wireframes, then cover with layers of papier-mâché, allowing each layer to dry thoroughly. Sand rough edges for a smooth finish if desired. Paint the forms with acrylics or spray paints after they dry. Attach the sculptures to the wall using strong adhesive or hooks, ensuring stability. Finish with a clear coat to protect the paint and texture.
Customize by choosing colors that match your vibe—vivid, pastel, or metallic. Add embellishments like glitter, beads, or textured gels for extra flair. Vary the sizes and shapes for an organic, dynamic look. Incorporate personal symbols or motifs to make it more meaningful. It’s your chance to turn a simple craft into a statement piece.
This approach shows that you don’t need to be a sculptor to create impressive wall art. It’s a playful project that combines creativity and craftsmanship. Once finished, you’ll have a tactile, colorful display that sparks conversations. Ready to craft your own sculptural wall masterpiece?
18. Minimalist Textured Art with Neutral Tones
Looking for a calming, stylish way to upgrade your walls? Minimalist textured art in neutral tones offers a sophisticated solution that pairs well with any decor. It’s perfect for creating a serene atmosphere without overwhelming the senses. Plus, it’s a low-maintenance way to keep your space looking polished.
Recommended Products to replicate this idea
| # | Preview | Product | |
|---|---|---|---|
| 1 |

|
Large 3D Textured Framed Boho Neutral Abstract Wall Art for Living Room, 3 Piece Modern Artwork for... | Check Latest Price |
| # | Preview | Product | |
|---|---|---|---|
| 1 |
|
Milnnie 9×9" Modern Luxury David Frame Art Decor – Minimalist Resin Bust in Black and White... | Check Latest Price |
Visualize a large, off-white canvas with subtle ridges and indentations created by thick paint or textured gels. The surface plays with light and shadow, adding depth to a monochrome palette. Incorporate soft materials like linen or woven fabrics glued onto the surface for tactile interest. The overall look is understated yet rich with detail, inviting viewers to explore the textures visually and physically.
Choose different shades of beige, gray, or taupe to match seasons or moods. Incorporate different textures such as rough plaster, smooth matte paint, or soft textiles. For a warmer look, add hints of blush or cream; for cooler tones, go with gray or slate. You can also experiment with layering textures, stacking materials or creating subtle patterns for more visual complexity.
Start with a sturdy backing like a wooden panel or stretched canvas. Use modeling pastes, textured gels, or thick acrylic paints to create surface variations. Attach textiles or woven strips with strong adhesive, pressing them into the surface to form ridges. Finish by sealing the surface with matte varnish or wax for a refined look. Keep the textures subtle to maintain the minimalist aesthetic.
Add a personal touch using different shades within the neutral spectrum—layer light and dark tones for depth. Incorporate natural elements like cork or sand-infused paint for extra texture. Keep the design simple—sometimes less truly is more. Display a series or a single bold piece for maximum impact.
This minimalist textured art proves that simplicity can be striking. It works beautifully in modern, Scandinavian, or contemporary interiors. With a few basic materials and patience, you can produce a refined, calming focal point. Your walls will radiate understated elegance.
19. Interactive Mixed Media Wall Art with Hidden Elements
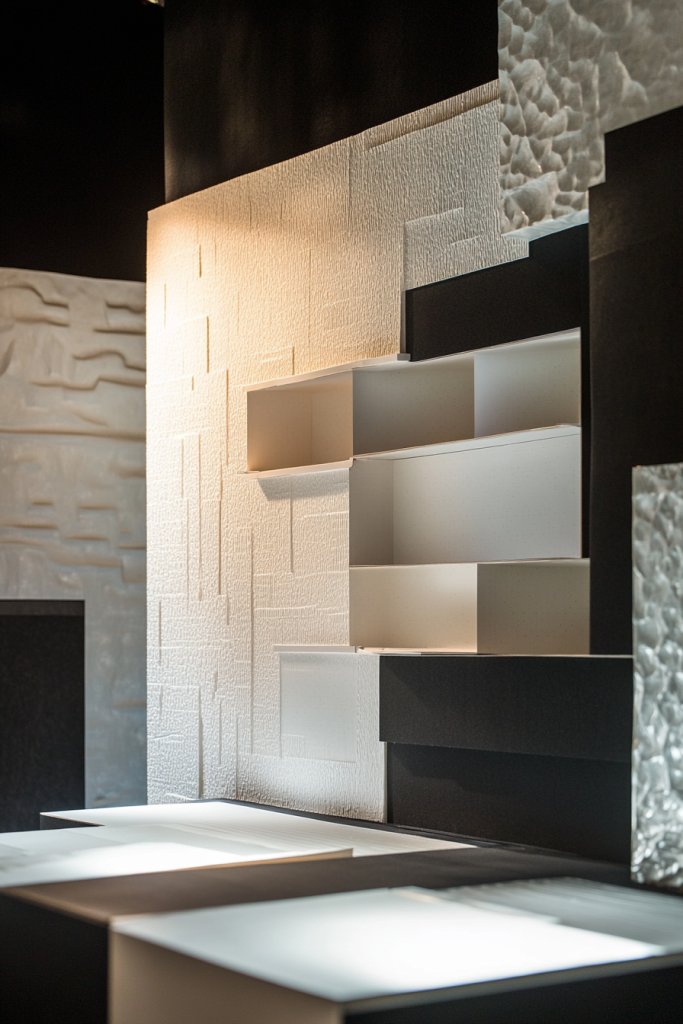
Tired of static wall decor? Interactive mixed media art introduces movement and discovery into your space. Hidden elements like sliding panels, pockets, or layered components turn your wall into an engaging experience. It’s perfect for those who love a bit of playfulness and surprise. Plus, it’s a unique way to showcase your creativity.
Recommended Products to replicate this idea
| # | Preview | Product | |
|---|---|---|---|
| 1 |

|
Adjustable Picture Hanger for Acoustic Panels and Slat Walls, No-Drill Tool-Free Hanging System for... | Check Latest Price |
| # | Preview | Product | |
|---|---|---|---|
| 1 |

|
Califortree 8x8 Shadow Box Frame with Soft Linen Back - Push Pins Included, Memory Box Display Case... | Check Latest Price |
Picture a piece with sections that slide open to reveal secret compartments or layered layers that can be rearranged. Imagine textured surfaces with hidden pockets filled with meaningful keepsakes or changeable art elements. The layered approach creates depth, while movable parts invite interaction. The overall effect is dynamic, constantly changing with your mood or season.
This concept adapts well to various styles—industrial with metal sliding panels, boho with fabric layers, or sleek modern with hidden LED accents. Use different materials like wood, fabric, or acrylic to suit your taste. The layers can be simple or complex, depending on how much interaction you want. Regular updates keep the display fresh and engaging.
Design your layered elements with lightweight materials like foam board, fabric, or thin plywood. Attach sliding or hinged parts using hinges, tracks, or Velcro strips. Incorporate hidden pockets or compartments to store small items or changeable inserts. Mount the entire assembly securely on your wall using appropriate anchors. Ensure each movable part glides smoothly and is safe to operate.
Personalize by customizing the hidden contents—family photos, quotes, or seasonal motifs. Use different textures and colors to enhance the interactive experience. Incorporate small LED lights or tactile features for added engagement. Regularly update the hidden elements to keep the display fresh and meaningful.
This innovative approach encourages creativity and personalization. It makes your wall a conversation starter and a reflection of your personality. With some basic carpentry and design skills, you can craft a playful, functional art piece. Ready to turn your wall into a fun, interactive showcase?
Conclusion
Exploring these diverse mixed media wall art ideas opens up a world of creative possibilities for your home decor. From layered textures to eclectic material combinations, each idea invites you to personalize your space with artistic flair. Don’t hesitate to experiment and make these ideas your own—your walls are the perfect canvas for your artistic journey. Get inspired and start transforming your walls today!