I have been, or can be if you click on a link and make a purchase, compensated via a cash payment, gift, or something else of value for writing this post. As an Amazon Associate, I earn from qualifying purchases. Please read my full Affiliate Disclosure for more information.
Your living room is more than just a space to relax—it’s a canvas to express your unique style and personality. Living Room Wall Decor Ideas have surged in popularity because they allow homeowners to instantly elevate their space, adding personality, warmth, and visual interest.
In this article, you’ll find a diverse range of decorating ideas that cater to every taste, from bold art installations to subtle gallery walls. Whether you prefer modern minimalism or eclectic charm, these ideas will inspire you to create a stunning focal point that truly reflects your style and transforms your living room into a welcoming haven.
1. Gallery Wall of Framed Photographs and Art Prints for Personal Charm
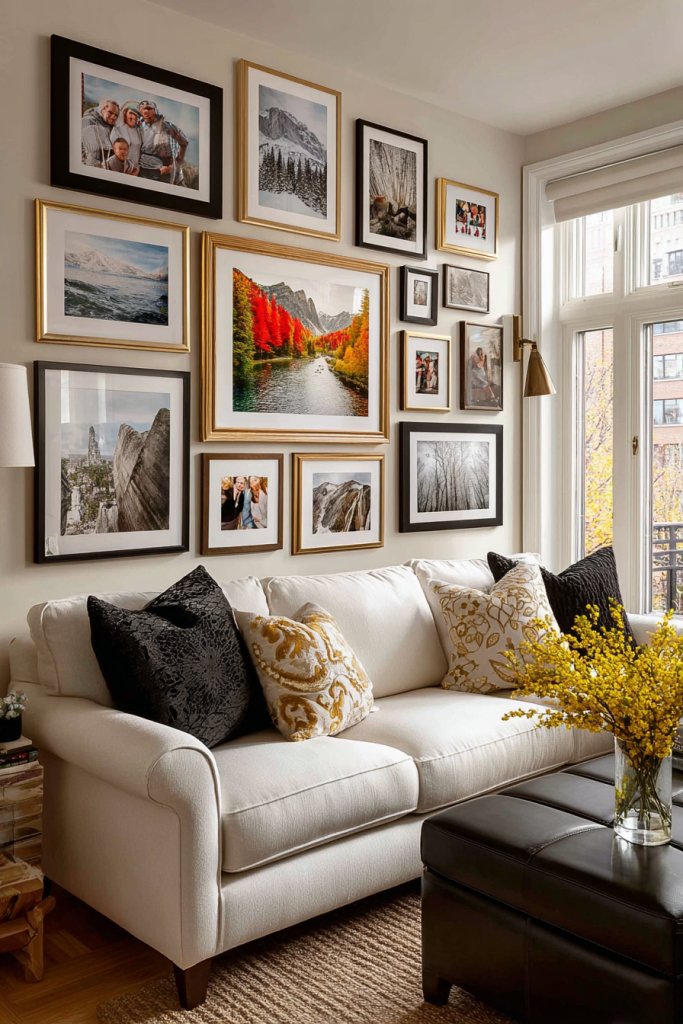
Ever feel like your living room lacks personality and that blank wall is just begging for some life? A gallery wall of framed photographs and art prints can transform a dull space into a reflection of your personality. It’s your chance to showcase memories, favorite artworks, or quirky prints that make your space truly yours. Plus, it adds visual interest that sparks conversations.
Recommended Products to replicate this idea
| # | Preview | Product | |
|---|---|---|---|
| 1 |

|
Vittanly 15 Pack Picture Frames Collage Wall Decor for Mounting or Tabletop Display, Gallery Frame... | Check Latest Price |
| # | Preview | Product | |
|---|---|---|---|
| 1 |

|
16 PCS Framed Eclectic Wall Art Decor, Modern Maximalist Home Gallery Wall Frame Set Prints for... | Check Latest Price |
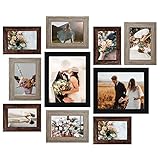
Imagine a wall filled with a mix of black-and-white family photos, vibrant art prints, and candid snapshots. The frames vary in size and style, creating an eclectic yet cohesive look. The contrast of textures and colors draws your eye and invites viewers to explore each piece. This layered display creates a personal gallery that feels warm, inviting, and uniquely you.
You can keep it simple with matching frames for a sleek look or go for a more curated, eclectic vibe by mixing frame styles and sizes. Seasonal updates, like swapping out holiday photos or adding new art prints, keep the display fresh. In small rooms, narrow frames save space, while large frames work well in spacious living areas. Play with thematic groupings for a cohesive story.
Start by selecting your favorite photos, prints, or artwork. Choose frames that complement your decor style—minimalist metal for modern, ornate wood for traditional. Lay out the arrangement on the floor first, experimenting with spacing and order. Use a level and measuring tape to keep everything straight during hanging. Incorporate different frame styles for visual interest, and consider using command strips for easy updates.
Add personal touches like handwritten labels, small decorative tags, or even washi tape accents for a DIY feel. Mix in small mementos like tickets or fabric swatches behind glass for extra texture. Create themed sections, such as travel, family, or art, for a more organized look. Incorporate seasonal colors or motifs to reflect your mood or holidays.
A gallery wall not only personalizes your space but also boosts your confidence in your decorating skills. It’s a flexible, forgiving project that evolves with your life. Don’t be afraid to experiment with different arrangements—your perfect wall is just a few frames away. This simple upgrade makes your living room feel more inviting and uniquely yours.
2. Minimalist Floating Shelves with Decorative Items
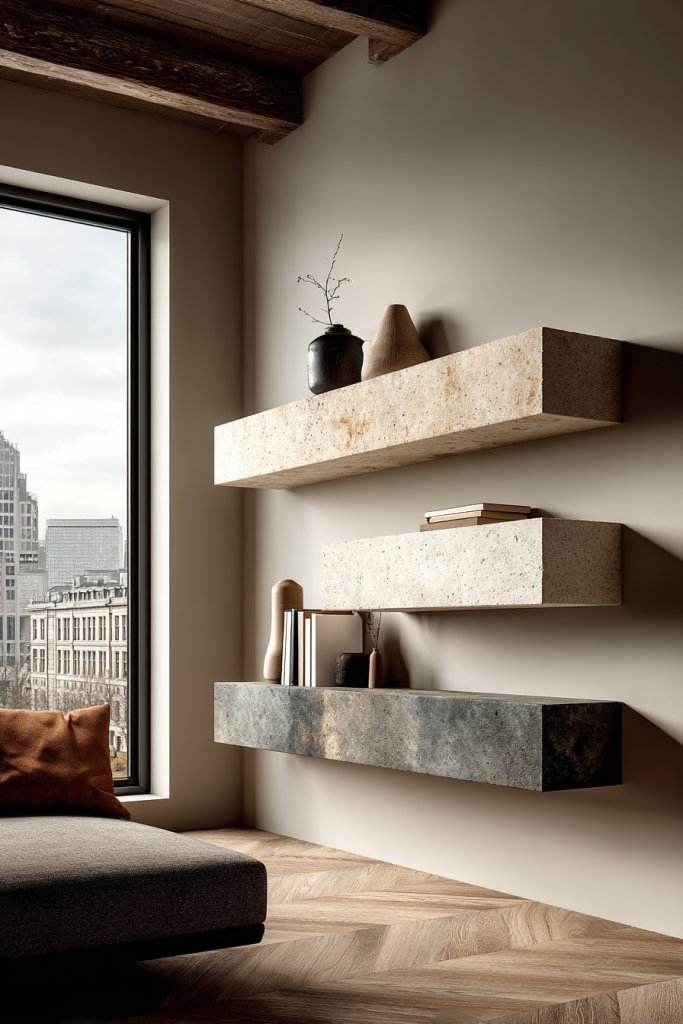
Tired of cluttered surfaces but still crave visual interest on your walls? Minimalist floating shelves offer a sleek solution to display your favorite items without overwhelming the space. They add a modern touch while keeping things simple and organized. Plus, they free up surface areas for other uses.
Recommended Products to replicate this idea
| # | Preview | Product | |
|---|---|---|---|
| 1 |

|
Boswillon Floating Shelves Wall Mounted Set of 2, Modern Black Wall Shelves for Storage with Lip,... | Check Latest Price |
| # | Preview | Product | |
|---|---|---|---|
| 1 |

|
Modern Ceramic Vase Set, Neutral Colors, Decorative Vases for Home Decor, 4 Piece Collection (Beige) | Check Latest Price |
Visualize a set of slim, matte-finished shelves mounted high on a wall, holding a few carefully chosen decorative objects—a ceramic bowl, a stack of art books, or a sculptural piece. The shelves cast subtle shadows that add depth, and the open design creates a sense of lightness. The overall effect is clean, uncluttered, and stylish.
Arrange the shelves in a linear, staggered, or grid pattern to suit your style. For a boho vibe, layer textiles or small plants (avoiding restricted categories) on the shelves; for a modern look, stick to monochrome or metallic accents. Adjust shelf height and spacing based on your ceiling height and wall size. Seasonal changes can be made by swapping decorative objects.
Choose sturdy, wall-mountable shelves made from wood, metal, or MDF that match your decor. Use a level and measuring tape to ensure even placement, especially for multiple shelves. Secure shelves into wall studs or use appropriate anchors for drywall. Decorate with a mix of functional pieces like clocks or small storage baskets and aesthetic objects that reflect your taste. Keep clutter minimal for maximum impact.
Personalize by adding meaningful items—vintage finds, souvenirs, or artistic objects—without overcrowding. Incorporate textures such as rough ceramics or smooth metals to create visual contrast. Use color-coordinated items to keep the look cohesive or intentionally mix hues for an eclectic feel. Add LED strip lighting underneath for a subtle glow.
Floating shelves are a minimalist’s dream—easy to update and highly adaptable. They help you curate your space with intention and style, proving that less really is more. With a little planning, they turn blank walls into eye-catching displays that reflect your personality and taste. It’s a small change with a big impact on your room’s vibe.
3. Large Statement Mirror to Brighten and Expand the Space
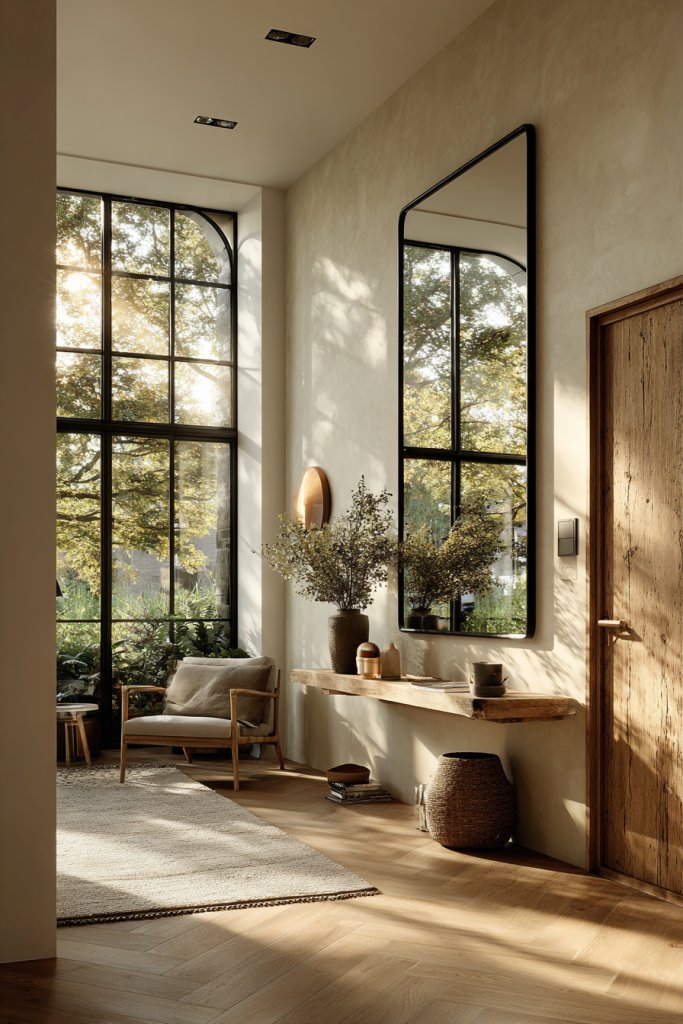
Does your living room feel cramped or dim? A large statement mirror can instantly brighten the space and create the illusion of a bigger room. It’s a simple trick that adds depth and reflects light, making your living area feel more open and inviting. Plus, it doubles as a striking focal point.
Recommended Products to replicate this idea
| # | Preview | Product | |
|---|---|---|---|
| 1 |

|
OGCAU Full Length Mirror, 76"x34" Arched-Top, Hanging or Leaning, Floor Length Full Body Standing... | Check Latest Price |
| # | Preview | Product | |
|---|---|---|---|
| 1 |

|
DUMOS Arched Full Length Mirror with Stand 64"x21" Floor Standing Aluminum Frame for Bedroom Body... | Check Latest Price |
Picture a grand mirror with an ornate frame or a sleek modern design hanging above your sofa or fireplace. It reflects natural light streaming through the windows, bouncing around the room and illuminating every corner. The mirror’s size dominates the wall, adding a sense of grandeur and elegance. The reflection creates a dynamic visual effect that makes the space seem larger.
Choose a mirror with a frame that complements your decor—rustic wood, metallic gold, or minimalist black. For smaller spaces, lean a large mirror against the wall for a casual vibe; in larger rooms, mount it for a polished look. Use multiple mirrors in a grid for a gallery effect, or pair with artwork for an eclectic style. Seasonal pillow or throw color updates can enhance the room’s mood.
Decide on the placement—above a sofa, entryway, or across from a window. Use a level and measuring tape to ensure perfect alignment. Secure the mirror into wall studs or use appropriate anchors to support its weight. Consider adding hooks or a decorative frame to enhance its visual appeal. Regular cleaning keeps the reflection clear and bright.
Frame the mirror with decorative molding, or hang smaller mirrors around it for a more dynamic look. Add string lights or sconces nearby for ambient lighting that highlights the mirror’s frame. Incorporate complementary decor like a console table or a textured wall behind it. Use the reflection to showcase other decorative elements of your living room.
A statement mirror isn’t just about aesthetics; it’s about transforming your space into a brighter, more open environment. It encourages you to experiment with scale and placement, boosting your confidence in decorating. Once hung, it’s a powerful, versatile piece that elevates your entire living room aesthetic. Go big, reflect boldly, and enjoy the spaciousness.
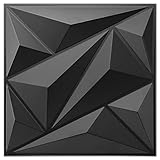
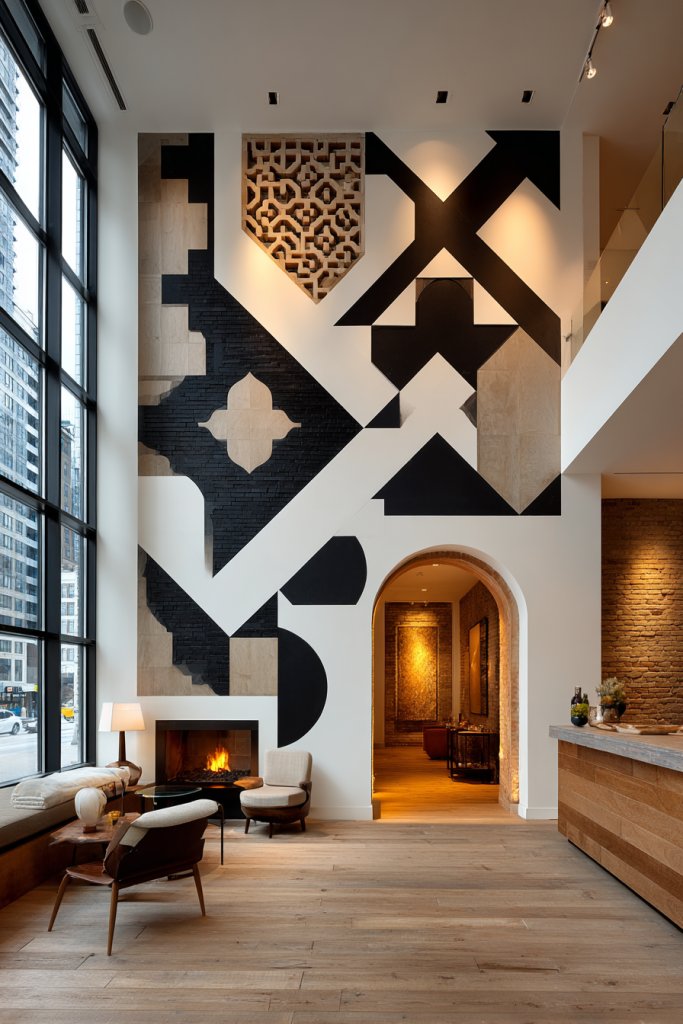
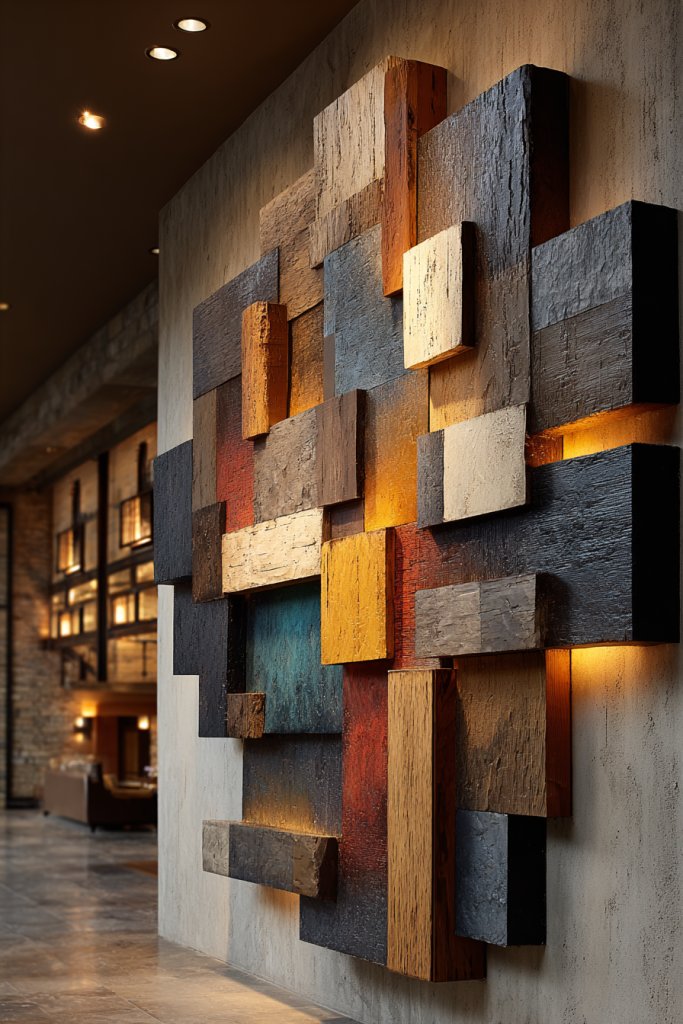
4. Textured Wall Panels for Modern Elegance
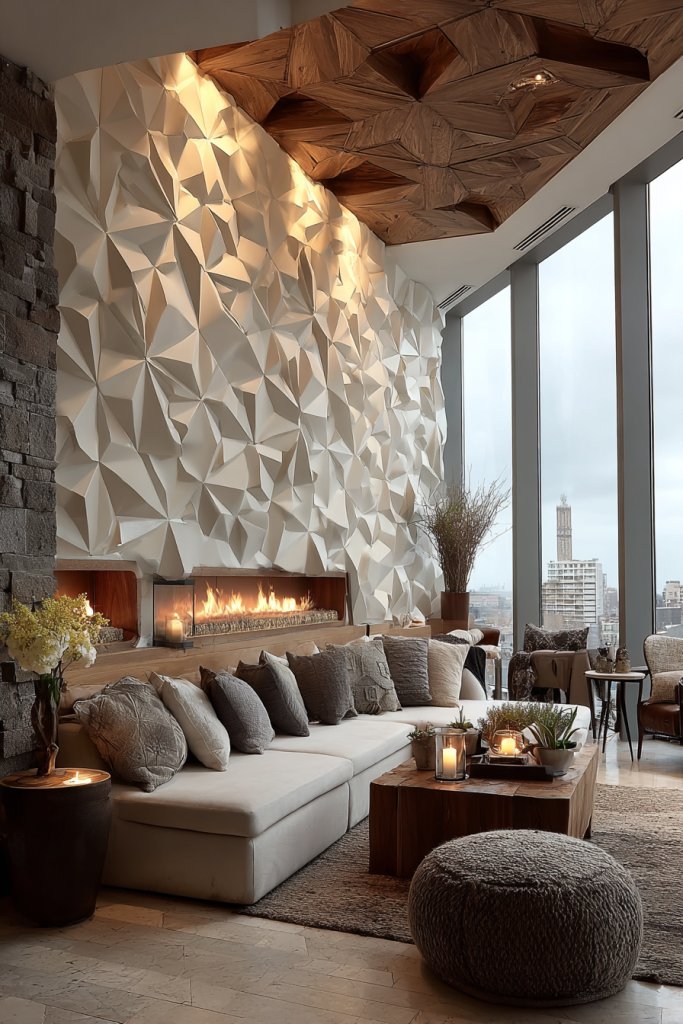
Is your wall feeling flat and uninspired? Textured wall panels bring tactile dimension and a touch of modern sophistication to any living room. They break the monotony of plain walls and add visual interest that can make your entire space feel more refined. Plus, they’re a great way to introduce contemporary style.
Recommended Products to replicate this idea
| # | Preview | Product | |
|---|---|---|---|
| 1 |
|
Art3dwallpanels 33 Pack 3D Wall Panel Diamond for Interior Wall Décor, PVC Flower Textured Wall... | Check Latest Price |
| # | Preview | Product | |
|---|---|---|---|
| 1 |

|
Art3d 102-Piece Peel and Stick Wall Tile for Kitchen Backsplash, Bathroom, Fireplace, 3in. × 6in.... | Check Latest Price |
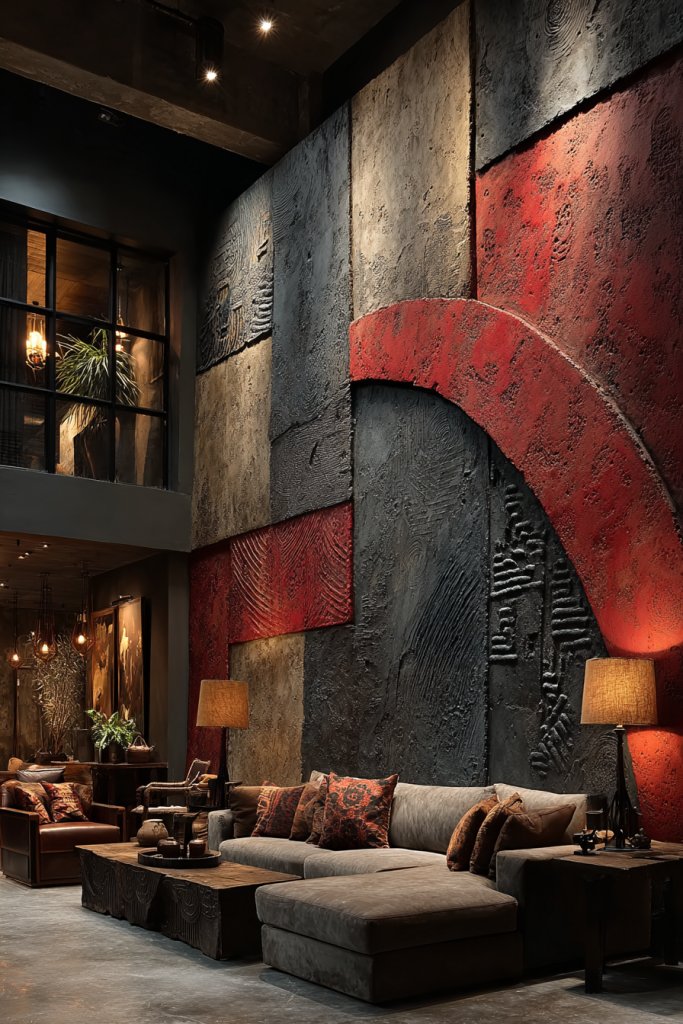
Imagine panels with geometric patterns, wave-like ripples, or subtle embossed designs. In neutral tones or bold colors, these panels create a layered visual effect that catches the light differently throughout the day. The textured surface invites touch and curiosity, transforming your wall into a piece of art. The interplay of shadows and light amplifies the room’s depth.
Select panels that match your decor—sleek materials like MDF or PVC for modern minimalism, or textured wood for warmth. Arrange panels in a continuous pattern or break it up with painted sections for contrast. Use them on feature walls or incorporated into larger design schemes. Seasonal accents can be added with decorative textiles or paint touches.
Start by measuring the wall area and selecting panels that fit your space. Prepare the surface by cleaning and smoothing it out. Use adhesive or mechanical fasteners suitable for your panel material. Carefully align each panel to ensure a seamless look, and consider installing lighting fixtures to highlight the textures. Seal or paint for added durability.
Combine textured panels with other design elements like metallic trims or LED lighting for a customized look. Paint some panels in accent colors or add metallic foil for extra flair. Mix different textures—smooth, embossed, matte—to create a layered aesthetic. Incorporate artwork or decorative elements around the panels for a complete look.
Textured wall panels elevate your space from ordinary to extraordinary with minimal effort. They showcase your sense of style and willingness to experiment. Once installed, they become a conversation starter and a reflection of your modern taste. Embrace the tactile beauty and enjoy a more dynamic, sophisticated living room.
5. Geometric Wall Decals for a Trendy Touch
Looking to add a trendy, eye-catching element to your living room without a big commitment? Geometric wall decals offer a quick, affordable way to infuse modern pattern and visual intrigue. They’re perfect for those who want a stylish update without the hassle of paint or wallpaper. Plus, they’re removable when you’re ready for a change.
Recommended Products to replicate this idea
| # | Preview | Product | |
|---|---|---|---|
| 1 |

|
CharmFlo 200 Pcs Geometric Wall Stickers (Irregular Lines/Triangles/Dots) - 10 Sheet Waterproof... | Check Latest Price |
| # | Preview | Product | |
|---|---|---|---|
| 1 |

|
576pcs Colorful Terrazzo Pattern Wall Decal Stickers Irregular Stones Modern Geometric Abstract Wall... | Check Latest Price |
Visualize a wall decorated with metallic gold triangles, matte black hexagons, or colorful abstract shapes. These decals create a layered pattern that transforms a blank wall into a dynamic artwork. The geometric shapes play with perspective and depth, adding a sense of movement and energy. They catch light and cast subtle shadows, enriching the room’s visual texture.
Mix and match decals in different sizes, colors, and finishes for a personalized look. Apply them in a symmetrical pattern for a sleek, modern vibe or scatter them randomly for an eclectic feel. Seasonal color schemes or metallic finishes can align with your decor updates. Use decals on empty walls, behind furniture, or as part of a gallery wall.
Clean the wall thoroughly before application. Peel and stick decals carefully, starting from one corner and smoothing as you go to avoid bubbles. Use a credit card or smoothing tool to press out air pockets. For more intricate designs, follow the decal’s guide or create custom shapes. Remove or reposition decals easily without damaging the paint.
Combine decals with painted accents or layered textiles nearby for a richer effect. Use metallic or holographic finishes to catch the eye. Create a focal point by placing decals behind a piece of furniture or in a corner. Change colors seasonally or for special occasions to keep the look fresh.
Geometric decals are a playful way to keep your decor current and exciting. They allow you to experiment with patterns and colors without permanence. Once applied, they boost your confidence in DIY home upgrades. It’s a fun, budget-friendly way to elevate your living room’s style and personality.
6. Tapestry or Fabric Wall Hangings for Cozy Vibes
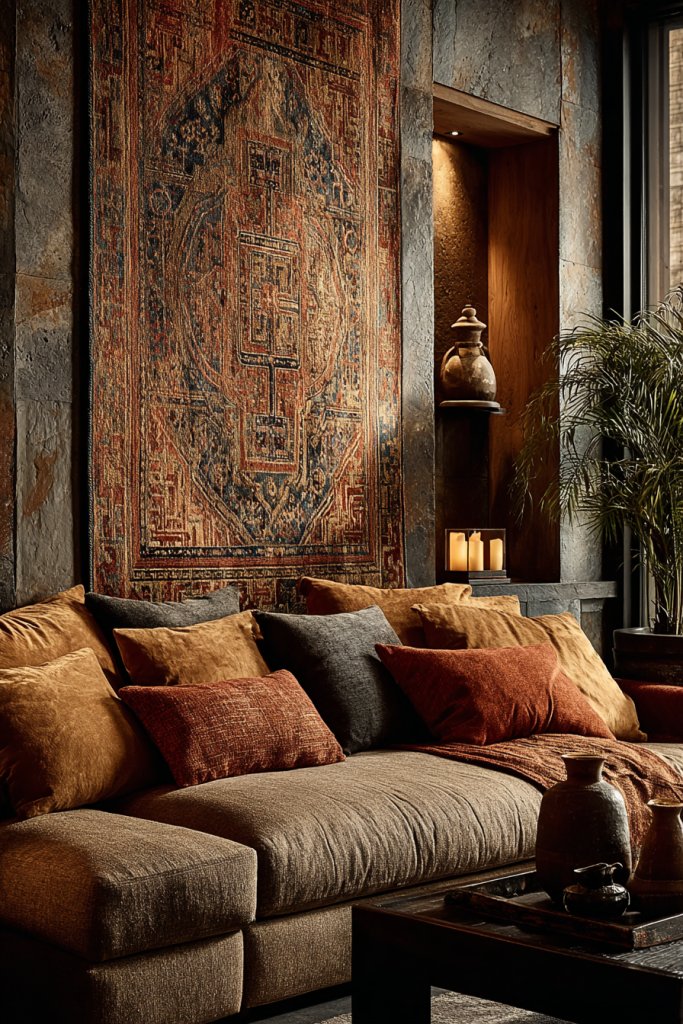
Ever wish your living room felt warmer and more inviting? Tapestries and fabric wall hangings bring softness, color, and texture that instantly cozy up a space. They’re a simple way to add personality and a layered look without clutter or fuss. Plus, they’re super easy to swap out for different moods.
Recommended Products to replicate this idea
| # | Preview | Product | |
|---|---|---|---|
| 1 |

|
Apdidl Boho Tapestry Wall Hanging for Bedroom Aesthetic, Bohemian Vintage 70s Rainbow Sun Tapestries... | Check Latest Price |
| # | Preview | Product | |
|---|---|---|---|
| 1 |

|
Flber Macrame Wall Hanging Macrame Wall Decor Large-Scale Tie-Dye Tapestry Living Home Room Wall... | Check Latest Price |
Picture a large, boho-inspired tapestry with intricate patterns hanging behind your sofa. The fabric’s rich textures and vibrant colors soften the room’s edges, creating a relaxed, welcoming vibe. Light filters through the textile, casting gentle shadows and adding a sense of depth. The tactile surface invites touch and adds visual warmth to your decor.
Choose from lightweight cotton, woven wool, or textured jute depending on your style preference. Hang a single large piece or layer multiple smaller textiles for a curated look. Seasonal fabrics like velvet or quilted textiles can reflect the weather or your mood. Incorporate fringes, tassels, or embroidery for extra flair.
Secure the fabric with a simple rod, clip rings, or adhesive hooks—no nails needed. Ensure the wall surface is clean and dry for a secure hold. For larger pieces, use lightweight tension rods or install a dedicated textile rod for a neat display. Keep the fabric taut but not stretched to avoid sagging. Regularly dust and spot-clean for longevity.
Add decorative trims, embroidery, or painted details to customize your tapestry. Play with color schemes that match or contrast your furniture. Layer textiles with different textures or patterns to create a gallery of softness. Incorporate elements like fairy lights or LED strips behind for a subtle glow.
Textile wall hangings instantly create a cozy, lived-in feel that’s hard to beat. They allow you to experiment with color and texture easily. Once you see how much warmth they add, you’ll feel confident exploring other tactile decor ideas. It’s your chance to turn a plain wall into a cozy sanctuary.
7. DIY Macramé Wall Art for Boho Chic Flair
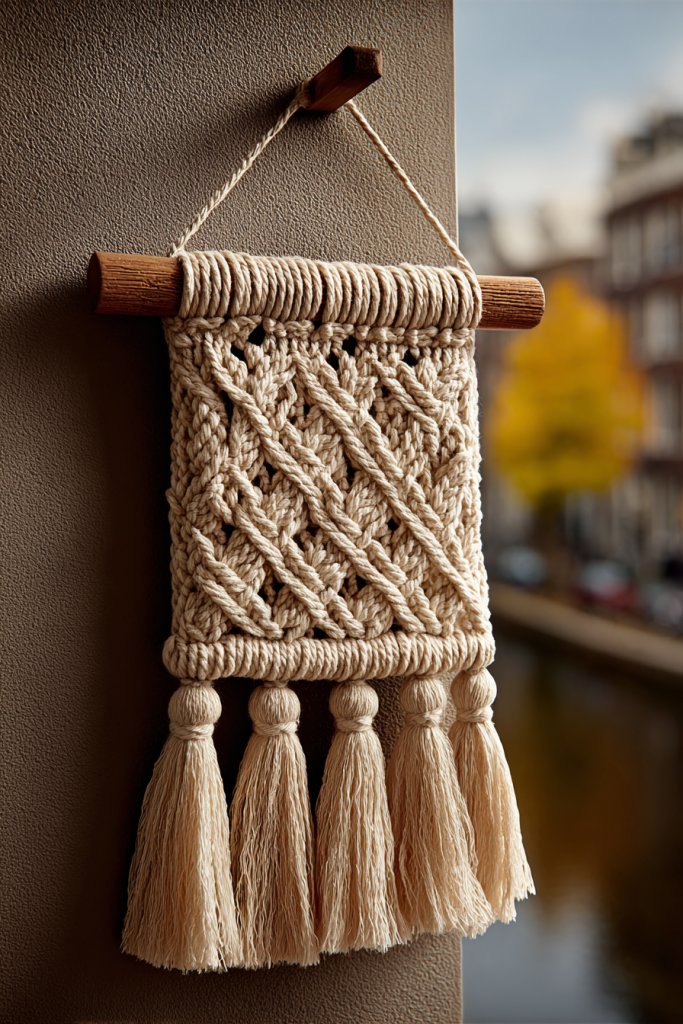
Craving a relaxed, boho vibe in your living room? DIY macramé wall art offers a handcrafted touch that’s both stylish and personalized. It’s a fun way to add texture and visual interest without spending a fortune. Plus, it’s a rewarding project that adds character to your walls.
Recommended Products to replicate this idea
| # | Preview | Product | |
|---|---|---|---|
| 1 |

|
NOANTA Natural Macrame Cord 3mm x 109Yards, Beige Macrame Rope, Cotton Cord for Wall Hanging, Plant... | Check Latest Price |
| # | Preview | Product | |
|---|---|---|---|
| 1 |

|
Yaliuliu 10PCS Dowel Rods Wood Dowels, 1/2 x 12 Inch Round Wooden Sticks for Craft, Macrame Dowel,... | Check Latest Price |
Imagine a large, intricate macramé piece with knotted patterns, fringes, and tassels hanging in a corner. The textured cords create a soft, tactile surface that contrasts beautifully with smooth walls. The knots and fringes catch the light, casting subtle shadows that deepen the visual appeal. It adds a cozy, artistic vibe that’s unmistakably boho.
Choose natural fibers like cotton, jute, or hemp for an authentic look. Play with different knotting techniques, from simple to complex, to suit your skill level. Hang the piece alone or combine several smaller macramé hangings for a gallery effect. Incorporate beads or shells for extra personal touches. Use neutral tones or soft pastel hues to match your color scheme.
Gather your supplies: cords, a wooden dowel or ring, scissors, and optional decorative elements. Follow tutorial patterns or create your own design. Use a ruler to measure lengths and keep knots even. Secure the top with a strong knot around the dowel or ring, then work your way down with different knotting styles. Finish with fringes or tassels at the bottom.
Add beads, charms, or painted accents to customize your piece. Mix textures by combining different fiber types. Frame or mount your macramé on a contrasting background for a layered look. Change the arrangement seasonally or rotate different pieces for variety.
Creating your own macramé art boosts your confidence in crafting and decorating. It’s a versatile piece that complements various styles from boho to coastal chic. Once you master basic knots, the possibilities are endless. Enjoy your handmade wall art as a testament to your creativity and style.
8. Vertical Garden Wall Using Faux or Real Greenery Alternatives

Thinking of bringing a touch of nature indoors but worried about maintenance? A vertical garden wall with faux or real greenery offers a lush, vibrant focal point without the fuss. It’s an easy way to add freshness and life to your living room, even if you’re not a plant person. Plus, it creates an instant calming effect.
Recommended Products to replicate this idea
| # | Preview | Product | |
|---|---|---|---|
| 1 |

|
AOKIE 10"X10" Artificial Grass Wall, 24Pcs Boxwood Hedge Wall Panels UV-Anti Grass Backdrop Wall... | Check Latest Price |
| # | Preview | Product | |
|---|---|---|---|
| 1 |

|
Make Good PlantPod Luxe - Self-Watering Wall Planters (Set of 6) - Easy to Water and Install -... | Check Latest Price |
Picture a grid of small, lush faux succulents or real trailing plants in decorative pots or wall-mounted planters. The greenery cascades down, filling the wall with shades of green and textures—from spiky cacti to soft ferns. The arrangement adds depth and a natural vibe that contrasts beautifully with modern or rustic decor. The plants’ shadows and movement enhance the visual interest.
Use modular planters or pockets for flexibility, allowing you to swap plants or update the look. Incorporate different types of foliage—succulents, herbs, or trailing varieties—depending on your light and climate. Seasonal changes can be made by switching out plants or adding decorative elements like stones or driftwood. Keep the design simple or layered for more impact.
Select a sturdy wall space with adequate light—natural or artificial—for real plants. Use wall-mounted planters, pockets, or grid systems designed for vertical gardens. For real greenery, choose low-maintenance varieties and install an irrigation system if needed. Faux plants require minimal upkeep—just dust or wipe periodically. Secure each component firmly to prevent accidents.
Mix different textures and shades of green for a dynamic look. Add decorative stones, fairy lights, or small sculptures around the plants for added personality. Create themed sections, like a herb garden or tropical paradise. Regularly prune or rotate plants to keep the garden lively and engaging.
A green wall elevates your decor and boosts your mood—science says so! It’s a bold statement that shows off your personal style and love for nature. Even with faux plants, you get the aesthetic benefits with no upkeep. It’s a win-win that makes your living room feel fresh and inviting.
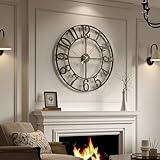
9. Artistic Wall Clocks as Functional Decor Pieces
Is your living room missing a central piece that’s both practical and stylish? An artistic wall clock can be the perfect solution. It adds a functional element while serving as a statement decor piece. No more boring clock faces—think bold designs, unique shapes, and eye-catching colors that elevate your space.
Recommended Products to replicate this idea
| # | Preview | Product | |
|---|---|---|---|
| 1 |

|
bakbrand Wall Clock 12 Inch Non-Ticking Silent Modern Simple Style Round Decor Clock Gold... | Check Latest Price |
| # | Preview | Product | |
|---|---|---|---|
| 1 |
|
Cuspin Large Wall Clock for Living Room Decor, 30 Inch Decorative Wall Clocks Battery-Operated... | Check Latest Price |
Visualize a large, modern clock with an oversized face and metallic accents hanging above your sofa. Its abstract design and vibrant colors turn time-telling into an art form. The clock’s hands move gracefully, catching the light and adding subtle motion to the wall. It’s a striking focal point that doubles as a piece of modern art.
Choose clocks that match your decor style—sleek and minimal for contemporary spaces, vintage-inspired for rustic charm, or playful for eclectic vibes. Mount a clock with a bold frame or a minimalist design depending on your wall size. For a layered look, pair the clock with other wall decor, but keep it balanced. Seasonal themes can be introduced with color or pattern changes.
Select a sturdy wall and mark the placement with a pencil. Use a level to ensure perfect alignment. Secure the clock with appropriate hooks or mounting hardware—consider weight and wall type. For larger clocks, wall anchors may be necessary. Keep the clock’s power source accessible, and consider a clean, uncluttered background for maximum impact.
Personalize by choosing clock faces that reflect your personality—quirky, elegant, or artistic. Incorporate surrounding decor like shelves, artwork, or decorative plaques for a curated look. Change the clock’s position or style seasonally for freshness. Use complementary colors or materials to tie the clock into your overall room theme.
An artistic clock is more than just a timekeeper; it’s a conversation starter. It shows off your sense of style and creativity. Once you pick a design that speaks to you, you’ll feel proud of your eye for unique decor. It’s a simple upgrade that adds both function and flair to your living room.
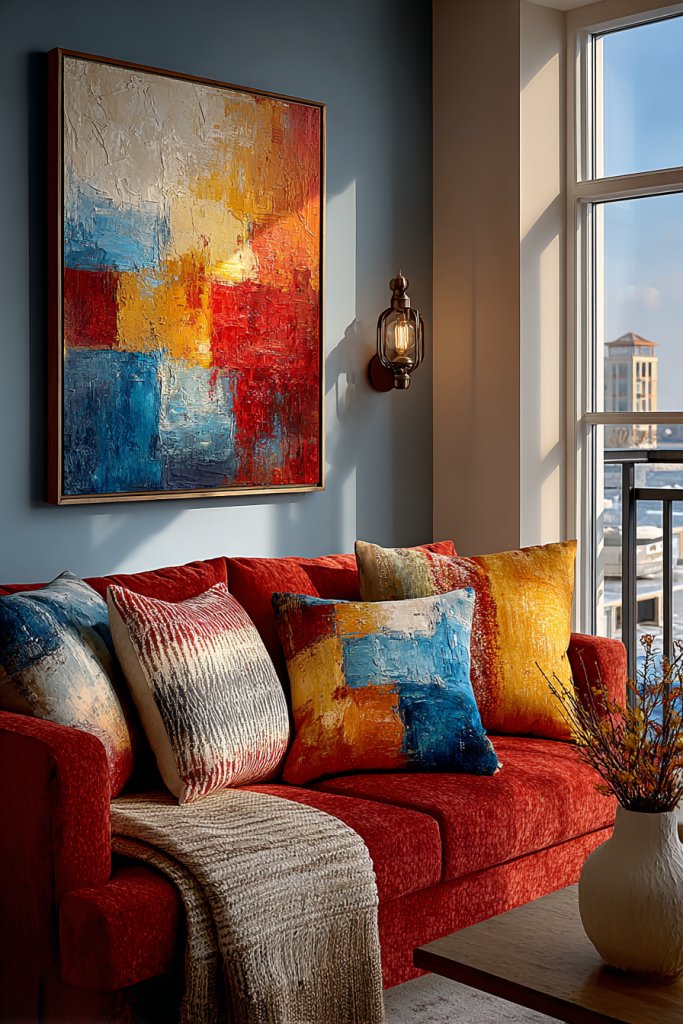
10. Abstract Canvas Art for Colorful Sophistication

Looking to add a splash of color and a touch of sophistication? Abstract canvas art can do both, transforming a plain wall into a bold statement. It’s a versatile way to introduce artistic energy and elevate your decor without overwhelming the space. Plus, it’s an easy way to personalize your living room.
Recommended Products to replicate this idea
| # | Preview | Product | |
|---|---|---|---|
| 1 |

|
Large Framed Black and White Neutral Abstract Wall Art for Living Room, 3 Piece Boho Canvas Prints... | Check Latest Price |
| # | Preview | Product | |
|---|---|---|---|
| 1 |

|
Large Framed Abstract Wall Art, Colorful Vertical Canvas Print Paintings, Picasso-Inspired Mid... | Check Latest Price |
Picture a large canvas with sweeping brushstrokes in vibrant reds, blues, and golds. The abstract forms evoke emotion and curiosity, inviting viewers to interpret the shapes. The textured paint adds depth, catching light differently throughout the day. The artwork anchors the room and ties together various decor elements with its dynamic presence.
Choose artwork with a color palette that complements your furniture and textiles. Opt for bold, graphic designs or softer, blended hues depending on your style. Frame the canvas with a sleek border or leave it unframed for a modern vibe. Hang multiple pieces in a gallery wall or single large piece for maximum impact. Seasonal color updates keep the look fresh.
Pick a wall with enough space for the artwork to breathe. Use a level and tape to mark the ideal placement. Secure the canvas with appropriate hooks or wire hanging systems. Consider installing lighting above or beside the piece to highlight textures and colors. Maintain a clean, uncluttered background to let the art stand out. Regularly dust with a soft cloth.
Customize your abstract art by choosing colors that reflect your mood or season. Mix different sizes or orientations for a more eclectic gallery feel. Incorporate other abstract pieces or textured decor to create a cohesive art zone. Rotate your artwork periodically to keep the space lively and engaging.
Abstract canvas art empowers you to embrace bold choices and artistic expression. It’s a reflection of your personality and taste, showing confidence in your decor decisions. Once you see how it transforms the room, you’ll be inspired to explore more creative ideas. Your living room will feel more vibrant and sophisticated.
11. Layered Mirrors and Art for Dynamic Visual Interest
Want to create a wall that feels alive and ever-changing? Layered mirrors and art can add depth and visual intrigue to your living room. This approach makes the space appear larger and more dynamic without cluttering the wall. It’s a creative way to mix function and style in a single focal point.
Recommended Products to replicate this idea
| # | Preview | Product | |
|---|---|---|---|
| 1 |

|
LuxenHome 3 Pieces Black Metal Rectangular Wall Mirror Set Large Vanity Mirror for Bedroom, Black... | Check Latest Price |
| # | Preview | Product | |
|---|---|---|---|
| 1 |
|
Vittanly 15 Pack Picture Frames Collage Wall Decor for Mounting or Tabletop Display, Gallery Frame... | Check Latest Price |
Envision a wall featuring small, decorative mirrors in various shapes—round, oval, and geometric—interspersed with framed art prints. The mirrors reflect light and surrounding decor, creating movement and brightness. The layered arrangement adds complexity and sophistication, making the wall look curated and lively. Shadows and reflections dance across the surface, enriching the space.
Combine different mirror styles and frame types—metal, wood, or acrylic—for eclectic appeal. Mix sizes and orientations to create a textured, layered look. For a cohesive effect, stick to a color theme or finish. Arrange mirrors and art in asymmetrical compositions for a modern, artistic vibe. Seasonal updates can be made by swapping out art or adding decorative elements.
Start by measuring your wall and sketching your desired layout. Hang smaller mirrors and art at varying heights for visual interest. Use appropriate hooks, nails, or adhesive strips, ensuring they can support the weight. Focus on creating balance by spacing items evenly and aligning edges. Incorporate lighting or accent pieces to highlight the layers. Keep the arrangement flexible for future updates.
Personalize by choosing mirrors with decorative frames or adding motifs like floral or geometric decals around the mirrors. Incorporate small decorative shelves or LED backlighting for extra depth. Use a mix of reflective and matte finishes to add contrast. Rotate pieces seasonally or for special occasions to keep the wall fresh.
Layered mirror and art arrangements showcase your creativity and eye for detail. They encourage experimentation with scale, shape, and balance. Once you see the lively effect, you’ll gain confidence in mixing decor styles. This versatile approach keeps your wall interesting and adaptable over time.
12. Retro or Vintage Signage for a Nostalgic Appeal
Craving a touch of nostalgia to give your living room character? Retro or vintage signage offers a fun, personality-packed way to decorate your walls. Whether it’s an old-fashioned neon sign or a weathered wooden plaque, these pieces evoke memories and add charm. They’re perfect for creating a cozy, inviting vibe.
Recommended Products to replicate this idea
| # | Preview | Product | |
|---|---|---|---|
| 1 |

|
Blue Beer Neon Sign,Dimmable PBR Neon Light Sign,Led Neon Signs for Man Cave,USB Powered Neon Wall... | Check Latest Price |
| # | Preview | Product | |
|---|---|---|---|
| 1 |

|
Rustic Wooden Wall Plaque Welcome Come On In Custom Wood Sign Front Door SpaWall Art Sign Wood Wall... | Check Latest Price |
Imagine a large metal sign with faded paint and rust accents hanging above your sofa. The vintage typography and nostalgic motifs instantly set a relaxed, retro tone. The signage’s worn finish adds texture and authenticity, making it feel like a treasured find. The imperfect edges and weathered surface tell stories of the past, enriching your decor.
Choose signs with bold lettering, bright colors, or rustic finishes to match your style—industrial, shabby chic, or coastal. Mix vintage signs with modern decor for an eclectic contrast. Hang a single statement piece or create a gallery of different signs for an impactful display. Seasonal or holiday-themed signs can be swapped in for variety.
Select a prominent wall and determine the ideal placement. Use appropriate hooks or mounting hardware—especially for heavier metal signs. Clean the surface beforehand for secure adhesion. Level the signs carefully and space them for visual balance. Consider framing or mounting on a backing board for added durability. Periodic cleaning preserves their nostalgic charm.
Personalize signs with custom messages or graphics—DIY painted or stenciled signs work well. Combine with other vintage accessories like old clocks or antique frames. Use lighting, such as Edison bulbs or wall sconces, to enhance the nostalgic feel. Incorporate your favorite colors or themes to reflect your personality.
Vintage signage adds instant personality and a story to your space. They show off your taste for history and unique finds. With a little effort, you can curate a collection that feels authentic and personal. It’s a nostalgic touch that makes your living room truly special.
13. DIY Photo Collage with Mixed Frame Sizes and Styles

Want a heartfelt, eclectic focal point that celebrates your memories? A DIY photo collage with mixed frame sizes and styles offers a personal, artistic way to decorate. It transforms your favorite moments into a piece of wall art that’s full of character. Plus, it’s a project that’s easy to customize.
Recommended Products to replicate this idea
| # | Preview | Product | |
|---|---|---|---|
| 1 |
|
LUCKYLIFE Picture Frames Collage Wall Decor 10-Pack, Gallery Wall Frame Set with 8x10 5x7 4x6 Frames... | Check Latest Price |
| # | Preview | Product | |
|---|---|---|---|
| 1 |

|
Go Hang It! Pro, All-in-One Picture Hanging Kit - Picture Leveling and Hanging Tool - Hang... | Check Latest Price |
Visualize a wall filled with a variety of frames—some vintage, some sleek modern—holding candid family shots, travel snaps, and artistic prints. The mismatched frames create a lively, layered effect that draws the eye. The collage’s asymmetry adds energy and personality, making it feel spontaneous yet curated. The diverse textures and colors add visual richness.
Mix frame materials—wood, metal, acrylic—and shapes—square, oval, rustic. Arrange the frames in a grid, a freeform cluster, or a symmetrical pattern based on your style. Incorporate different matting and border colors for contrast. Update the collage periodically with new photos or themed collections. Use washi tape or decorative clips for an easy swap.
Lay out your frames on the floor first, experimenting with arrangements until you find the perfect composition. Measure and mark the wall, then hang each piece with appropriate hooks or nails. Use a level for straight lines and consistent spacing. Consider adding a backing board or large frame for a unified look. Keep the display balanced and visually engaging.
Add small decorative elements like tags, quotes, or stickers to enhance the personal touch. Use themed backgrounds or mats to tie the collection together. Incorporate seasonal or travel memorabilia for variety. Rotate photos seasonally or for special occasions to keep the collage fresh and reflective of your current life.
A photo collage reveals your story and personality while showcasing your creativity. It’s a low-cost, high-impact decor idea that you can update endlessly. As you curate and arrange, your confidence in DIY decorating grows. It’s a heartfelt way to turn everyday memories into a beautiful wall feature.
14. Wire Grid or Pegboard Wall for Flexible Display Options
Looking for a versatile, changeable wall display? A wire grid or pegboard wall gives you the flexibility to showcase art, photos, or small decor items without permanence. It’s perfect for creative minds who love switching things up. Plus, it keeps your living room looking fresh and organized.
Recommended Products to replicate this idea
| # | Preview | Product | |
|---|---|---|---|
| 1 |

|
Wall Photo Grid Shelf, Wall Hanging Ins Art Display Grid Panel for Decor & Storage, Metal Wire... | Check Latest Price |
| # | Preview | Product | |
|---|---|---|---|
| 1 |
|
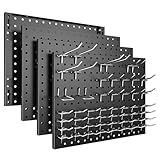
Spampur Peg Board, 4 Pack Metal Pegboard Panels with 50 Hooks, Black Pegboards Wall Organizer, Heavy... | Check Latest Price |
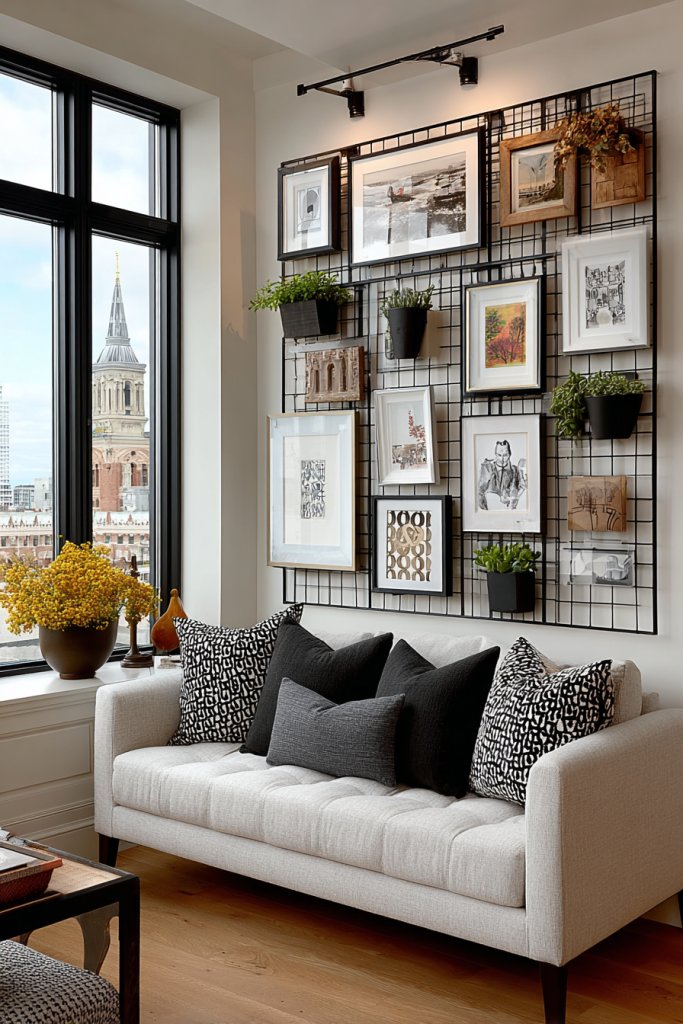
Imagine a black wire grid mounted on the wall, with clips holding different items—notes, photos, decorative objects. The grid’s open structure allows light and air to flow, preventing clutter. Use hooks and shelves to create layers of visual interest and functional storage. The modular setup adapts easily to your changing style and needs.
Customize your grid with colorful clips, baskets, or small shelves. Use a single large grid for a bold statement or multiple smaller ones in a pattern. Incorporate different hanging elements like tags, mini corkboards, or artwork. Arrange items symmetrically or randomly for diverse effects. Seasonal updates are simple—just swap or add items.
Select a sturdy, wall-mounted grid or pegboard suitable for your wall type. Use a level to ensure proper alignment. Secure with appropriate anchors or screws. Attach hooks, clips, and small shelves to hold your display items. Organize items by theme or color for coherence. Regularly refresh the display with new photos, notes, or decor.
Personalize with painted or colored hooks and clips. Incorporate small decorative elements like tags or mini planters (avoiding restricted categories). Use cork-backed sections for added texture. Rotate items seasonally or as your mood changes. Add LED lights for an extra touch of style.
A wire grid or pegboard encourages creativity and helps you stay organized. It’s a customizable, dynamic feature that grows with your style. The ease of switching items boosts your confidence in DIY and decorating. It’s a fun, functional way to keep your living room fresh and engaging.
15. Artistic Wall Stickers or Murals for Instant Impact

Want to make a bold statement instantly? Artistic wall stickers or murals can transform a boring wall into a captivating focal point. They’re quick to install and remove, making them perfect for renters or those who love changing their decor. It’s your shortcut to a dramatic, personalized look.
Recommended Products to replicate this idea
| # | Preview | Product | |
|---|---|---|---|
| 1 |

|
MUDECOR Wall Mural Vintage Forest Scene Sepia-Toned Scenic with Trees Removable Self-Adhesive... | Check Latest Price |
| # | Preview | Product | |
|---|---|---|---|
| 1 |

|
Chinco 4 Pcs Black Half Mandala Wall Decal Boho Mandala Sticker Lotus Flower Vinyl Wall Decals... | Check Latest Price |
Picture a scenic mural of a forest or cityscape covering an entire wall, or large, colorful decals with abstract shapes. The vibrant imagery sets the tone for your entire living room. The stickers or murals add depth and dimension, creating a sense of space and energy. They can evoke tranquility or excitement, depending on your choice.
Select murals that match your color palette and style—modern, boho, or eclectic. Use decals with metallic or matte finishes for different effects. Combine with painted accents or textured decor for a layered look. Position murals behind key furniture pieces to anchor the room. Seasonal or thematic decals keep things fresh.
Clean the wall thoroughly before application. Carefully peel and stick the decals or murals, smoothing out air bubbles with a squeegee or credit card. Use masking tape to align patterns or create borders. For murals, consider professional wallpaper adhesive for larger projects. Regularly clean with a soft cloth to maintain their appearance.
Customize decals with your own designs or quotes for extra personality. Incorporate LED backlighting or spotlights to highlight murals or decals at night. Layer decals with textured paint or fabric for a richer effect. Change or add new decals seasonally to reflect your mood or decor themes.
Wall decals and murals are a fun, impactful way to express your style quickly. They encourage experimentation with bold patterns and colors. Once installed, they boost your confidence in creating statement walls. Enjoy transforming your living room into a personalized art space with minimal effort.
16. Framed Fabric or Textile Art for Unique Texture
Looking to add a tactile, one-of-a-kind touch to your living room? Framed fabric or textile art offers a creative way to introduce texture and color. It’s a departure from traditional art, giving your walls a soft, inviting vibe. Plus, it’s a fantastic way to showcase your love for textiles and craftsmanship.
Recommended Products to replicate this idea
| # | Preview | Product | |
|---|---|---|---|
| 1 |

|
InSimSea Gold Framed 3D Textured Wall Art, Vintage Peacock Bird Pattern Wall Decor, Middle Eastern... | Check Latest Price |
| # | Preview | Product | |
|---|---|---|---|
| 1 |

|
MCS Canvas Float Frames 16x20 Frame, Natural Woodgrain for Finished Canvases, Vertical & Horizontal... | Check Latest Price |
Imagine a framed embroidered piece with intricate floral patterns or a colorful woven textile. The fabric’s textures and patterns add depth, contrasting beautifully with smooth painted walls. The frame enhances the textile’s craftsmanship, turning it into a piece of decorative art. Light plays off the surface, highlighting stitches and textures that invite touch.
Use different textiles—embroidered, woven, appliqué—to match your decor style. Frame individual pieces or create a gallery wall of textiles with various patterns and colors. Mix textures like silk, linen, or burlap for a layered, tactile effect. Change the textiles seasonally or for special occasions to keep the look fresh.
Select textiles that are lightweight and easy to frame—use stretcher bars or fabric frames. Mount the fabric onto a backing board or stretch it over a frame for a clean finish. Secure with staples or glue, then frame with a simple or ornate border. Hang using picture hooks, ensuring the weight is supported. Keep textiles clean and dust-free.
Add decorative stitching, beading, or painting to personalize your textile art. Incorporate motifs or colors that reflect your style or season. Mix with other art forms—like photos or paintings—for a curated look. Rotate pieces or change mats to refresh your decor periodically.
Framed textile art celebrates craftsmanship and adds a cozy, textured element to your space. It encourages you to explore different textiles and creative techniques. As you build your collection, your confidence in DIY decor and styling grows. It’s a unique, tactile way to elevate your living room.
17. Modern Metal Wall Sculptures for Artistic Edge

Craving a bold, contemporary statement in your living room? Modern metal wall sculptures inject an artistic edge that’s both striking and sophisticated. They add dimension, movement, and a touch of industrial chic. It’s a perfect way to elevate the room’s aesthetic with a single, eye-catching piece.
Recommended Products to replicate this idea
| # | Preview | Product | |
|---|---|---|---|
| 1 |

|
Rajukit Modern Geometric Abstract Metal Wall Art – Black Wall Decor – Large Metal Wall Sculpture... | Check Latest Price |
| # | Preview | Product | |
|---|---|---|---|
| 1 |

|
Bdor Decorative Metal Panels, Set of 4, 10.98" x 15.94", Modern Geometric Design, Black Metal Wall... | Check Latest Price |
Imagine a large, abstract metal sculpture with flowing curves or sharp geometric forms mounted on a plain wall. The reflective surfaces and layered metal create shadows and highlights that change with the light. The sculpture’s dynamic shape adds energy and depth, transforming a blank wall into a piece of modern art. Its tactile metal surface invites curiosity.
Choose sculptures with polished, matte, or textured finishes to match your decor. Pair with minimalist furniture for a sleek look or with rustic elements for contrast. Mount multiple pieces in a series or a single large sculpture for impact. Incorporate lighting to accentuate the textures and forms. Seasonal or thematic pieces can add variety.
Select a secure mounting method, such as wall anchors or hooks designed for heavy objects. Measure and mark the placement carefully for balanced positioning. Use a level for straight alignment. Consider installing additional lighting—such as wall washers or spotlights—to highlight the sculpture’s details. Regularly dust and inspect for stability.
Customize with painted accents or patinas to match your color scheme. Mix metals—copper, brass, steel—for visual interest. Pair with other modern decor, like glass or acrylic, to create a layered, artistic display. Rotate or add new pieces over time to keep the look fresh. Incorporate complementary wall colors to enhance the sculpture’s presence.
A metal wall sculpture adds a contemporary, artistic statement that boosts your confidence in bold decorating choices. It demonstrates your appreciation for craftsmanship and design. Once installed, it becomes a conversation starter and a signature piece. Enjoy the modern edge it brings to your living room’s aesthetic.
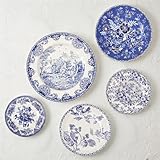
18. DIY Painted Mason Jars or Decorative Plates as Wall Accents

Want a budget-friendly, creative way to add color and charm? DIY painted mason jars or decorative plates can be transformed into unique wall accents. They’re easy to make, customizable, and bring a handcrafted touch to your space. Plus, they’re a fun project that adds personality and flair.
Recommended Products to replicate this idea
| # | Preview | Product | |
|---|---|---|---|
| 1 |

|
SPANLA 12 Pack Glass Mason Canning Jars With Regular Lids, Ideal for Jam, Jelly, Honey, Wedding... | Check Latest Price |
| # | Preview | Product | |
|---|---|---|---|
| 1 |
|
Yiyiring 5 Pcs Holland Wall Sculpture Plates for Wall Ceramic Vintage Blue and White Plates Set... | Check Latest Price |
Picture a cluster of painted mason jars with intricate patterns or soft pastel hues arranged in a creative pattern on your wall. Or imagine decorative plates with hand-painted designs, mounted in a grid or asymmetrical arrangement. The painted surfaces add color and texture, creating a lively, personalized display that catches the eye. The mix of shapes and finishes adds depth and interest.
Use different painting techniques—stenciling, freehand, or decoupage—to match your style. Incorporate metallic or matte finishes for variety. Arrange in a symmetrical grid, a casual cluster, or a vertical line for a dynamic look. Swap out or update the painted designs seasonally or for special occasions to keep it fresh. Combine with other DIY decor for a cohesive theme.
Start by cleaning and priming your jars or plates. Use acrylic or chalk paints for easy application. Decorate with brushes, stencils, or sponges. Seal with a clear protective coat for durability. Attach wall hooks or use velcro strips for easy hanging. Arrange the pieces on the wall before securing to ensure a balanced composition.
Add embellishments like metallic accents, glitter, or decals for extra detail. Incorporate seasonal motifs—holly, snowflakes, flowers—to reflect the time of year. Personalize with initials or meaningful symbols. Change the arrangement or design periodically for a fresh look.
DIY painted jars and plates showcase your creativity and add a whimsical, personal touch to your decor. They’re a cost-effective way to make a big impact with simple materials. As you experiment, your confidence in DIY projects and decorating grows. Enjoy crafting and displaying your own unique accents.
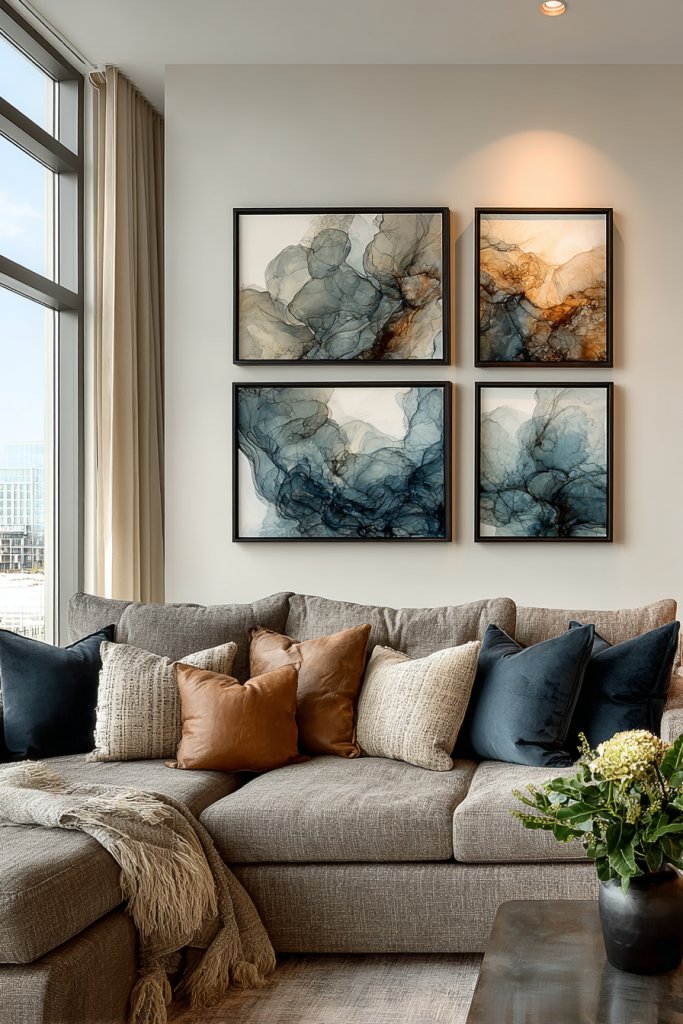
19. Modular Art Panels for Customizable Style

Wish your living room had a flexible, modern art focal point? Modular art panels let you customize your wall decor while offering endless possibilities. They’re perfect for creating a large, impactful statement that can be rearranged or expanded over time. It’s an adaptable solution for evolving tastes.
Recommended Products to replicate this idea
| # | Preview | Product | |
|---|---|---|---|
| 1 |

|
ARPEOTCY Household decor Acoustic Art Wall Panels,Reduce Noise for Room (Home, Office &... | Check Latest Price |
| # | Preview | Product | |
|---|---|---|---|
| 1 |

|
Horizon Group USA Painting Panel Canvas Boards, 8" x 10", Pack of 12, Multicolor | Check Latest Price |
Imagine a set of four or six panels arranged in a grid or pattern, each with abstract shapes or textured finishes. The separate pieces come together to form a cohesive artwork, but can also be shifted for different layouts. The varied textures and finishes create depth and movement, making the wall dynamic and engaging. It’s like a puzzle that turns into art.
Choose panels with finishes—metal, wood, canvas, or textured composites—that match your decor style. Arrange the panels in symmetrical, asymmetrical, or freeform layouts. Mix different sizes and orientations for a more eclectic look. Seasonal color schemes or themes can be incorporated by swapping panels or adding new ones. Expand the setup as your collection grows.
Measure your wall area and plan your layout. Mount each panel securely with appropriate hardware—hooks, brackets, or mounting strips. Use a level and tape to keep everything aligned. Consider lighting options to highlight textures and finishes. Organize the panels to ensure a balanced, harmonious composition. Regularly update by replacing or rearranging panels.
Customize panels with personal artwork, textured finishes, or painted details. Incorporate themes—geometric, organic, or abstract—that reflect your style. Add decorative elements like metallic accents or LED backlighting for extra flair. Rotate panels seasonally or for events to keep the display lively and relevant.
Modular art panels demonstrate your ability to create a large, sophisticated art piece that evolves with your taste. They empower you to experiment with layout and texture without a long-term commitment. Once you see your personalized arrangement, your confidence in DIY wall decor will soar. It’s a creative, adaptable way to showcase your style.
20. String Lights or Lighted Art for Ambiance and Style

Want to add warmth and cozy ambiance without cluttering your walls? String lights or lighted art pieces create a magical glow that instantly transforms the mood of your living room. They’re perfect for setting a relaxed, inviting tone for evenings or special occasions. Plus, they add a subtle decorative element that’s both functional and beautiful.
Recommended Products to replicate this idea
| # | Preview | Product | |
|---|---|---|---|
| 1 |

|
DAYBETTER LED Strip Lights 130ft Lights Strip for Bedroom, Desk, Indoor Room Bedroom Brithday Gifts... | Check Latest Price |
| # | Preview | Product | |
|---|---|---|---|
| 1 |

|
Artiluxy LED Canvas Wall Art, Cabin Lake House Wall Decor with Built-In LED,Battery Operated & Auto... | Check Latest Price |
Picture delicate string lights draped across a feature wall, casting a soft, warm glow. Or imagine a wall-mounted art piece with integrated LED lighting that highlights textures or colors. The gentle illumination creates depth and intimacy, making the space feel more welcoming. The lights’ twinkle or glow enhances the room’s atmosphere, perfect for unwinding or entertaining.
Use fairy lights, Edison bulbs, or LED strips to suit your style—vintage, modern, or whimsical. Drape the lights in organic shapes, geometric patterns, or around specific decor elements. Lighted art pieces can be framed prints with backlit panels or illuminated sculptures. Change lighting colors or intensity based on mood or season.
String lights are easy to install with hooks, clips, or adhesive strips—no damage required. For lighted art, secure wiring and power sources discreetly to avoid clutter. Position lights to highlight focal points or architectural features. Use dimmers or remote controls for easy adjustments. Keep wiring tidy and out of sight for a polished look.
Sync lights with music or set timers for automation. Incorporate decorative elements like paper lanterns or soft fabric shades. Use color-changing LEDs to match your decor or mood. Combine with other lighting layers—floor lamps, sconces—for a layered, cozy effect. Rotate lighted art pieces seasonally or for special events.
Lights and illuminated art boost your confidence in creating ambiance with simple tools. They allow you to experiment with color and placement effortlessly. Once you see your space glow, you’ll be inspired to explore more lighting options. It’s a quick, impactful upgrade that makes your living room feel warm and stylish.
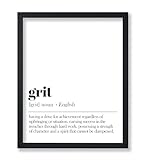
21. Inspirational Quote Wall in Stylish Typography

Looking for a motivational boost or a daily reminder of your values? An inspirational quote wall in stylish typography can turn a blank space into a source of positivity. It’s a simple, impactful way to personalize your living room and uplift your mood every day. Plus, it’s a chance to showcase your favorite fonts and design skills.
Recommended Products to replicate this idea
| # | Preview | Product | |
|---|---|---|---|
| 1 |

|
Zonon 5 Sheets Vinyl Wall Quotes Stickers Inspirational Quotes Decals Peel and Stick Motivational... | Check Latest Price |
| # | Preview | Product | |
|---|---|---|---|
| 1 |
|
Poster Master Definition of Grit Print - Typography Poster - Dictionary Art - Minimal Gift for Men,... | Check Latest Price |
Imagine a large wall featuring a quote in bold, artistic lettering—perhaps hand-painted or vinyl decals—paired with minimalistic decor. The typography’s size and style make it a focal point that draws attention. The message adds emotional depth and creates a sense of purpose in your space. The contrast of font and background enhances readability and visual appeal.
Choose fonts that match your decor—modern sans-serif, elegant script, or playful hand-lettered styles. Incorporate decorative elements like banners, floral motifs, or geometric accents around the quote. Use contrasting colors or metallic finishes to make the text pop. Change quotes seasonally or for special occasions to keep the message fresh.
Decide on the quote placement and style. Use stencils, vinyl decals, or hand-painting for the lettering. Ensure the wall surface is clean and smooth before application. Use painter’s tape and a level to align the text properly. For vinyl decals, peel and stick carefully, smoothing out air bubbles. Seal with a clear coat if needed for longevity.
Add decorative elements like banners, background patterns, or frames to enhance the message. Incorporate your favorite colors or metallic accents for extra style. Pair with related decor—such as a cozy reading nook or minimalist shelves—to reinforce the message’s theme. Update quotes periodically for new inspiration.
An inspirational quote wall motivates and reflects your personality. It shows your confidence in using typography and design to create meaningful decor. Once completed, it becomes a daily source of positivity and a conversation starter. It’s an easy, impactful way to make your living room feel more personal and inspiring.
Conclusion
With a variety of wall decor ideas showcased, you have plenty of inspiration to personalize your living space. Incorporate these creative touches to make your living room more inviting and stylish. Don’t hesitate to experiment and let your personality shine through—your perfect wall decor awaits to turn your home into a beautiful expression of you.