I have been, or can be if you click on a link and make a purchase, compensated via a cash payment, gift, or something else of value for writing this post. As an Amazon Associate, I earn from qualifying purchases. Please read my full Affiliate Disclosure for more information.
Imagine walking into a kitchen that instantly sparks creativity and makes you want to cook up a storm! Kitchen Inspiration Design Ideas have become incredibly popular because they turn everyday spaces into inspiring places that reflect personality and style.
In this article, you’ll find a diverse array of ideas that cater to various tastes, from cozy rustic charm to sleek modern elegance. Whether you’re looking to refresh your current kitchen or completely overhaul it, these ideas will ignite your imagination and help you craft a space that’s both functional and beautiful.
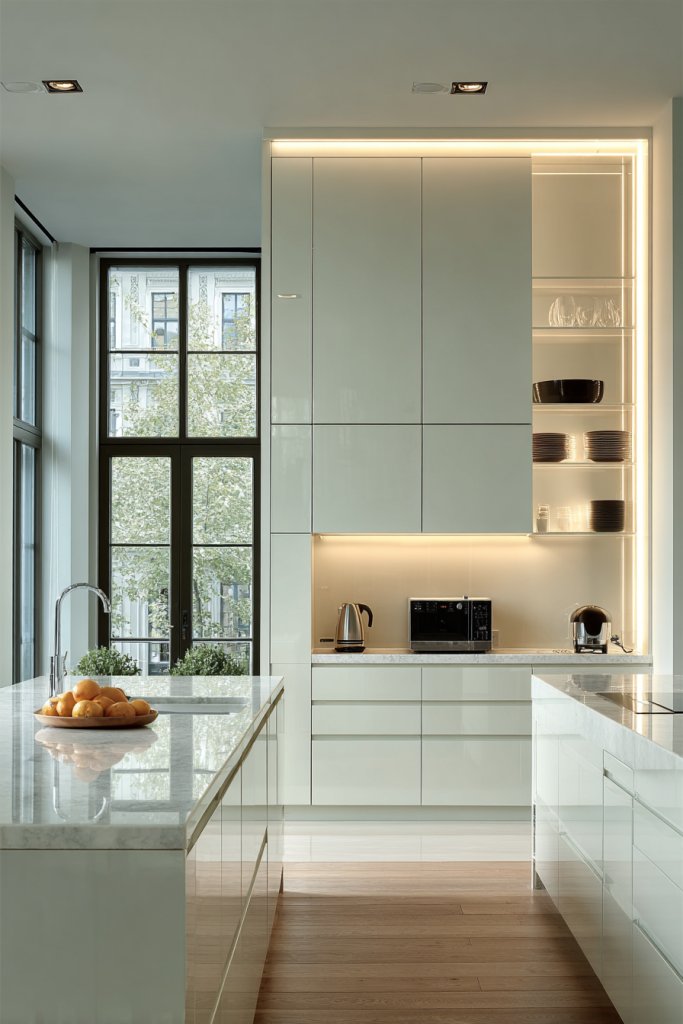
1. Bright, Open Shelving Displays for a Modern Touch
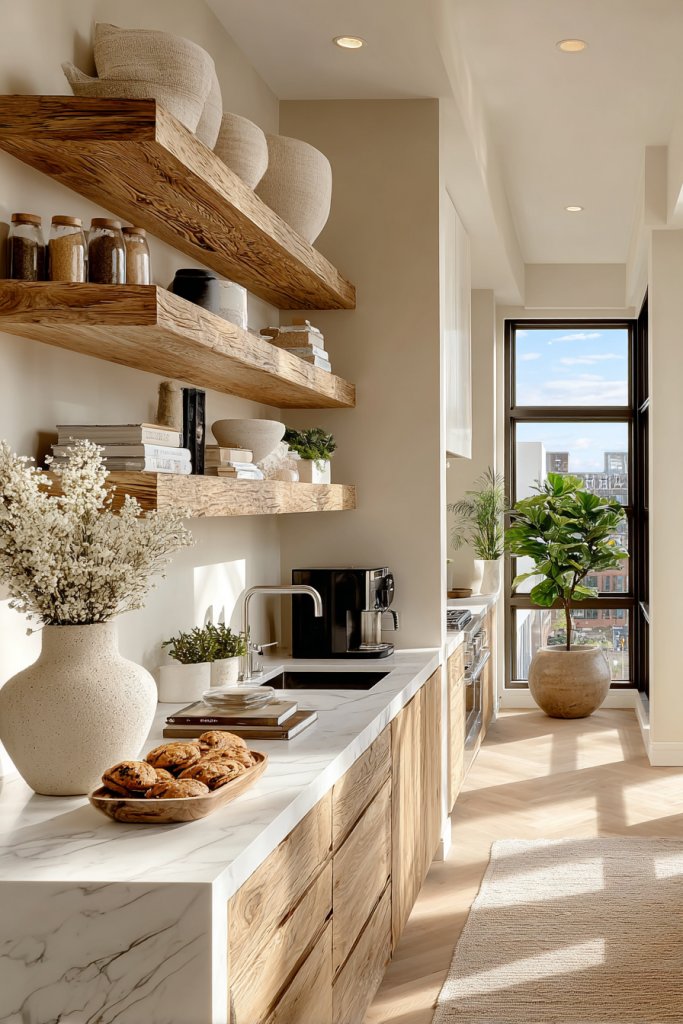
Ever feel like your kitchen is stuck in the dark ages with cluttered cabinets and no style? Bright, open shelving offers a simple fix that transforms your space into something fresh and inviting. It’s perfect for showing off your favorite dishware or glassware without sacrificing accessibility. Plus, it adds an instant modern vibe that makes any kitchen look more polished.
Recommended Products to replicate this idea
| # | Preview | Product | |
|---|---|---|---|
| 1 |
|
BAYKA Floating Shelves for Wall, Wall Mounted Rustic Wood Shelves for Bathroom, Bedroom, Living... | Check Latest Price |
| # | Preview | Product | |
|---|---|---|---|
| 1 |

|
Anchor Hocking Heritage Hill 1 Gallon Glass Jar with Lid, Set of 2 | Check Latest Price |
Imagine floating wooden shelves mounted on a clean, neutral wall, holding colorful plates and sleek glass jars. The open layout creates a sense of airiness, making even small kitchens feel spacious. Textures like matte ceramics and glossy glass catch the light, adding dimension. The arrangement feels casual yet curated, inviting you to grab a cup or plate with ease.
Adjust shelf styles to match your decor—think minimal white units for a Scandinavian look or rustic reclaimed wood for farmhouse charm. You can also vary the height and depth of shelves to suit your storage needs. In open-concept kitchens, add decorative baskets or plants on top to soften the look. Seasonal swaps of dishware can refresh the vibe anytime.
Start by choosing sturdy, wall-mountable shelves that can hold your heaviest dishes. Use appropriate anchors and spacers to ensure safety, especially if your walls are drywall. Arrange your most attractive dishware at eye level for display, and store everyday items below. Consider adding LED strip lighting underneath for extra flair. Measure carefully to keep everything aligned and balanced.
Personalize your open shelving by mixing in decorative elements like vintage cups or handcrafted pottery. Use color-coordinated dishware to create a cohesive look, or go for a wild, eclectic mix for a boho feel. Add textured textiles like woven placemats or cloth napkins folded artfully on a shelf. Think about incorporating small sculptures or unique containers for a truly personal touch.
Open shelving not only boosts style but also makes kitchen tasks more efficient. It encourages organization and showcases your personality. Plus, it’s a trend that’s here to stay, so you’re investing in a design that’s both practical and stylish. Ready to turn your kitchen into a modern showcase?
2. Two-Tone Cabinetry for a Stylish Contrast
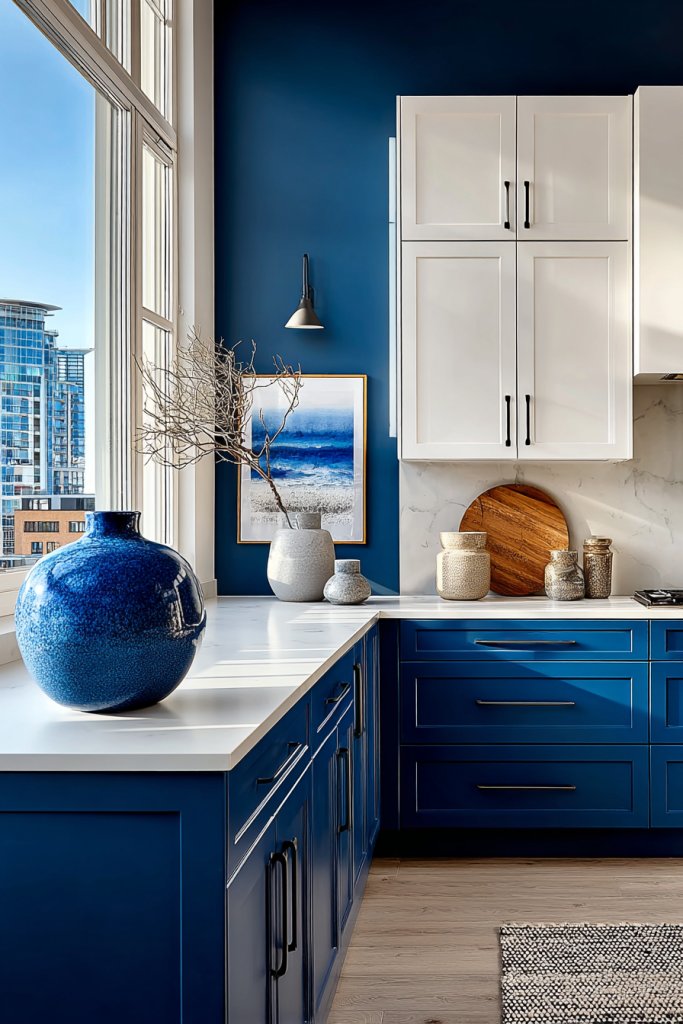
Tired of your bland, uniform kitchen cabinets? Two-tone cabinetry offers a fresh way to add personality and depth without a complete overhaul. It’s perfect for those who want a sophisticated look that also breaks the monotony. Plus, it can visually define different zones in open-plan spaces, making your kitchen feel more dynamic.
Recommended Products to replicate this idea
| # | Preview | Product | |
|---|---|---|---|
| 1 |

|
Heroad Peel and Stick Wallpaper Wood Contact Paper Wood Wallpaper White Wood Grain Contact Paper... | Check Latest Price |
| # | Preview | Product | |
|---|---|---|---|
| 1 |

|
Haliwu 10 Pack Black and Gold Cabient Handles 2 Tone Cabinet Hardware Black and Brushed Gold Cabinet... | Check Latest Price |
Picture a kitchen with dark navy lower cabinets paired with crisp white upper cabinets, creating a striking contrast. The bold colors highlight the cabinetry’s shape and details, drawing the eye across the space. Matte finishes add a modern touch, while wood accents soften the overall look. This combination adds a layer of visual interest that’s both calming and captivating.
Mix and match colors to suit your style: pastel shades for a soft, vintage vibe or black and gold for luxe glam. You can also vary the finishes—matte, gloss, or textured—to add further depth. This idea works well in small kitchens by emphasizing certain areas or appliances. Seasonal accents, like replaced hardware or decorative trims, can update the look throughout the year.
Choose contrasting colors that complement your overall palette. Use painter’s tape for clean lines, and apply primer before painting if you’re DIY-ing. For durability, opt for high-quality cabinet paint or veneer overlays. Plan your layout so that the more visually striking color is on the lower cabinets, which are more visible and accessible. Consider adding different hardware styles to each section for extra flair.
Customize your cabinetry with unique knobs or handles—brass, matte black, or colorful ceramics—to match your personality. Incorporate textured finishes like faux wood grain or patterned overlays for added interest. You can also add decorative trim or molding to accentuate the two-tone effect. Keep the interior of cabinets organized with dividers and trays to complement the exterior style.
Two-tone cabinets instantly elevate your kitchen’s style and show off your design confidence. They’re versatile enough to suit modern, rustic, or eclectic themes. This look can grow with your evolving taste, allowing you to switch out accents or change colors easily. Ready to make a bold statement?
3. Innovative Backsplash with Patterned Tiles
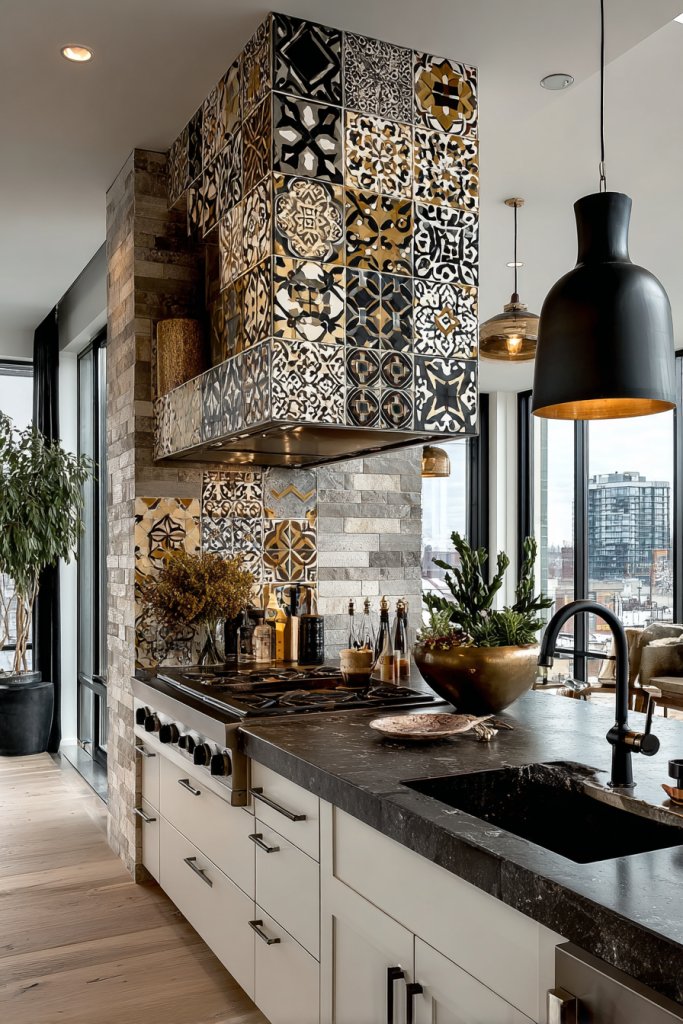
Is your kitchen feeling a bit flat or uninspired? An eye-catching backsplash can instantly add personality and visual interest. Patterned tiles, in particular, turn a functional surface into a piece of art. They’re a simple way to inject color, texture, and style without a full renovation.
Recommended Products to replicate this idea
| # | Preview | Product | |
|---|---|---|---|
| 1 |

|
COLOR Y TRADICIN 25 Mixed Color Mexican Talavera Tiles, 4x4 Square, 25 Pieces, Geometric Pattern,... | Check Latest Price |
| # | Preview | Product | |
|---|---|---|---|
| 1 |

|
Art3d 102-Piece Peel and Stick Wall Tile for Kitchen Backsplash, Bathroom, Fireplace, 3in. × 6in.... | Check Latest Price |
Imagine a wall behind your stove covered in geometric black-and-white tiles that create a hypnotic effect. The textured surface catches the light differently throughout the day, giving your kitchen a lively, dynamic feel. A mosaic pattern with small, colorful tiles can evoke a Mediterranean vibe. The intricate details invite you to get lost exploring the design.
Choose bold patterns for a statement or subtle textures for a refined look. You can mix and match tiles, combining matte and glossy finishes or different shapes like hexagons, triangles, or arabesques. Seasonal color themes—warm tones for fall or cool shades for summer—can refresh the mood. Smaller kitchens benefit from larger tiles to reduce grout lines and visual clutter.
Start by selecting durable, water-resistant tiles suited for a kitchen environment. Use a level and spacers to ensure even placement, especially with intricate patterns. Prepare your wall by cleaning and applying a primer if necessary. Mix your grout carefully, choosing a color that complements or contrasts with your tiles. Seal the finished backsplash for longevity.
Add a decorative border or a metallic accent tile for extra flair. Incorporate a custom mosaic that reflects your personality or heritage. For a more eclectic feel, combine vintage tiles with modern patterns. Use lighting to highlight the texture and colors—think under-cabinet LEDs or spotlights.
A patterned backsplash transforms your kitchen from plain to personality-packed, making every meal prep more enjoyable. It’s a creative upgrade that’s surprisingly affordable and customizable. Your space will feel fresh and inspiring, encouraging you to experiment with new recipes and styles.
4. Under-Cabinet Lighting to Highlight Your Workspace
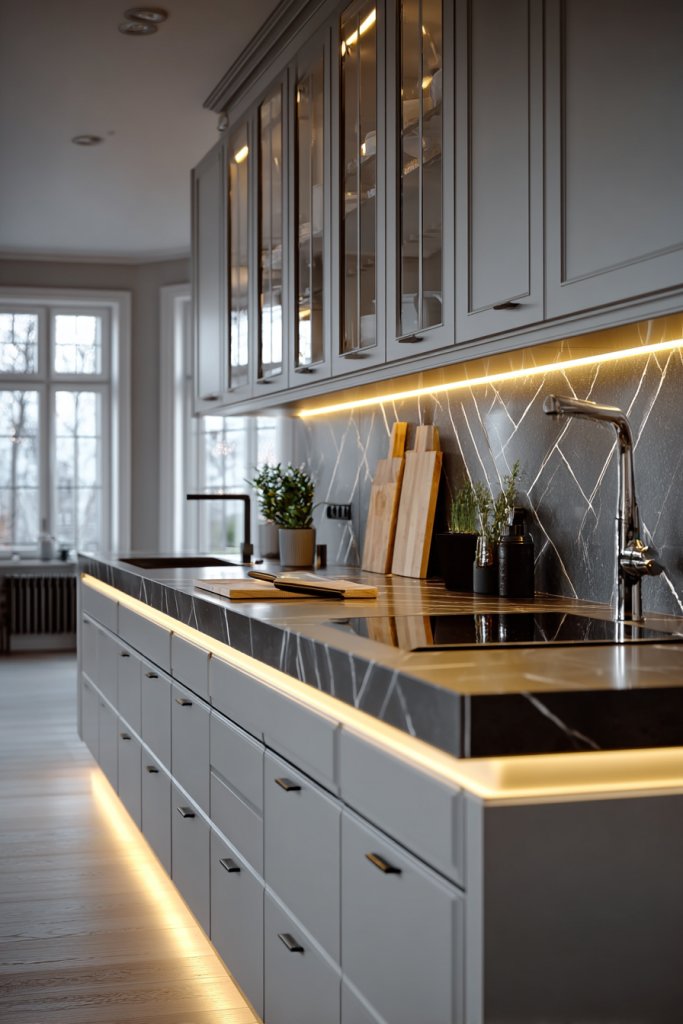
Ever find yourself squinting at your countertops or struggling to see what you’re chopping? Under-cabinet lighting offers a practical fix that brightens your workspace instantly. Plus, it adds a cozy, inviting glow that makes your kitchen feel warmer and more welcoming. Who knew illumination could make such a difference?
Recommended Products to replicate this idea
| # | Preview | Product | |
|---|---|---|---|
| 1 |
|
JUSJUBR Plug-in Under Cabinet Lighting, 2pcs 12 Inch Dimmable Closet Light, Cold White 6000K... | Check Latest Price |
| # | Preview | Product | |
|---|---|---|---|
| 1 |

|
MCGOR 10inch Under Cabinet Lighting, 2 Pack Rechargeable Motion Sensor Light Indoor, 5 Levels... | Check Latest Price |
Picture sleek LED strips installed beneath upper cabinets, casting a soft, even light over your prep area. The light emphasizes the texture of your countertops and makes colors pop—perfect for food prep or late-night snacking. It creates a layered lighting effect, making the space feel open and well-designed. When you turn it on, the entire kitchen feels more vibrant and alive.
Choose between warm or cool white LEDs depending on your mood or decor style. Flexible, dimmable strips let you adjust brightness for different tasks or atmospheres. You can also incorporate motion sensors for hands-free operation—a real game-changer during busy mornings. For a subtle look, hide the wiring behind trim or molding.
Measure the length of your cabinets to determine how much lighting you need. Use high-quality LED strips with adhesive backing for easy installation. Connect the strips to a compatible dimmer or switch for adjustable lighting. Ensure your electrical supply is safe and properly grounded; hire an electrician if unsure. Conceal wiring along the cabinet edges or inside molding for a clean finish.
Add color-changing LEDs to customize your ambiance for holidays or parties. Pair the lighting with a smart home system for voice control or remote adjustments. Use diffusers or covers to soften the light and reduce glare. Incorporate a timer to turn lights on or off automatically, saving energy and effort.
Under-cabinet lighting is a simple upgrade that elevates both function and style. It creates a professional kitchen look and makes everyday tasks easier. Installing it can be a quick DIY project with big visual payoff—go ahead, brighten up your space!
5. Use of Statement Hardware for a Pop of Style
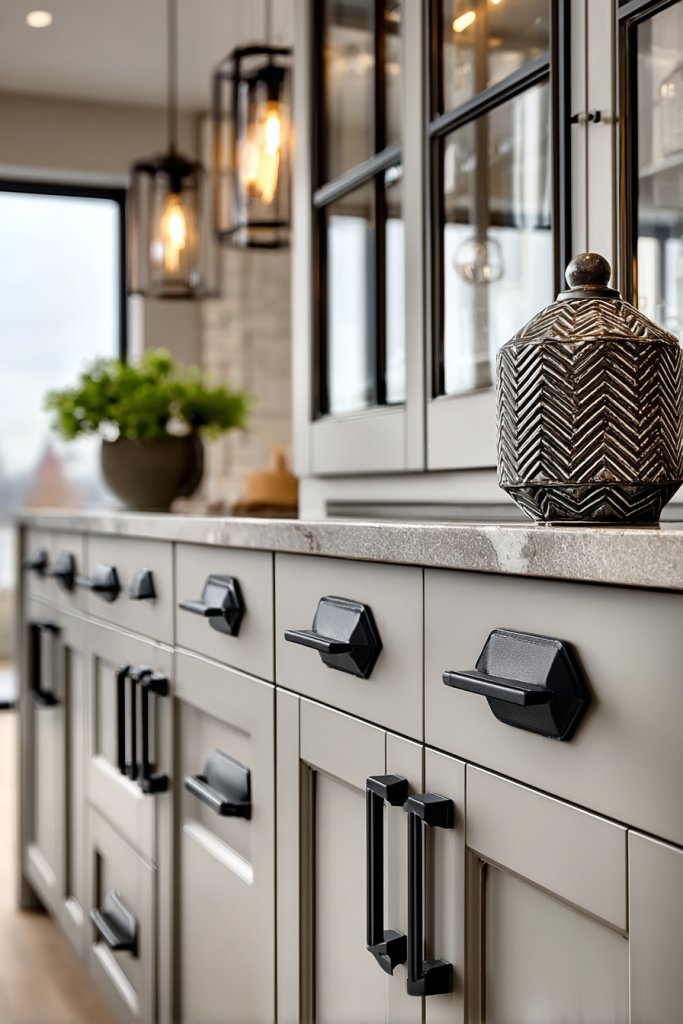
Tired of plain, boring cabinets that blend into the background? Statement hardware offers an easy way to add personality without a full remodel. It’s like jewelry for your kitchen—small but impactful. Plus, swapping out handles and knobs can refresh the entire look instantly.
Recommended Products to replicate this idea
| # | Preview | Product | |
|---|---|---|---|
| 1 |
|
Ravinte 30 Pack Solid Knobs Kitchen Cabinet Round Pulls Dresser Handles Gold Cupboard Hardware... | Check Latest Price |
| # | Preview | Product | |
|---|---|---|---|
| 1 |
|
Ravinte 30 Pack | 5 Inch Cabinet Pulls Matte Black Stainless Steel Kitchen Drawer Pulls Cabinet... | Check Latest Price |
Picture matte black bar pulls contrasting against white cabinets or vintage brass knobs adding warmth. The hardware’s shape and finish draw attention, creating focal points that elevate your cabinets. Textured or decorative handles can also add tactile interest, making every interaction with your cabinetry a delight.
Mix and match hardware styles—sleek modern, antique, or colorful—for a personalized vibe. Use different finishes on upper and lower cabinets for subtle contrast. For a cohesive look, select hardware that complements your faucet, lighting fixtures, or other accents. Seasonal themes can be incorporated with fun, playful designs.
Identify your cabinet style and measure handle placements accurately. Choose hardware that fits existing holes or plan for new drilled holes if needed. Use a screwdriver and level to ensure straight alignment. For a professional look, install hardware at the same height and spacing across all cabinets. Finish with a quick wipe of the surface for a polished appearance.
Customize with unique shapes—geometric, vintage-inspired, or sculptural handles. Add a pop of color with vibrant or pastel knobs for a playful look. Combine different materials like wood and metal for an eclectic vibe. Keep hardware maintenance in mind; choose finishes resistant to fingerprints and corrosion.
Statement hardware is a small upgrade with big style impact, showing off your attention to detail. It’s a simple way to customize your kitchen and reflect your personality. Once installed, you’ll wonder why you didn’t do it sooner—time to get those handles shining!
6. Incorporating a Breakfast Nook with Cozy Seating
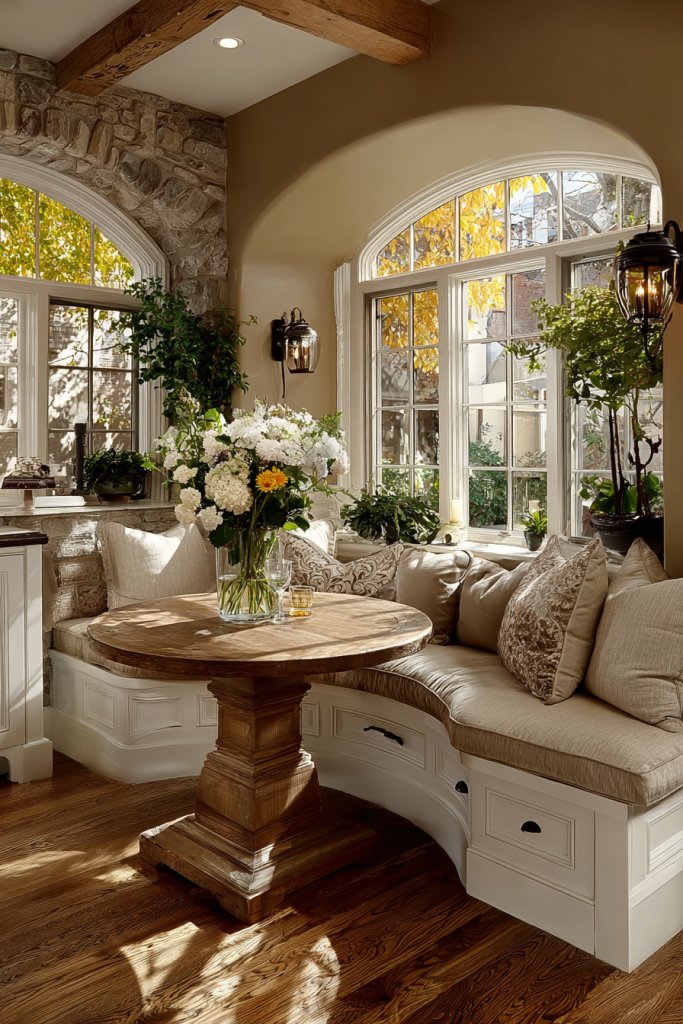
Does your kitchen lack a casual spot for morning coffee or quick bites? A breakfast nook creates an inviting corner that makes everyday meals feel special. It’s perfect for family mornings, intimate chats, or even reading the newspaper with your coffee. Who says eating has to be boring?
Recommended Products to replicate this idea
| # | Preview | Product | |
|---|---|---|---|
| 1 |

|
Harris White Solid Pine Backless Nook with Interior Storage by Linon | Check Latest Price |
| # | Preview | Product | |
|---|---|---|---|
| 1 |
|
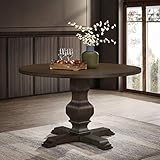
Roundhill Furniture Havre Pedestal Base Round Dining Table, Espresso | Check Latest Price |
Imagine a cozy corner with a built-in bench covered in soft cushions and a small round table. The space is framed by a window, letting in natural light, making it perfect for lazy weekends. Warm textiles like a plush throw blanket and textured pillows add comfort, while a small pendant or wall sconce provides gentle illumination.
Choose built-in benches for a seamless look or opt for a freestanding banquette for flexibility. Mix patterned and solid fabrics to create a layered, inviting feel. Seasonal throws and cushions can update the look, and you can even swap out the table to match your decor style. For small spaces, a fold-down table or corner seating maximizes every inch.
Identify a cozy corner near a window or underutilized space. Build or buy a bench with storage underneath for extra practicality. Select a small, durable table that can be easily moved if needed. Add cushions and upholstery in your favorite fabrics to tie the space together. Incorporate lighting—like sconces or a small pendant—to enhance ambiance.
Personalize your nook with a gallery wall of family photos or artwork nearby. Use a mix of textiles—plaid, floral, or textured knits—to add warmth. Incorporate a small shelf for decorative or functional items, like a jar of jam or a vintage teapot. Keep the space clutter-free for a truly relaxing vibe.
A breakfast nook transforms your everyday routine into a cozy ritual. It’s a charming space that adds value and personality to your home. With a few simple touches, you can create a special spot that everyone will want to gather around.
7. Playing with Unexpected Wall Colors
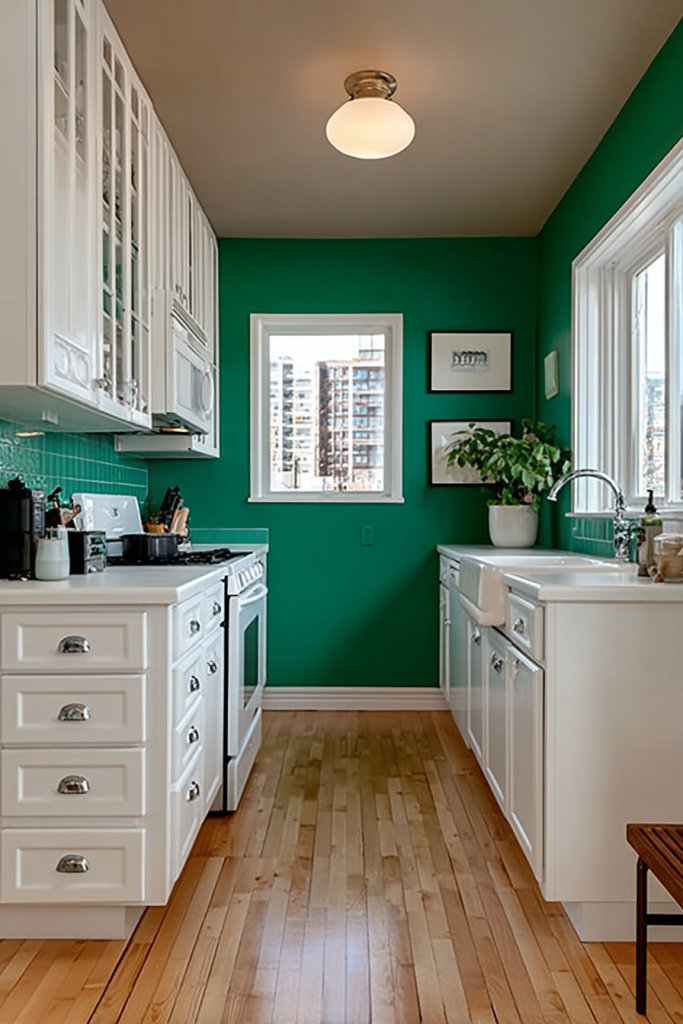
Bored with the same old neutral walls? An unexpected wall color can energize your kitchen and make it feel fresh and modern. It’s a simple update that packs a punch—no demolition required. Plus, bold hues reflect your personality and add a layer of depth to your space.
Recommended Products to replicate this idea
| # | Preview | Product | |
|---|---|---|---|
| 1 |

|
PRESTIGE Paints Interior Paint and Primer In One, 1-Gallon, Semi-Gloss, Comparable Match of Benjamin... | Check Latest Price |
| # | Preview | Product | |
|---|---|---|---|
| 1 |
|
Art3d Smoothing Tool Kit for Applying Peel and Stick Wallpaper, Vinyl Backsplash Tile | Check Latest Price |
Imagine a single wall painted in a vibrant teal or a deep navy, creating a stunning backdrop for your cabinetry and countertops. The color adds warmth and vibrancy, making the space feel more inviting. Textured finishes like matte or satin help the color pop without overwhelming the room. Accentuate the hue with contrasting trim or molding for a polished look.
Choose shades that complement your existing decor—earthy tones for a cozy vibe or bright colors for a playful feel. Experiment with accent walls, or paint a strip along the ceiling or floor for a subtle yet impactful effect. Seasonal color updates, like soft pastels for spring or rich jewel tones for fall, keep the space feeling fresh.
Prep your wall surface by cleaning and patching any holes. Use painter’s tape to create clean edges, especially if you’re doing a geometric or striped design. Apply primer if you’re covering a dark or glossy color, then use high-quality paint for smooth coverage. Multiple thin coats yield the best results. Seal with a clear finish if necessary for durability.
Add decorative molding or wall decals in coordinating colors for added interest. Incorporate artwork or shelving that frames or highlights the color. Change up accessories like dish towels, rugs, or small appliances to match or contrast with your chosen hue. Keep the overall look balanced for a cohesive feel.
Unexpected wall colors can completely change your kitchen’s mood and style. They’re a bold statement that shows off your daring side. Don’t be afraid to experiment—your perfect shade might be just a brush stroke away.
8. Mixing Materials for Eclectic Charm
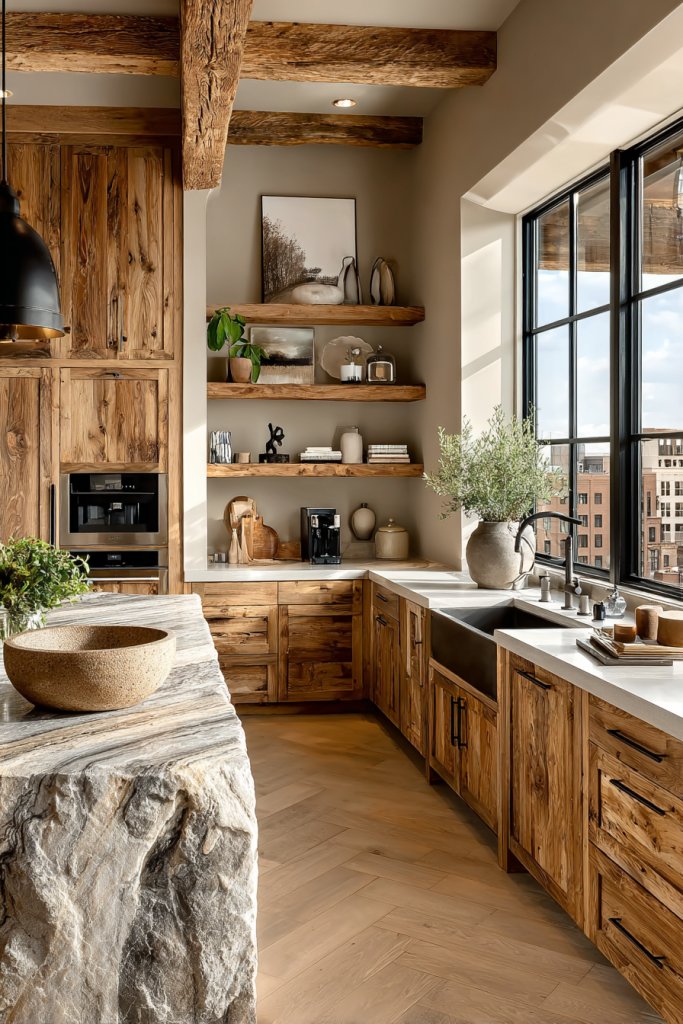
Feeling like your kitchen lacks personality? Mixing materials is an easy way to add depth and character without a complete overhaul. Combining wood, metal, stone, and ceramics creates a layered, eclectic vibe that’s both stylish and inviting. It’s perfect for those who love a curated, personalized look.
Recommended Products to replicate this idea
| # | Preview | Product | |
|---|---|---|---|
| 1 |

|
COLAMY Counter Height Bar Stools Set of 3, Upholstered Barstools with Back, Mid Century Modern... | Check Latest Price |
| # | Preview | Product | |
|---|---|---|---|
| 1 |
|
TTU Tabletops Gallery Ceramic Canister Collection- Stoneware Designed Kitchen Storage Embossed... | Check Latest Price |
Picture a countertop with a reclaimed wood butcher block, paired with sleek metal fixtures and a stone backsplash. Textures vary from smooth ceramic tiles to rough-hewn wood, creating tactile interest. The mix of matte and glossy finishes enhances the visual complexity, making the space feel warm and lived-in. Artful combinations like open shelving with metal brackets and wooden accents complete the look.
Use contrasting materials in small doses—metal pendant lights with wooden shelves or a marble countertop paired with matte-finish cabinetry. Seasonally, you can swap out textiles or decorative objects to change the feel—think cozy wool throws or sleek glass containers. This approach suits both modern minimalist and rustic farmhouse styles.
Select durable, compatible materials that can withstand kitchen conditions. Mix finishes—brushed, matte, polished—to add interest. Incorporate different textures through countertop materials, backsplashes, and cabinet choices. Pay attention to color harmony, opting for a cohesive palette that ties all elements together. Use proper sealing and maintenance to ensure longevity.
Add handcrafted or vintage pieces for a personal touch. Incorporate decorative items like textured bowls or sculptural lighting fixtures. Use layered textiles—rugs, curtains, or cushions—that combine different materials and patterns. Keep clutter minimal to let the materials shine.
Mixing materials celebrates your unique style and encourages creative freedom. It’s a timeless approach that evolves with trends and your taste. Your kitchen becomes a reflection of your personality—warm, inviting, and undeniably yours.
9. Installing a Vintage-Style Pendant Lighting Cluster
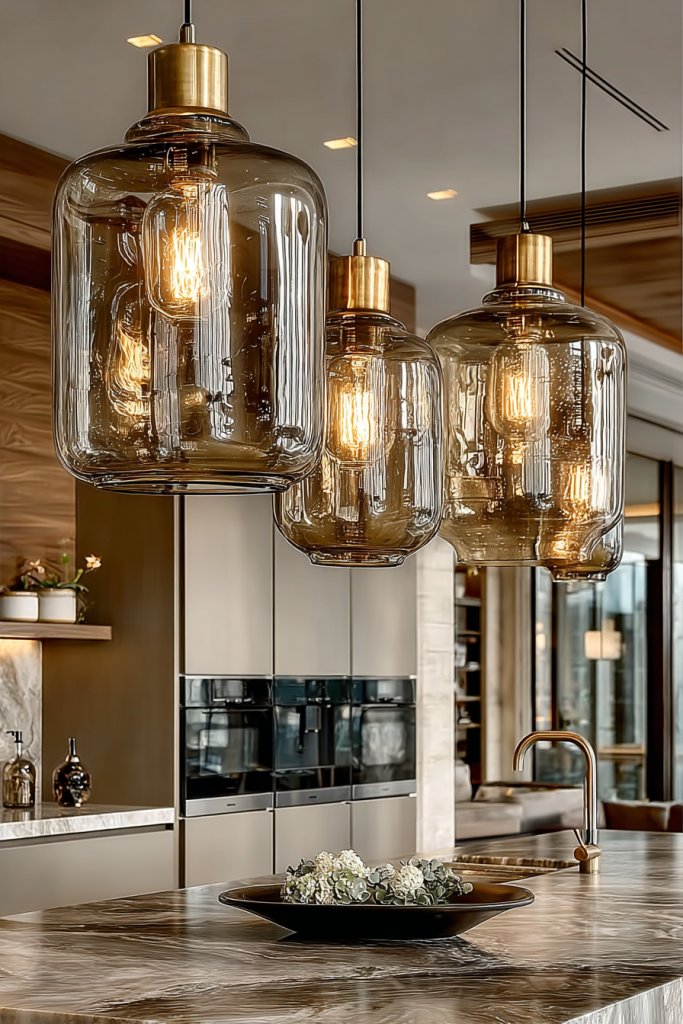
Looking for a statement piece that elevates your kitchen’s style? Vintage-style pendant lighting provides instant charm and ambiance. It’s like jewelry for your ceiling, drawing attention and creating focal points. Plus, it adds a touch of nostalgia that’s both trendy and timeless.
Recommended Products to replicate this idea
| # | Preview | Product | |
|---|---|---|---|
| 1 |

|
FM-24 Vintage 8-Lights Island Cognac Glass Cluster Pendant Chandelier Antique Black Finish Glass... | Check Latest Price |
| # | Preview | Product | |
|---|---|---|---|
| 1 |

|
TJOY Edison Light Bulbs 60W Equivalent, Dimmable Vintage LED Light Bulbs, E26 Medium Base, Warm... | Check Latest Price |
Imagine a cluster of pendant lights with antique brass or colored glass shades hanging over your island or dining table. The varied heights and shapes create visual interest, while warm bulbs cast a cozy glow. The vintage design pairs beautifully with rustic, farmhouse, or eclectic decor, adding character and warmth.
Choose from different styles—industrial, Art Deco, or boho—to match your theme. Use a mixture of shapes and finishes for an eclectic look, or keep it uniform for a streamlined appearance. Incorporate dimmable bulbs to control the mood, whether bright for cooking or soft for entertaining. Seasonal accents, like holiday-themed shades, can add fun.
Select pendant lights that fit your space’s scale and style. Install wiring according to safety standards, preferably by a professional. Hang them at appropriate heights—usually about 30-36 inches above the surface— for optimal lighting and aesthetics. Use adjustable cords or chains to fine-tune the look. Ensure the electrical connection is secure and compliant.
Customize by mixing different shades or adding decorative bulbs. Incorporate vintage or handcrafted fixtures for authenticity. Use dimmers to adjust brightness and mood. Complement the lighting with matching hardware or accessories to unify the space.
A vintage pendant cluster instantly elevates your kitchen’s style, making it feel curated and cozy. It’s a design detail that leaves a lasting impression and adds warmth to everyday routines. Embrace the charm—your kitchen just got a whole lot more interesting.
10. Incorporating a Hidden Kitchen Storage Solution
Cluttered countertops and overflowing cabinets ruining your vibe? Hidden storage solutions keep your kitchen sleek and organized. They maximize space without sacrificing style, making your kitchen look tidy and sophisticated. Who doesn’t want a clutter-free zone?
Recommended Products to replicate this idea
| # | Preview | Product | |
|---|---|---|---|
| 1 |

|
PAKETA 4 Pack Expandable Pull Out Cabinet Organizer, 21'' Deep Pull Out Drawers for Cabinets,Upgrade... | Check Latest Price |
| # | Preview | Product | |
|---|---|---|---|
| 1 |
|
YENUO Push to Open Drawer Slides Full Extension Rail 12 14 16 18 20 22 24 inch handleless Side Mount... | Check Latest Price |
Imagine a pull-out pantry tucked behind a disguised cabinet door or a corner turntable that swivels out of sight. These clever solutions hide your everyday essentials while maintaining a seamless aesthetic. The cabinetry blends into the wall, so no one notices the extra storage—until you need it. It’s all about smart design.
Opt for built-in drawers, hidden compartments, or sliding panels that match your cabinetry. Use vertical space with tall, narrow pull-outs for spices or baking supplies. Seasonal or themed storage can be concealed behind decorative panels. Adapt solutions to fit your space—small or large—and your storage needs.
Identify clutter hotspots and measure available space. Choose hidden storage options like pull-out spice racks, concealed trash bins, or pocket doors. Install these with sturdy hardware and professional help if needed. Organize contents with baskets or dividers to maximize efficiency. Regularly review to keep clutter at bay.
Customize with decorative fronts or matching cabinetry panels. Use labels or color coding for quick identification. Incorporate soft-close mechanisms for quiet, smooth operation. For a personalized touch, add a small display or decorative handle to the hidden door.
Hidden storage solutions keep your kitchen looking magazine-ready and stress-free. They’re a smart investment in functionality and style, making everyday routines easier. Once you master the art of discreet storage, your space will feel instantly more luxurious.
11. Using Patterned or Textured Rugs for Warmth and Style
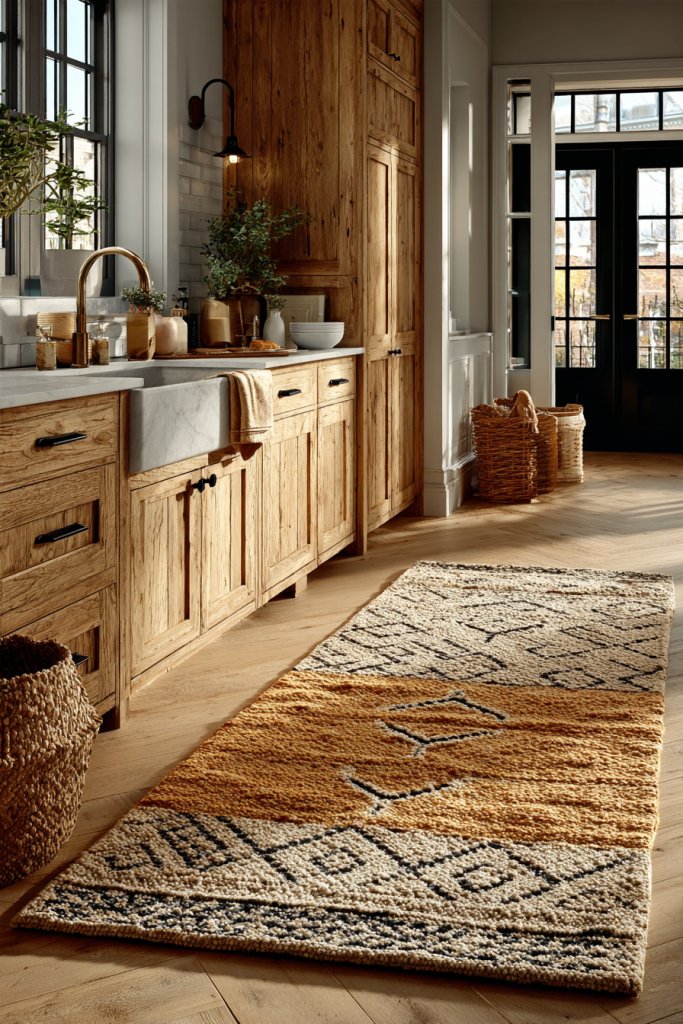
Is your kitchen floor feeling cold and uninspired? A patterned or textured rug adds warmth and personality, making your space more inviting. It’s an easy way to introduce color or pattern without a costly renovation. Plus, it helps define zones within open-plan layouts.
Recommended Products to replicate this idea
| # | Preview | Product | |
|---|---|---|---|
| 1 |

|
2x6 Hallway Washable Runner Rug : Vintage Soft Kitchen Laundry Runner with Non Slip Backing... | Check Latest Price |
| # | Preview | Product | |
|---|---|---|---|
| 1 |

|
Rugcomf 6x9 Rug Washable Bedroom Rug Large Soft Area Rug Abstract Pattern Non-Slip Faux Wool Vintage... | Check Latest Price |
Picture a vibrant geometric rug in front of your sink or stove, adding a splash of color and interest. The textured weave provides tactile richness and hides stains or crumbs better than plain floors. The pattern can complement or contrast with your cabinetry, creating visual harmony or playful discord.
Choose rugs in durable, washable materials like wool, jute, or synthetic fibers suitable for high-traffic areas. Play with patterns—florals, stripes, or abstract designs—to match your decor theme. Seasonal color updates, like warm reds or cool blues, can refresh the look. Small rugs can delineate different functional zones.
Measure your space carefully to select the right size, ensuring it doesn’t overcrowd or get lost. Place non-slip pads underneath for safety. Coordinate colors with your cabinets, countertops, or wall accents for a cohesive look. Regular vacuuming and spot cleaning keep rugs looking new.
Layer rugs with different textures or patterns for a curated feel. Add decorative fringes or tassels for extra charm. Use a rug as a base for a small seating area or breakfast corner. Incorporate personalized mats with quotes or monograms for a special touch.
A well-chosen rug instantly adds warmth and style, making your kitchen feel more comfortable. It’s an affordable upgrade that can be swapped out or updated as your taste evolves. Go ahead—step onto a new level of cozy design.
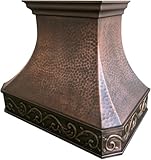
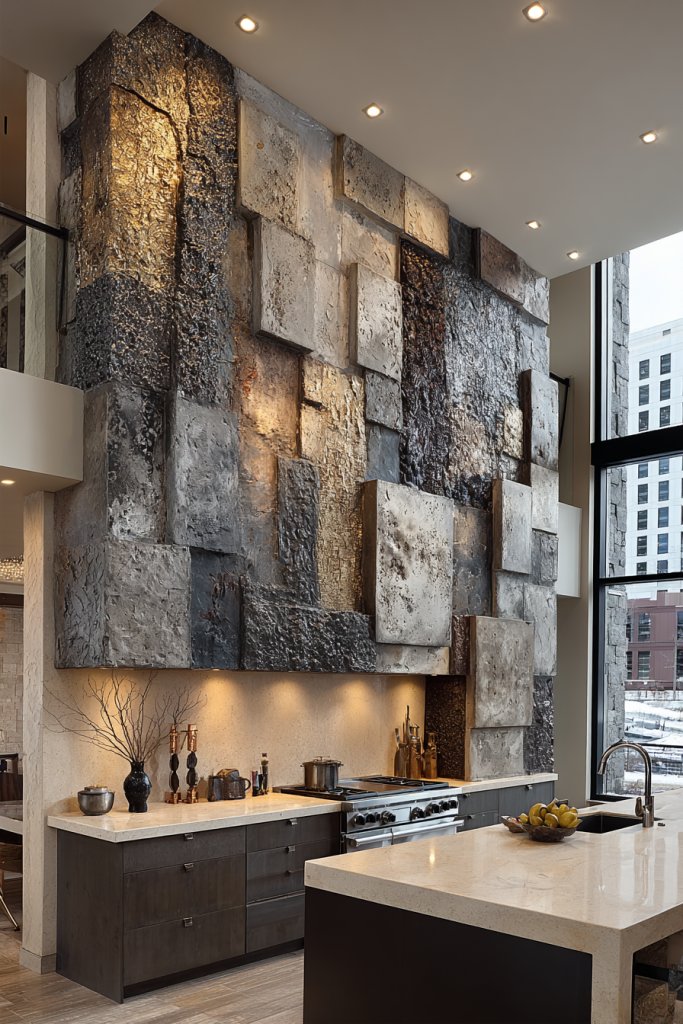
12. Installing a Statement Range Hood with Unique Finishes
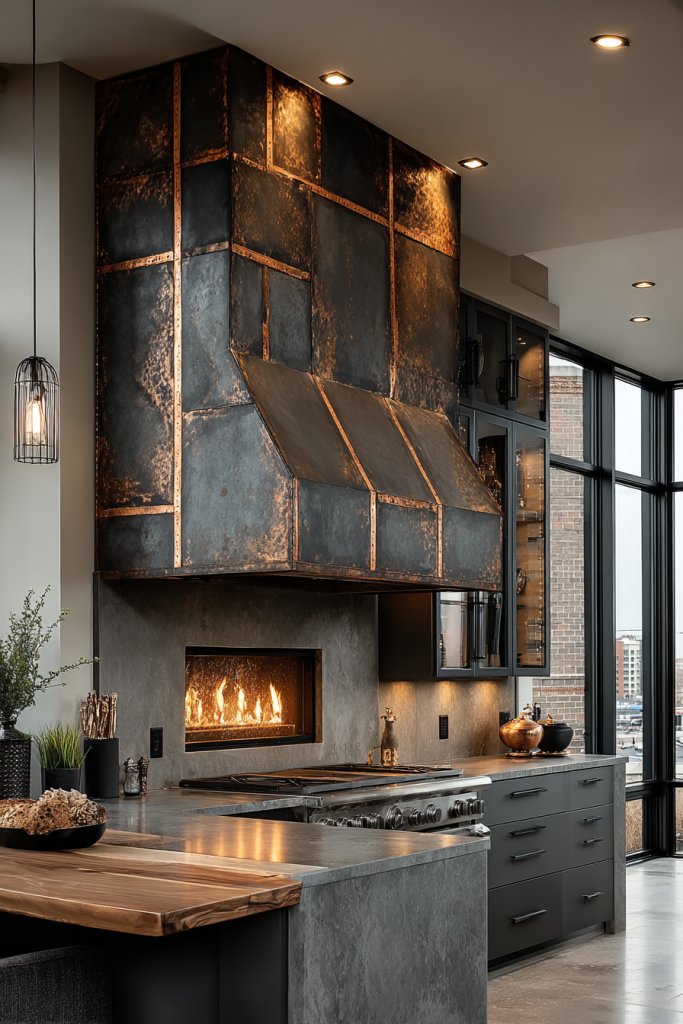
Does your kitchen lack that wow factor? A statement range hood can be the centerpiece that elevates your entire space. It’s more than just functional—it’s a sculptural element that adds personality and style. Who knew ventilation could be so stylish?
Recommended Products to replicate this idea
| # | Preview | Product | |
|---|---|---|---|
| 1 |
|
SINDA Custom Copper Range Hood Made from 99.9% Pure Virgin Copper with High CFM Vent, H3 362127L,... | Check Latest Price |
| # | Preview | Product | |
|---|---|---|---|
| 1 |

|
VEVOR Insert Range Hood, 800CFM 3-Speed, 27 Inch Stainless Steel Built-in Kitchen Vent with Push... | Check Latest Price |
Imagine a custom copper or painted metal hood with decorative tiles or intricate metalwork. It hangs boldly above your stove, drawing the eye upward. The material and finish set the tone—industrial, rustic, or modern luxe—adding depth and character to your kitchen.
Choose finishes that match or contrast with your cabinetry—brushed copper, matte black, or painted metal. Add decorative elements like embossed patterns or tile accents around the hood. Size it proportionally to your range and ceiling height for a balanced look. Adjust lighting underneath for a soft glow.
Opt for custom or high-quality pre-made hoods that suit your style. Install according to manufacturer instructions, ensuring proper venting and clearance. Use durable materials that withstand kitchen heat and grease. Integrate lighting and control switches for convenience. Consider hiring a professional for complex installations.
Decorate with metallic accents, decorative tiles, or paint finishes that reflect your personality. Pair it with matching hardware or appliances for a cohesive look. Add small decorative elements like a vintage clock or sculpture nearby to enhance its impact. Regular cleaning maintains its stunning appearance.
A statement range hood instantly upgrades your kitchen’s style, making it a showstopper. It’s a practical feature that also serves as art—proof that functional can be fabulous. Go bold and make your cooking space uniquely yours.
13. Creating a Gallery Wall of Culinary Prints or Vintage Signs
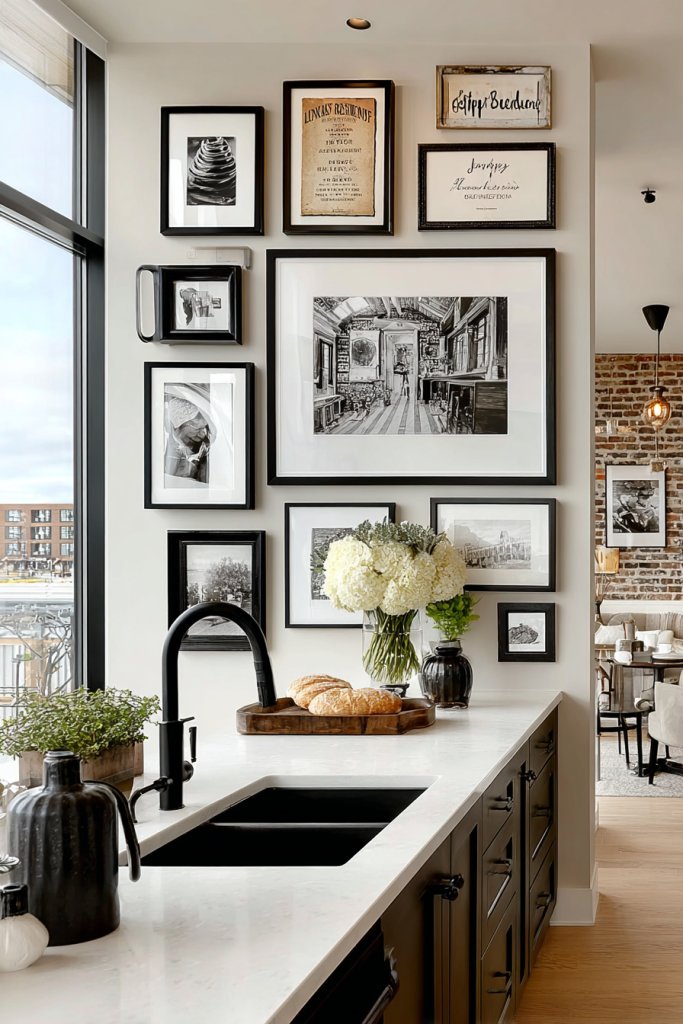
Looking to add a personal touch to your kitchen? A gallery wall of culinary prints or vintage signs injects nostalgia and charm. It transforms blank walls into storytelling art that reflects your personality and love of food. Why settle for plain when you can have a visual feast?
Recommended Products to replicate this idea
| # | Preview | Product | |
|---|---|---|---|
| 1 |

|
Classic Baking Patent Prints, 6 (8x10) Unframed Photos, Wall Art Decor Gift for Home Work Office... | Check Latest Price |
| # | Preview | Product | |
|---|---|---|---|
| 1 |

|
Agedsign Retro Kitchen Decor, Aunt Jemima Pancake Waffle Mix Metal Signs, Vintage Breakfast Tin Sign... | Check Latest Price |
Picture a wall adorned with framed vintage kitchen ads, colorful illustrations of fruits, or handwritten recipe cards. Mix different frame styles and sizes for an eclectic, curated look. The arrangement creates a focal point that sparks conversation and adds character. It’s a playful way to celebrate your culinary passions.
Use black and white photos for a classic vibe or vibrant prints for pop. Incorporate different frame materials—wood, metal, or distressed finishes—to add texture. Hang art at varying heights for visual interest, or create a symmetrical grid for a clean, modern feel. Update seasonally with new prints or signs.
Select a wall that’s visible but not crowded with cabinetry or appliances. Arrange your prints on the floor or table first to find the best layout. Use appropriate hooks, nails, or picture hanging strips for a secure display. Mix and match frames for a layered look. Keep the arrangement balanced but lively.
Add personal touches like your favorite recipes, family photos, or hand-lettered quotes. Incorporate vintage utensils or cookware as decorative accents nearby. Use themed prints—farmhouse, retro, or modern—to match your decor style. Rotate or swap out pieces for fresh inspiration.
A gallery wall adds warmth and personality, making your kitchen uniquely yours. It’s a simple upgrade that feels curated and intentional. Your space becomes a reflection of your taste, inspiring you to cook, entertain, and create.
14. Incorporating Open-Back Shelves for Display and Accessibility
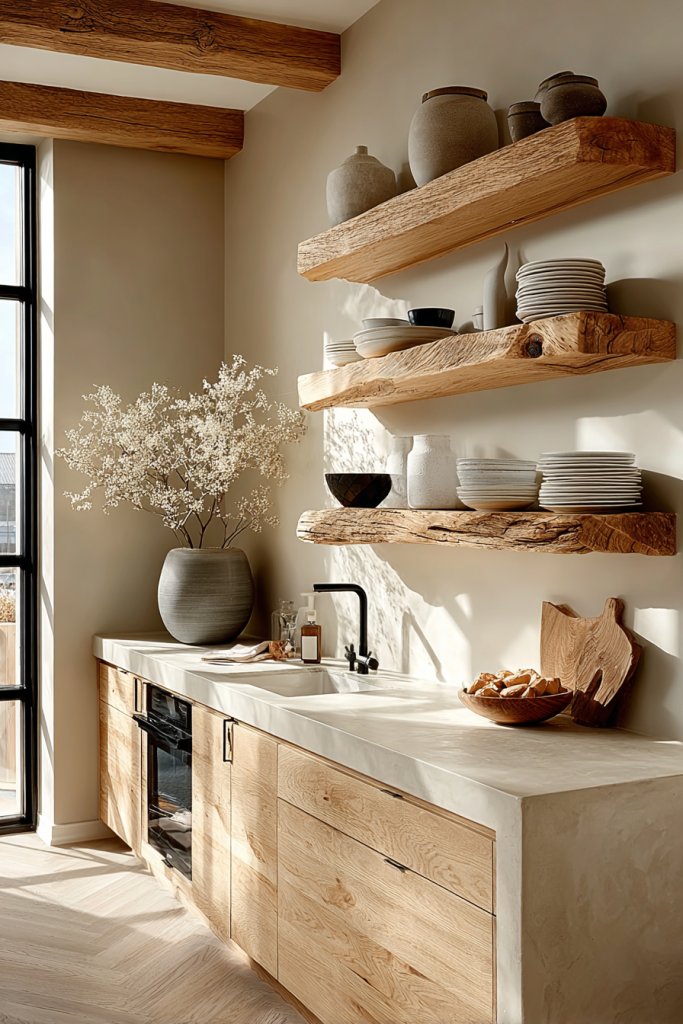
Do your cabinets hide your favorite dishes or everyday essentials? Open-back shelves offer a stylish way to display and access items easily. They add a sense of openness, making your kitchen feel larger and more inviting. Plus, they’re a quick upgrade with big visual impact.
Recommended Products to replicate this idea
| # | Preview | Product | |
|---|---|---|---|
| 1 |

|
NUMENN Triple Column 5 Tier Bookshelf, Bookcase with 14 Open Display Shelves, Adjustable Rustic... | Check Latest Price |
| # | Preview | Product | |
|---|---|---|---|
| 1 |

|
BAYKA Floating Shelves, 22.5 inches Rustic Wood Wall Shelves for Bathroom,Bedroom, Living Room,... | Check Latest Price |
Imagine a set of floating shelves with colorful bowls, neatly stacked plates, and decorative jars. The open design creates a layered look, blending function and beauty. The light passing through highlights textures and colors, adding vibrancy. It’s like a mini curated gallery right in your kitchen.
Use different materials—wood, metal, glass—for variety and to match your decor. Arrange items in a balanced way, mixing decorative and functional pieces. Incorporate hooks or small baskets for utensils or towels. Seasonal swaps of colorful or themed items keep the display fresh.
Install sturdy brackets or floating shelf hardware that can hold your heaviest items. Plan the height and spacing based on your storage needs and aesthetic preference. Keep the shelves level and secure to avoid accidents. Organize items to look intentional and tidy, avoiding clutter.
Add decorative elements like textured ceramics or vintage items for a personal touch. Incorporate lighting—LED strips or puck lights—to highlight your display. Mix in some special or heirloom pieces to showcase your story. Regularly update the arrangement to keep it engaging.
Open shelves make your kitchen feel more open and accessible. They showcase your style and make everyday items easy to grab. It’s a simple change that boosts both aesthetic appeal and functionality, making your space more inviting.
15. Using Colorful Appliances as Design Accents

Feeling like your kitchen lacks personality? Bright, colorful appliances can turn a dull space into a fun and vibrant area. They serve as statement pieces that reflect your style and mood. Who says appliances have to be boring white or stainless?
Recommended Products to replicate this idea
| # | Preview | Product | |
|---|---|---|---|
| 1 |

|
Hazel Quinn X Eduardo Recife Collaboration 2-Slice Retro Toaster, 6 Browning Levels, 3... | Check Latest Price |
| # | Preview | Product | |
|---|---|---|---|
| 1 |

|
Frigidaire EFR176 1.6 cu. ft. Retro Bar Fridge with Side Bottle Opener (Pink) | Check Latest Price |
Imagine a bold red stand mixer on a neutral countertop or a sunny yellow toaster paired with pastel cabinetry. These pops of color draw attention and create focal points. The contrast energizes the space and can even inspire your cooking adventures. It’s like adding a splash of personality with every appliance.
Choose colors that complement your overall palette—think bright primary colors or soft pastels. Mix and match appliances for a playful look, or go monochrome with a single bold hue. Seasonal updates with removable covers or decorative skins are an easy way to refresh. Pair with coordinating textiles or accessories to unify the style.
Select appliances in colors that stand out but still match your decor theme. Consider size and functionality, ensuring they don’t clutter your workspace. Place statement pieces where they’re most visible—near the sink or on open shelving. Keep the surfaces easy to clean to maintain their vibrant look. Balance the color with neutral elements for harmony.
Add custom decals or wraps for a personalized touch. Use colored appliances to highlight specific culinary zones—baking, coffee, or prep areas. Incorporate matching accessories like bowls, utensils, or storage containers. Regularly update or swap out appliances to keep your kitchen looking fresh and lively.
Colorful appliances inject fun and personality into your kitchen, making it a space you love. They’re an easy, affordable way to upgrade your style without a full renovation. Embrace bold choices—your kitchen just became a whole lot more cheerful.
16. Installing a Pot Rack with an Artistic Twist
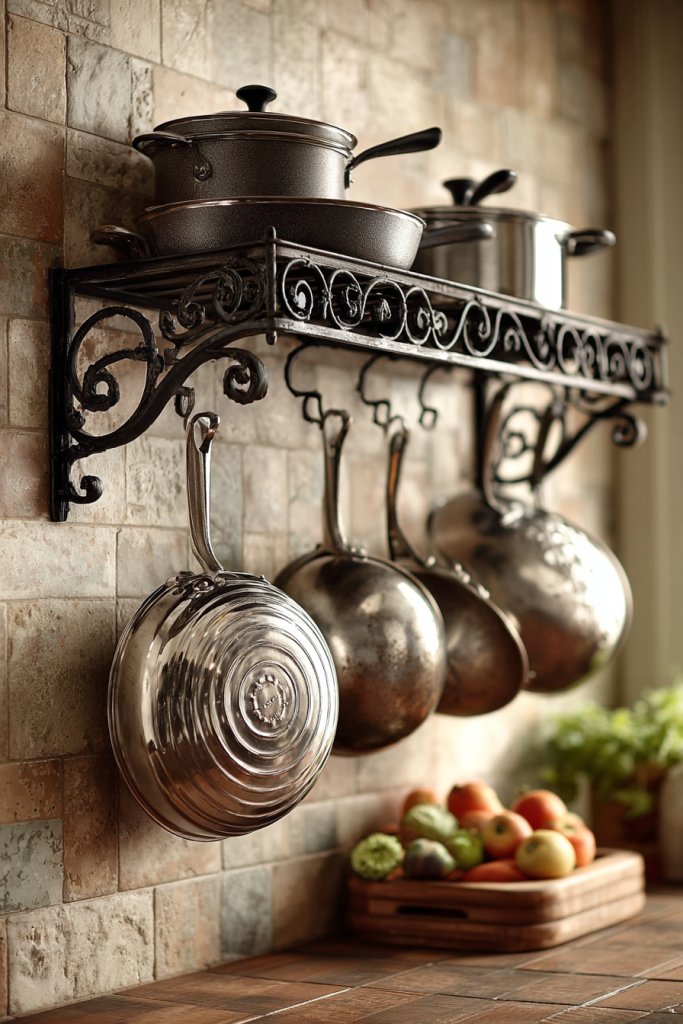
Hate cluttered countertops with pots and pans taking over? A pot rack solves the storage problem while adding a decorative element. It’s a functional piece that also doubles as wall art—who says storage can’t be stylish?
Recommended Products to replicate this idea
| # | Preview | Product | |
|---|---|---|---|
| 1 |

|
Cooks Standard Wall Mounted Wooden Pot Rack, 36 by 8-Inch | Check Latest Price |
| # | Preview | Product | |
|---|---|---|---|
| 1 |

|
Sorbus® Pot and Pan Rack for Ceiling with Hooks — Decorative Oval Mounted Storage Rack —... | Check Latest Price |
Picture a wrought iron rack hanging above your island, holding colorful pots and utensils. The design adds an artistic, vintage vibe, making your kitchen feel warm and inviting. The open display keeps essentials within reach and adds texture to the wall. It’s both practical and pretty.
Choose from rustic wooden racks, sleek modern designs, or ornate wrought iron styles. Incorporate hooks for utensils, lids, or even decorative elements like hanging herbs (if permitted). Match the finish to your hardware or lighting for cohesion. Seasonal or themed racks can add a festive touch.
Mount the rack securely into studs or wall anchors that support weight. Arrange pots by size or color for visual interest. Keep frequently used items at the front for convenience. Regularly clean and organize to prevent clutter. Consider adding decorative elements like vintage utensils or a small plant if restrictions allow.
Personalize with custom paint or finishes to match your decor. Incorporate decorative hooks or add a small shelf for spices or cookbooks. Use colorful or patterned pots for extra flair. Change up the display seasonally to keep it fresh.
A pot rack with an artistic twist combines functionality with style, making your kitchen more efficient and charming. It’s a statement piece that showcases your culinary tools and personality. Get ready to cook in a space that’s both practical and beautiful.
17. Embracing Minimalism with Streamlined Storage Solutions
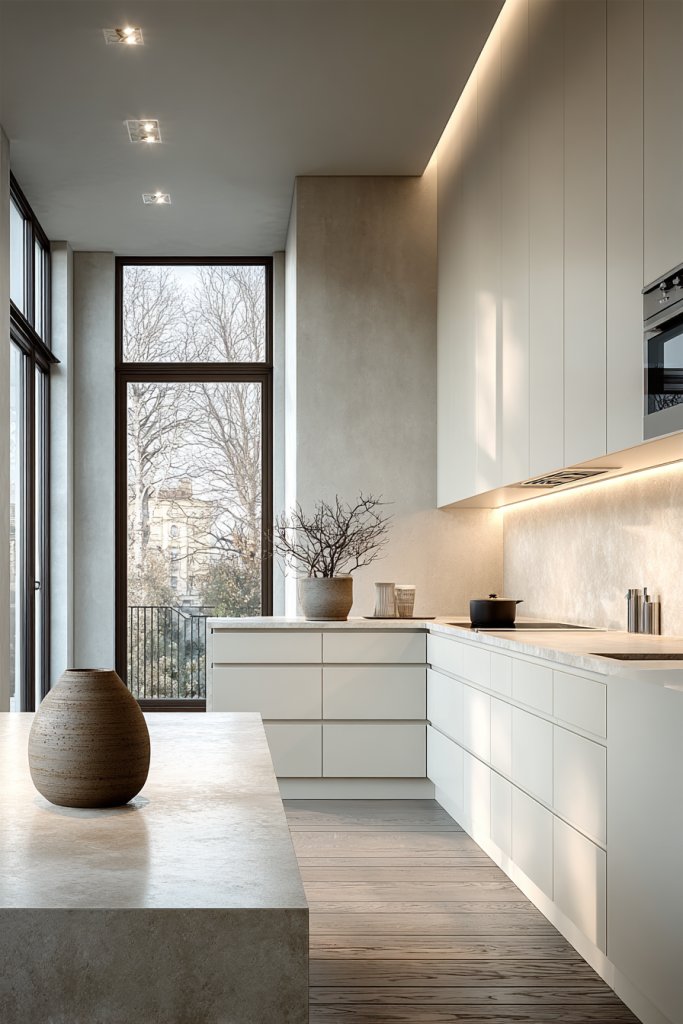
Overstuffed cabinets and cluttered counters make your kitchen feel chaotic? Embracing minimalism offers a sleek, calm aesthetic that simplifies your space. It’s about decluttering and hiding away items for a clean, modern look. Less really is more here.
Recommended Products to replicate this idea
| # | Preview | Product | |
|---|---|---|---|
| 1 |

|
Seinloes 2Pack Expandable Pull Out Cabinet Organizer 21"Deep With Raising Pad for Framed Cabinets,... | Check Latest Price |
| # | Preview | Product | |
|---|---|---|---|
| 1 |

|
CHEFSTORY Airtight Food Storage Containers with Lids, 8 PCS Plastic Storage Canisters for Kitchen &... | Check Latest Price |
Imagine handle-less cabinets with push-to-open mechanisms, creating a smooth, uninterrupted surface. Hidden drawers and integrated appliances keep everything out of sight. The result is a streamlined, clutter-free space that feels spacious and serene. Neutral tones and simple lines emphasize the minimalist vibe.
Use high-quality, durable materials that blend seamlessly into your decor—think matte finishes or lacquered surfaces. Incorporate concealed storage for small appliances and utensils. Seasonal updates are easy—swap out decorative accents or organize contents to keep the look fresh. This style suits contemporary, Scandinavian, or industrial themes.
Plan your layout to maximize hidden storage—consider deep drawers, tall cabinets, or pocket doors. Use internal organizers and dividers to keep items tidy. Install handle-less cabinetry with push latches or touch-to-open systems. Keep countertops clear by storing everything out of sight. Regularly review your storage to maintain simplicity.
Add subtle decorative elements like textured wall panels or a sleek countertop in a bold color. Incorporate lighting that emphasizes clean lines—LED strip lights or hidden fixtures work well. Keep accessories minimal but meaningful—like a sculptural vase or a statement clock.
Minimalism isn’t just a trend—it’s a lifestyle that promotes calm and clarity. Your kitchen will feel more spacious and organized, inspiring better cooking habits. It’s a timeless look that adapts easily as your needs evolve.
18. Adding a Unique, Artistic Backsplash Panel
Want to make your kitchen truly stand out? An artistic backsplash panel transforms a mundane wall into a sculptural focal point. It’s a bold statement that combines function with art, elevating your entire space. Who says backsplash has to be boring tiles?
Recommended Products to replicate this idea
| # | Preview | Product | |
|---|---|---|---|
| 1 |

|
24" x 30" Reversible Metal Backsplash Matching screws | Compatible with Broan-NuTone SP3004 - Ultra... | Check Latest Price |
| # | Preview | Product | |
|---|---|---|---|
| 1 |

|
48Pcs Tile Sticker Peel and Stick, Kitchen Wall Decals Stick on Tile Adhesive Stickers, Moroccan... | Check Latest Price |
Imagine a textured wall panel made of metal, resin, or hand-painted ceramic that adds depth and dimension. The design could be abstract, nature-inspired, or geometric—whatever reflects your style. The tactile surface catches light differently, creating shadows and interest. It’s a conversation starter that’s both beautiful and functional.
Choose materials that suit your decor—metal for industrial, resin for modern, or textured tiles for organic appeal. Incorporate sculptural reliefs or 3D patterns for extra impact. Coordinate the colors with your cabinetry and countertops for harmony. Seasonal or thematic art can be added with removable panels.
Select a durable, moisture-resistant panel suitable for kitchen conditions. Secure it firmly to the wall using appropriate fasteners or adhesives. Ensure edges are sealed and finished neatly. Consider lighting options to highlight the texture and design—spotlights or strip lights work well. Regular cleaning maintains its visual appeal.
Add custom elements—your own artwork, metallic accents, or layered textures. Use lighting to emphasize the panel’s sculptural qualities. Rotate removable pieces or panels to refresh the look periodically. Keep complementary decor simple to let the panel shine.
An artistic backsplash panel turns your kitchen into a personal gallery, making everyday cooking extraordinary. It’s an investment in both style and personality—your space, uniquely yours. Feel inspired every time you step into your beautifully designed kitchen.
19. Incorporating a Fold-Down Workspace or Drop Leaf Table
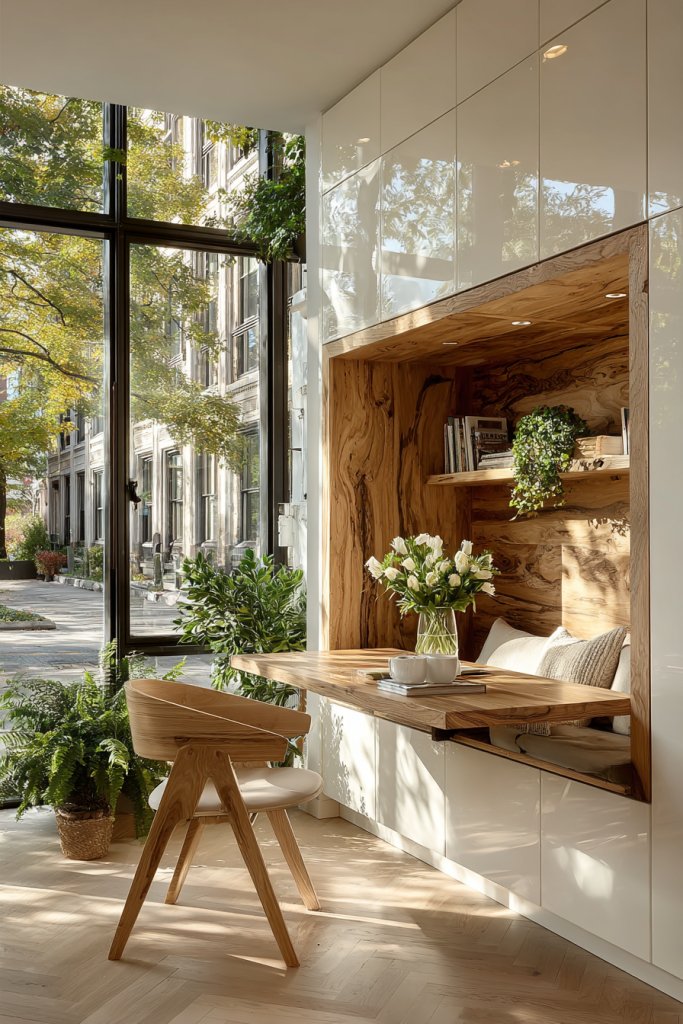
Limited counter space making meal prep stressful? A fold-down workspace or drop leaf table provides an extra surface when needed and tucks away when not. It’s perfect for small kitchens or multi-purpose rooms. Now, you can have your prep area and keep your space uncluttered.
Recommended Products to replicate this idea
| # | Preview | Product | |
|---|---|---|---|
| 1 |

|
COSTWAY Wall Mounted Folding Table, 31.5" x 23.5" Drop-Leaf Floating Writing Desk for Small Spaces,... | Check Latest Price |
| # | Preview | Product | |
|---|---|---|---|
| 1 |

|
HOMCOM Foldable Convertible Writing Table, Wall Mounted Space-Saving Computer Desk with Chalkboard... | Check Latest Price |
Picture a sleek wall-mounted table that folds down to reveal a sturdy surface, ready for chopping or serving. When folded up, it becomes a seamless wall, maintaining a clean look. Pair it with minimalist stools or a foldable chair for flexibility. The design feels modern yet practical, blending into the decor.
Choose materials like wood, laminate, or metal for durability and style. Opt for a design that matches your cabinetry or wall color for a cohesive look. Use it as a breakfast bar, extra prep station, or a mini workspace. Accessories like magnetic strips or hooks maximize utility.
Install a sturdy hinge system with proper supports, especially for heavier surfaces. Ensure the wall and mounting hardware can handle weight. Keep the fold mechanism smooth with regular maintenance. Place the table in a convenient location near your main cooking zone. Consider a lock or latch to keep it secure when folded up.
Decorate with a colorful countertop or patterned surface for visual interest. Add matching or contrasting seating options. Use a small shelf or hooks nearby for utensils or tools. Change up the look seasonally with decorative accents or accessories.
A fold-down workspace makes your kitchen smarter, more adaptable, and clutter-free. It’s a clever solution that combines function and style, perfect for modern living. Elevate your kitchen game—compact, versatile, and beautifully efficient.
20. Using Vertical Gardens or Herb Walls for Freshness
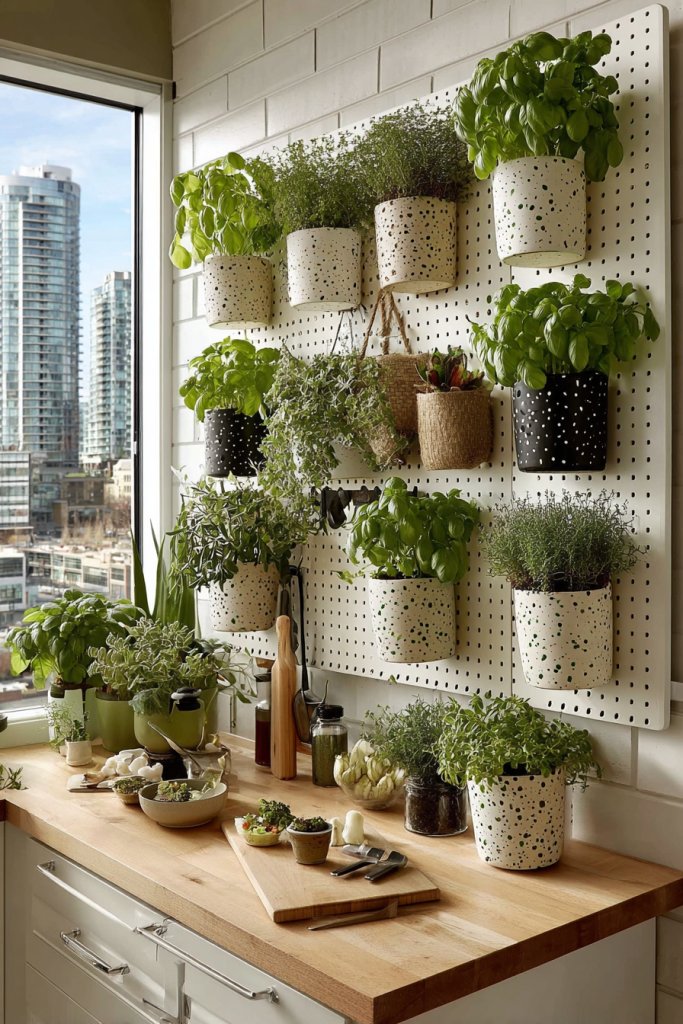
Craving fresh herbs but tired of constantly running to the store? A vertical garden or herb wall brings greenery indoors, making your kitchen fresher and more vibrant. Plus, it’s a stylish way to add life and color without sacrificing space. Who says you can’t have a garden in your kitchen?
Recommended Products to replicate this idea
| # | Preview | Product | |
|---|---|---|---|
| 1 |

|
Ahopegarden Hydroponics Growing System Kit Indoor Herb Garden with Grow Light 12 Pods, with LCD... | Check Latest Price |
| # | Preview | Product | |
|---|---|---|---|
| 1 |

|
Make Good PlantPod Luxe - Self-Watering Wall Planters (Set of 6) - Easy to Water and Install -... | Check Latest Price |
Imagine a wall-mounted planter with rows of lush herbs—basil, mint, cilantro—growing in sleek containers. The green backdrop adds a natural touch to your decor, contrasting beautifully with neutral cabinetry. The textured foliage and fragrant herbs create a sensory experience that’s both calming and inspiring.
Choose from different systems—wall-mounted pots, pocket planters, or hydroponic setups—to suit your space and style. Incorporate decorative containers, colorful or rustic, to match your decor theme. Rotate herbs seasonally or add flowering plants for variety. Keep the wall accessible and easy to water.
Install the system securely into studs or wall anchors, ensuring proper drainage and ventilation. Use waterproof or moisture-resistant materials to protect your wall. Arrange herbs based on sunlight needs and accessibility. Water regularly and trim to encourage growth. Use organic fertilizers for healthy, flavorful herbs.
Add decorative elements like small signs, labels, or fairy lights for charm. Incorporate a small shelf or countertop nearby for tools or pots. Personalize with your favorite herbs or flowers that match your kitchen’s color scheme. Regularly refresh the display with new plants or arrangements.
A vertical herb garden not only boosts your kitchen’s freshness but also encourages healthier eating. It’s a beautiful, practical feature that makes cooking more joyful. Grow your own flavor and confidence—your kitchen just got a lot greener.
21. Opting for Glass-Front Cabinets to Showcase Special Items
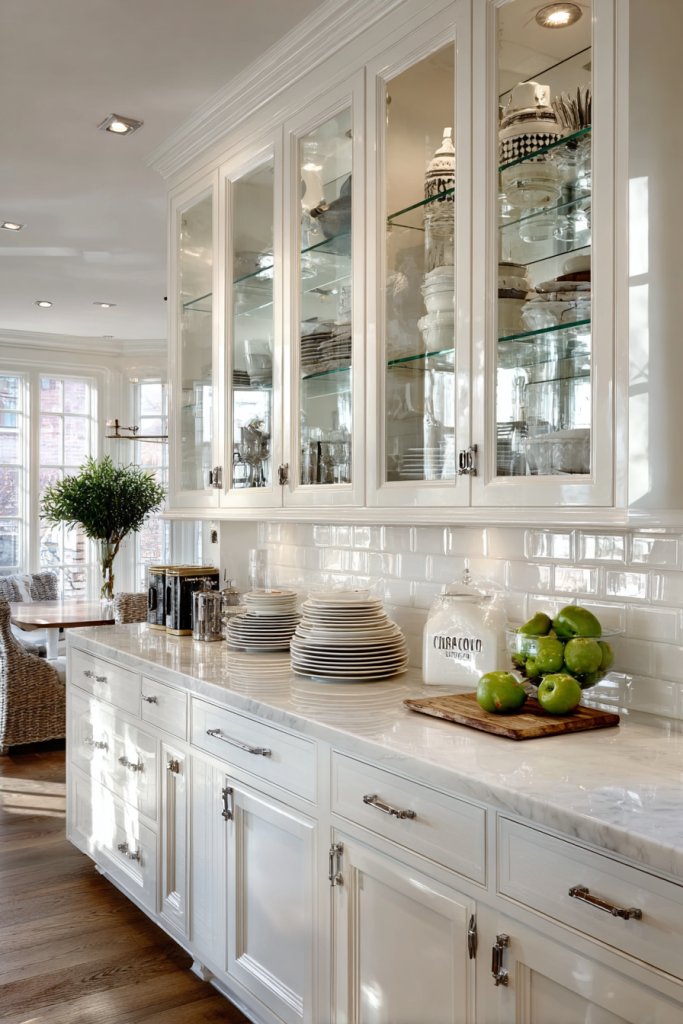
Tired of hiding your beautiful dishware or collectibles behind closed doors? Glass-front cabinets turn storage into a display opportunity. They add elegance and transparency, making your kitchen look more open and organized. Who doesn’t love a peek at their favorite pieces?
Recommended Products to replicate this idea
| # | Preview | Product | |
|---|---|---|---|
| 1 |

|
Furnaza Kitchen Wall Cabinets 4 Doors - Laundry Wall Mounted Storage Cabinets with Acrylic Glass... | Check Latest Price |
| # | Preview | Product | |
|---|---|---|---|
| 1 |

|
JUSJUBR Black Display Shelf Lighting, 4 Pack x12 Inch Display Lights for Display Case, LED Display... | Check Latest Price |
Picture a row of glass cabinets filled with colorful china, vintage glassware, or curated collectibles. The transparency draws the eye and creates depth, especially when combined with interior lighting. Different glass styles—clear, frosted, or textured—can set various moods, from sleek modern to cozy vintage.
Arrange items thoughtfully—group similar colors or styles for impact. Use matching or contrasting dishware to create a cohesive look. Incorporate lighting inside the cabinets to highlight your display. Keep clutter minimal to maintain a polished appearance.
Choose cabinets with glass doors suited for your space—full-height, short, or open shelving with glass fronts. Install lighting elements like LED strips or puck lights for added effect. Regularly clean the glass for clarity and dust. Organize items in attractive trays or baskets inside for easy access.
Add decorative trims or framing to enhance the glass panels. Personalize with curated collections—coastal, vintage, or modern. Incorporate small decorative labels or tags for a boutique feel. Change displays seasonally to keep the look fresh.
Glass-front cabinets showcase your favorite items, making your kitchen more inviting and lively. They reflect your personal style and add a touch of sophistication. It’s an easy way to elevate your decor and enjoy your treasures every day.
22. Designing a Statement Flooring Pattern or Material

Does your floor blend into the background? A bold flooring pattern or material can define your entire kitchen’s style. It’s an eye-catching feature that anchors the space and adds character. Ready to make a flooring statement?
Recommended Products to replicate this idea
| # | Preview | Product | |
|---|---|---|---|
| 1 |

|
Nexus Self Adhesive 12-Inch Vinyl Floor Tiles, 20 Tiles - 12" x 12", Bianco Marble Pattern - Peel &... | Check Latest Price |
| # | Preview | Product | |
|---|---|---|---|
| 1 |

|
Nexus Self Adhesive 12-Inch Vinyl Floor Tiles, 20 Tiles - 12" x 12", Black/White Pattern - Peel &... | Check Latest Price |
Imagine patterned encaustic tiles in a herringbone or floral design underfoot, creating a visual journey as you move through the space. Contrasting colors or textures—like black and white or wood tones—add depth and interest. The pattern guides the eye and can even influence the overall decor theme.
Choose from tiles, stamped concrete, or contrasting wood planks. Larger tiles make the pattern more subtle, while smaller ones create intricate designs. Use colors that complement your cabinets and walls, or go for high contrast for a dramatic effect. Seasonal rugs can add softness and warmth.
Select durable, easy-to-maintain materials suitable for kitchens. Prepare a level subfloor and follow manufacturer instructions for installation. Use spacers and precise cuts for clean lines. Seal the surface to prevent stains and water damage. Consider professional installation for complex patterns.
Incorporate custom patterns or unique materials like metal or resin insets for a luxe touch. Use area rugs to break up the pattern or add comfort. Match the floor with your cabinetry hardware or wall color for harmony. Regular cleaning preserves its beauty.
A statement floor elevates your entire kitchen aesthetic and showcases your bold style. It’s a long-term investment that makes your space unforgettable. Step confidently onto a design that’s uniquely yours.
23. Personalizing with DIY Decor and Upcycled Elements
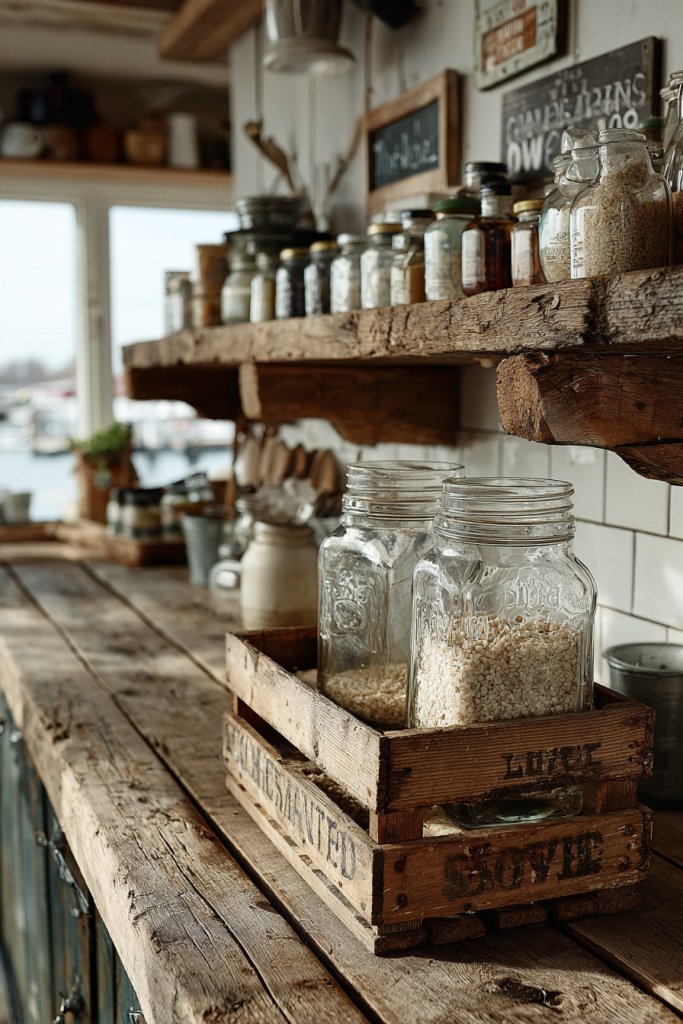
Want a truly unique kitchen that reflects your personality? DIY decor and upcycled elements add charm and originality, making your space one-of-a-kind. It’s also budget-friendly and eco-conscious—win-win! Ready to roll up your sleeves?
Recommended Products to replicate this idea
| # | Preview | Product | |
|---|---|---|---|
| 1 |

|
Art3d Premade Board and Batten Paintable Wainscoting Kit, MDF Accent Wall Panel for Kitchen Bedroom... | Check Latest Price |
| # | Preview | Product | |
|---|---|---|---|
| 1 |
|
Art3d 102-Piece Peel and Stick Wall Tile for Kitchen Backsplash, Bathroom, Fireplace, 3in. × 6in.... | Check Latest Price |
Imagine painted mason jars repurposed as utensil holders, or vintage crates turned into open shelving. Hand-painted signs, custom wooden cutting boards, or repurposed glass jars filled with pantry staples add personal flair. These touches create a warm, lived-in atmosphere that’s full of character.
Use reclaimed wood, old textiles, or vintage hardware to craft decor pieces. Experiment with paint, stencils, or decoupage to add color and pattern. Incorporate upcycled furniture or accessories that tell a story. Seasonal or themed projects keep your decor fresh and engaging.
Gather supplies—paint, brushes, reclaimed materials—and plan your projects. Follow tutorials or join DIY communities for ideas and tips. Seal and protect your creations to withstand kitchen messes. Install or place your decor thoughtfully, balancing functionality and style. Maintain and update periodically for continued charm.
Add personal touches like family heirlooms or handmade artwork. Customize labels, tags, or decals for a cohesive look. Mix up textures—woven, painted, or distressed—to add interest. Keep clutter to a minimum to let your upcycled masterpieces shine.
DIY decor and upcycled elements make your kitchen truly yours, full of stories and personality. They’re a sustainable choice that saves money and reduces waste. Get creative, and turn your kitchen into a crafted masterpiece everyone will admire.
Conclusion
This collection of Kitchen Inspiration Design Ideas showcases a wide range of styles and clever solutions to elevate your culinary space. Don’t hesitate to experiment with these concepts and make them your own—your dream kitchen is within reach. Embrace the change and let your kitchen become a vibrant hub of creativity and joy!