I have been, or can be if you click on a link and make a purchase, compensated via a cash payment, gift, or something else of value for writing this post. As an Amazon Associate, I earn from qualifying purchases. Please read my full Affiliate Disclosure for more information.
Imagine walking into a room that instantly feels personalized and full of character—that’s the magic of DIY wall art decor! These creative projects have surged in popularity because they allow you to express your unique style while adding a warm, welcoming touch to any space.
In this article, you’ll find a diverse array of ideas that cater to all skill levels and aesthetic preferences. Whether you’re into minimalist designs, boho vibes, or vibrant colors, there’s something here to inspire your next home decor project and turn blank walls into stunning focal points.
1. Framed Quote Typography Using Washi Tape for a Colorful Statement Wall
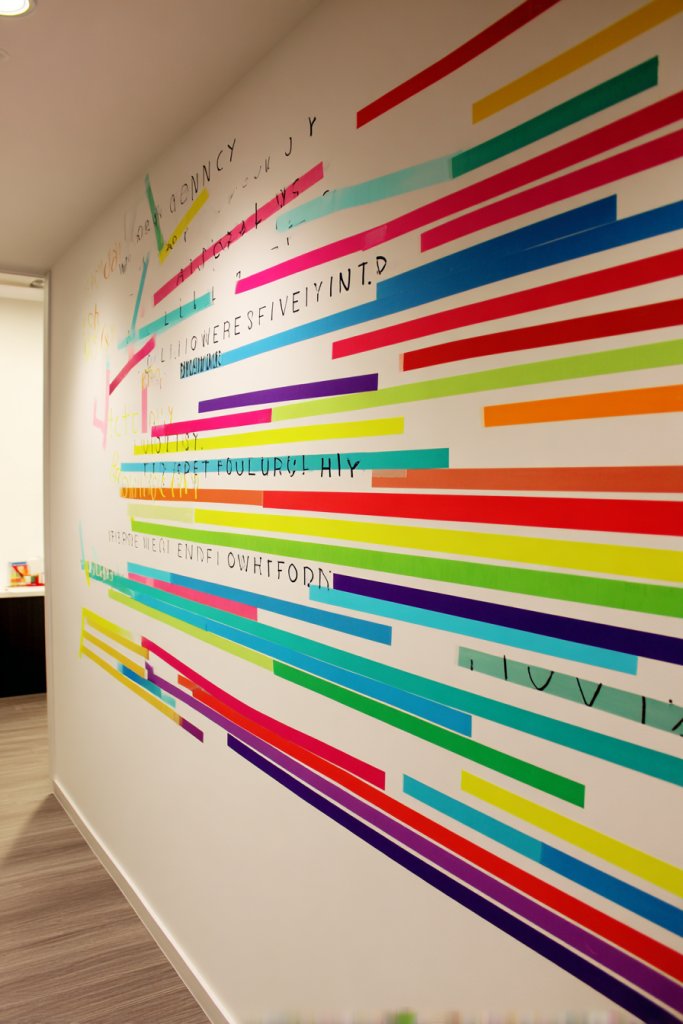
Ever feel like your bare wall is just crying out for some personality? Maybe you want a quick, inexpensive way to make a statement without drilling holes or hiring a pro. A bold quote or inspiring words can turn a dull space into something uplifting. The trick is finding a method that’s easy, customizable, and removable.
Recommended Products to replicate this idea
| # | Preview | Product | |
|---|---|---|---|
| 1 |

|
Phinus Washi Tape Set, 16 Pack Decorative Tape, Multicolor, 15mm x 5m, Reusable, Ideal for Gift... | Check Latest Price |
| # | Preview | Product | |
|---|---|---|---|
| 1 |

|
Americanflat 11x14 Floating Picture Frame with Polished Crystal-Clear Glass - Use as 8x10 Picture... | Check Latest Price |
Imagine a vibrant wall where colorful washi tapes form a neat, eye-catching quote. The tapes come in cheerful patterns—stripes, florals, or geometric shapes—adding texture and color. The words pop against a neutral painted background, making your message the star. It looks like a modern, playful mural that can be changed with your mood.
Switch up the tapes for different seasons—bright colors for summer, warm tones for fall. Use metallic or glitter washi for a touch of glam, or opt for pastel palettes for a soft vibe. This technique works in living rooms, bedrooms, or even home offices. You can also layer tapes of varying widths for a more dynamic look.
Start by choosing a quote or phrase that resonates with you. Use painter’s tape or a ruler to lightly outline the text on the wall. Apply washi tape carefully along the lines, ensuring straight edges. Mix and match patterns and colors to suit your style. If you make a mistake, peel and reposition the tape easily without damage. Finish with a clear top coat spray for extra durability if desired.
Add small decorative elements like arrow accents, floral motifs, or icons with washi tape for extra flair. Incorporate your favorite colors or themes—think tropical, boho, or minimalist—to personalize it. You can also attach small framed photos or notes around the quote for a collage effect. This makes your wall truly one-of-a-kind.
This DIY method proves that you don’t need to be a graphic designer to create impactful wall art. It’s budget-friendly, reversible, and endlessly customizable. Plus, it encourages creativity and experimentation—what’s not to love? Go ahead, turn that bland wall into a colorful, inspiring focal point!
2. Abstract Canvas Art Created with Sponges and Acrylic Paints for Modern Flair

Feeling like your wall decor is stuck in the past? Want something fresh, modern, and artistic without hiring an expensive artist? Abstract art offers that cool, contemporary vibe that can instantly elevate your space. The best part? You can make it yourself with simple tools.
Recommended Products to replicate this idea
| # | Preview | Product | |
|---|---|---|---|
| 1 |

|
Apple Barrel, Vibrant Spectrum Collection Acrylic Craft Paint, PROMOABIII, 2 fl oz each, 16 assorted... | Check Latest Price |
| # | Preview | Product | |
|---|---|---|---|
| 1 |

|
Simetufy 12 Pack 8x10 Canvas Boards for Painting, Blank Flat Canvas Panels Art Painting Supplies -... | Check Latest Price |
Picture a canvas bursting with bold, swirling colors and textured layers. Using sponges dipped in vibrant acrylic paints, you dab, swipe, and blend to create dynamic shapes. The textures add a tactile dimension, making the artwork pop off the wall. It looks spontaneous yet thoughtfully layered, perfect for a modern aesthetic.
Experiment with monochromatic schemes for a sleek look or go for contrasting colors for impact. Smaller canvases grouped together create a gallery wall, while a single large piece makes a bold statement. You can also vary the sponge techniques—stippling, sweeping, or dabbing—to achieve different textures. This style adapts well to minimalist, industrial, or eclectic interiors.
Choose a stretched canvas or even heavyweight paper if you’re just testing. Use acrylic paints in your favorite shades, and gather different-sized sponges or even household items like kitchen sponges for variety. Start by adding large patches of color, then layer in shades and textures with dabbing motions. Don’t overthink it—let spontaneity guide your strokes. Feel free to add metallic accents or metallic paints for extra shine. Finish with a clear sealant if you want to protect your work.
Create multiple pieces inspired by your favorite colors or themes—nature, urban landscapes, or abstract emotions. Incorporate metallic or glow-in-the-dark paints for unique effects. Customize by adding personal symbols or motifs with smaller brushes or stencils. Frame your artwork or hang it unframed for a raw, edgy look, depending on your style.
Making abstract art yourself demystifies the process and frees you from perfectionism. It’s a fantastic way to experiment with color and texture and develop your artistic eye. Plus, it’s a conversation starter and a true reflection of your personality. Ready to turn your blank wall into a gallery of your creativity?
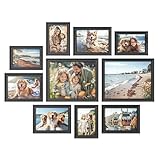
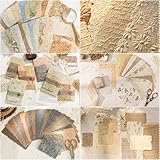
3. Customized Photo Collage with Hand-Decorated Borders Using Washed-Out Edges

Ever wish your photos could tell a story beyond a digital album? Turning your favorite memories into a wall collage adds a personal touch and makes your space feel more like home. But standard photo displays can look generic or cluttered if not styled right. The secret? Customizing borders and edges for a cohesive yet eclectic look.
Recommended Products to replicate this idea
| # | Preview | Product | |
|---|---|---|---|
| 1 |

|
SONGMICS 4x6 Picture Frames Collage Wall Decor, 12-Pack Photo Collage Frame, Multi Picture Frame Set... | Check Latest Price |
| # | Preview | Product | |
|---|---|---|---|
| 1 |

|
55 Rolls Holiday Washi Tape Set - Decorative Tape Seasonal Bohemian Colored Tape, Cute Washi Tapes... | Check Latest Price |
Imagine a wall filled with your cherished photos, each framed with hand-decorated borders in soft, washed-out hues. The borders have a vintage, faded effect that unifies different images and styles. Some borders feature hand-drawn doodles, watercolor washes, or torn paper edges, adding depth and character. The overall effect is warm, nostalgic, and uniquely yours.
Use different border techniques—watercolor washes for a dreamy feel or torn edges for a rustic vibe. Mix black-and-white and color photos for contrast, or keep everything in pastel shades for harmony. Arrange the collage in a grid, organic cluster, or across multiple shelves. Seasonal themes can be incorporated by swapping out some photos or adding themed borders.
Print your favorite photos on quality paper, then cut borders in various shapes and sizes. Use watercolors, diluted inks, or even tea stains to create washed-out effects on the edges. Distress the borders with sandpaper for a worn look. Use double-sided tape or removable adhesive strips to attach photos, allowing easy updates. Play with layering and overlapping for a dynamic display. Add small decorative elements like handmade tags or captions for extra personalization.
Incorporate mementos like ticket stubs, pressed flowers, or fabric snippets into your collage. Use different border techniques to match your decor style—delicate and refined or bold and rustic. Consider adding a framed corkboard or wire grid to hang new photos and keep your display fresh. Personal touches like handwritten notes or doodles make it even more special.
A customized photo collage makes your space truly yours and sparks joy every time you see it. It’s a fun, creative way to showcase your memories without overwhelming your walls. Plus, it’s easy to update and personalize over time. Get ready to turn your photos into a stunning wall narrative that invites conversation and nostalgia.
4. Yarn Wall Hangings in Your Favorite Colors for Textural Warmth

Looking for a cozy, tactile way to add warmth to your walls? Yarn wall hangings are a perfect answer—they’re soft, colorful, and instantly inviting. Whether you want to create a boho vibe or just love textures, this DIY is a fun way to craft something stylish. Plus, it’s budget-friendly and customizable.
Recommended Products to replicate this idea
| # | Preview | Product | |
|---|---|---|---|
| 1 |

|
FREEBLOSS DIY Macrame Leaf Wall Hanging Beginners Macrame Kit Leaf Woven Tapestry Feather Wall... | Check Latest Price |
| # | Preview | Product | |
|---|---|---|---|
| 1 |

|
JOYTAG 10 Acrylic Yarn Skeins,Multicolor Crochet Craft for Crocheting and Knitting,with Hooks... | Check Latest Price |
Picture a large, plush wall hanging made of layered yarns in shades of blush pink, deep navy, or earthy tones. The yarns cascade in waves or tassels, creating a sense of movement and softness. The texture invites touch, and the vibrant colors brighten up any room. It looks handmade but polished, adding a welcoming ambiance to your space.
Change the yarn thickness, length, and color palette to match your decor. For a minimalist look, opt for neutral tones and simple tassels; for a boho theme, mix bright colors and mixed textures. Hang multiple smaller pieces for a gallery effect or one large piece as a focal point. Incorporate metallic accents or beads for extra sparkle.
Gather yarn in your preferred colors and thicknesses, along with a wooden dowel or a metal rod. Cut yarn into varying lengths, then attach them by folding and looping around the rod with a lark’s head knot. Layer and arrange the yarns for fullness and visual interest. Secure the top with a sturdy knot or glue if necessary. Hang using a strong hook or wall bracket. Keep the yarns dust-free with occasional gentle brushing.
Add decorative elements like small charms, beads, or feathers woven into the yarns. Use different knotting techniques or braid sections for variety. Match the colors to your room’s palette or create a gradient effect. You can also make mini yarn hangings for shelves or doorways, creating a cohesive, textured look.
Yarn wall hangings are a fantastic way to introduce softness and personality into your decor. They’re easy to make, even for beginners, and they turn plain walls into cozy retreats. Once you see the transformation, you’ll wonder why you didn’t try it sooner. Get ready to craft your own plush, colorful masterpiece!
5. DIY Macramé Wall Art with Personal Color Preferences for Boho Vibes
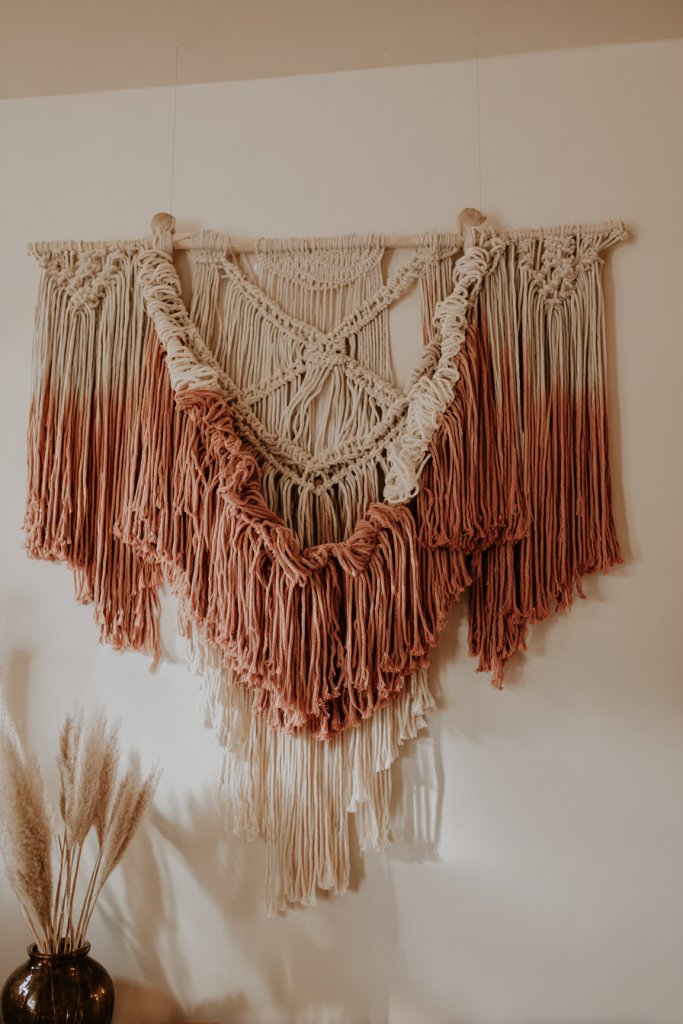
Craving that trendy boho look but don’t want to spend a fortune on store-bought decor? Macramé offers a versatile, handcrafted aesthetic that’s both stylish and relaxing to create. It’s perfect for adding texture and personality to any wall, with the bonus of customizing colors to match your vibe.
Recommended Products to replicate this idea
| # | Preview | Product | |
|---|---|---|---|
| 1 |
|
FREEBLOSS DIY Macrame Leaf Wall Hanging Beginners Macrame Kit Leaf Woven Tapestry Feather Wall... | Check Latest Price |
| # | Preview | Product | |
|---|---|---|---|
| 1 |

|
Natural Macrame Cord Colored Macrame Cord 2mm/3mm/4mm/5mm/6mm Macrame Cotton Cord, Twisted Macrame... | Check Latest Price |
Imagine a large, intricate macramé piece hanging gracefully, with natural fibers in earthy tones or vibrant shades. The knots and patterns form a captivating, textured design that draws the eye. Light filters through the open weave, casting interesting shadows. It’s both an art piece and a cozy accent, transforming a plain wall into a statement.
Choose from different knot styles—square, spiral, or feathered—for varied textures. Use dyed cords in your favorite colors—think terracotta, mustard, or pastel hues—to personalize. Hang multiple smaller pieces for a gallery wall or one large statement. Incorporate shells, beads, or feathers for extra flair. Adapt the size to fit your space, from small hangings over beds to large focal points.
Start with quality macramé cords and a sturdy dowel or wooden ring. Learn basic knots like the lark’s head, square knot, and spiral knot through tutorials or kits. Cut cords to desired lengths, then begin knotting patterns, alternating colors if desired. Use tape or clips to keep cords organized as you work. Finish with a decorative fringe or tassels at the bottom. Secure the top with a secure knot or glue, then hang on a strong hook.
Add accents like wooden beads, metal charms, or colorful tassels. Experiment with asymmetric designs for a modern touch. Use dyes or fabric paints to customize sections of your macramé for extra color. Personalize by incorporating symbols or initials into the design. Regularly adjust and tighten knots to maintain a polished look.
Making your own macramé wall art boosts your creative confidence and results in a unique decor piece. It’s a relaxing craft that yields beautiful results and impresses guests. Plus, it’s an affordable way to refresh your space with a trendy, handcrafted touch. Time to knot your way to a stylish wall!
6. Painted Wooden Pallet Art with Inspirational Words or Patterns
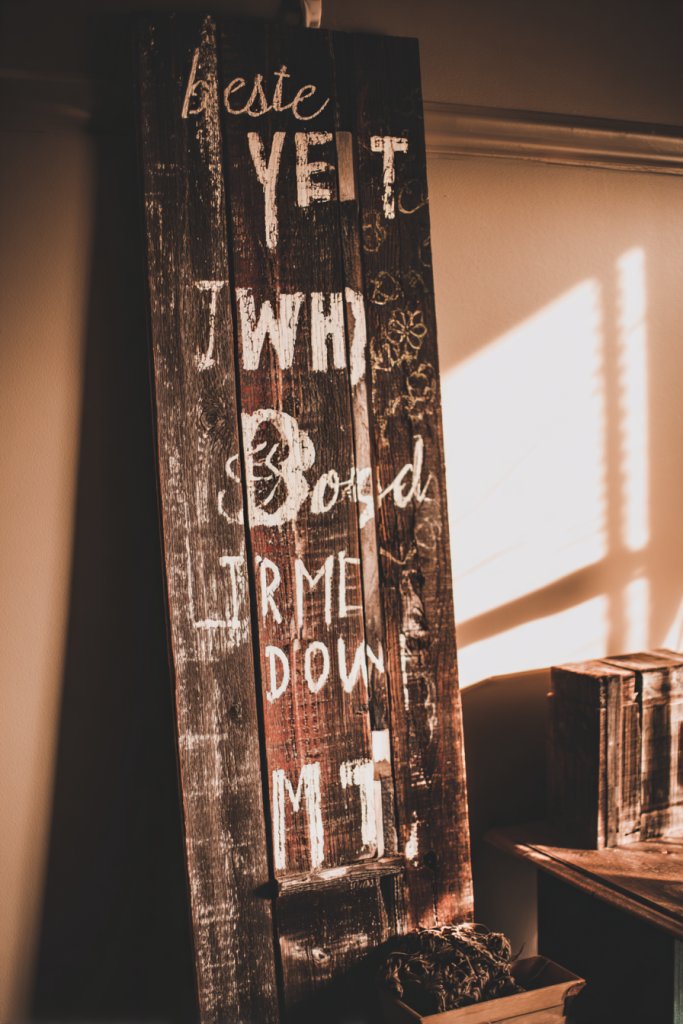
Want to add a rustic, meaningful touch to your home without breaking the bank? Wooden pallets are a versatile canvas for personalized art that can showcase your favorite quotes or patterns. It’s a fun, eco-friendly project that combines creativity with sustainability. Plus, it adds warmth and character to any room.
Recommended Products to replicate this idea
| # | Preview | Product | |
|---|---|---|---|
| 1 |
|
Pallet Board Co. - 20 Sq. Ft. Bundle of Reclaimed Pallet Boards - Nail Up Application - Rustic... | Check Latest Price |
| # | Preview | Product | |
|---|---|---|---|
| 1 |

|
Pagather 72 Colors Acrylic Paint Markers, Dual Tip with Fine Tip and Brush Tip Pens for Stone, Wood,... | Check Latest Price |
Picture a weathered wooden pallet painted in soft white or bold hues, with inspiring words like ‘Dream,’ ‘Create,’ or ‘Gather’ stenciled in stylish fonts. Alternatively, paint geometric or floral patterns for a decorative look. The wood’s natural grain peeks through the paint, adding texture and depth. Hung on a wall, it instantly turns a plain spot into a focal point full of personality.
Use different paint techniques—distressed, ombre, or solid colors—to match your decor. Attach multiple pallets in a collage for a layered effect or keep it simple with one large piece. Customize with different fonts, hand-lettered quotes, or abstract designs. Seasonal themes can be incorporated by changing the colors or motifs.
Start by sourcing old pallets from hardware stores or thrift shops—make sure they’re clean and free of chemical treatments. Sand the wood to smooth rough edges and prep the surface with a primer. Use stencils or freehand paint your chosen words or patterns with acrylics or chalk paint. Seal the paint with a clear topcoat for durability. Hang with sturdy hooks or brackets, ensuring the weight is well supported.
Add decorative touches such as metal embellishments, decals, or family initials. Incorporate small hooks or shelves for functionality—think about hanging keys or small plants nearby. Paint in your favorite colors or create a monochrome palette for a chic look. Personalize with hand-painted details or textured accents.
Transforming pallets into art proves that you don’t need fancy materials to create impactful decor. It’s satisfying to turn reclaimed wood into a meaningful masterpiece. This project encourages eco-consciousness and self-expression, making your home truly yours. Ready to give it a go?
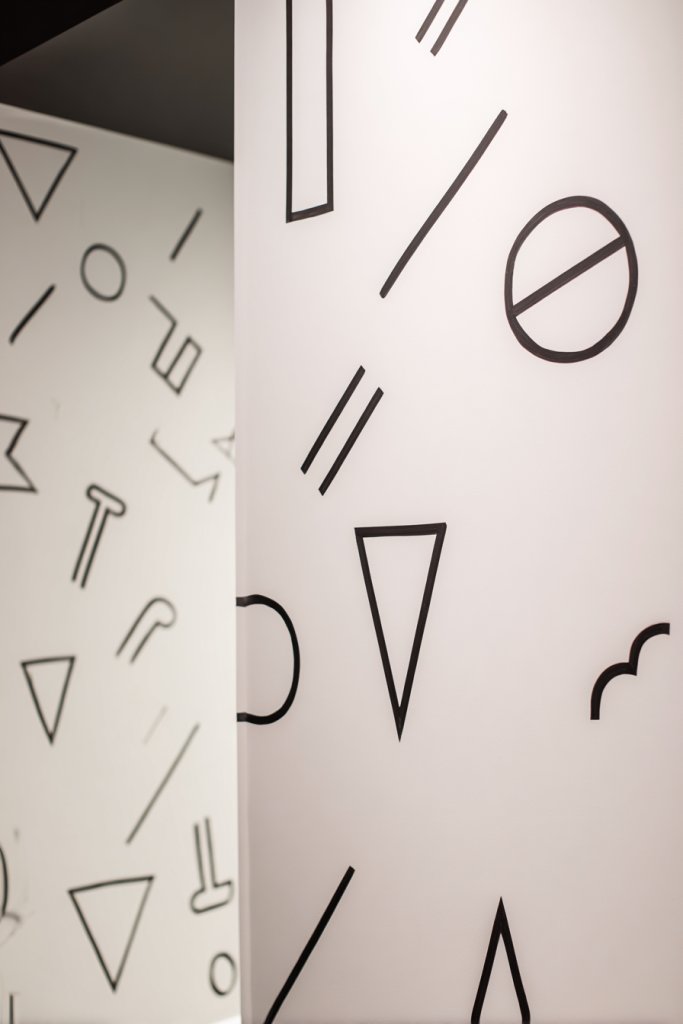
7. Hand-Painted Geometric Shapes on Canvas for a Minimalist Touch
Looking for a sleek, modern way to decorate your walls without clutter? Geometric patterns are timeless and versatile, perfect for a minimalist aesthetic. The best part? You can create custom art that reflects your style and color palette with just a few supplies. It’s a straightforward project that packs a visual punch.
Recommended Products to replicate this idea
| # | Preview | Product | |
|---|---|---|---|
| 1 |

|
Artlicious Canvases for Painting - Pack of 12, 9 x 12 Inch Blank White Canvas Boards - 100% Cotton... | Check Latest Price |
| # | Preview | Product | |
|---|---|---|---|
| 1 |
|
Apple Barrel, Vibrant Spectrum Collection Acrylic Craft Paint, PROMOABIII, 2 fl oz each, 16 assorted... | Check Latest Price |
Imagine a large canvas featuring bold triangles, squares, and lines in muted shades or vibrant contrasts. The clean edges and precise shapes give a sense of order and calm. The subtle interplay of colors and shapes creates an optical illusion of movement or depth. It’s a sophisticated piece that complements contemporary interiors.
Experiment with monochrome schemes for a subtle look or bright, contrasting colors for impact. Use painter’s tape for sharp lines and clean edges, or freehand for a more organic feel. Vary the size of shapes to add visual interest. Hang a series of smaller canvases to build a structured gallery wall or one large piece for a statement.
Choose a primed canvas or paint your own wooden board for a sturdy surface. Plan your design with light pencil sketches or tape off sections for precision. Select your acrylic or spray paints, and carefully fill in the shapes. Use a steady hand and a ruler for straight lines, or freehand for a looser look. Let each section dry before removing tape to keep edges crisp. Seal with a matte or gloss varnish for longevity.
Add metallic or glitter accents for a luxe touch or incorporate your favorite color combinations. Customize by adding subtle textures with sponges or brushes. Frame the artwork in a sleek frame or hang it unframed for a modern edge. Use stencils or masks to incorporate small details or symbols.
Creating geometric art is a great way to develop your precision and design sense. It’s a simple, impactful way to elevate your decor without overwhelming the space. Each piece becomes a reflection of your taste—minimalist, bold, or somewhere in between. Time to geometric your way to a stylish wall!
8. Deco Tape Wall Mural with Custom Patterns for a Quick, Stylish Accent
Want to add a splash of personality to your wall but don’t want the hassle of painting or wallpapering? Deco tape, also known as washi or painter’s tape, offers an easy way to create eye-catching patterns that are entirely removable. It’s perfect for renters or anyone who loves changing their decor often.
Recommended Products to replicate this idea
| # | Preview | Product | |
|---|---|---|---|
| 1 |

|
Washi Tape Set 30 Rolls, Decorative Tape, Colored Tape, Scrapbook Tape, Craft Tape for Scrapbook... | Check Latest Price |
Picture a wall adorned with bold, geometric stripes or intricate chevron patterns in bright colors or muted pastels. The tape’s clean edges and vibrant hues create a dynamic, modern look. You can also layer different patterns for depth or combine multiple colors for a playful effect. The tape adheres smoothly, giving a professional appearance without the mess.
Try different patterns—stripes, chevrons, honeycombs, or abstract shapes—based on your mood or season. Use a grid or freeform designs for variety. For a softer feel, opt for pastel colors; for a bolder statement, choose saturated shades. Mix matte and metallic tapes for added texture. You can also create temporary murals for special occasions or themed parties.
Begin by planning your pattern with light pencil lines or a template. Use painter’s tape or deco tape in your chosen colors, applying carefully along your guidelines. For sharp lines, press tape firmly and use a smoothing tool. Layer tapes for complex designs, ensuring edges are sealed to avoid peeling. Remove the tape carefully after completing your design to reveal crisp lines. Seal with a clear spray if desired for durability.
Incorporate your favorite motifs—arrows, stars, or abstract swirls—using different tape widths or colors. Add small decorative elements like stickers or decals to enhance the pattern. Change up the design seasonally or for special events. Use metallic and matte tapes together for a sophisticated or playful vibe.
This quick, reversible method lets you experiment with patterns without commitment. It’s a playful way to update your space regularly and showcase your style. Plus, it’s so easy that you’ll want to try new designs all the time. Ready to turn plain walls into a colorful, patterned canvas?
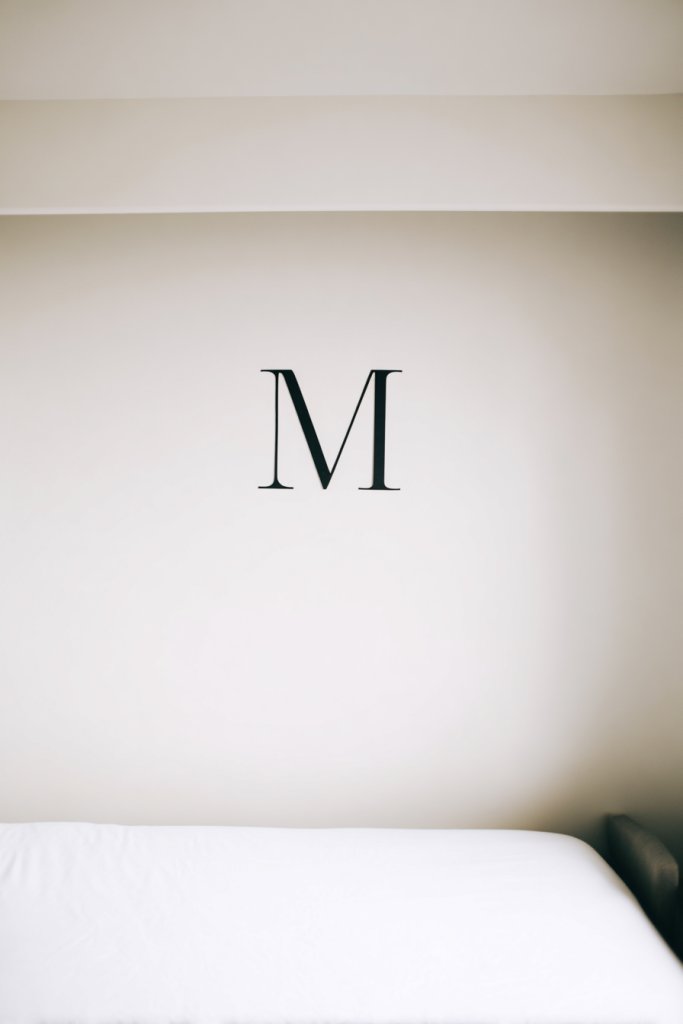
9. Personalized Monogram Wall Art Using Vinyl Stickers or Stencils
Ever wanted a personal touch on your walls that feels both elegant and meaningful? Monograms are timeless symbols of identity and style, perfect for adding a sophisticated vibe. The challenge is finding a way to customize without expensive or complicated methods. Luckily, vinyl stickers or stencils make it simple and stylish.
Recommended Products to replicate this idea
| # | Preview | Product | |
|---|---|---|---|
| 1 |

|
Rapid Vinyl Custom Vinyl Wall Lettering Decal Personalized Design and Create Your Own (Multiple... | Check Latest Price |
| # | Preview | Product | |
|---|---|---|---|
| 1 |

|
BAZIC Products Letter Stencil Set – Alphabet, Number and Signs Kit, Reusable for Painting, Fabric,... | Check Latest Price |
Imagine a sleek wall featuring a large, metallic monogram of your initials or family name. The vinyl sticker’s clean edges and shiny finish catch the light, adding a luxurious feel. Alternatively, a painted stencil creates a matte, textured look that blends seamlessly with your decor. Surround it with minimal accents or decorative elements for a personalized gallery.
Choose fonts that match your decor style—modern sans-serif, classic script, or vintage serif. Use metallic, matte, or gloss finishes depending on your aesthetic. For a layered look, combine monograms with decorative borders or floral motifs. Hang it in entryways, bedrooms, or living rooms, or create a family monogram for a warm, personalized touch.
Select a high-quality vinyl decal or stencil kit that suits your style. Measure your wall space and mark the center for symmetry. Clean the surface thoroughly before applying the vinyl sticker or stencil. Use a squeegee or brush to ensure adherence and smooth out bubbles. For stenciling, tape the stencil firmly and apply paint with a sponge or brush, then peel away carefully. Seal with a clear topcoat if needed.
Add decorative elements like metallic accents, small hooks, or LED backlights for a modern twist. Use different fonts, sizes, or colors to customize further. Incorporate family dates, icons, or symbols to tell your story. Change the background color or add textured wall paint for extra depth.
Creating your own monogram art makes your space uniquely yours and adds an elegant, personal statement. It’s a simple project that yields impressive results and boosts your decorating confidence. Plus, it’s a perfect gift idea for housewarmings or weddings. Your walls will thank you!
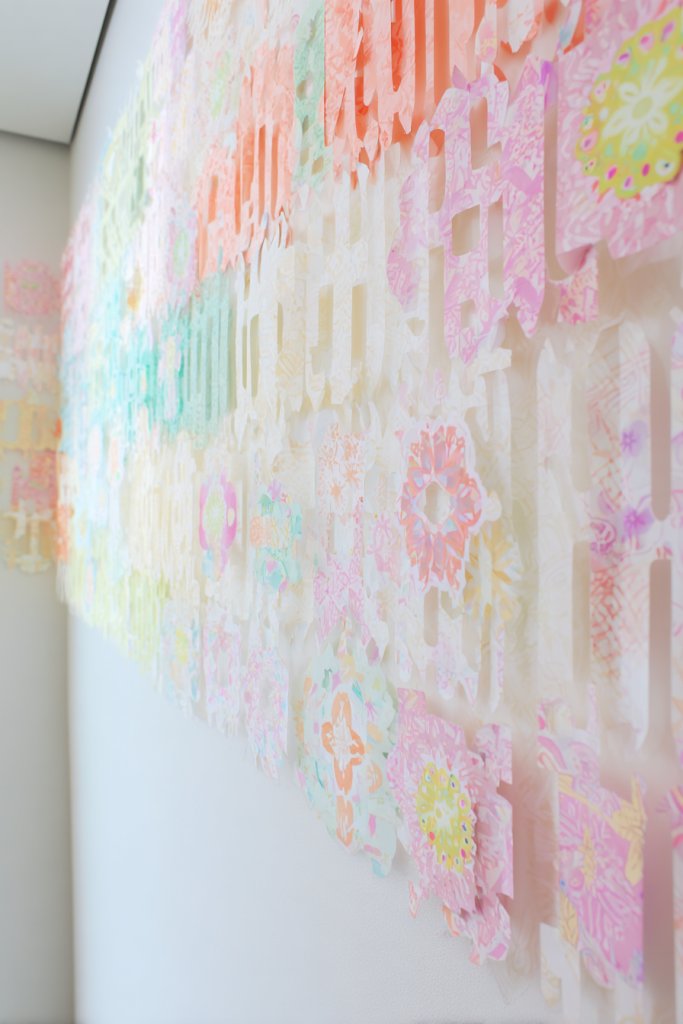
10. Layered Paper Art with Cut-Out Shapes for a 3D Effect

Want to add depth and dimension to your wall decor without complicated framing? Layered paper art offers a creative way to bring visual interest and a touch of artistry. This technique transforms flat surfaces into dynamic, eye-catching displays that feel alive. Best of all, it’s a budget-friendly DIY project anyone can try.
Recommended Products to replicate this idea
| # | Preview | Product | |
|---|---|---|---|
| 1 |

|
Shuttle Art 44 Pcs Magic Foam Texture Painting Kit, Including 28 Pcs Foam Texture Paper, 12 Colors... | Check Latest Price |
| # | Preview | Product | |
|---|---|---|---|
| 1 |

|
Americanflat 11x14 Shadow Box Frame with Shatter-Resistant Glass - Silhouette Collection - Large... | Check Latest Price |
Picture a series of colorful paper layers creating a floating effect on your wall. Cut-out shapes—circles, triangles, or organic forms—are stacked at varying heights for a layered, three-dimensional look. Shadows cast by the overlapping layers change with the light, adding movement and intrigue. It’s playful yet sophisticated, perfect for a statement wall.
Use different colors, textures, and shapes to match your decor theme—bold geometric, soft floral, or whimsical designs. Incorporate metallic or textured paper for extra richness. Arrange the layers in symmetrical patterns for a structured look or in freeform clusters for an artistic vibe. Combine with other wall art for a mixed-media gallery.
Cut your paper into shapes using scissors or craft knives, then assemble in layers with foam adhesive or small spacers to create depth. Mount the base layer directly on the wall with double-sided tape or poster strips. Add subsequent layers on top, adjusting angles for the desired effect. Use a level to keep everything aligned and a ruler for consistent spacing. Experiment with different shapes and colors to find your style.
Personalize with meaningful shapes—hearts, stars, initials, or symbols. Incorporate metallic accents or glitter paper for a festive touch. Change the color scheme seasonally or for special occasions. You can also add small LED lights or glow-in-the-dark elements to make it pop at night.
Layered paper art is a creative way to develop your crafting skills and produce a striking decor piece. It’s easy to customize and update, making it a versatile project for all skill levels. Seeing your wall transform into a textured, colorful masterpiece will boost your confidence. Get ready to impress your friends with your DIY talent!
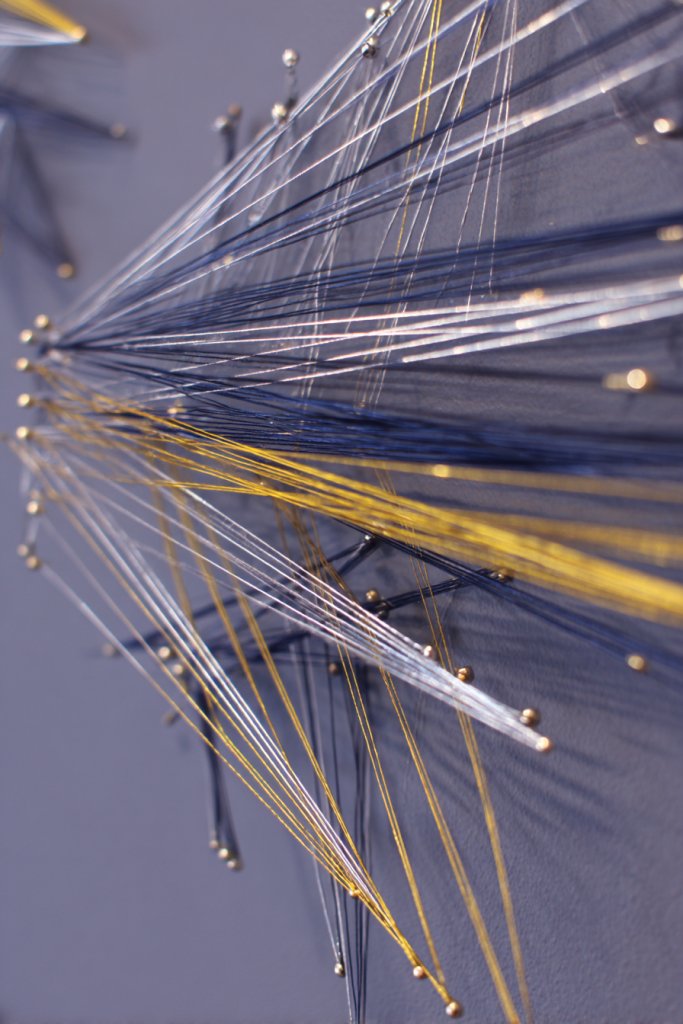
11. String Art with Metallic Nails and Colored Thread for a Chic Focal Point
Looking for a statement piece that combines craftsmanship with elegance? String art turns simple materials into stunning wall decor that’s both modern and timeless. It’s an artsy, decorative method that adds a chic, personalized touch. Plus, it’s surprisingly easy to learn and customize.
Recommended Products to replicate this idea
| # | Preview | Product | |
|---|---|---|---|
| 1 |

|
GORGECRAFT Heart String Art Kit Craft Cupcake All Necessary Accessories and Frame for Adults Crafts... | Check Latest Price |
| # | Preview | Product | |
|---|---|---|---|
| 1 |

|
Rrina 1200Pcs Small Tiny Nails Carbon Steel Brass Plated for Wooden DIY Micro Mini Nails M1.2/1.5... | Check Latest Price |
Imagine a wall featuring a geometric heart, star, or initials outlined with metallic nails. Brightly colored or metallic threads crisscross inside the shapes, creating a textured, intricate design. The contrast between the shiny nails and vibrant threads catches the light beautifully, making your wall a true conversation starter.
Experiment with different shapes—letters, symbols, or abstract patterns—for a personalized look. Use metallic, matte, or neon threads to match your decor style. Combine multiple designs or create a large, central piece for maximum impact. For a softer look, choose pastel threads and delicate outlines.
Start by sketching your design on the wall or paper. Hammer in nails along the outline, ensuring they’re evenly spaced and secure. Tie the thread to a nail, then weave it back and forth to fill in the shape, creating a web-like pattern. Use different thread colors and thicknesses for visual interest. Finish by tying off the ends securely. Clean up any excess or loose threads.
Add small decorative elements like beads, crystals, or charms to the thread for extra shine. Personalize with initials or symbols meaningful to you. Use different color combinations for different rooms or moods. Frame or mount the finished piece on a decorative backboard for a polished look.
String art is a charming craft that combines patience with style, resulting in a unique decor element. It’s a fantastic way to display your creativity and create a focal point that’s both personal and elegant. Once finished, you’ll be proud of your handcrafted masterpiece—time to hang it up!
12. DIY Felt Wall Hangings with Custom Shapes and Colors for Soft Textures

Craving a cozy, tactile element to soften your space? Felt wall hangings are a delightful way to add warmth and texture without overwhelming your decor. They’re customizable in shape, size, and color, making them perfect for expressing your style. Best of all, they’re easy to make at home.
Recommended Products to replicate this idea
| # | Preview | Product | |
|---|---|---|---|
| 1 |

|
KaKaPops Thin Felt Fabric Sheets, Assorted Colors Stiff Felt Sheets for Crafts DIY Patchwork Sewing... | Check Latest Price |
| # | Preview | Product | |
|---|---|---|---|
| 1 |
|
Playfully Ever After Mixed Color Assortment of Craft Felt Circles (1 Inch - 200pc) | Check Latest Price |
Visualize a wall covered with soft, overlapping felt shapes—clouds, stars, or abstract blobs—in pastel shades or bold hues. The plush texture invites touch and adds depth to your room. Layered and arranged thoughtfully, these pieces create a playful, inviting atmosphere. They look like handcrafted art pieces with a cozy, Scandinavian vibe.
Choose shapes that reflect your personality or decor theme—geometric, whimsical, or organic. Mix colors for a vibrant, energetic look or keep it monochrome for elegance. Hang multiple small pieces in a cluster or one large focal piece. Incorporate decorative stitching or embroidery for added detail. Use different thicknesses or textures of felt for variety.
Cut felt into your desired shapes using sharp scissors or a craft knife. Attach the shapes to a fabric backing or directly onto the wall with double-sided tape or hooks. For a more polished look, sew the shapes onto a fabric or felt base, then hang the entire piece. Experiment with layering and spacing to achieve your preferred aesthetic. Incorporate decorative stitches or embellishments if desired. Ensure the hanging method supports the weight and is secure.
Add embroidered details, small fabric flowers, or metallic accents for extra flair. Customize colors to match your decor palette or seasonal themes. Create a series of shapes that spell out words or initials. For a tactile upgrade, include textured stitches or quilting details. Change the arrangement over time to keep the look fresh.
Making your own felt wall art is a cozy, creative project that boosts your crafting confidence. It transforms plain walls into soft, inviting landscapes full of personality. Plus, it’s a low-cost way to experiment with color and form. Your space will thank you for this warm, handcrafted touch.
13. Stamped Art Pieces Using Alphabet or Pattern Stamps on Canvas or Paper
Want a quick way to add a personal, artistic touch to your walls? Stamped art is a playful, customizable method that combines typography and patterns. It’s perfect for creating meaningful quotes or abstract designs without the need for advanced painting skills. Plus, it’s fun and easy to do.
Recommended Products to replicate this idea
| # | Preview | Product | |
|---|---|---|---|
| 1 |

|
OJYUDD 70Pcs Wooden Rubber Alphabet Letter Number Stamps, Rectangular, Capital & Lower Case, DIY... | Check Latest Price |
| # | Preview | Product | |
|---|---|---|---|
| 1 |

|
ESRICH Canvas Boards for Painting, 5 Pack Canvases for Painting 8x10 Cotton Primed Acid Free Blank... | Check Latest Price |
Imagine a canvas decorated with repeated stamped words like ‘Love,’ ‘Joy,’ or your favorite quote in a stylish font. Or, create a pattern of geometric shapes, florals, or abstract motifs. The ink’s texture lends a tactile quality, and overlapping stamps add depth. The result is a lively, textured piece that feels personal and artistic.
Use different ink colors—black for classic, metallic for luxe, or pastel for soft vibes. Combine alphabet stamps with pattern stamps for a layered look. Vary the stamp size and placement for visual interest. Create a series of smaller prints for a gallery wall or one bold statement piece. Experiment with different backgrounds—plain, textured, or patterned.
Select high-quality stamps and ink pads suitable for your surface (canvas or paper). Plan your design with light pencil marks beforehand. Press the stamp firmly onto the ink pad, then onto your surface, applying even pressure. Repeat to fill the space, varying the orientation for a dynamic effect. Use masking tape or guides for straight lines. Let dry completely before framing or hanging. Seal with a fixative spray if needed.
Personalize by stamping initials, dates, or symbols alongside words or patterns. Mix different ink colors or add metallic accents for a luxurious feel. Incorporate hand-drawn elements or embellishments after stamping. Use different stamp styles within the same piece for variety. Mount on a decorative backing or frame for a finished look.
Stamped art proves that you don’t need to be a painter to create stylish decor. It’s a simple, creative outlet that yields charming results. Your walls will have a fresh, personalized vibe, and you’ll feel accomplished knowing you made it yourself. Time to stamp your way to a beautiful home!
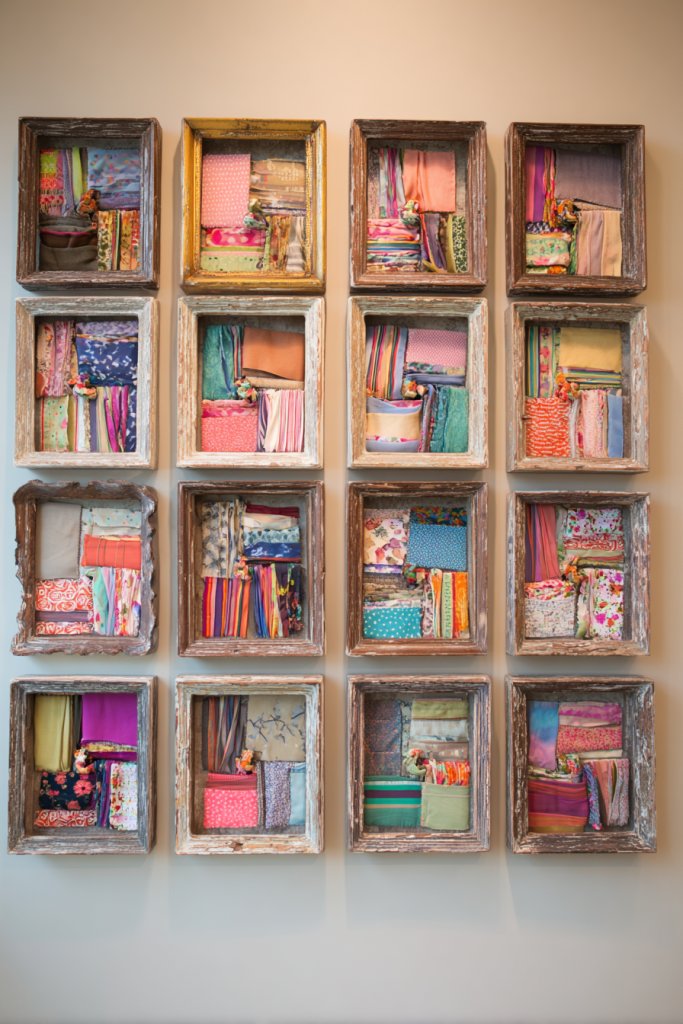
14. Repurposed Vintage Frames Filled with Fabric or Patterned Paper for a Retro Look
Looking for a stylish way to showcase your favorite textiles or patterns without buying new art? Vintage frames are a charming way to display fabric swatches, patterned paper, or even wallpaper remnants. It’s a simple, budget-friendly method to add a nostalgic, eclectic vibe to your decor. Plus, it’s a great way to recycle.
Recommended Products to replicate this idea
| # | Preview | Product | |
|---|---|---|---|
| 1 |

|
10 Pack Vintage Picture Frames for Wall or Tabletop Display Ornate Vintage Picture Frames Vintage... | Check Latest Price |
| # | Preview | Product | |
|---|---|---|---|
| 1 |
|
24 Sheets 12 Designs Scrapbook Paper Pad,6"×6” Single-Sided Decopodge Craft Cardstock... | Check Latest Price |
Picture a collection of old frames, each filled with different fabrics—floral upholstery, textured linen, or bold geometric prints. The frames’ worn edges and patina add character, making each piece a mini art gallery. Hung together, they create a layered, vintage-inspired wall that’s full of personality and history.
Mix frame styles—ornate, distressed, or simple—to enhance the vintage feel. Use fabrics and papers that match your color palette or theme—boho, shabby chic, or industrial. Create a grid or an organic arrangement for visual interest. Swap out fabrics seasonally or as your style evolves. Incorporate small decorative elements like tags or labels for added charm.
Remove the glass from the vintage frame if possible, or cover it with a backing board for safety. Attach fabric or patterned paper with double-sided tape, glue, or mounting squares. For a layered look, add multiple pieces of fabric or paper within each frame. Mount the frames on the wall with appropriate hooks or nails, ensuring stability. Adjust spacing for a cohesive display. You can also add small decorative items like vintage postcards or trims inside the frames for extra flair.
Customize by adding embroidered initials, small charms, or decorative stitches to the fabric. Use a variety of fabrics to tell a story or reflect your personality. Incorporate themed prints for holidays or special occasions. Keep some frames empty for future updates or seasonal decor. This approach allows your wall to evolve over time.
Reusing vintage frames is a delightful way to blend history with your current style. It’s an easy project that creates a warm, inviting atmosphere. Plus, it’s a conversation starter and a testament to your creative resourcefulness. Your home will radiate charm and personality!
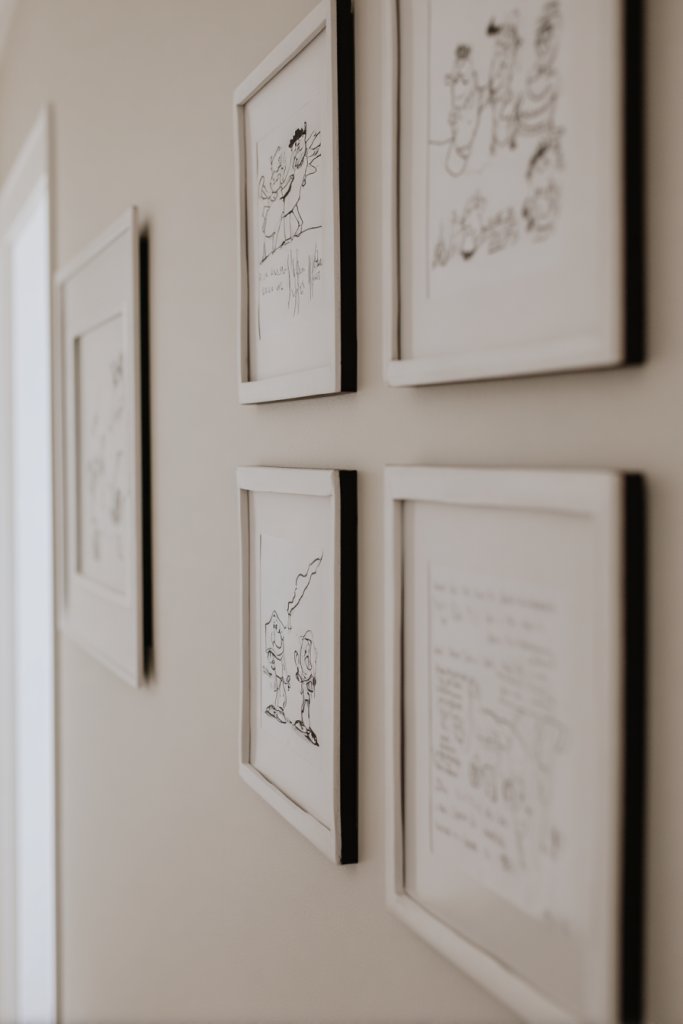
15. Hand-Drawn Illustrations or Doodles in Frames for a Personalized Artistic Touch
Want to add a truly personal, artistic element to your walls but don’t have the skills for detailed paintings? Hand-drawn illustrations and doodles offer a charming, casual vibe that’s both authentic and stylish. It’s a perfect way to showcase your creativity and make your space uniquely yours.
Recommended Products to replicate this idea
| # | Preview | Product | |
|---|---|---|---|
| 1 |
|
SONGMICS Picture Frames with 16 Mats, Set of 10 Collage Photo Frames, Two 8x10, Four 5x7, Four 4x6... | Check Latest Price |
| # | Preview | Product | |
|---|---|---|---|
| 1 |

|
Mr. Pen- Sketch Pencils for Drawing, 19 Pcs, With Graphite Sticks, Erasers and Sharpener, Art... | Check Latest Price |
Picture a series of simple line drawings—flowers, animals, abstract patterns—each framed individually or grouped in a gallery style. The sketches are minimal yet expressive, and the irregular linework adds a handcrafted charm. Use black ink on white paper for a classic look or color for a playful or themed effect. These art pieces instantly inject personality and a relaxed, artsy feel.
Create a cohesive series by using the same style or theme, such as botanical sketches or whimsical doodles. Mix different frame styles—wooden, metal, or painted—to enhance the casual vibe. Hang them in a grid, linear arrangement, or freeform cluster. Change the drawings periodically for a fresh look or to celebrate seasons and holidays.
Start by sketching your designs on paper, then trace or draw directly onto high-quality paper or cardstock. Use fine-tip pens or markers for crisp lines. Frame your drawings with inexpensive or vintage frames, or create your own with painted or decorated mats. Mount the frames on your wall using appropriate hooks or clips. Keep the drawings protected with glass or acrylic if desired.
Personalize with handwritten quotes, initials, or small decorative elements like stickers or stamps. Incorporate color accents or metallic inks to highlight certain areas. Combine with other art styles—watercolor backgrounds or collage elements—for variety. Display your sketches in a themed series or mix with other decor for an eclectic look.
Drawing your own art is a rewarding way to develop your skills and add a heartfelt touch. It transforms your space into a gallery of your personality and creativity. Plus, it’s a cost-effective project that’s fun and fulfilling. Your walls will tell your story through your own sketches!
16. Painted Mason Jar Lid Art for Unique Circular Wall Decor
Searching for a quirky, eco-friendly decor idea that’s easy to make? Mason jar lids are often overlooked, but they can be transformed into charming wall art. It’s a fun way to reuse what you might throw away and add a touch of rustic charm. Plus, it’s a project that’s quick to complete.
Recommended Products to replicate this idea
| # | Preview | Product | |
|---|---|---|---|
| 1 |

|
200 PCS Canning Lids Regular Mouth,2.76in Regular Mouth Mason Jar Lids,Ball Jar with Lids with Leak... | Check Latest Price |
| # | Preview | Product | |
|---|---|---|---|
| 1 |
|
Apple Barrel, Vibrant Spectrum Collection Acrylic Craft Paint, PROMOABIII, 2 fl oz each, 16 assorted... | Check Latest Price |
Picture a wall with a collection of painted lids, each featuring different designs—floral patterns, geometric shapes, or inspiring words. The circular shape lends itself well to symmetrical or freeform arrangements. Bright colors or metallic paints make each piece stand out, creating a lively, handcrafted gallery. It’s a playful, vintage-inspired look full of personality.
Use different paint techniques—stenciling, freehand, or decoupage—to customize each lid. Mix metallic, matte, or gloss finishes for variety. Group the lids in a grid, circle, or organic arrangement for visual interest. Decorate some with glitter or rhinestones for sparkle or add small fabric or paper accents underneath. Incorporate seasonal themes or quotes for variety.
Clean and dry the lids thoroughly before painting. Use acrylic or enamel paints for durability. Paint on the inside or outside, depending on your design, and let dry completely. Optional: add a protective sealant. Mount the lids on the wall with small nails or adhesive strips, ensuring they are level and evenly spaced. For added stability, attach a backing board or frame if needed.
Personalize with hand-lettered words, initials, or symbols. Incorporate layered textures with mixed media—like adding small fabric or paper pieces behind the painted surface. Use color schemes that match your decor or mood. Change the arrangement seasonally or for holidays to keep it fresh. It’s a versatile, charming display.
Transforming simple jar lids into art shows you don’t need fancy materials to create impact. It’s a budget-friendly way to decorate and express your style. Plus, it’s a satisfying project that results in a one-of-a-kind wall feature. Get ready to turn everyday items into art!
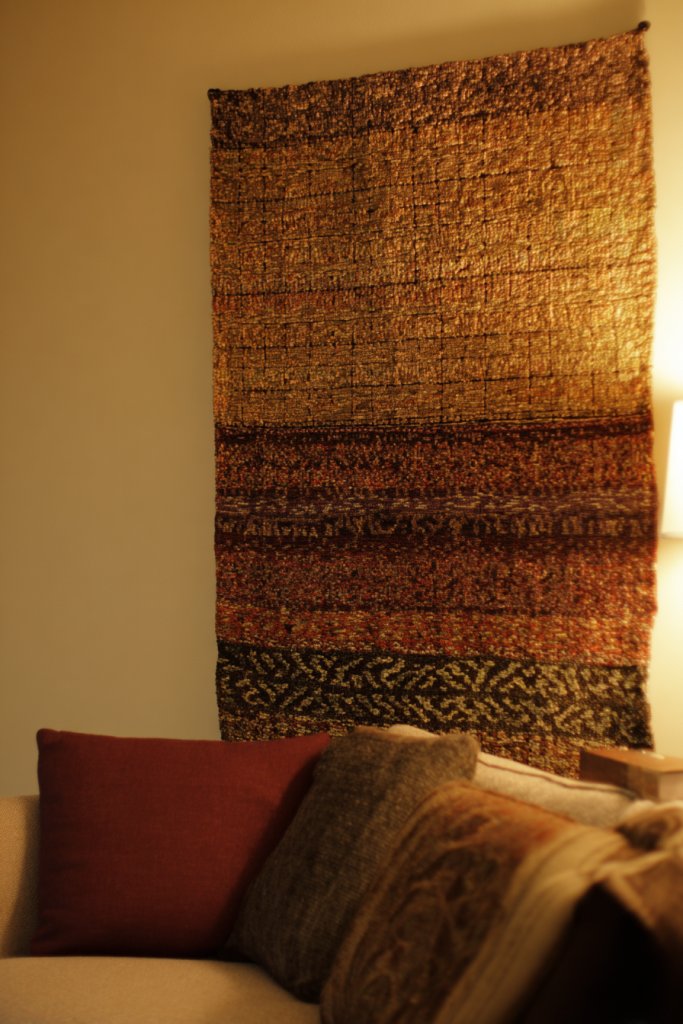
17. DIY Tapestry with Embroidery or Textile Art for a Cozy Feel
Want to bring warmth and texture into your space without heavy furniture or complicated decor? A DIY tapestry crafted with embroidery or textile art can instantly add coziness and personality. It’s a versatile project that combines craft and decor, perfect for a boho or rustic aesthetic.
Recommended Products to replicate this idea
| # | Preview | Product | |
|---|---|---|---|
| 1 |

|
Caydo 6 Pieces Embroidery Hoops 3 Inch to 10 Inch Cross Stitch Hoop Small Embroidery Hoop with 16... | Check Latest Price |
| # | Preview | Product | |
|---|---|---|---|
| 1 |

|
Achart Macrame Wall Hanging Large- Boho Wall Decor- large wall art- Wall Decor Living Room- Macrame... | Check Latest Price |
Picture a large fabric wall hanging adorned with embroidered patterns, tassels, or woven textures. Use natural fibers like jute, linen, or cotton in earthy tones or vibrant colors. Intricate embroidery, macramé details, or woven geometric designs create a tactile, layered effect. It’s both functional and beautiful, turning a blank wall into a focal point.
Create a simple woven panel, a detailed embroidery piece, or a combination of both. Use different textile techniques—fringe, knotting, or appliqué—to add variety. Choose colors that complement your decor—neutrals for calm, bright hues for lively spaces. Hang the tapestry using a wooden rod, a fabric sleeve, or with decorative hooks. Adjust the size to fit your wall space.
Start with a sturdy base fabric or textile artist canvas. Sketch your design lightly with chalk or fabric markers. Embroider, weave, or attach decorative elements as desired. Finish the edges with a decorative hem or fringe. Mount the tapestry on the wall with lightweight hooks or a rod. Keep the fabric taut for a clean, polished look. Consider adding backing for extra stability.
Add personal touches like initials, symbols, or favorite motifs. Use a mix of textures—ribbon, beads, or metallic threads—for visual interest. Incorporate seasonal or thematic elements to reflect your mood or occasion. Frame smaller textile art pieces or combine them into a gallery wall. Keep updating it with new stitches or patterns over time.
Making your own textile art encourages creativity and adds a handcrafted, cozy touch to your decor. It’s a rewarding project that can evolve with your skills and taste. Plus, it’s an affordable way to make a big impact on your walls. Prepare to enjoy a warm, inviting atmosphere!
18. Customized Washi Tape Mural with Personal Motifs or Designs
Looking for an easy way to personalize your walls without permanence? Washi tape is a versatile, decorative adhesive that allows you to create custom murals with motifs, shapes, or patterns. It’s perfect for renters or anyone who loves changing their decor often. Plus, it’s super simple to DIY.
Recommended Products to replicate this idea
| # | Preview | Product | |
|---|---|---|---|
| 1 |
|
55 Rolls Holiday Washi Tape Set - Decorative Tape Seasonal Bohemian Colored Tape, Cute Washi Tapes... | Check Latest Price |
| # | Preview | Product | |
|---|---|---|---|
| 1 |
|
55 Rolls Holiday Washi Tape Set - Decorative Tape Seasonal Bohemian Colored Tape, Cute Washi Tapes... | Check Latest Price |
Picture a wall decorated with a whimsical scene—balloons, clouds, or abstract shapes—in cheerful colors. The tape’s matte, textured surface adds visual interest, and its flexibility allows for detailed designs. The motifs can be layered, overlapping, or connected with lines for a cohesive look. It feels playful, lively, and completely personalized.
Create thematic murals—nature, celestial, geometric—or keep it abstract. Use different widths and colors of tape to add depth and contrast. Incorporate your favorite symbols or motifs, like arrows, hearts, or stars. Change the design seasonally or for special occasions. Mix matte and metallic tapes for a luxe touch.
Sketch your design lightly with pencil or use a digital template. Apply the tape carefully along your guidelines, ensuring edges are flat and smooth. Layer tapes for complex motifs and use small pieces for detailed areas. Remove any pencil marks after tape is set. For larger designs, work in sections. Seal with a clear spray if you want extra durability.
Add personalized symbols, initials, or decorative accents with smaller tape pieces. Incorporate seasonal or themed motifs—holidays, birthdays, or hobbies—for variety. Use contrasting colors to make certain elements pop. Change and update the mural regularly to reflect your evolving style. It’s a creative, non-permanent way to decorate.
Creating a washi tape mural is a playful, low-stakes project that encourages experimentation. It transforms your walls into a canvas of your personality and mood. Plus, it’s easily removable and reconfigurable—perfect for freshening up your space. Get ready to unleash your inner designer!
19. Silhouette Shadow Boxes with Personal Items or Cut-Out Shapes
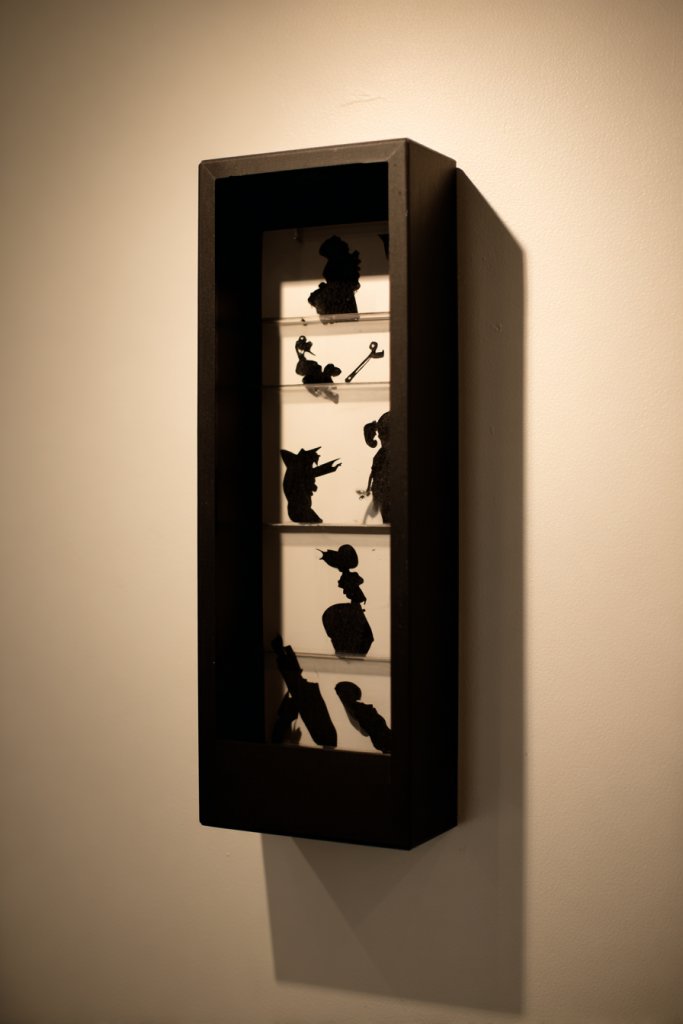
Want to showcase meaningful or sentimental items in a stylish way? Shadow boxes offer depth and dimension, allowing you to display personal items or cut-out shapes with a dramatic silhouette effect. It’s a creative way to add layers of storytelling to your decor. Plus, it keeps your keepsakes safe and stylish.
Recommended Products to replicate this idea
| # | Preview | Product | |
|---|---|---|---|
| 1 |
|
Muzilife 8x10 Shadow Box Picture Frame - 2.16" Interior Deep Wood & Glass Display Case Ready to Hang... | Check Latest Price |
| # | Preview | Product | |
|---|---|---|---|
| 1 |

|
25 Sheets Black Cardstock Paper 8.5 x 11 inches, 250 GSM/92 lb Thick Card Stock Paper for DIY Cards,... | Check Latest Price |
Imagine a shadow box featuring a cut-out silhouette of a favorite city skyline or a loved one’s profile, set against a colorful background or textured paper. The layered depth creates a striking visual, with shadows adding drama. Incorporate small personal items like jewelry or souvenirs inside for a multi-dimensional display. The result is a personal, artistic showcase.
Use different shapes—animal silhouettes, abstract forms, or initials—to match your decor theme. Play with contrasting backgrounds—bright, patterned, or metallic—to enhance the silhouette. Combine multiple shadow boxes for a gallery wall or focus on one statement piece. Incorporate seasonal motifs or personal symbols for variety.
Cut your shapes from heavy cardstock or thin plywood, ensuring clean edges. Mount the cut-out inside a deep shadow box frame with a secure backing. Arrange personal items or layered paper behind the silhouette for depth. Use double-sided tape, glue, or small nails for secure attachment. Hang the shadow box at eye level with sturdy hooks. Adjust the positioning for the best visual impact.
Personalize by adding handwritten quotes, dates, or decorative elements inside the box. Use different background colors or textured papers to match your room’s style. Incorporate small lights, like fairy lights, to highlight certain areas. Change the items seasonally or for special occasions to keep the display fresh.
Silhouette shadow boxes turn personal memorabilia into art, combining sentimentality with style. They’re an easy way to make your space more meaningful and visually interesting. Plus, they serve as conversation starters and showcase your storytelling skills. Time to create a personalized, dimensional display!
20. Painted Wooden Letter Art Spelling Out Names or Quotes for a Personal Statement
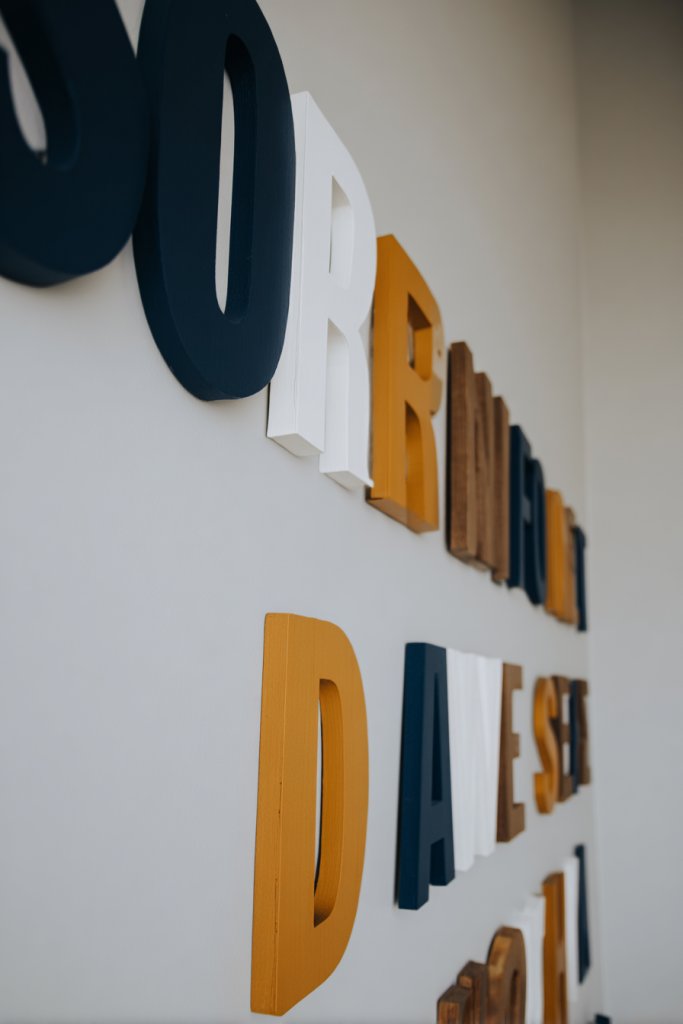
Looking for a bold, personalized way to make a statement on your walls? Painted wooden letters are a simple yet impactful decor idea that can spell out names, quotes, or meaningful words. It’s a DIY project that’s fun and produces a custom piece with lots of personality.
Recommended Products to replicate this idea
| # | Preview | Product | |
|---|---|---|---|
| 1 |

|
Wooden Letters 12 Inch, Big Wooden Letter A Shapes Cutouts Blank Unfinished Large Wood Alphabet... | Check Latest Price |
| # | Preview | Product | |
|---|---|---|---|
| 1 |
|
Apple Barrel, Vibrant Spectrum Collection Acrylic Craft Paint, PROMOABIII, 2 fl oz each, 16 assorted... | Check Latest Price |
Picture large wooden letters painted in your favorite colors—bright, pastel, or metallic—arranged to spell out a motivational quote or your family’s surname. The chunky, textured letters stand out against a neutral wall, creating a focal point. Add decorative touches like patterns, stripes, or monograms to enhance the visual appeal. The result is both modern and personal.
Choose different font styles—block, cursive, or vintage—to match your decor. Paint the letters in contrasting shades or use a single color for a sleek look. Mix with other decorative elements like plants, photos, or artwork for a layered display. You can also hang individual letters for a more dynamic, spaced-out effect. Change the words seasonally or for special events.
Buy or cut your own wooden letters from craft plywood or reclaimed wood. Sand the edges smooth and paint with acrylic or spray paint in your chosen colors. Use painter’s tape for clean lines or patterns. Attach the letters to the wall with mounting hardware or strong adhesive strips. Arrange on a flat surface first to plan spacing before hanging. Seal the paint if needed for durability.
Add decorative details like metallic accents, glitter, or hand-painted patterns. Personalize with initials, dates, or symbols relevant to your story. Incorporate string lights or small decorative items around the letters. Create a themed set—holiday, birthday, or family—to keep it fresh and meaningful. Rotate or update the message for different occasions.
Making your own wooden letter art is a satisfying way to showcase your personality. It adds a bold, artistic touch that’s sure to impress. Plus, it’s a durable, reusable decor piece that grows with your style. Get ready to spell out your story in the most stylish way!
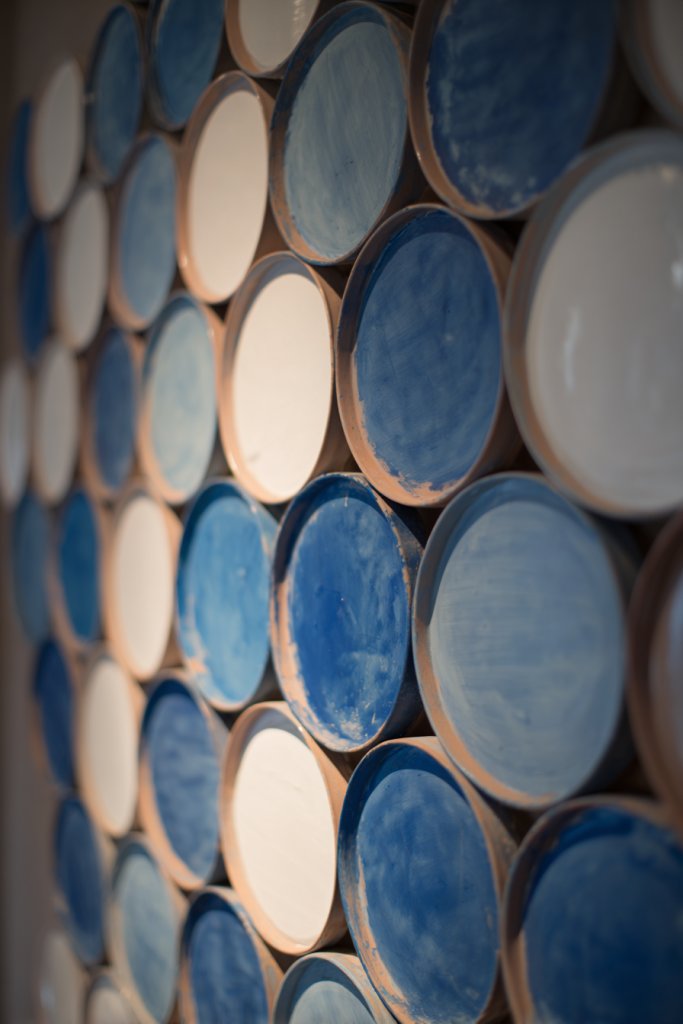
21. Mosaic Tile Wall Art Using Broken Ceramic Pieces for Colorful Texture
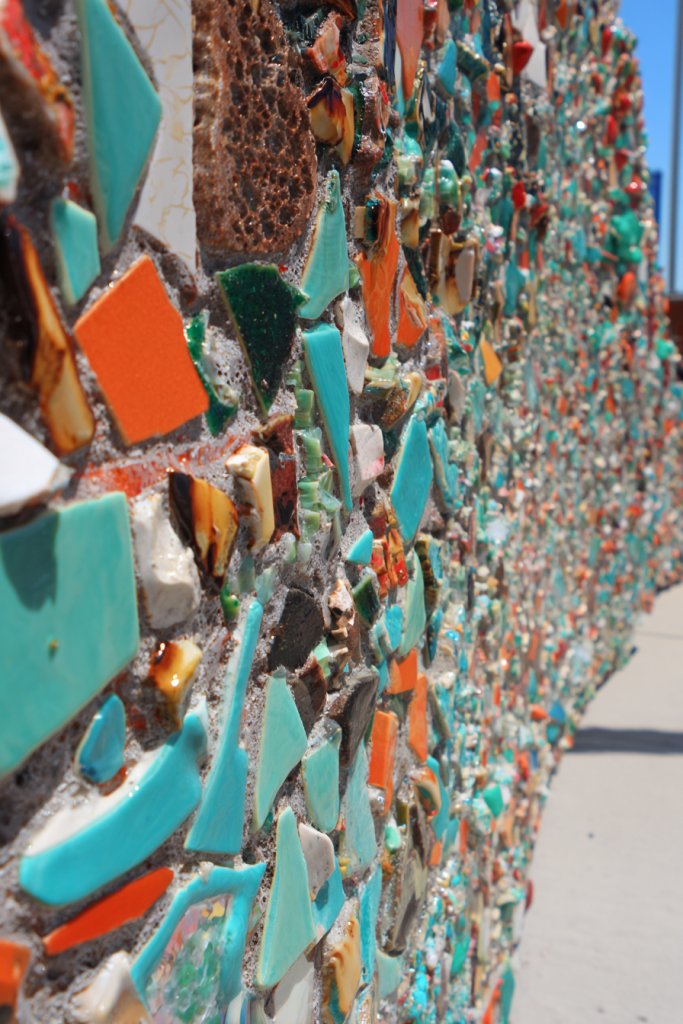
Want a vibrant, textured focal point that’s both artistic and eco-friendly? Mosaic tile art made from broken ceramic or glass pieces offers a splash of color and a tactile experience. It’s a creative way to upcycle old dishes or tiles while brightening your space with a one-of-a-kind piece.
Recommended Products to replicate this idea
| # | Preview | Product | |
|---|---|---|---|
| 1 |

|
Glass Tile Nippers - Heavy Duty Wheeled Glass Mosaic Nipper & Hd Ceramic Tile Nipper, Tile Cutter... | Check Latest Price |
| # | Preview | Product | |
|---|---|---|---|
| 1 |

|
SUPVOX 200pcs Mixed Mosaic Tiles Glass Mosaic Tile Assortment for DIY Crafts Crystal Mosaic Supplies... | Check Latest Price |
Imagine a wall mosaic composed of colorful broken ceramics arranged in swirling patterns or geometric designs. The irregular shapes and glossy surfaces reflect light, creating shimmer and depth. The mixture of colors and textures makes it lively, eclectic, and full of personality. It’s a DIY project that feels like creating a piece of modern art.
Use a monochromatic palette for a subtle, sophisticated look or a rainbow of colors for maximum impact. Arrange the pieces in a mosaic, abstract pattern, or themed design—flowers, waves, or symbols. Incorporate metallic or iridescent shards for extra shine. Frame the mosaic or embed it directly into a wall for a seamless look.
Gather broken ceramic pieces, safety gloves, and a sturdy base—cement board or thick plywood. Plan your design and lay out the pieces before gluing. Use tile adhesive or strong glue, pressing each piece firmly into place. Fill gaps with grout or a similar filler for a polished finish. Seal the surface with a clear protective coat. Mount the finished piece securely on your wall.
Add personal touches like embedded personal items, small photos, or themed motifs within the mosaic. Create patterns that tell a story or evoke a certain mood. Incorporate metallic or iridescent shards for shimmer. Regularly clean and reseal to maintain vibrancy. This project turns upcycling into a stunning decor statement.
Transforming broken ceramics into art shows resourcefulness and creativity. Each piece becomes a conversation starter and a showcase of your eco-conscious style. It’s a rewarding project that combines craftsmanship with personal expression. Your walls will sparkle with color and history!
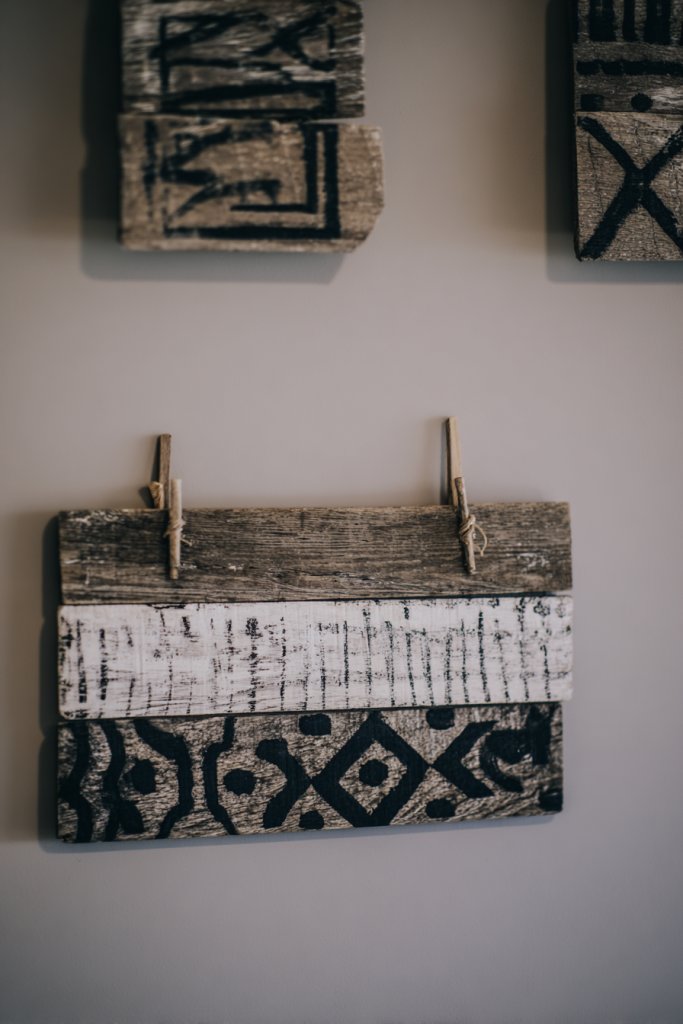
22. Upcycled Scrap Wood Art with Stenciled Messages or Patterns
Looking to add rustic charm and a personal message to your home? Upcycled scrap wood is a fantastic canvas for stenciled quotes, patterns, or designs. It’s an eco-friendly way to craft meaningful decor while giving new life to old wood. Plus, it’s a project that’s accessible and rewarding.
Recommended Products to replicate this idea
| # | Preview | Product | |
|---|---|---|---|
| 1 |

|
Lewtemi 6 Pcs Mixed Metal Stencil Wood Stencil Templates Stencils for Journaling Burning Stencils... | Check Latest Price |
| # | Preview | Product | |
|---|---|---|---|
| 1 |

|
Rustic Reclaimed Wood Planks for Crafts – 10 Pack (5" W x 48" L) – Unfinished Barnwood Boards... | Check Latest Price |
Picture a piece of weathered wood with a freshly stenciled word like ‘Hope’ or a geometric pattern in bold black or vibrant colors. The natural grain and imperfections add authenticity and texture. When hung, it creates a warm, welcoming vibe that blends vintage appeal with modern design. It’s both art and a statement.
Use different types of scrap wood—pallet planks, reclaimed furniture parts, or broken trims—to add variety. Combine multiple pieces into a gallery or focus on one large plank. Experiment with different stencil designs—quotes, symbols, or abstract shapes. Paint or stain the wood to match your decor palette. Incorporate mixed media like metal or fabric accents for extra interest.
Collect and clean your scrap wood, removing nails or splinters. Sand the surface for a smooth base. Use painter’s tape or a stencil to outline your message or pattern. Apply spray paint, brush, or sponge for the stencil, ensuring even coverage. Let dry, then seal with a clear coat for durability. Mount on the wall with appropriate hardware to support the weight. Arrange in a grid or linear formation.
Add decorative elements like metal accents, painted borders, or small hooks. Personalize with your favorite quotes, initials, or symbols. Incorporate seasonal colors or themes. Mix different finishes—matte, gloss, or distressed—to enhance the rustic feel. Regularly update or add new pieces for ongoing decor evolution.
Using scrap wood for art combines creativity with sustainability, giving you a sense of accomplishment. It creates a warm, personal atmosphere and highlights your resourcefulness. It’s a versatile project that can grow with your style. Your space will be uniquely yours—rustic, meaningful, and eco-conscious!
23. Hand-Painted Pebble or Shell Art Arranged in Decorative Patterns
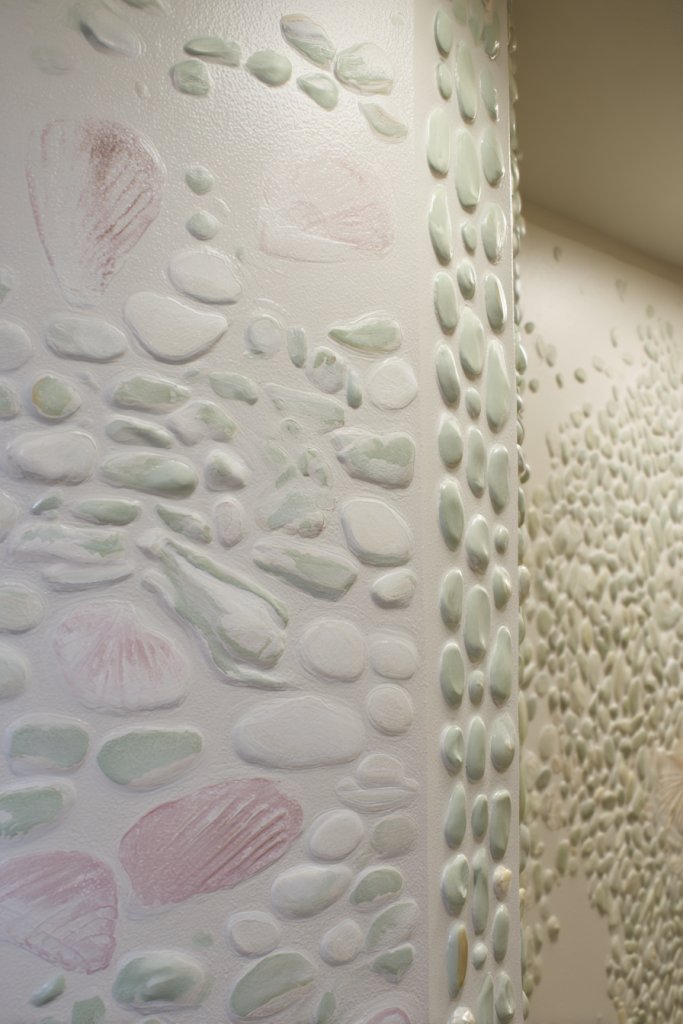
Craving a natural, calming decor element that captures the essence of the outdoors? Hand-painted pebbles or shells are perfect for creating textured, decorative patterns on your walls or tables. They bring a sense of serenity and organic beauty into your space. Plus, it’s a fun craft that lets you get creative with nature.
Recommended Products to replicate this idea
| # | Preview | Product | |
|---|---|---|---|
| 1 |
|
Apple Barrel, Vibrant Spectrum Collection Acrylic Craft Paint, PROMOABIII, 2 fl oz each, 16 assorted... | Check Latest Price |
| # | Preview | Product | |
|---|---|---|---|
| 1 |

|
Sea Shells Mixed Beach Seashells 9 Kinds 1.2"-3.5 "Various Sizes Natural Seashells and 2 Kinds of... | Check Latest Price |
Visualize a wall or tabletop decorated with smooth pebbles or shells, each painted with intricate designs—mandalas, floral motifs, or abstract patterns. The tactile surface invites touch, and the colorful paint adds vibrancy. Arranged in symmetrical patterns or freeform clusters, they create a harmonious, Zen-like vibe. It’s a natural yet artistic display of beauty.
Choose a color palette—earth tones, metallics, or bright hues—to match your decor. Combine painted pebbles with unpainted ones for contrast or add small embellishments like glitter or metallic accents. Arrange in circular, linear, or organic shapes depending on your space. Use them as wall accents, table centerpieces, or borders.
Clean and dry your pebbles or shells thoroughly. Use fine brushes or paint pens to decorate with detailed patterns. Seal the paint with a clear acrylic spray for protection. Arrange the decorated pieces on a canvas, tray, or directly affixed to a wall with adhesive. For wall mounting, use a strong, clear adhesive or small nails, depending on the weight. Adjust spacing for balance and aesthetic. Ensure all pieces are securely attached.
Create themed collections—beach scenes, mandalas, or floral designs—that reflect your personality. Incorporate small charms, beads, or metallic paints for added flair. Mix sizes and shapes to add visual interest. Frame your arrangement or create a decorative border for a finished look. Change the design seasonally or as your mood shifts.
Decorating with painted pebbles or shells is a calming, creative activity that results in a natural, artistic display. It’s a wonderful way to connect with nature and personalize your decor. The project is simple, inexpensive, and endlessly customizable. Your home will radiate tranquility and organic charm—time to get painting!
24. DIY Canvas with Mixed Media Collage Incorporating Personal Memorabilia
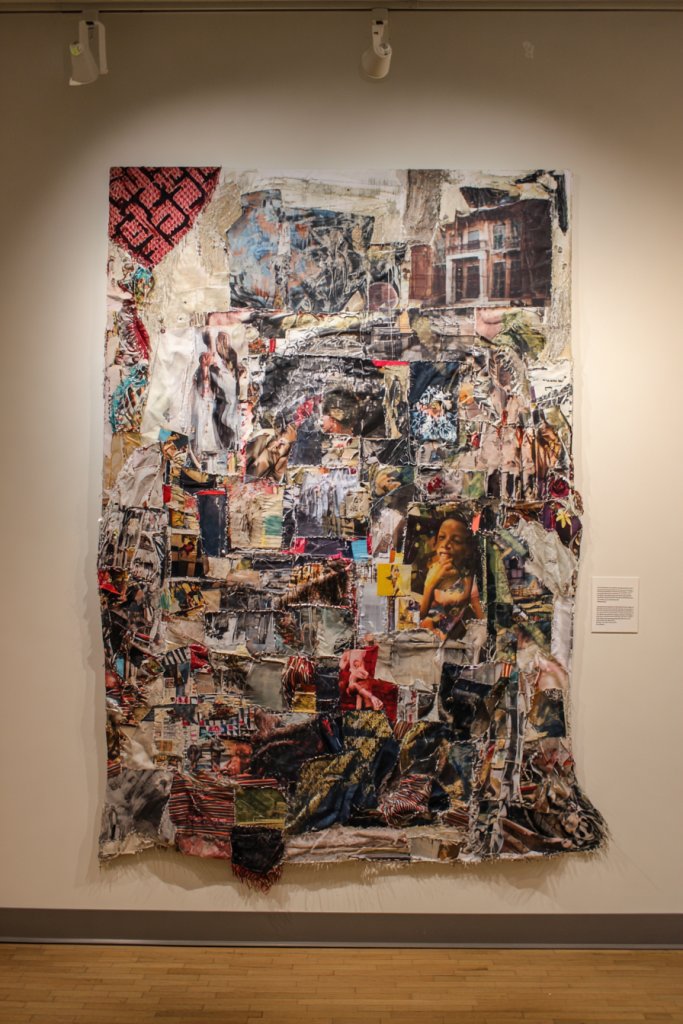
Want a truly personal piece of art that tells your story? A mixed media collage on canvas allows you to combine photos, fabrics, paint, and memorabilia into a layered, meaningful masterpiece. It’s a creative way to preserve memories and showcase your personality all in one piece. Plus, it’s a rewarding project for any craft lover.
Recommended Products to replicate this idea
| # | Preview | Product | |
|---|---|---|---|
| 1 |
|
FIXSMITH Stretched White Blank Canvas - 11x14 Inch, 8 Pack, Primed,100% Cotton,5/8 Inch Profile of... | Check Latest Price |
| # | Preview | Product | |
|---|---|---|---|
| 1 |
|
168Pcs Scrapbook Supplies Kit Textured Paper, Rice Paper For Scrapbooking Paper,Junk Journal... | Check Latest Price |
Imagine a canvas filled with overlapping photos, handwritten notes, fabric swatches, and small keepsakes—like ticket stubs or charms. The textures and layers create depth, inviting viewers to explore your story visually. Accents like paint splashes, ink doodles, or metallic details add vibrancy and dimension. The result is a rich, textured display of your life’s moments.
Design your collage around a theme—family, travel, or personal milestones—or create an abstract, freeform composition. Use a variety of materials—newspaper clippings, textured paper, fabric scraps—to add complexity. Incorporate 3D elements like small objects or raised embellishments. Keep a cohesive color scheme or go eclectic for a more dynamic look. Frame or stretch the canvas for a polished finish.
Gather your memorabilia and materials—photos, fabric, paint, glue, and embellishments. Start by arranging the items on your canvas without glue to plan your layout. Use glue, Mod Podge, or gel medium to affix each element securely. Add paint, doodles, or other details to unify the collage. Seal with a clear varnish or spray for protection. Hang with sturdy hooks or wires, ensuring the collage’s weight is supported.
Add handwritten captions, dates, or quotes to personalize further. Incorporate metallic or glitter accents for sparkle. Use themed embellishments—vintage buttons, charms, or decorative tape. Change or update the collage periodically to reflect new memories. Create a series for different themes or periods in your life.
This mixed media collage is more than wall art—it’s a personal archive that celebrates your journey. It encourages creativity and storytelling, making your home more meaningful. It’s also a flexible project that can grow and evolve over time. Your walls will become a living, breathing narrative—ready to inspire!
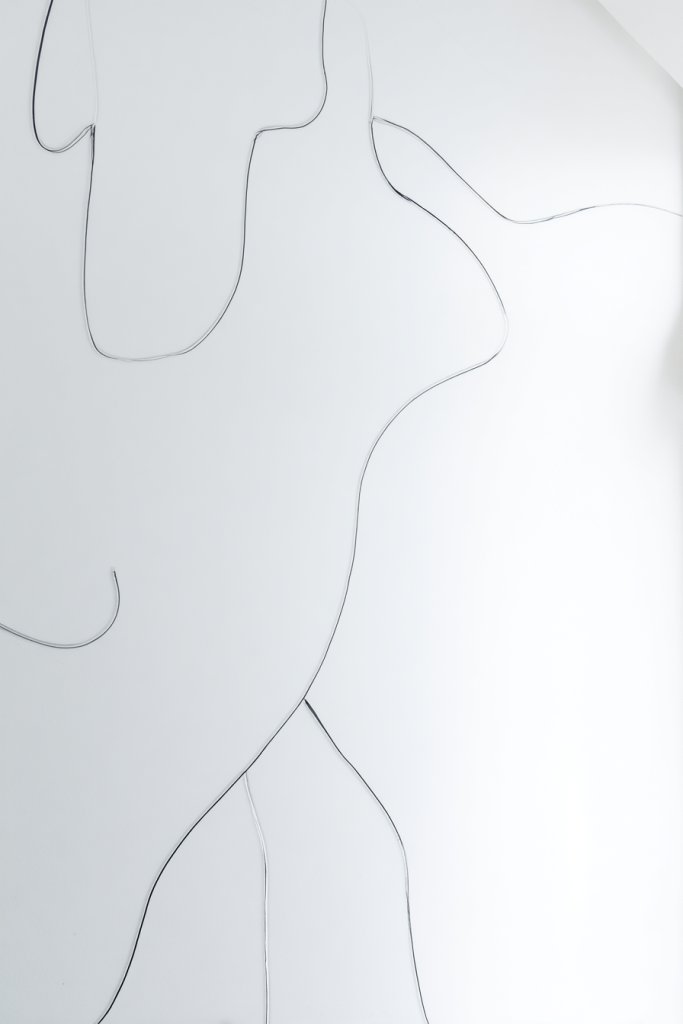
25. Minimalist Line Art Drawings Using Permanent Markers on Large Paper or Canvas
Looking for a sleek, modern way to decorate without clutter? Minimalist line art offers a chic, understated aesthetic that’s easy to create and suits any space. It’s perfect for those who love clean lines and simplicity but want to make a bold statement. Plus, it’s an inexpensive way to add contemporary art to your walls.
Recommended Products to replicate this idea
| # | Preview | Product | |
|---|---|---|---|
| 1 |
|
Cgerma Ultra Fine Point Permanent Marker Bulk, 8 Assorted Colors 0.4mm Fine Tip Permanent Markers... | Check Latest Price |
| # | Preview | Product | |
|---|---|---|---|
| 1 |

|
ESRICH Canvas for Painting 18x24 Inch, 6 Pack Canvas Boards for Painting Cotton Primed Acid Free... | Check Latest Price |
Picture a large sheet of paper or canvas featuring a single, continuous line forming an abstract face, animal, or geometric shape. The simple black lines create a striking visual that’s open to interpretation. The minimalism emphasizes elegance and sophistication, transforming your wall into a gallery of effortless style. It’s a calming yet captivating focal point.
Use different line weights—thick, thin, or variable—for varied effects. Incorporate color accents or leave it monochrome for a timeless look. Create a series of small drawings or one large, continuous piece. Frame in sleek, modern frames or hang unframed for a more casual vibe. Match your art style to your decor—modern, Scandinavian, or eclectic.
Start with high-quality paper or stretch a canvas onto a frame. Sketch your design lightly with a pencil, then outline with a permanent marker or ink pen. Keep your lines fluid and confident—no erasing required. Add subtle details or color accents if desired. Seal with a fixative spray or leave as is for a matte finish. Mount on the wall with minimal hardware, ensuring the piece is centered and level.
Personalize by incorporating initials, dates, or small symbols into your line art. Experiment with multiple pieces—faces, animals, abstract forms—for a cohesive series. Use metallic or colored markers for accents. Change the artwork periodically to keep your decor fresh. It’s a simple yet impactful way to showcase your artistic sensibility.
Creating minimalist line art is a freeing process that develops your drawing confidence and aesthetic sense. It’s a modern, elegant addition that elevates your decor effortlessly. Plus, it’s a great project for all skill levels, proving that less truly is more. Your walls will thank you for the sleek upgrade.
Conclusion
With this variety of DIY wall art decor ideas, you’ll be equipped to transform your home into a reflection of your personality and style. From simple crafts to more intricate masterpieces, these projects are perfect for unleashing your creativity. Dive in, get inspired, and make your walls a beautiful showcase of your individuality!