I have been, or can be if you click on a link and make a purchase, compensated via a cash payment, gift, or something else of value for writing this post. As an Amazon Associate, I earn from qualifying purchases. Please read my full Affiliate Disclosure for more information.
Imagine transforming your home into the ultimate entertainment hub with a DIY bar that showcases your personal style and creativity. DIY bar ideas have surged in popularity because they allow you to craft a space that’s both functional and uniquely yours, all while adding a touch of personality and charm.
In this article, you’ll discover a variety of inspiring DIY bar ideas perfect for any space and skill level. From chic mini bars to rustic setups, these ideas will ignite your imagination and help you create a stylish, inviting spot to entertain friends and family with confidence and flair.
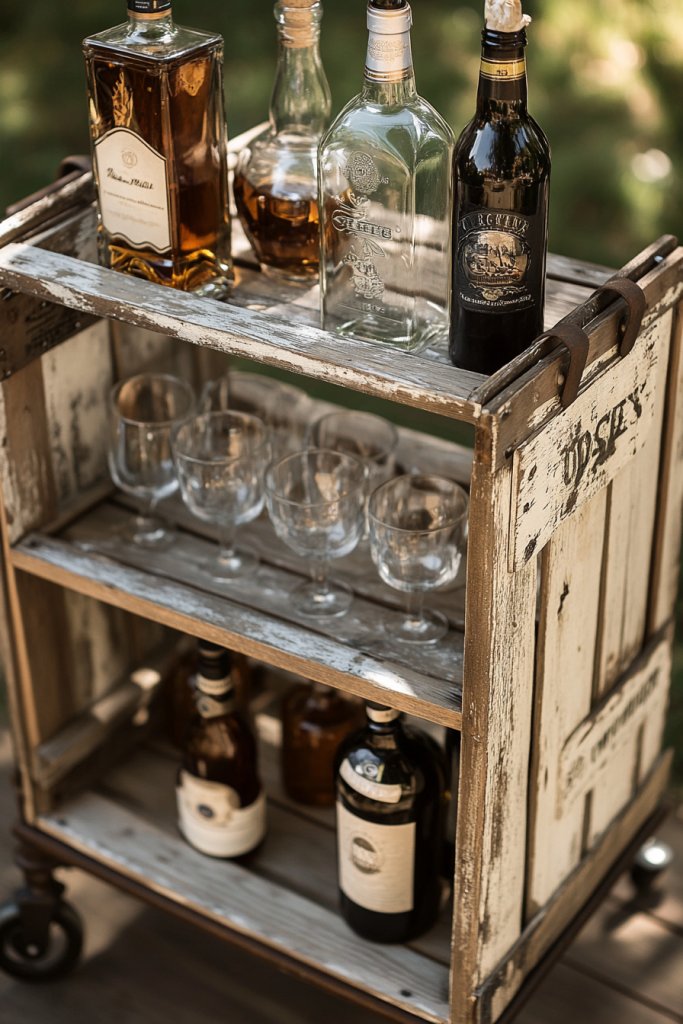
1. Repurposed Crate Bar Cart with Vintage Charm
Ever tried to entertain guests but felt like your space was lacking that wow factor? A stylish, functional bar cart can be the perfect solution to elevate your hosting game. The challenge is finding something unique that doesn’t break the bank but still adds personality. DIYing your own gives you the freedom to customize and impress without overspending. Who says practicality can’t be charming?
Recommended Products to replicate this idea
| # | Preview | Product | |
|---|---|---|---|
| 1 |

|
Dapedomal Kitchen Butcher Block Cart - Acacia Wooden Bar Cart with Drop Leaf, Aluminum Handles and... | Check Latest Price |
| # | Preview | Product | |
|---|---|---|---|
| 1 |

|
TUTOTAK Bar Cart, Home Bar Serving Cart with 3-Tier Mirrored Shelf, Wine Cart, Mobile Kitchen Shelf,... | Check Latest Price |
Imagine stacking weathered wooden crates, each with its own rustic charm, topped with vintage-style hardware for stability. The open design invites curiosity, with bottles and glasses arranged artfully across the surface. Soft light filters through the cracks in the wood, casting warm shadows that create an inviting atmosphere. It’s a piece that feels both nostalgic and modern, perfect for cozy gatherings.
You can paint or stain the crates in colors matching your decor, from distressed white for shabby chic to dark espresso for industrial vibes. Add wheels for mobility or decorative metal corner brackets for extra flair. For small spaces, consider stacking vertically to save floor area. Seasonal touches like fairy lights or faux greenery can enhance the look during holidays or summer nights.
Start with sturdy wooden crates, available at craft stores or reclaimed from old furniture. Secure them together with heavy-duty screws or industrial brackets, ensuring stability. Attach small caster wheels to the bottom if you want mobility. Finish with a protective sealant or paint to match your style. Arrange bottles, glasses, and bar tools on the top surface, and use inside compartments for extra storage. This project takes a few hours but results in a unique piece everyone will admire.
Add personal touches like stenciled monograms, vintage labels, or hand-painted patterns to make it truly yours. Incorporate textile elements such as a burlap runner or a cozy fabric cover for the crates. You could also attach hooks on the sides for hanging bar accessories or cocktail tools. Customizing the layout allows you to tailor the cart to your hosting style, whether casual or formal.
Building your own crate bar cart not only saves money but also boosts your DIY confidence. It’s a conversation starter and a testament to your creativity. Plus, it’s versatile enough to serve as a side table or plant stand when not in use. Ready to transform simple crates into a vintage charm centerpiece?
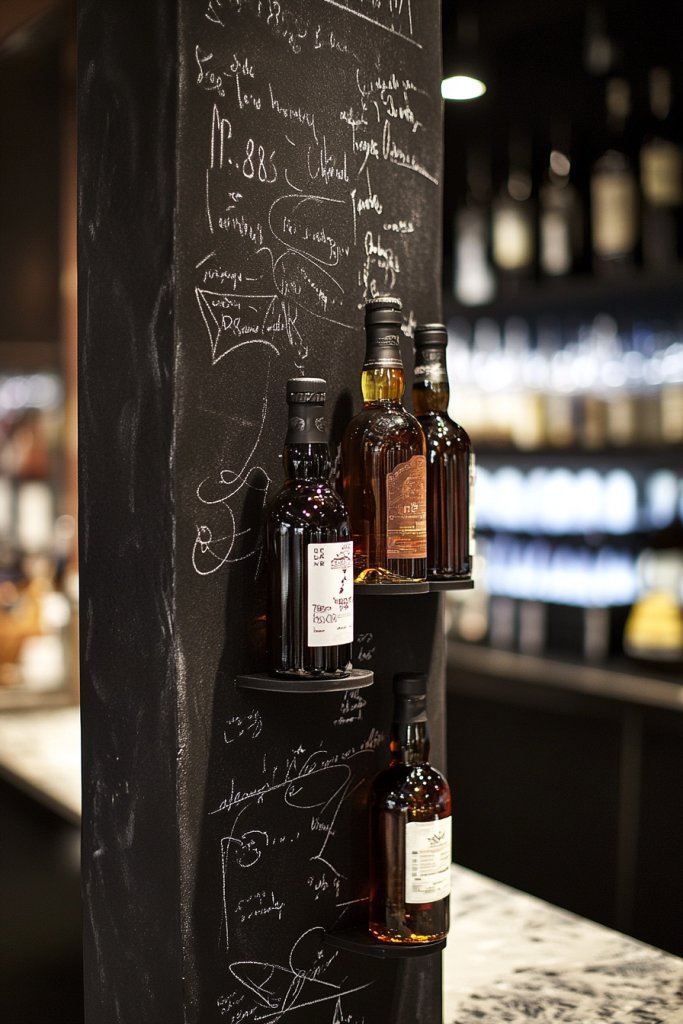
2. Chalkboard-Wrapped Bottle Display
Ever wanted to add a touch of personal flair to your beverage station? A chalkboard-wrapped bottle display creates an interactive and stylish focal point that’s perfect for parties. The challenge lies in making it look polished rather than DIY-clunky. Luckily, with a few materials, you can turn ordinary bottles into eye-catching conversation starters. Ready to impress your guests?
Recommended Products to replicate this idea
| # | Preview | Product | |
|---|---|---|---|
| 1 |
|
Nicpro Chalkboard Contact Paper Roll, 17.7" X 78.7" (6.5 Feet) Self Adhesive Blackboard Wallpaper,... | Check Latest Price |
| # | Preview | Product | |
|---|---|---|---|
| 1 |

|
Bold Chalk Markers - Dry Erase Marker Pens - Liquid Chalk Markers for Chalkboards, Signs, Windows,... | Check Latest Price |
Picture clear glass bottles wrapped in matte black chalkboard paint, with handwritten labels in chalk. The labels feature fun messages or cocktail ingredients, which guests can read easily. Soft lighting highlights the matte finish, giving a sophisticated yet playful vibe. The contrast between the dark bottles and white chalk creates a clean, customizable look that can be changed as needed.
Choose bottles of various shapes and sizes for an eclectic look, or keep it uniform for a sleek, modern style. You can also use colored chalk for seasonal themes or special occasions. For a more rustic feel, opt for kraft paper labels underneath the chalk. This method works well on countertop displays, bar carts, or wall-mounted shelves, depending on your space.
Begin by thoroughly cleaning your bottles. Apply a few coats of chalkboard paint, allowing each layer to dry completely. Use painter’s tape for clean edges or intricate designs. Once dry, write labels with chalk or chalk markers for durability. You can also seal the paint with a clear matte finish if you want it to last longer. Organize bottles by type or color for visual appeal. Every step is simple and allows for easy customization.
Personalize your labels with names, dates, or themed messages that match your party vibe. Use stencils or hand lettering for a bespoke look. Add decorative elements like metallic chalk accents or borders. Incorporate small hooks or clips for hanging tags or additional notes. This display becomes a dynamic feature that can evolve with your style or event themes.
Transforming bottles with chalkboard paint is an easy yet impactful project that elevates your entertaining space. It encourages creativity and adds a personal touch to every gathering. Plus, it’s a fantastic way to reuse bottles and reduce clutter. Are you ready to give your beverage display a stylish upgrade?
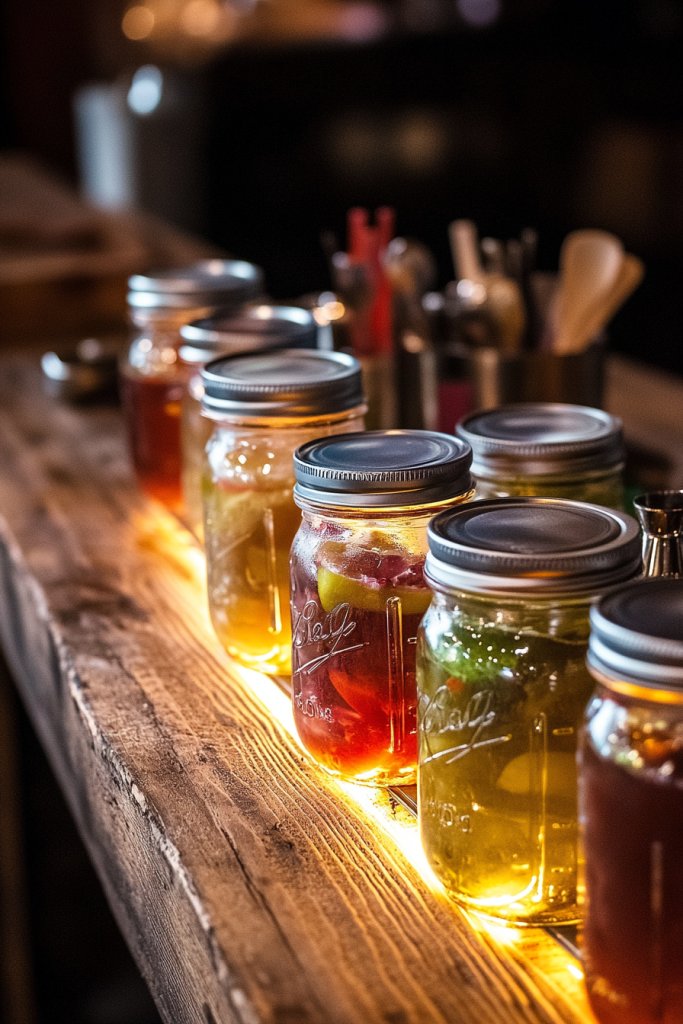
3. Mason Jar Cocktail Station with LED Lighting
Hosting a party and feeling overwhelmed by cluttered counters? A mason jar cocktail station can organize your ingredients while adding rustic charm. The trick is to make it both functional and visually appealing, so guests feel invited to serve themselves. DIYing this setup saves money and allows you to customize your favorite ingredients. Who wouldn’t want a cozy, lit-up drink station?
Recommended Products to replicate this idea
| # | Preview | Product | |
|---|---|---|---|
| 1 |

|
1 Gallon Glass Drink Dispensers For Parties-Set of 2,Drink Dispenser with Fruit Infuser &... | Check Latest Price |
| # | Preview | Product | |
|---|---|---|---|
| 1 |

|
Brightown 12 Pack LED Fairy Lights Battery Operated String Lights - 7ft 20LED Waterproof Silver Wire... | Check Latest Price |
Imagine rows of glass mason jars filled with colorful liquids, herbs, and garnishes, all illuminated by soft LED fairy lights. The jars sit on open shelves or a sturdy wooden tray, creating a warm, inviting glow. The textured glass and twine or metal accents add a touch of vintage vibe. The ambient light reflects off the jars, making the whole setup feel lively yet intimate.
Use different jar sizes for variety, or match jars with themed labels for special occasions. Incorporate chalkboard tags for easy identification. For seasonal decor, add faux snowflakes or colored ribbons. This setup works well on a kitchen island, sideboard, or outdoor patio table, depending on your space and style. Swap out LED colors for holidays or parties to keep it fresh.
Gather a selection of clean mason jars, preferably with lids for storage. Fill jars with spirits, mixers, or fresh ingredients, and label them with waterproof markers or chalk labels. String LED fairy lights around the jars or drape them across shelves for gentle illumination. Use a sturdy wooden board or tiered stand for display. Regularly check and replace LED batteries or power sources to keep the glow consistent. This project takes minimal setup but delivers big visual impact.
Add personalized tags or decals to each jar to match your theme. Incorporate decorative textiles like burlap or lace beneath the jars. Consider adding small trays or coasters for glasses next to the station. You can even embed scent diffuser sticks into the setup for a subtle aroma that complements your drinks. This station is versatile, so feel free to customize based on your favorite cocktails.
A mason jar cocktail station turns a simple idea into a cozy, Pinterest-worthy feature. It encourages creativity, making your gatherings more interactive and fun. Plus, it’s easy to update for different seasons or moods. Are you ready to craft a charming, illuminated bar that’s both practical and pretty?
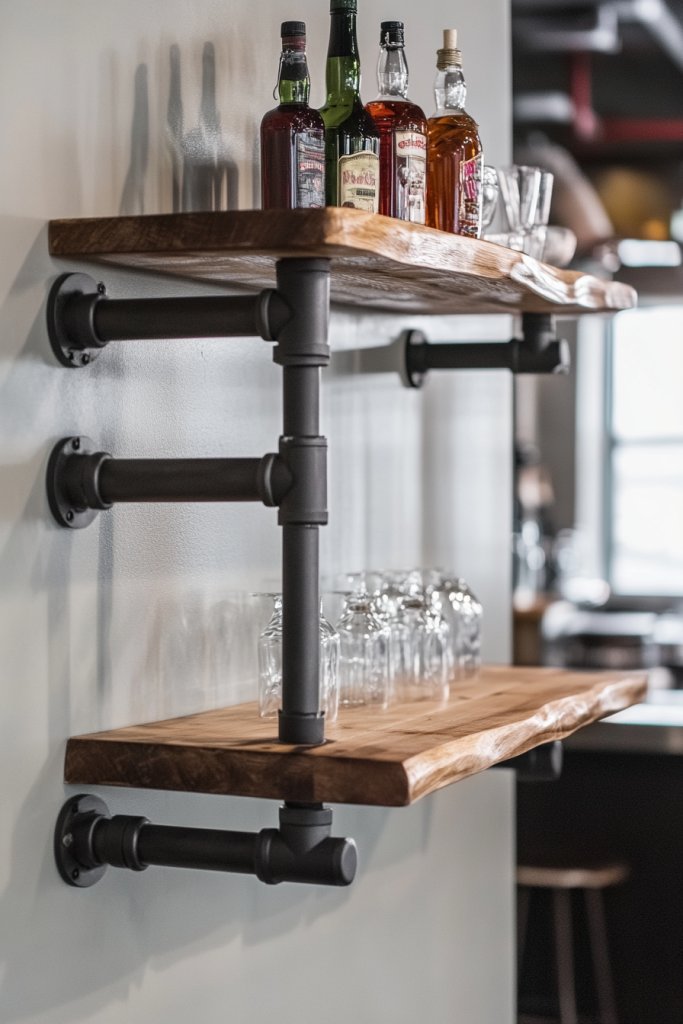
4. Modern Pipe and Wood Pipe Bar Shelf
Tired of cluttered countertops and tired furniture? A sleek pipe and wood bar shelf offers an industrial-chic solution that looks great and saves space. The challenge is creating a sturdy, stylish piece that fits your decor without a big budget. DIYing this project lets you tailor the design to your space and style. Ready for a modern upgrade?
Recommended Products to replicate this idea
| # | Preview | Product | |
|---|---|---|---|
| 1 |

|
Janyang Industrial Pipe Shelf Brackets for 8 10 12 14 inches Board, Iron L Pipe Floating Shelves,... | Check Latest Price |
| # | Preview | Product | |
|---|---|---|---|
| 1 |

|
upsimples Floating Shelves for Wall, Wall Shelves for Decor Storage Set of 6, Wall Mounted Wood... | Check Latest Price |
Visualize black iron pipes mounted on the wall, supporting reclaimed wood planks with rich grain and warm tones. The open design highlights the clean lines and industrial vibe, perfect for minimal or loft-style spaces. Bottles, glasses, and small decor items sit neatly on the shelf, creating a balanced look. Soft lighting from sconces or candles enhances the textured metal and wood combination, adding warmth to the overall aesthetic.
Opt for different pipe fittings or finishes like matte black or brushed nickel to match your theme. Use reclaimed wood, stained or painted to your preferred color. Adjust the length of the shelf based on available wall space, or add additional tiers for more storage. This concept adapts well to small apartments or large open-plan areas, giving you flexibility in design.
Start by measuring the desired length and securing wall anchors for the pipe fittings. Assemble the pipes using threaded connections, then attach the wood shelves with brackets or screws designed for wood and metal. Sand and finish the wood as needed, sealing it with a protective coat. Mount the whole structure securely, ensuring it can hold your bar essentials. Organize bottles and glasses on the shelf, keeping everything within easy reach. This project combines DIY simplicity with high-end style.
Personalize with engraved or painted designs on the wood surface. Incorporate decorative pipe fittings or vintage industrial accents. Use different wood stains or paints to match your decor palette. Add hooks underneath for hanging bar tools or mugs. This setup can be a statement piece and a conversation starter, reflecting your unique taste.
Building your own pipe and wood shelf brings a modern industrial vibe straight into your home. It’s a practical project that turns raw materials into a functional art piece. Once finished, it elevates your entertaining space and boosts your confidence in tackling DIY projects. Ready to craft a sleek, sturdy bar shelf?
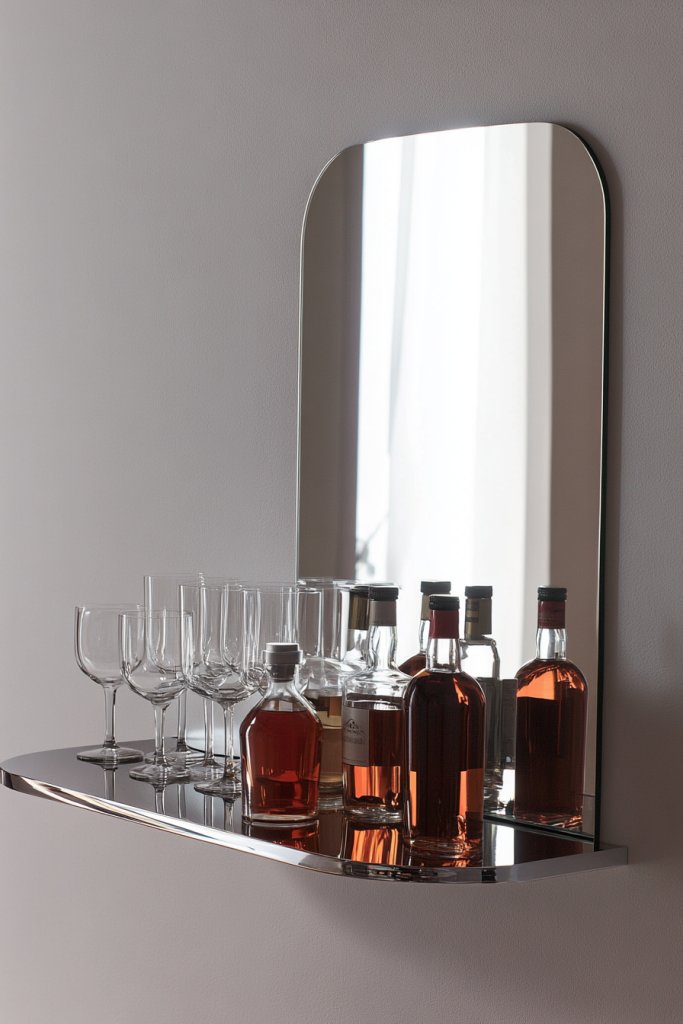
5. Floating Wall-Mounted Mini Bar with Mirrored Backing
Limited space but still want a stunning bar area? A floating wall-mounted mini bar with a mirrored back can make your space look bigger and more glamorous. The challenge is creating a sleek, functional unit that doesn’t overwhelm the room. DIY gives you the flexibility to design something tailored to your style and space constraints. Fancy a chic upgrade?
Recommended Products to replicate this idea
| # | Preview | Product | |
|---|---|---|---|
| 1 |

|
39.4in Modern LED Wine Rack Wall Mounted, 3-Tier Floating Bar Shelves with Wine Glass Rack, Large... | Check Latest Price |
| # | Preview | Product | |
|---|---|---|---|
| 1 |
|
Diflart Peel and Stick Mirror Glass Mosaic Tile, 3/4 Inch Silver Square, Crystal Diamond Mirror Tile... | Check Latest Price |
Imagine a minimalist floating shelf mounted on the wall, with a mirrored panel behind it that doubles the visual space. Bottles and glasses sit on the ledge, while the mirror reflects ambient lighting, adding depth and brightness. The mirror’s frame could be sleek metal or painted wood, depending on your aesthetic. Soft, indirect lighting from hidden LED strips enhances the reflective surface, creating a luxurious ambiance.
Choose different mirror shapes—round, rectangular, or mosaic—for a unique look. Incorporate additional shelves or hooks underneath for storage. For a modern vibe, keep the color palette monochrome; for a vintage touch, add ornate frames or distressed finishes. This setup adapts well to small apartments, corner nooks, or above existing furniture.
Start by securing a sturdy floating shelf bracket to the wall at your desired height. Attach a mirror panel to the wall, ensuring it is securely mounted and level. Place the shelf on the brackets, and organize your bottles and glasses on top. Add LED strip lighting behind the mirror or underneath the shelf for a soft glow. Keep the installation simple but effective—measure twice, drill once. This project creates a high-impact feature with minimal effort.
Frame the mirror with decorative molding or paint it in your favorite color for a custom look. Add small decorative trays or containers for bar tools and accessories. You could also incorporate a chalkboard section on the mirror’s frame for notes or drink specials. Personal touches make this mini bar uniquely yours.
This floating mini bar combines style and space efficiency, perfect for modern homes. It elevates your entertaining game while making the room feel more open. DIYing a mirrored backsplash boosts your confidence in wall-mount projects. Time to turn a blank wall into a glamorous bar retreat?
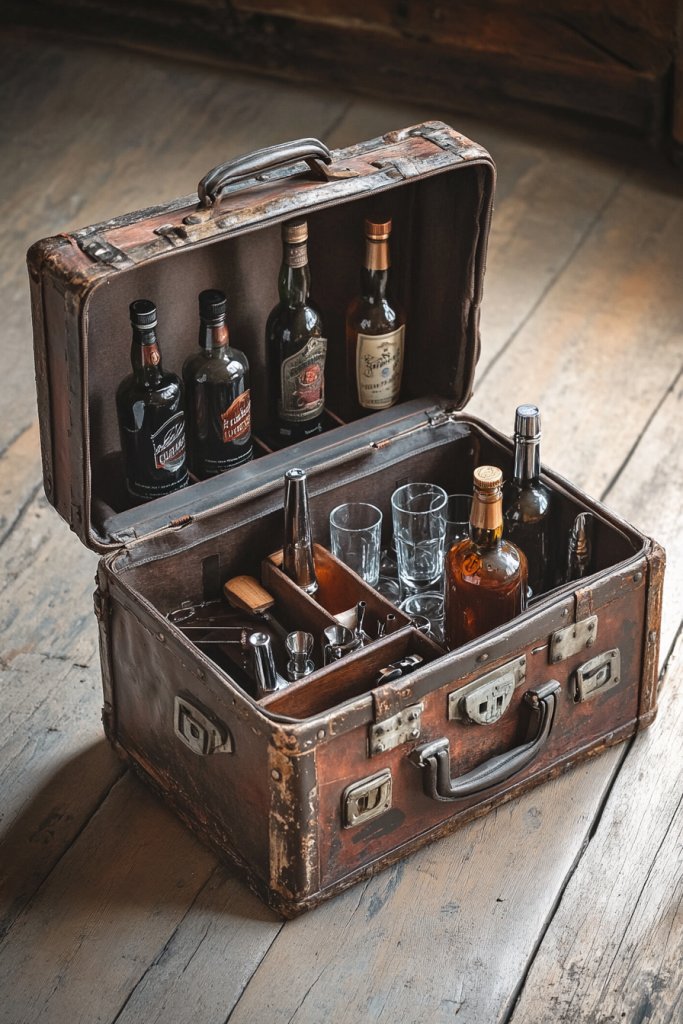
6. Vintage Suitcase Bar with Hidden Storage
Looking for a portable bar that’s full of character? A vintage suitcase turned bar offers charm and functionality in one package. The challenge is creating a secure, organized space inside without sacrificing style. DIY allows you to repurpose an old suitcase into a statement piece for small apartments or outdoor gatherings. Ready to travel back in time?
Recommended Products to replicate this idea
| # | Preview | Product | |
|---|---|---|---|
| 1 |

|
TIEETDYE Leather Cocktail Bar Cabinet Vintage Trunk Suitcase Style Liquor Display Shelves with Glass... | Check Latest Price |
| # | Preview | Product | |
|---|---|---|---|
| 1 |

|
Surblue Backpack Organizer Insert Liner Hanging Travel Rucksack and Handbag Insert Pocket,... | Check Latest Price |
Visualize an old leather or fabric suitcase, opened to reveal compartments filled with bottles, glasses, and bar tools. The interior can be lined with fabric or cork for a refined look. The exterior retains its vintage charm, with worn edges and brass hardware. When closed, it becomes a portable, stylish piece that fits in easily anywhere, from a shelf to a picnic table.
Choose suitcases in various sizes or styles—retro, steampunk, or shabby chic—to match your decor. Inside, add removable dividers or pockets for organization. For outdoor use, reinforce the suitcase with weatherproof paint or sealant. You can also add a sturdy handle or wheels for easy transport. This concept works well as a display piece or mobile bar station.
Start by cleaning and repairing your chosen suitcase. Install dividers or small shelves using wood or plastic for added organization. Secure the interior lining with adhesive or sewing, ensuring it’s smooth and durable. Attach a sturdy handle or wheels if mobility is desired. Fill with your favorite spirits, garnishes, and barware, and you’re set for spontaneous hosting. Regular maintenance keeps it looking great.
Decorate the exterior with paint, stencils, or vintage decals for a personalized touch. Inside, add small LED lights or even a mini chalkboard for notes. Customize compartments for specific bottles or tools, and add labels for easy access. This suitcase becomes a functional art piece that reflects your style.
A vintage suitcase bar combines nostalgia with practicality, making it a fun project and a unique asset. It’s perfect for impromptu parties or outdoor adventures, all while showcasing your creative side. Once completed, it’s a conversation starter and a reminder of your DIY skills. Ready to pack up and host?
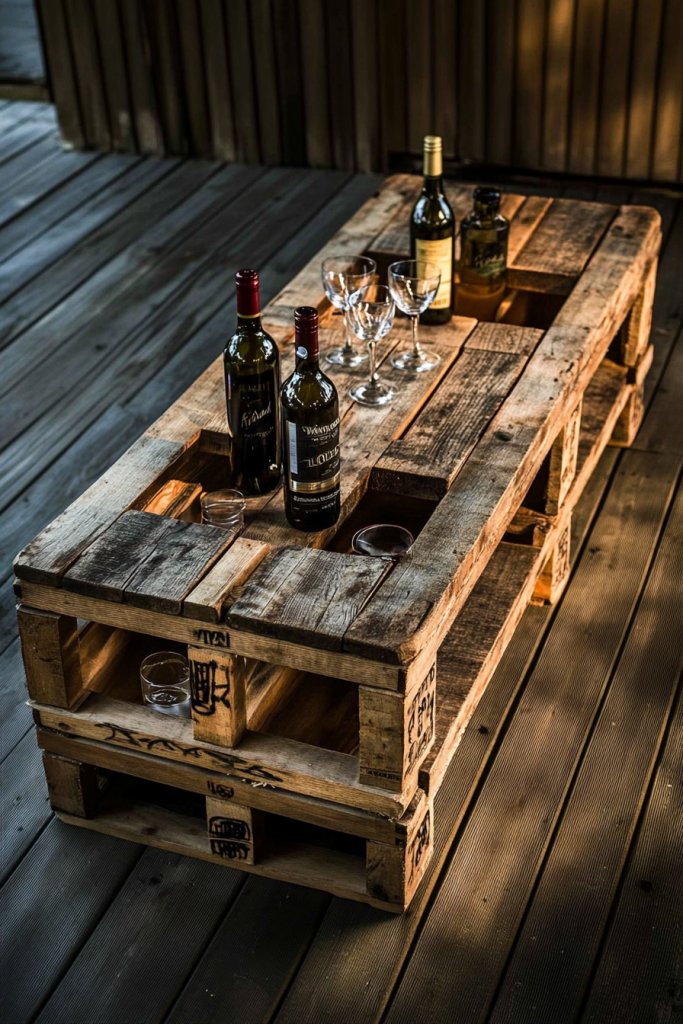
7. Pallet Wood Bar with Built-In Wine Rack
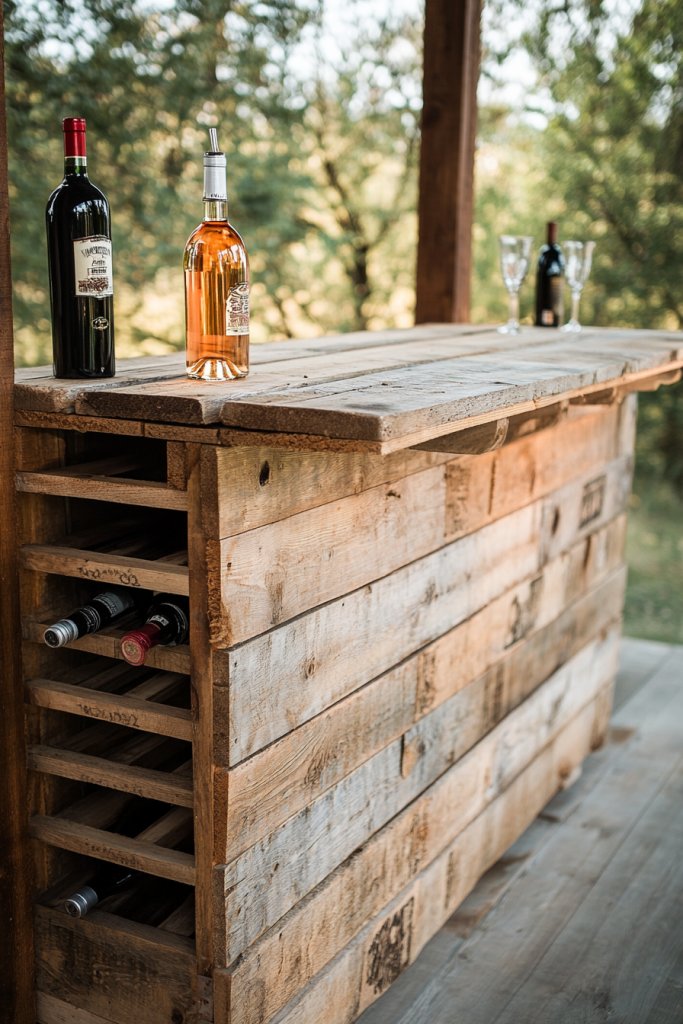
Ever wish your bar looked more rustic yet functional? A pallet wood bar with a built-in wine rack combines charm and convenience effortlessly. The challenge is transforming simple pallets into a sturdy, attractive piece without extensive carpentry skills. DIYing this project makes it achievable and customizable. Want a piece that’s both practical and eye-catching?
Recommended Products to replicate this idea
| # | Preview | Product | |
|---|---|---|---|
| 1 |

|
Holydecot Nail Up Paneling Wood Wall Panels, Real Solid Planks DIY Easy Application, Rustic... | Check Latest Price |
| # | Preview | Product | |
|---|---|---|---|
| 1 |
|
SODUKU Rustic Wood Countertop Wine Rack 6 Bottles No Need Assembly Brown | Check Latest Price |
Picture a sturdy rectangular frame made from reclaimed pallet wood, with a cozy, weathered finish. The lower section houses a custom wine rack, while the top serves as a bar surface. The natural wood grain and rough texture add warmth, making it perfect for a country or industrial aesthetic. Bottles are stored horizontally in the rack, while glasses and accessories sit on the surface.
Stain or paint the pallets in shades matching your decor, from natural wood tones to bold colors. Incorporate hooks or small shelves for bar tools. Adjust the size based on available space, or add casters for mobility. The wine rack can be customized to hold different bottle sizes or to include a small fridge underneath. It’s adaptable for both indoor and outdoor use.
Start by sourcing sturdy pallets, checking their condition and cleaning thoroughly. Disassemble and sand the wood to remove splinters. Assemble the frame with screws or nails, reinforcing joints as needed. Build or install the wine rack within the frame, ensuring stability. Finish with a sealant or stain, then organize bottles and barware. This project takes a weekend but results in a rustic, functional masterpiece.
Add decorative elements like metal accents, stenciled designs, or personalized labels. Incorporate LED lighting inside the wine rack for visual pop. Use different stains or paints for a customized look. Personal touches like engraved initials or themed decor make it uniquely yours. This piece becomes a focal point of your entertaining space.
Creating a pallet wood bar with a wine rack proves that DIY can be both simple and stylish. It’s an eco-friendly project that showcases your creativity. Once finished, it offers both practicality and charm, perfect for intimate gatherings or outdoor parties. Ready to craft a rustic centerpiece?
8. Tiered Cake Stand Bar for Appetizers and Drinks
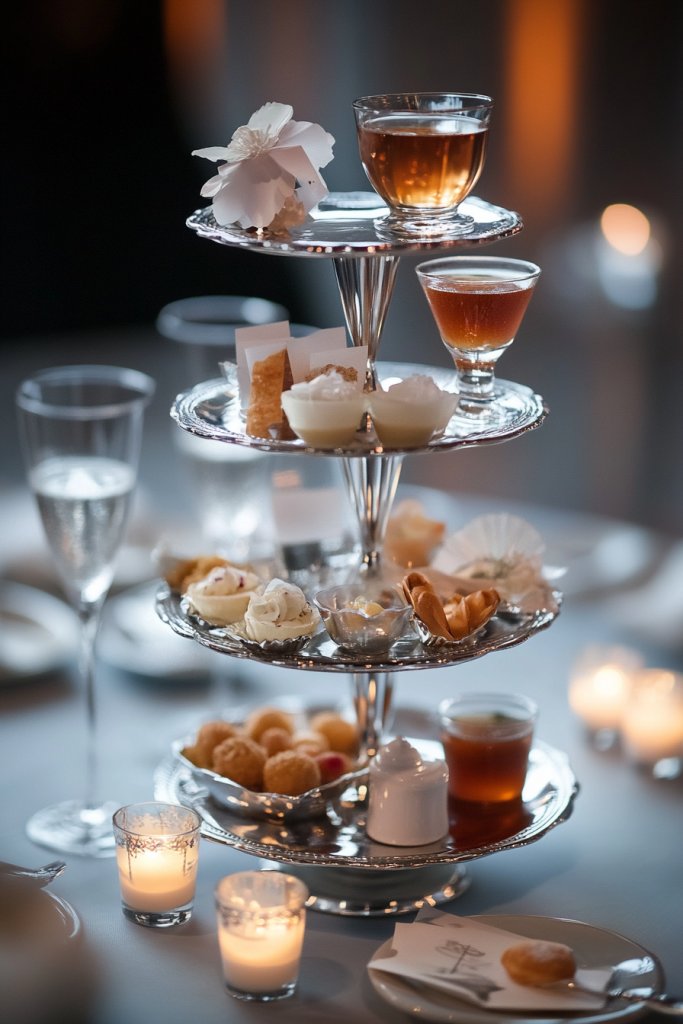
Hosting a party and struggling to display both drinks and snacks attractively? A tiered cake stand bar offers a stylish solution that adds height and visual interest. The challenge is balancing function with aesthetics, so everything remains accessible. DIY allows you to customize sizes and styles, making your setup both practical and pretty. Ready to elevate your serving game?
Recommended Products to replicate this idea
| # | Preview | Product | |
|---|---|---|---|
| 1 |

|
Mfacoy 3 Tier Serving Tray Set, 12" Tiered Serving Trays Platters, Reusable Serving Tray for Party,... | Check Latest Price |
| # | Preview | Product | |
|---|---|---|---|
| 1 |
|
Drink Dispenser Stand,Clear Acrylic Stands,Fit Max 7.87 Inch Diameter of Glass Drink Dispenser,Water... | Check Latest Price |
Imagine a three-tiered stand made from vintage china or modern metallic trays, stacked with small glasses, cocktail garnishes, and bite-sized appetizers. The varying heights create a dynamic display that draws the eye and encourages mingling. Soft lighting or candles placed around the stand amplify the layered effect, making it a centerpiece. The combination of textures and colors can match any theme, from rustic to glam.
Use different materials for the tiers, such as wood, metal, or ceramic, to match your decor. Mix and match patterns or keep it monochrome for a sleek look. Adjust the size and number of tiers based on your space and guest list. Incorporate decorative elements like fabric runners or small floral accents for seasonal flair. This versatile setup works equally well indoors or outside.
Begin by selecting sturdy trays or plates that can be safely stacked. Secure each tier with a central rod or decorative pillars, ensuring stability. If you prefer a more DIY approach, glue or bolt the tiers together with strong adhesive or hardware. Arrange drinks on the top tier and snacks on the lower levels, making sure everything is within easy reach. Enhance stability by adding rubber feet or non-slip pads underneath.
Decorate the edges with ribbon, faux flowers, or seasonal motifs. Personalize the tiers with painted designs or monograms. Incorporate small containers or bowls for dips, nuts, or garnishes. Use themed accessories, like mini lanterns or fairy lights, to match your event. This centerpiece will impress guests and keep everything organized.
A tiered stand is a simple yet impressive way to serve and display food and drinks. It adds height and elegance, making even simple snacks look special. DIYing this project helps you develop a sense of accomplishment and style. Once complete, it becomes a go-to for all your entertaining needs. Ready to stack and impress?
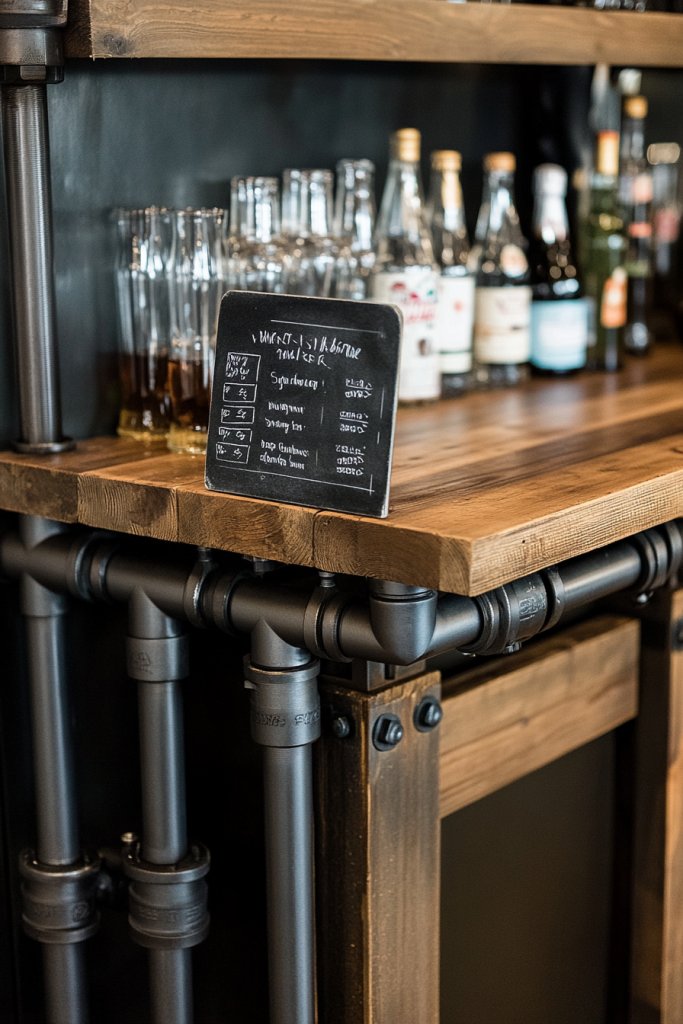
9. Pipe Clamp Cocktail Station with Chalkboard Menu
Tired of cluttered bar setups that look chaotic? A pipe clamp cocktail station offers a sleek, industrial solution that keeps everything organized. The challenge is creating a sturdy structure that’s both functional and visually appealing. DIY allows you to customize the size and features, making your bar stand out. Ready to clamp down on clutter?
Recommended Products to replicate this idea
| # | Preview | Product | |
|---|---|---|---|
| 1 |

|
Industrial Pipe Shelf Brackets for 8 10 12 14 inches Board, Iron L Pipe Floating Shelves, Heavy Duty... | Check Latest Price |
| # | Preview | Product | |
|---|---|---|---|
| 1 |

|
Double Sided Hanging Chalkboard Signs Wooden Erasable Message Board Rustic Chalkboard Hanging Signs... | Check Latest Price |
Visualize a robust pipe framework mounted on the wall, with adjustable clamps holding bottles and glasses securely in place. The surface features a chalkboard panel displaying drink options or recipes, adding a personal touch. The dark metal contrasted with light wood or painted surfaces creates a modern industrial aesthetic. Soft lighting highlights the setup, making it perfect for both casual and upscale gatherings.
Use different pipe fittings and finishes—matte black, brushed nickel, or antique brass—to match your decor. Incorporate hooks or shelves underneath for additional storage. For a vintage vibe, use reclaimed pipes and wood; for a contemporary look, go sleek and minimal. Adjust the size based on your space, and add decorative elements like string lights or signage.
Start by planning your layout and measuring wall space. Assemble the pipe frame using threaded fittings, ensuring stability at each joint. Mount the frame securely with anchors, then attach adjustable clamps for bottles and glasses. Write your menu or recipes on the chalkboard with chalk markers for durability. Keep the area clean and organized for quick access during parties. This project combines DIY ingenuity with industrial style.
Personalize the chalkboard with custom artwork or menu items. Add decorative labels or tags on bottles. Incorporate small hooks for cocktail tools or napkins. Use different finishes or paints on pipes for a unique look. This station becomes a statement piece that reflects your personality and hosting style.
A pipe clamp cocktail station elevates your entertaining setup with a modern edge. It’s a sturdy, flexible solution that keeps everything within reach. Building it boosts your confidence in working with pipes and hardware. Once finished, it’s a conversation starter and a functional centerpiece. Ready to clamp down on your home bar?
10. Pallet Coffee Table Turned Bar with Storage Compartments
Need a versatile piece that serves as both a coffee table and a bar? Converting a pallet coffee table into a dual-purpose unit offers practicality with a rustic touch. The challenge is creating hidden compartments that are easy to access yet keep your bottles and mixers organized. DIY gives you control over size, style, and storage features. Ready to multi-task?
Recommended Products to replicate this idea
| # | Preview | Product | |
|---|---|---|---|
| 1 |

|
OLIXIS Wooden Coffee Table, Lift Top Coffee Table with Large Hidden Compartment and Ample Storage... | Check Latest Price |
| # | Preview | Product | |
|---|---|---|---|
| 1 |

|
MOCOUM Wine Glasses Rack Under Cabinet Stemware Rack,Wine Glass Hanger Rack Wire Wine Glass Holder... | Check Latest Price |
Imagine a sturdy pallet coffee table with a weathered finish, featuring a hinged top that opens to reveal storage compartments. Inside, bottles, mixers, and bar tools are neatly arranged, ready for spontaneous cocktails. The rough texture and raw wood finish add a cozy, lived-in vibe. When closed, it functions seamlessly as a coffee table, blending form and function.
Paint or stain the pallet in your preferred color—be it natural, distressed, or bold hues. Incorporate small hooks or baskets inside for accessories. The size can be customized for small apartments or larger living rooms. Add caster wheels for mobility, especially if you like to change layouts frequently. This project adapts easily to different decor styles.
Start by disassembling the pallet or working directly with the assembled unit. Reinforce the structure with screws if needed. Attach hinges to the top for easy access to storage compartments. Seal or stain the wood to protect against spills. Organize bottles and supplies inside, and add small dividers or trays for neatness. The project is straightforward and highly customizable.
Add decorative hardware, like vintage handles or painted patterns, to personalize your piece. Use removable liners or fabric inside the compartments for easier cleaning. Incorporate LED strips for subtle lighting inside the storage. Personal touches like monograms or themed labels can make it uniquely yours. It’s a practical, stylish upgrade to your living space.
Transforming a pallet into a dual-purpose table boosts your DIY confidence and adds a personal touch to your home. It’s a conversation starter and a functional centerpiece. Once finished, it proves that with a little effort, you can create stylish, multi-use furniture. Ready to build your own versatile bar?
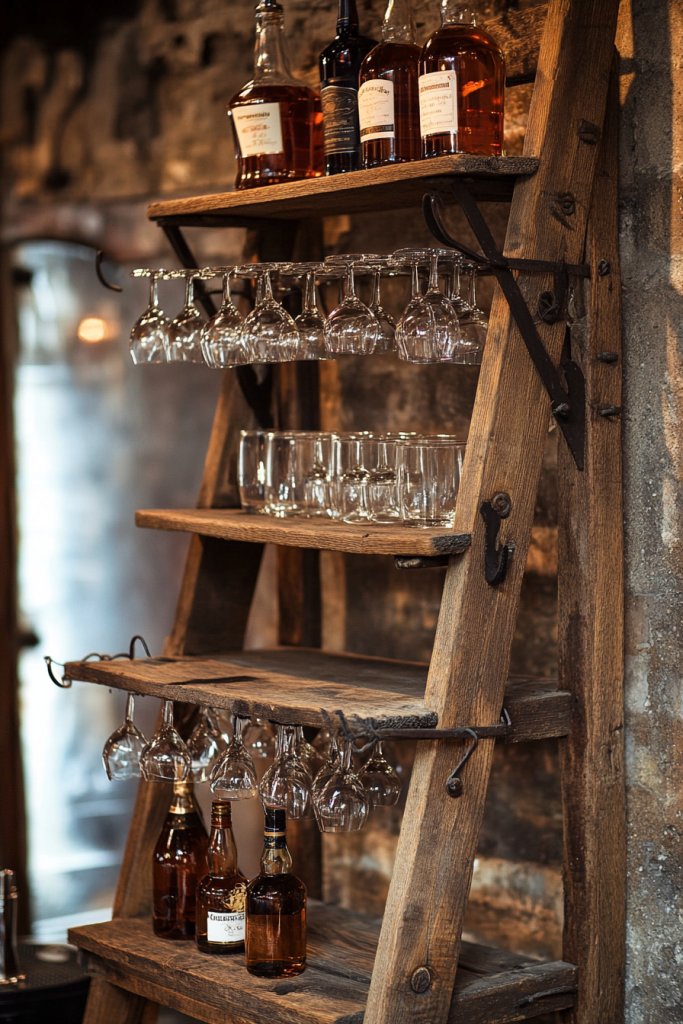
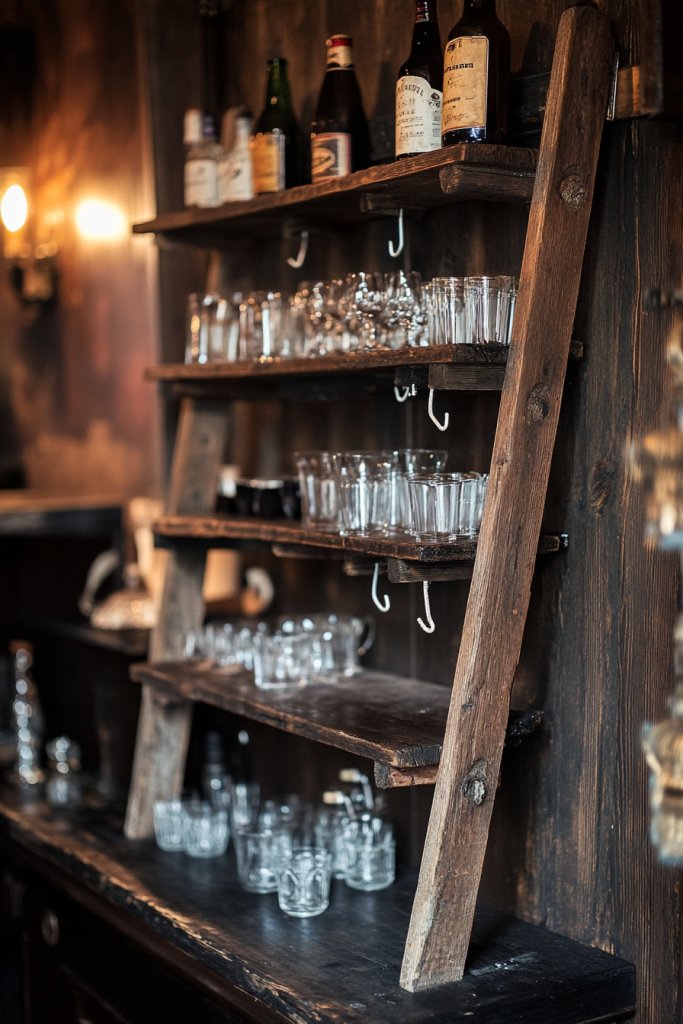
11. Upcycled Ladder Bar with Hanging Glasses and Bottles
Searching for a unique way to display your barware? An upcycled ladder turned into a bar offers an eye-catching, space-saving solution. The challenge is repurposing an old ladder into a stable, functional display that adds charm. DIY lets you customize height, style, and storage capacity. Want to impress guests with your creative flair?
Recommended Products to replicate this idea
| # | Preview | Product | |
|---|---|---|---|
| 1 |

|
Amazon Basics 5-Tier Ladder Bookshelf Storage Organizer, Solid Rubberwood Frame, Space-Saving... | Check Latest Price |
| # | Preview | Product | |
|---|---|---|---|
| 1 |

|
GeLive 10 Inch Under Cabinet Wine Glass Rack Stemware Holder Glass Storage Hanger Organizer for... | Check Latest Price |
Imagine a vintage wooden ladder leaned against the wall, with glasses hanging from hooks on the rungs and bottles resting on the steps. The worn paint and rustic wood add character, making it a focal point of your entertaining space. String lights or decorative ribbons can enhance the visual appeal. The setup is both functional and decorative, blending practicality with a whimsical touch.
Use different types of ladders—metal, wooden, or painted in bold colors—to match your decor. Attach hooks or small shelves for versatility. You can also add small baskets or bins on the steps for additional storage. Adjust the ladder’s angle or add wheels for mobility. It’s adaptable for indoor, outdoor, or even as a garden feature.
Choose a sturdy ladder with a stable base. Clean and, if desired, repaint or seal the wood. Install hooks or hangers at regular intervals for glasses and bottles. Secure the ladder to the wall for added safety. Organize your glasses by size or style, and place bottles strategically for easy access. Decorate with string lights or signs for extra personality. This project is straightforward but impactful.
Personalize with painted motifs, stenciled names, or decorative decals. Use different hook styles or add small shelves for snacks or mixers. Incorporate colorful ribbons or fabric wraps for a playful vibe. Add small LED lights for nighttime ambiance. It’s a fun project that reflects your individual taste.
An upcycled ladder bar is a charming, functional piece that showcases your creativity. It’s perfect for small spaces and adds a vintage or eclectic touch. Building it encourages resourcefulness and DIY skills. Once complete, it’s a conversation starter and a practical solution for stylish entertaining. Ready to lean into your creative side?
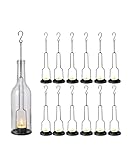
12. Glass Bottle Lanterns for Ambient Lighting
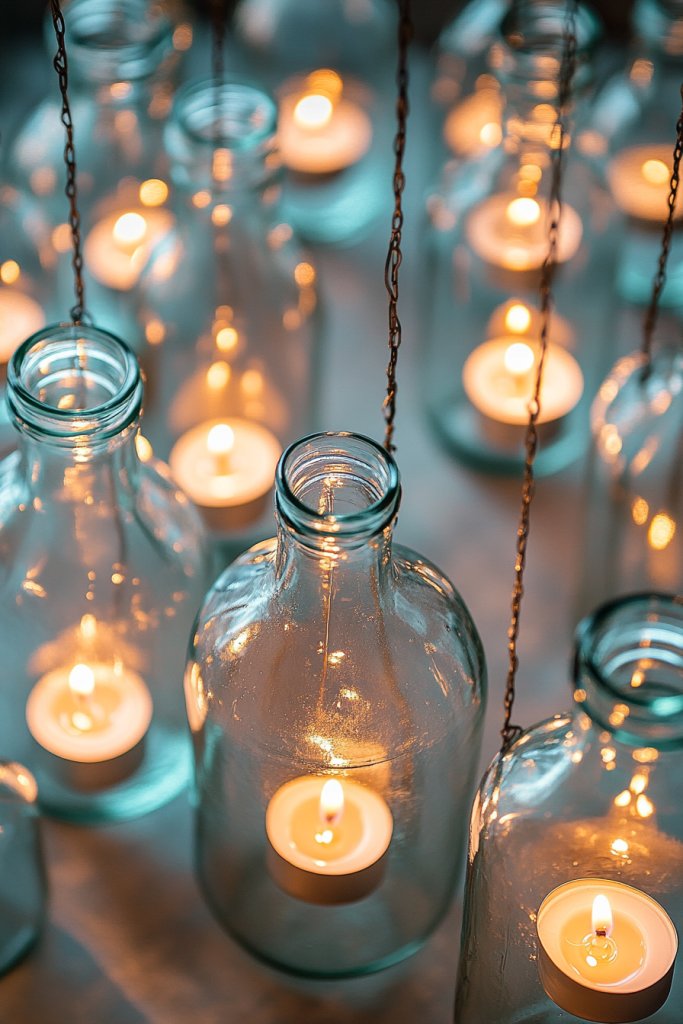
Want to add soft, inviting light to your entertaining area? Glass bottle lanterns are a simple yet stunning way to create ambiance. The challenge is crafting beautiful lanterns without complicated tools or expensive supplies. DIY makes it easy to customize size and style, and they’re perfect for both indoor and outdoor settings. Ready to glow?
Recommended Products to replicate this idea
| # | Preview | Product | |
|---|---|---|---|
| 1 |
|
AceList 12 Pack Wrought Iron Hanging Candle Holder for Cut Glass Bottles, Fits 3.0" Diameter... | Check Latest Price |
| # | Preview | Product | |
|---|---|---|---|
| 1 |

|
Homemory 24Pcs Flickering Flameless Candle Battery Operated, 200+Hours Fake Electric LED Tea Lights... | Check Latest Price |
Picture clear glass bottles, cut or drilled to hold candles or fairy lights. The warm flicker of candlelight or the gentle glow of LEDs illuminates the textured glass. You can decorate the bottles with twine, paint, or metal accents for a personalized look. Lining your walkway, hanging from trees, or clustering on tables creates a magical, cozy vibe. The soft light dances on nearby surfaces, transforming your space.
Use different bottle shapes and sizes for variety, or match colors to your theme. For outdoor use, seal and treat the glass to withstand weather. Incorporate decorative elements like sand, stones, or dried flowers inside for added visual interest. Hang lanterns at different heights or cluster them in groups. This approach is versatile and adaptable to any occasion.
Start by selecting suitable bottles, cleaning and removing labels. Drill holes or cut openings carefully, using appropriate tools like a glass cutter or drill with a masonry bit. Insert candles or fairy lights, securing the wiring if needed. Add decorative elements outside the bottle for a finished look. Mount or hang the lanterns using sturdy hooks or wires. This project is simple, but the effect is stunning.
Personalize with painted designs, metallic accents, or monograms. Use colored lighting or flickering candles for different moods. Incorporate seasonal decorations, like faux snow or flowers, inside the bottles. Attach handles or decorative ropes for hanging. These lanterns are a charming addition that can evolve with your style.
Creating glass bottle lanterns is an inexpensive way to upgrade your lighting decor. It encourages creativity and adds a warm glow that invites relaxation. Once finished, you’ll feel confident in customizing and enhancing your space with DIY touches. Ready to light up your next gathering?
13. Copper Pipe and Wooden Bar Top with Industrial Flair
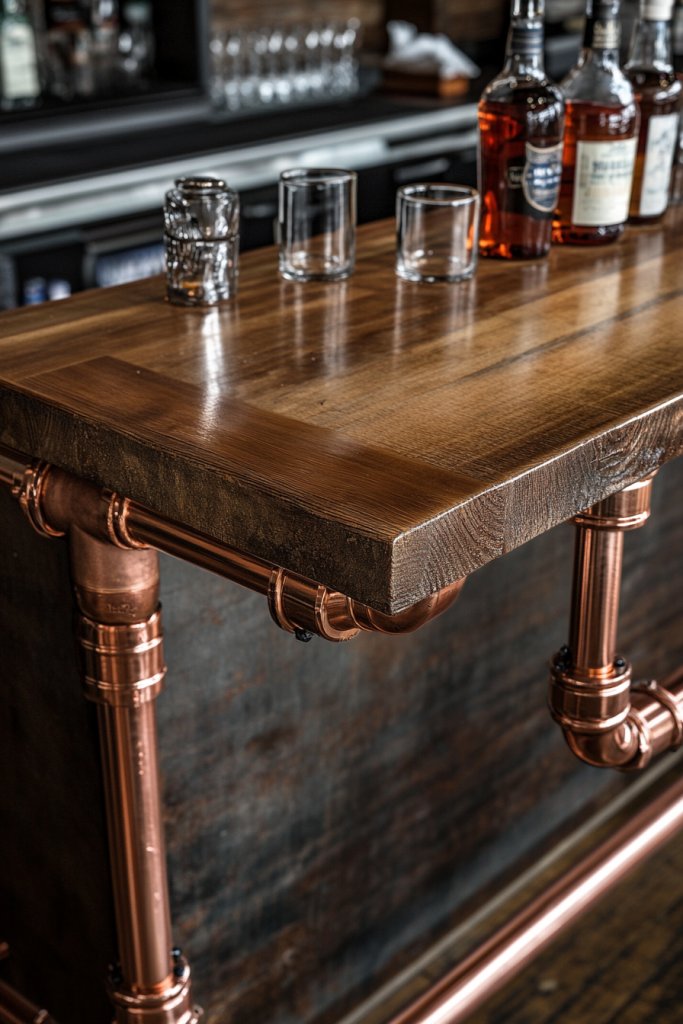
Looking to add an industrial edge to your home bar? A copper pipe and wooden bar top combo offers a trendy, durable solution that oozes style. The challenge is sourcing materials and assembling a stable, polished piece without professional tools. DIY lets you customize the design, finish, and size to fit your space perfectly. Ready for an industrial upgrade?
Recommended Products to replicate this idea
| # | Preview | Product | |
|---|---|---|---|
| 1 |
|
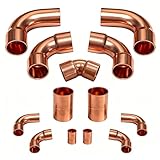
3/8 & 3/4 HVAC Copper Fittings Kit, Lines Set Fitting Kit for AC with Copper pipe Coupling & Elbow,... | Check Latest Price |
| # | Preview | Product | |
|---|---|---|---|
| 1 |

|
Solid Wood Butcher Block Countertop - Unfinished Birch Slab Counter Top Wooden Table Top for DIY... | Check Latest Price |
Imagine a sturdy frame built from polished copper pipes, supporting a reclaimed wood top with rich grain and warm tones. The metallic sheen contrasts beautifully with the rustic wood, creating a sleek yet raw look. Small details like pipe fittings and exposed joints add character. Ambient lighting from above highlights the reflective copper, casting a warm glow over your drinks and guests.
Opt for different finishes—aged copper, brass, or painted pipes—to match your decor. Use stained or painted wood for the top, choosing colors that complement the metallic elements. Adjust the size based on your space, adding shelves or hooks underneath for extra storage. This design works well in open kitchens, basements, or outdoor patios.
Begin by planning your layout and measuring the space. Assemble the pipe frame using threaded fittings, ensuring stability with proper wall anchors. Cut and finish the wood top to your desired dimensions, sealing it with a protective coat. Attach the pipes to the wall and frame, then secure the wood surface. Organize bottles, glasses, and accessories on or under the top for easy access. This project is straightforward but creates a high-end look.
Add engraved or painted designs on the wood surface for a personal touch. Incorporate LED strip lighting underneath the top or inside the pipe framework for a dramatic effect. Use different pipe fittings or add decorative caps for extra flair. Personalize with your favorite colors, logos, or motifs to make it uniquely yours. It’s a statement piece that elevates your entertaining space.
Building a copper pipe and wood bar top combines craftsmanship with style, boosting your confidence in DIY projects. It’s a unique, functional addition that impresses guests and reflects your taste. Once finished, it transforms your space into a modern industrial haven. Are you ready to craft a trendy, durable bar?
14. DIY Barrel-Style Mini Bar with Metal Accents

Ever wanted a compact, rustic bar that looks like it belongs in a vintage tavern? A barrel-style mini bar with metal accents offers portability and charm. The challenge is converting a large wooden barrel into a functional, stylish bar without sacrificing ease of access. DIY allows you to add personal touches and hardware for that perfect rugged look. Ready to roll?
Recommended Products to replicate this idea
| # | Preview | Product | |
|---|---|---|---|
| 1 |

|
2 Liter Oak Aging Barrel with Wood Stand, Bung & Spigot - Mini Whiskey Barrels for The Home Alcohol... | Check Latest Price |
| # | Preview | Product | |
|---|---|---|---|
| 1 |

|
8 Pcs Brass Barrel Hinges Hidden, 8 mm Concealed Furniture Fittings with 180 Degree Opening for... | Check Latest Price |
Imagine a reclaimed wooden barrel, its metal hardware cleaned and polished, transformed into a mini bar. The top is a cut-open lid or a removable wooden panel, revealing storage inside. Metal bands and accents add industrial flair, contrasting with the warm wood tones. Small wheels or legs elevate the barrel slightly, making it easy to move around. It’s both a statement piece and a functional bar.
Paint or stain the wood to match your decor—dark stains for a vintage look or brighter colors for a more playful vibe. Add hooks or small shelves on the outside for tools or glasses. Use different metal finishes like matte black or aged brass. This concept is adaptable for outdoor patios, man caves, or compact apartments, offering versatility in size and style.
Start by selecting a sturdy barrel, cleaning thoroughly, and repairing any structural issues. Cut the top opening with a saw or chainsaw, then reinforce the edges with metal bands or trim. Attach wheels or legs for mobility. Install interior shelves or racks for bottles and mixers. Seal the wood with a protective finish to withstand spills. Organize your spirits and tools inside for easy access.
Decorate the outside with stenciled designs, logos, or personalized labels. Incorporate LED lighting inside or underneath for a glowing effect. Add metal tags, vintage hardware, or custom handles for extra detail. Personal touches like monograms or themed decals make it uniquely yours. This project combines rustic charm with DIY pride.
A barrel mini bar is a fun, functional project that adds character to any space. It’s portable, stylish, and a great conversation starter. Building it boosts your confidence in working with wood and metal, proving DIY can be both simple and impressive. Once complete, it becomes a focal point for your gatherings. Ready to craft a vintage-inspired bar?
15. Concrete Block Bar with Colorful Accents
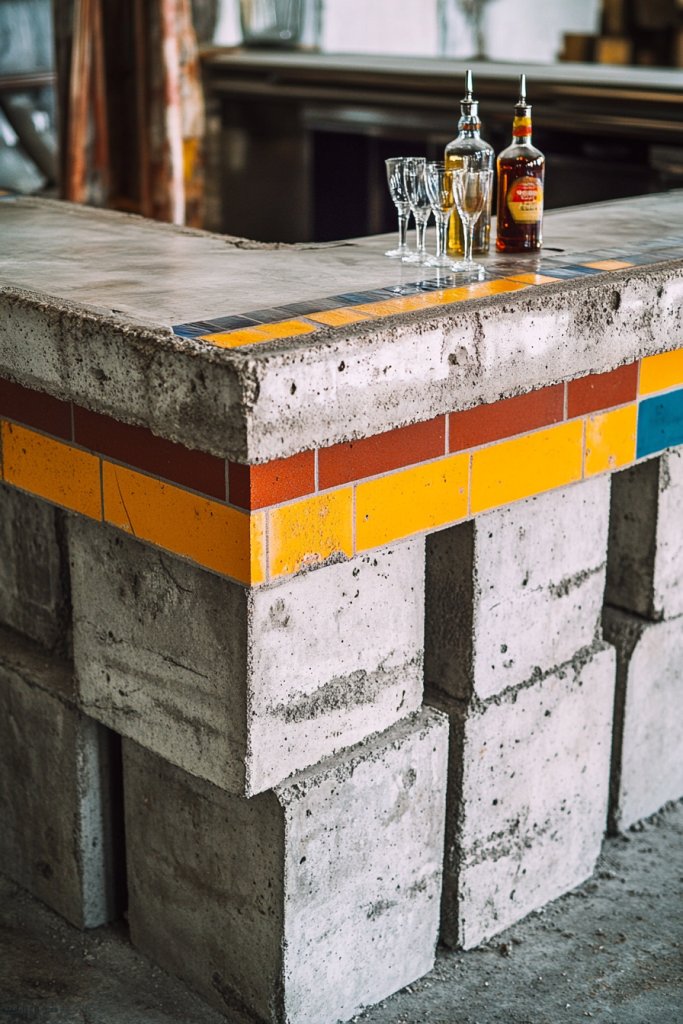
Craving a bold, industrial look for your home bar? A concrete block bar with colorful accents offers durability and eye-catching appeal. The challenge is balancing raw materials with vibrant design details. DIY gives you the freedom to create a statement piece that’s both sturdy and stylish. Ready to make a concrete impression?
Recommended Products to replicate this idea
| # | Preview | Product | |
|---|---|---|---|
| 1 |

|
DoubleFill 2 Pairs 4 Inch Line Blocks Masonry String Lines Concrete Blocks for Masonry... | Check Latest Price |
| # | Preview | Product | |
|---|---|---|---|
| 1 |

|
Epoxy Resin 2 Gallon - Crystal Clear Epoxy Resin Kit - Self-Leveling, High-Glossy, No Yellowing, No... | Check Latest Price |
Picture stacked concrete blocks forming the base, with bright tiles or painted sections adding pops of color. The textured surface and rough edges create an urban vibe, contrasted by sleek, modern bar stools or accessories. The vibrant accents catch the light and draw attention, transforming a simple construction into a focal point. It’s a minimalist yet bold aesthetic.
Use different colored or patterned tiles for the backsplash or the front face of the bar. Incorporate shelves or hooks on top for glasses and tools. Adjust height based on your needs—counter height or bar height. For outdoor use, seal the concrete and add weatherproof finishes. Personalize with geometric designs or murals for extra flair.
Start by stacking concrete blocks on a level surface, securing with mortar or adhesive for stability. Apply colorful tiles or paint to the front or top surface, sealing with a waterproof finish. Install a sturdy top surface—wood, metal, or stone—on the concrete base. Organize bottles, glasses, and mixers on the top or inside the blocks if hollow. Finish by cleaning excess grout or paint for a polished look.
Add decorative borders or painted patterns for a personalized touch. Use weatherproof paint for outdoor setups. Incorporate LED lighting underneath the top or inside hollow blocks. Attach small hooks or baskets for accessories. Customizing the color scheme and design makes your concrete bar unique and vibrant.
A concrete block bar proves that DIY can create bold, lasting structures. It’s perfect for modern, industrial, or eclectic spaces. Building it enhances your skills and confidence in working with heavy materials. Once finished, it’s a stylish hub for entertaining and a reflection of your creative vision. Ready to build your own concrete masterpiece?
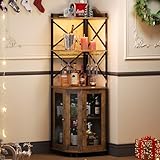
16. Vintage Ladder Shelf Turned Beverage Station
Looking for a charming, space-efficient way to display your drinks and barware? A vintage ladder shelf offers vertical storage with personality. The challenge is repurposing an old ladder into a functional, safe beverage station that complements your decor. DIY makes it easy and affordable. Want to add character and practicality?
Recommended Products to replicate this idea
| # | Preview | Product | |
|---|---|---|---|
| 1 |
|
Amazon Basics 5-Tier Ladder Bookshelf Storage Organizer, Solid Rubberwood Frame, Space-Saving... | Check Latest Price |
| # | Preview | Product | |
|---|---|---|---|
| 1 |

|
MyGift 6-Hook Rotating Wine Glass Rack with Sturdy Base & Scrollwork Design - Black Metal Countertop... | Check Latest Price |
Picture an old wooden ladder, leaning against the wall, with wine glasses hanging from hooks on the rungs and bottles resting on the steps. The weathered paint and rustic wood add a nostalgic feel, while string lights or decorative accents enhance its appeal. It becomes a focal point that combines storage with style, perfect for small spaces or open-plan areas.
Choose different types of ladders—metal, painted, or distressed wood—to match your theme. Add hooks, small shelves, or baskets for extra storage. Adjust the ladder’s angle or mount it securely to the wall for safety. Incorporate decorative elements like signs or plants on the steps for a personalized touch. It’s a versatile piece adaptable to various aesthetics.
Clean the ladder thoroughly, repairing or repainting as needed. Secure the ladder to the wall using appropriate anchors or brackets. Hang glasses from hooks attached to the rungs, and arrange bottles on the steps or shelves. Keep it organized with labels or small containers for accessories. Add string lights or decorative ribbons for extra charm. It’s a straightforward project with big visual payoff.
Decorate with painted motifs, stenciled patterns, or themed decals. Incorporate small planters or decorative signs for added personality. Use colored hooks or hangers for visual interest. Personalize with labels or monograms. This setup becomes a unique, functional statement piece in your home.
A vintage ladder shelf is a fun project that combines creativity with practicality. It enhances your space while showcasing your DIY skills. Once finished, it’s a stylish, functional focal point that sparks conversation. Ready to lean into a project that’s both charming and useful?
17. Reclaimed Door Serving Bar with Industrial Hardware
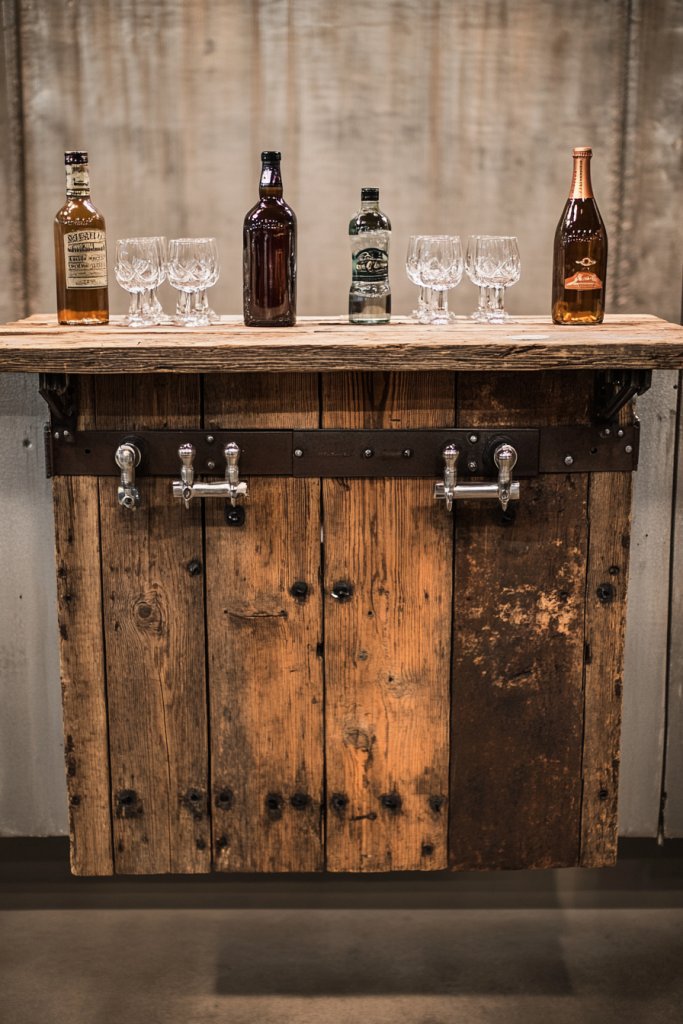
Want a distinctive bar that stands out and tells a story? Reclaimed doors transformed into serving bars add character and history to your space. The challenge is selecting the right door and mounting it securely without complicated carpentry. DIY gives you the freedom to craft a vintage-inspired focal point that’s both functional and stylish. Ready to open the door to your new bar?
Recommended Products to replicate this idea
| # | Preview | Product | |
|---|---|---|---|
| 1 |

|
Vintage Harvest Reclaimed Barn Wood Wall Planks - Naturally Weathered, Rustic Kiln Fired Barn Wood... | Check Latest Price |
| # | Preview | Product | |
|---|---|---|---|
| 1 |
|
Janyang Industrial Pipe Shelf Brackets for 8 10 12 14 inches Board, Iron L Pipe Floating Shelves,... | Check Latest Price |
Imagine an old, weathered wooden door, mounted horizontally on industrial pipe legs or brackets. The surface acts as a bar top, while the door’s textured surface and hardware add rustic charm. The finish could be stained or painted for a customized look. It’s a statement piece that combines history and function, perfect for both indoor and outdoor entertaining.
Choose doors with unique details—panels, carvings, or distressed paint—to match your style. Reinforce the door with sturdy hardware or add metal accents for an industrial look. Adjust the height with custom legs or supports. Incorporate shelving or hooks underneath for additional storage. This concept adapts well to various decor themes, from vintage to modern.
Start by selecting a reclaimed door in good condition. Clean and repair as needed, adding protective finishes. Attach industrial pipe legs or supports securely to the bottom for stability. Mount the door on the supports, ensuring it’s level and sturdy. Organize bottles, glasses, and bar tools on the surface or underneath using hooks or shelves. Seal all exposed hardware and wood for durability. It’s a project that combines vintage charm with DIY craftsmanship.
Decorate with stenciled patterns, painted borders, or vintage decals. Add small hooks for hanging utensils or glasses. Incorporate LED lighting underneath or behind for a dramatic effect. Personal touches like monograms or themed signs enhance its uniqueness. It’s a conversation-worthy centerpiece for your space.
Transforming an old door into a serving bar shows that history and creativity go hand in hand. It’s a project that adds authenticity and style while being manageable for DIY enthusiasts. Once completed, it’s a proud display of resourcefulness and design. Ready to open the door to your new favorite bar?
18. String Light-Enclosed Bar Nook in a Corner
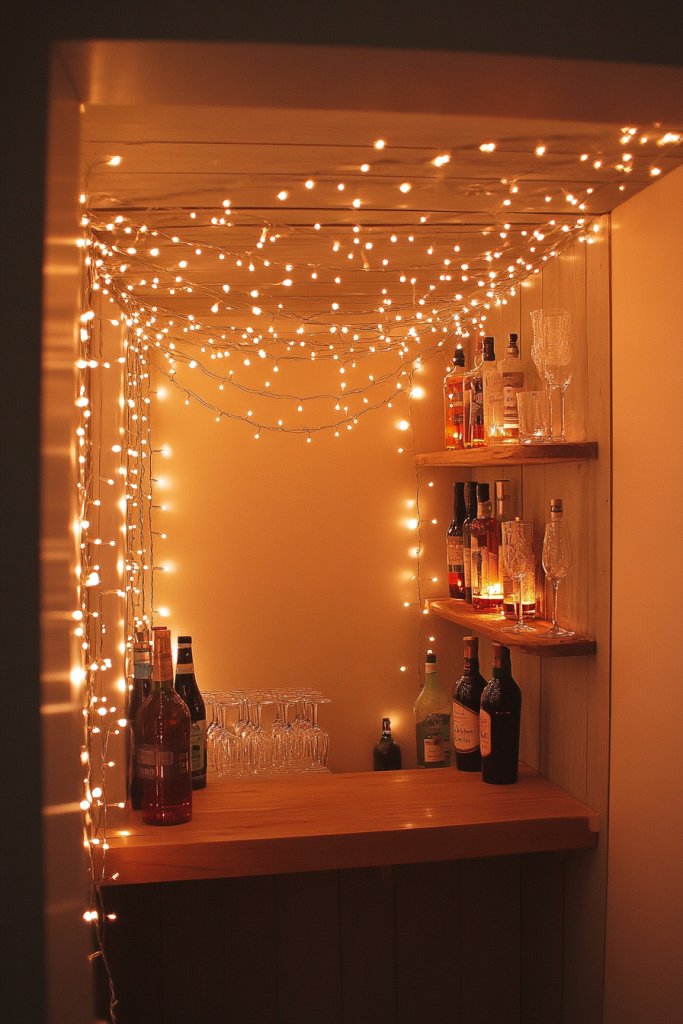
Craving a cozy, semi-private space to entertain? A string light-enclosed bar nook offers an intimate ambiance that’s perfect for small gatherings. The challenge is creating a defined area that feels inviting without taking up too much room. DIY solutions allow you to customize the layout and lighting to match your style. Ready to create your own secret lounge?
Recommended Products to replicate this idea
| # | Preview | Product | |
|---|---|---|---|
| 1 |

|
DAYBETTER LED Strip Lights 130ft Lights Strip for Bedroom, Desk, Indoor Room Bedroom Brithday Gifts... | Check Latest Price |
| # | Preview | Product | |
|---|---|---|---|
| 1 |
|
JKsmart Corner Bar Cabinet with LED Lights, 5-Tier Industrial Wine Bar Cabinet with Glass Holder,... | Check Latest Price |
Picture a corner of your room framed by sheer curtains or fabric panels, with fairy lights intertwined along the edges. Inside, a small shelf or table holds your drinks and glasses, bathed in a warm glow. The soft, twinkling light creates a magical atmosphere that encourages relaxed conversations. The enclosure adds a sense of privacy and charm that transforms an ordinary corner into a retreat.
Use different fabrics like lace, burlap, or velvet for the enclosure for varied textures. Add decorative tiebacks or drapes for flexibility. Incorporate small shelves or hooks within for accessories. Change the lighting color or intensity to match seasons or events. This concept adapts to various room sizes and styles, from boho chic to modern minimalism.
Begin by setting up a frame or using existing corners. Attach lightweight curtains or fabric panels with hooks, clips, or tension rods. Wrap fairy lights around the perimeter, ensuring safe and secure connections. Place a small table or shelf inside for bottles and glasses. Add cushions or throws for comfort if seating is included. This DIY project is simple but creates a cozy, captivating space.
Decorate the enclosure with tassels, pom-poms, or themed ornaments. Change curtain fabrics seasonally for variety. Incorporate small LED candles or lanterns for additional ambiance. Personal touches like monogrammed pillows or custom signs make it more inviting. It becomes a private retreat tailored to your hosting style.
Creating a string light-enclosed nook transforms a corner into a magical hideaway perfect for entertaining or relaxing. It’s an easy project that adds a lot of charm and intimacy. Building it boosts your confidence in working with textiles and lighting. Once finished, it’s a unique feature that invites guests to unwind. Ready to craft your cozy corner?
19. DIY Bar Cart Using Repurposed Furniture Pieces

Want a versatile, stylish bar that’s also mobile? A DIY bar cart made from repurposed furniture pieces offers a personalized, functional solution. The challenge is finding suitable pieces and transforming them into a cohesive unit. DIY gives you the freedom to mix styles and materials for a truly unique piece. Ready to roll?
Recommended Products to replicate this idea
| # | Preview | Product | |
|---|---|---|---|
| 1 |

|
LOTEYIKE 3 Tier Bar Cart, Mini Liquor Utility Cart for Wine Beverage Dinner Party, Rolling Wine... | Check Latest Price |
| # | Preview | Product | |
|---|---|---|---|
| 1 |

|
SEISSO Wood Repair Kit Touch up Paint Restore Any Wooden Furniture Stain, 12 Colors Cover Surface... | Check Latest Price |
Visualize an old side table, vintage sewing machine cart, or even a sturdy bookshelf repurposed into a mobile bar cart. Casters or wheels are attached for easy mobility, while the surface is topped with a new or refinished wood or metal tray. The combination of different furniture styles adds character, making it a conversation starter. Bottles and glasses are arranged neatly, ready for action.
Mix and match furniture pieces in different styles—industrial, shabby chic, or modern—for an eclectic look. Customize with paint, stencils, or hardware to match your decor. Add hooks, shelves, or baskets for organization. Adjust size and shape based on space and needs, making it suitable for small apartments or large homes.
Select furniture pieces with sturdy frames and suitable surfaces. Attach casters securely, ensuring stability. Sand and paint or stain surfaces for a fresh look. Organize bottles, mixers, and tools on the top or inside compartments. Add decorative elements like handles or labels. This project is flexible, quick, and results in a mobile, personalized bar.
Personalize with custom painted designs, decals, or hardware. Incorporate themed accessories or labels for drinks. Add decorative elements like faux leather grips or metallic accents. Use removable trays or containers for easy cleaning and organization. Your custom bar cart becomes a reflection of your style and hospitality.
A repurposed furniture bar cart proves that with a bit of creativity, you can craft a stylish, functional piece that moves with you. It’s perfect for entertaining indoors or outdoors and can be styled for any occasion. Completing this project enhances your DIY confidence and decor skills. Ready to roll out your new favorite piece?
Conclusion
With a diverse array of DIY bar ideas covered, you now have everything you need to start transforming your space into a stylish entertainment haven. Whether you prefer sleek modern designs or cozy rustic vibes, these projects are easy to customize and fun to create. Get inspired, gather your supplies, and take the first step towards a personalized bar that will impress every guest—your perfect entertaining space is just a DIY away!