I have been, or can be if you click on a link and make a purchase, compensated via a cash payment, gift, or something else of value for writing this post. As an Amazon Associate, I earn from qualifying purchases. Please read my full Affiliate Disclosure for more information.
Imagine stepping into a kids’ room that sparks joy, creativity, and endless imagination! Creative kids room decor ideas are wildly popular because they turn ordinary spaces into magical realms where kids can learn, play, and grow happily.
In this article, you’ll discover a variety of inspiring decor ideas that cater to different tastes and themes, from whimsical wall art to clever storage solutions. Whether you’re seeking playful, cozy, or innovative designs, these ideas will help you transform any kids’ room into a vibrant and personalized haven that your little ones will love spending time in.
1. Colorful Wall Murals for Instant Playfulness
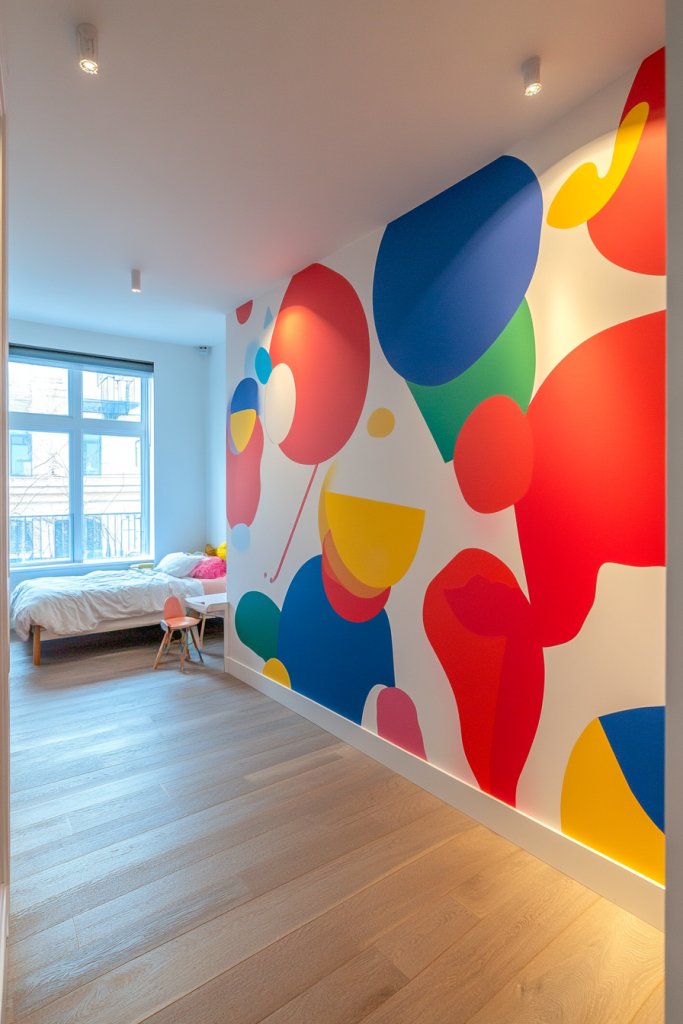
Kids’ rooms can often feel dull or uninspiring, making it tough for little imaginations to run wild. Parents want spaces that ignite creativity without cluttering the room with toys or art supplies. A bland wall can be a missed opportunity to add personality and fun. Who wouldn’t want a space that sparks endless adventures just by looking at it?
Recommended Products to replicate this idea
| # | Preview | Product | |
|---|---|---|---|
| 1 |

|
Roman’s E-Z Hang Peel & Stick Wallpaper Helper, Clear, Non-Staining, 32 Fluid Ounces | Check Latest Price |
| # | Preview | Product | |
|---|---|---|---|
| 1 |

|
RoomMates Bluey Family and Friends Peel and Stick Wall Decals, RMK5457SCS | Check Latest Price |
Imagine a wall covered with vibrant decals of animals, planets, or fairy tales, transforming a plain surface into a storybook scene. Bright colors like turquoise, sunny yellow, or bold reds turn the space into a lively playground. Removable murals make it easy to switch themes as your child’s interests evolve. The textures and shapes create a dynamic background that feels alive and engaging.
You can opt for murals that match your child’s favorite themes or colors to personalize the room. Seasonal themes like winter wonderlands or jungle safaris work well, and you can change them over time. For small rooms, vertical color blocks or partial murals help avoid overwhelming the space. Use a mix of decals, wallpaper borders, or painted scenes tailored to your child’s evolving tastes.
Start by selecting high-quality, removable decals or murals suited for kids’ rooms. Measure the wall carefully to ensure proper placement, and choose themes that resonate with your child’s interests. Prepare the wall by cleaning it thoroughly to ensure adhesion. Use painter’s tape or level guides for precise positioning. Installing decals is straightforward—peel and stick, smoothing out bubbles as you go. For painted murals, consider hiring a professional or using stencils for intricate designs.
Add name banners or custom characters within the mural to make the space uniquely theirs. Incorporate glow-in-the-dark paints or accents for a magical touch at night. Frame or outline sections of the mural with decorative tape or borders to add extra dimension. Encourage your child to contribute ideas or even help with the design to foster ownership and pride in their space.
A colorful wall mural can turn an ordinary room into a vibrant sanctuary where creativity flourishes. Your child will love having a space that feels truly theirs, inspiring play and learning. Plus, it’s a simple upgrade that makes a big impact without a hefty price tag. Ready to turn your child’s room into a masterpiece of fun and imagination?
2. DIY Hanging Fabric Canopy Nooks
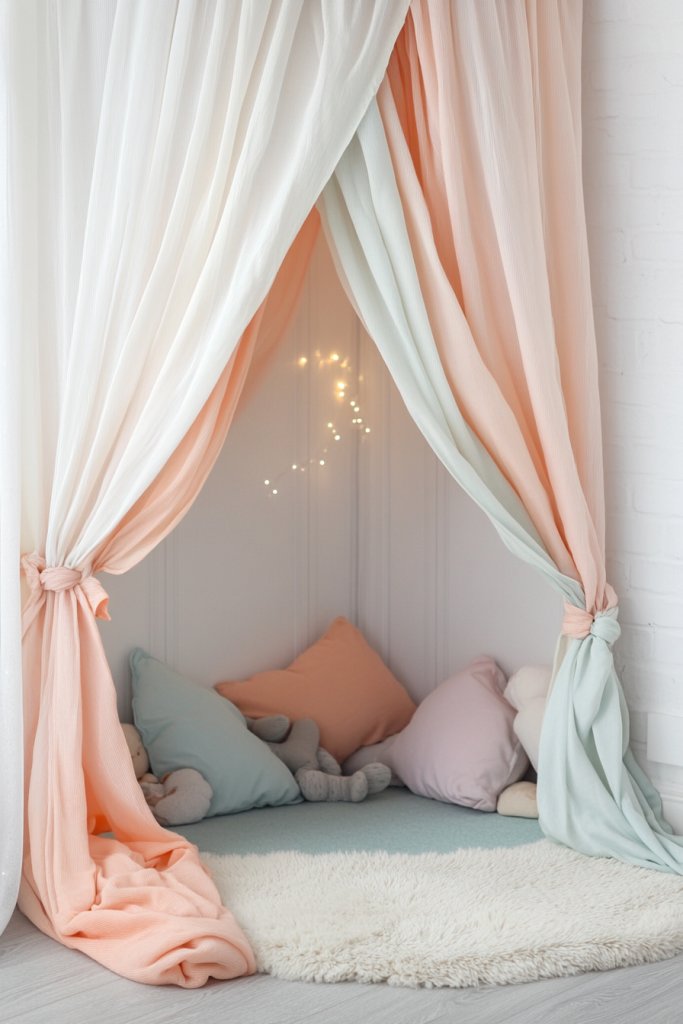
Kids need secret hideouts and cozy spots to retreat, but buying elaborate play tents can get pricey and take up space. Creating a special nook that feels like a magical hideaway is a dream for many parents and children alike. The challenge is making it both fun and functional without cluttering the room.
Recommended Products to replicate this idea
| # | Preview | Product | |
|---|---|---|---|
| 1 |

|
IBIZA VIBE MAMERIA Kids Bed Canopy with Frills Cotton Hanging Tent Curtain Net for Reading Nook... | Check Latest Price |
| # | Preview | Product | |
|---|---|---|---|
| 1 |

|
Rocky Mountain Goods Ceiling Swag Hook 2 Pack with Mounting Hardware - 1 1/2” Heavy Duty Swag... | Check Latest Price |
Picture a soft fabric draped gently from the ceiling, forming a tent-like canopy over a cozy corner. Bright, cheerful fabrics in patterns like stars or clouds add a whimsical touch. Inside, plush cushions, fairy lights, or small pillows create an inviting little space. The fabric sways softly with every movement, giving it a magical, almost fairy-tale quality.
Choose fabrics that match your child’s favorite colors or themes, like pastel florals for a fairy vibe or bold stripes for a sporty look. For smaller spaces, a simple draped curtain over a corner works well. During different seasons, swap lightweight fabrics for warmer, thicker ones for winter warmth. You can also incorporate netting for a princess castle or pirate ship theme.
Start by selecting lightweight, washable fabrics and ceiling hooks or tension rods. Measure the space to ensure the canopy fits comfortably without blocking windows or doors. Attach hooks securely into ceiling joists or use strong adhesive hooks for lighter fabrics. Drape the fabric over the hooks, adjusting for a balanced look. Secure the fabric edges with ties or clips to keep it tidy. Add cushions and fairy lights or lanterns inside for extra charm.
Personalize the nook with your child’s name sewn into the fabric or attached as a small flag. Incorporate themed pillows or plush toys for added character. Use string lights or battery-operated lanterns to create a warm glow. You could also hang small decorative items from the canopy for a layered, personalized look.
A DIY fabric canopy nook transforms a corner into a magical retreat that encourages imaginative play and quiet reading. It’s easy to assemble and customize, making it perfect for any space. Your child will treasure their secret hideaway, fostering independence and creativity. Ready to create a dreamy escape in your home?
3. Modular Storage Cubes with Fun Labels
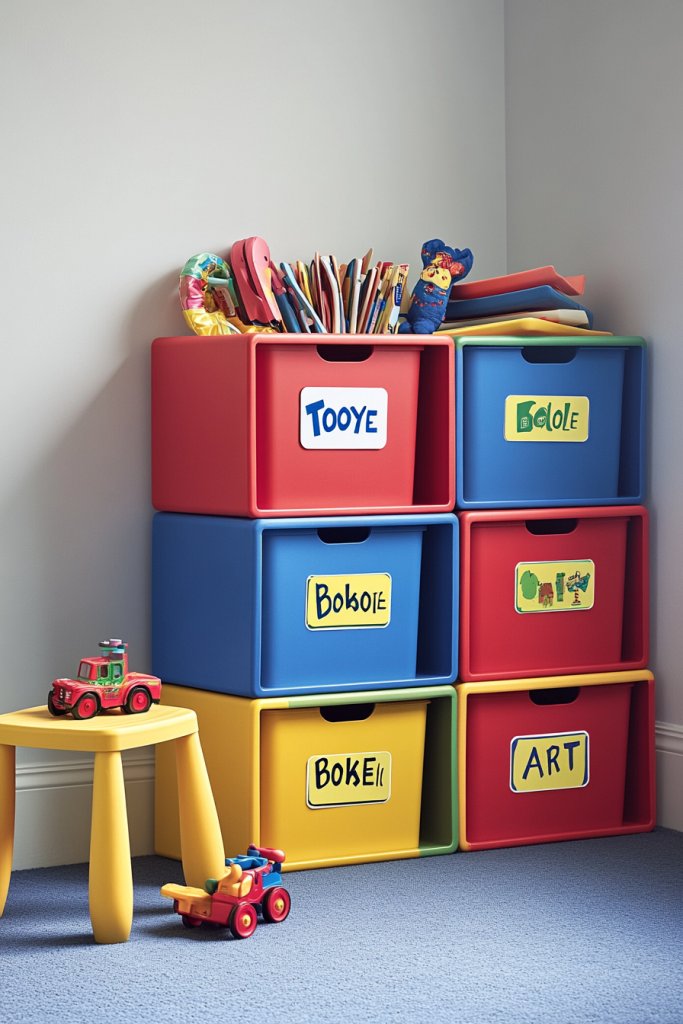
Toy clutter can quickly turn a kid’s room into chaos, making it hard for both parents and kids to stay organized. The goal is to keep things tidy without sacrificing style or fun. Traditional storage bins often look dull and don’t encourage kids to put things away.
Recommended Products to replicate this idea
| # | Preview | Product | |
|---|---|---|---|
| 1 |
|
C&AHOME Cube Storage Organizer, 16-Cube Shelves Units, Plastic Storage Cubes, DIY Closet Organizer,... | Check Latest Price |
| # | Preview | Product | |
|---|---|---|---|
| 1 |

|
12PCS Basket Labels Clip On for Storage Bins, Removable & Erasable Bin Labels Clips On, Laundry... | Check Latest Price |
Imagine colorful, stackable cubes arranged neatly on shelves or the floor, each labeled with playful icons or words like ‘lego’, ‘books’, or ‘art supplies’. Bright hues like orange, teal, and lime green add a lively vibe. Fun patterns such as stars or stripes decorate the sides, making organization feel like a game. Clear labels and cheerful colors turn storage into an engaging visual puzzle.
Mix and match different sizes and colors to suit your room’s theme or your child’s preferences. You can also use themed labels or stickers to match current interests, like dinosaurs or princesses. For older kids, sleek monochrome cubes with minimalist labels work well. For small rooms, stack cubes vertically to save space and keep the floor clear.
Choose sturdy, lightweight plastic or fabric-covered cubes with labels that are easy to change. Attach labels with Velcro or adhesive stickers for flexibility. Organize items by category and assign designated cubes for each type of toy or book. Place cubes on open shelves, under beds, or in cubby units for easy access. Encourage your child to help with labeling and sorting to foster responsibility.
Create custom labels with your child’s handwriting or favorite characters to make the storage uniquely theirs. Use themed stickers or decals to match current interests. Incorporate decorative washi tape around the edges for a DIY touch. Adding a label station with markers and stickers can make organization a fun ongoing project.
Colorful, labeled storage cubes make tidying up feel less like a chore and more like a game. Kids learn responsibility while enjoying the vibrant, personalized space. It also makes cleaning quicker and less stressful for everyone. Ready to turn chaos into colorful order?
4. Chalkboard Wall for Creative Expression
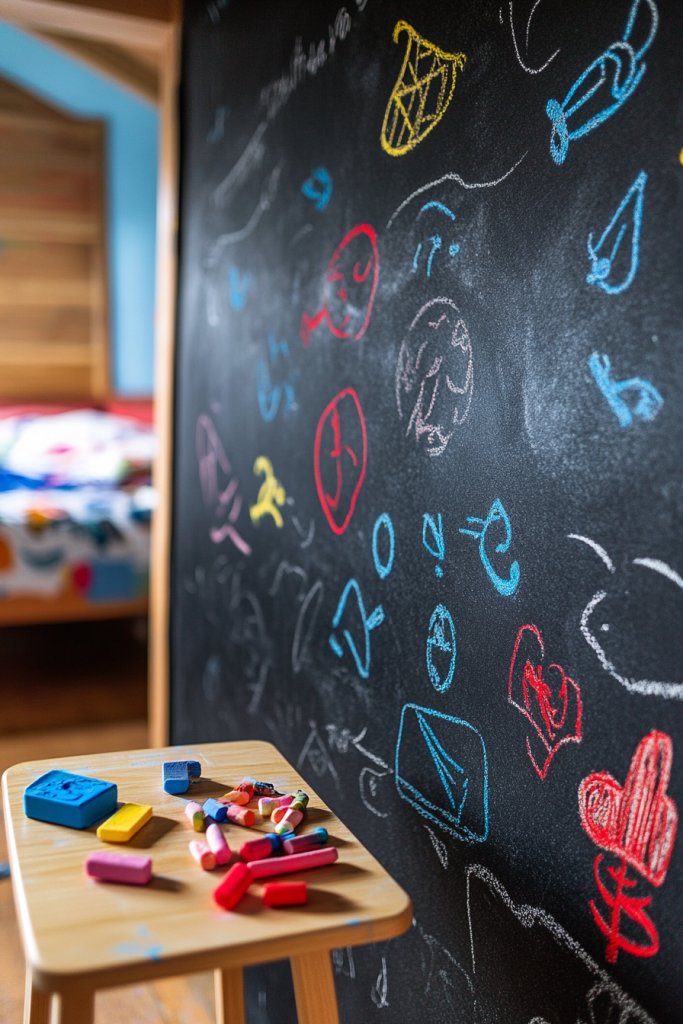
Kids love to draw and doodle, but constantly changing art and messes can be overwhelming. Parents want a dedicated space that encourages creativity without cluttering surfaces or furniture. A chalkboard wall offers a perfect solution for artistic freedom and easy cleanup.
Recommended Products to replicate this idea
| # | Preview | Product | |
|---|---|---|---|
| 1 |

|
Rust-Oleum 206540 Chalkboard Brush-On Paint, 30 oz, Black | Check Latest Price |
| # | Preview | Product | |
|---|---|---|---|
| 1 |

|
Kedudes Dustless Chalk with Eraser, 24pk - 12 Colored Chalkboard Chalks and 12 White Chalk for... | Check Latest Price |
Visualize a large section of wall painted with matte black chalkboard paint, ready for endless drawings. Kids can create colorful sketches that pop against the dark background, using chalk in vibrant shades. The wall becomes a dynamic canvas, filled with their latest masterpiece or messages for friends and family. Chalk dust adds a nostalgic scent, and the surface invites spontaneous creativity.
Designate a specific wall or part of a wall for chalk art, and paint surrounding areas with bright, cheerful colors to frame the blackboard. Use decorative borders or removable decals to add extra flair. For smaller rooms, a vertical panel or door can serve as the chalkboard surface. You can also combine with magnetic paint for dual functionality.
Prep the wall by cleaning and sanding to ensure smooth paint adherence. Apply at least two coats of chalkboard paint, allowing proper drying time. Once dry, prime the surface with chalk to prevent ghosting. Stock up on colorful chalks and erasers, and set ground rules for use. For easy maintenance, wipe with a damp cloth regularly to keep it looking fresh.
Encourage your child to personalize their chalkboard with their name or favorite quotes. Add decorative washi tape or stickers around the edges for a finished look. Use different chalk colors or create a mini art gallery on the wall to display their best work. Consider framing the chalkboard area with molding for a polished appearance.
A chalkboard wall invites endless creative expression and makes art a part of everyday life. Kids develop fine motor skills and confidence as they see their ideas come to life. Plus, it keeps their space fun and interactive, inspiring a love of drawing and writing. Ready to turn a blank wall into a colorful art studio?
5. DIY Rope Ladder or Climbing Wall for Active Play
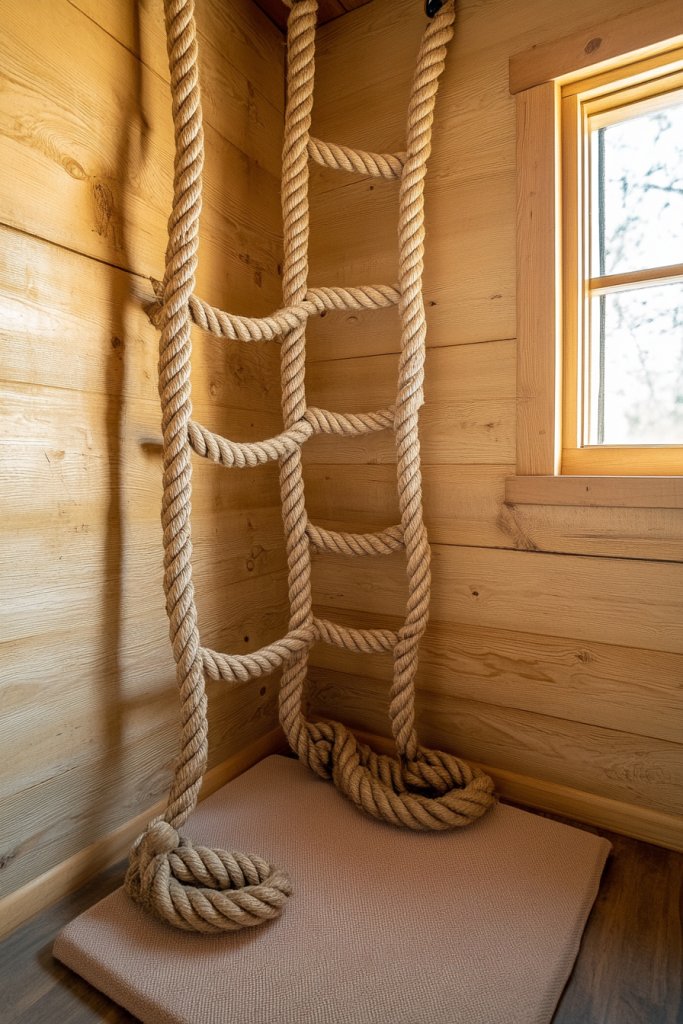
Kids need active outlets to burn off energy, but space and safety concerns make it tricky to set up traditional play equipment. Creating a safe, engaging climbing feature in their room can transform it into an adventure zone. The challenge is balancing excitement with practicality.
Recommended Products to replicate this idea
| # | Preview | Product | |
|---|---|---|---|
| 1 |
|
Rainbow Craft 6.6FT Climbing Rope Ninja Ladder for Kids - Kids Ninja Warrior Obstacle Course... | Check Latest Price |
| # | Preview | Product | |
|---|---|---|---|
| 1 |
|
TOPNEW 32 Rock Climbing Holds Multi Size for Kids, Adult Rock Wall Holds Climbing Rock Wall Grips... | Check Latest Price |
Envision a colorful rope ladder hanging confidently on one wall, ready for scaling. Or a mini climbing wall painted with vibrant patterns or themed murals, inviting kids to test their strength. Soft mats or padded flooring below add safety and comfort. The wall becomes an indoor playground where every day feels like an adventure.
Select bright, durable ropes and sturdy anchors for the ladder, or opt for foam climbing holds for a wall. Customize the colors and patterns to match the room’s theme or your child’s favorite colors. For smaller spaces, a foldable or retractable ladder can save room when not in use. Incorporate safety features like padded mats or cushioned wall panels.
Identify a sturdy wall with access to ceiling joists or studs for secure mounting. Install heavy-duty hooks or anchors rated for the weight, following manufacturer instructions carefully. Attach the ropes or climbing holds securely, ensuring no loose ends or sharp edges. Encourage your child to use the feature under supervision initially. Regularly check for wear and tear to maintain safety.
Personalize the climbing wall with themed holds or painted designs that match the room’s decor. Add colorful flags or banners hanging from the ceiling nearby for extra fun. Incorporate a small shelf or basket for climbing gear or rewards. Let your child choose their favorite colors or themes to make it truly theirs.
A climbing feature promotes physical activity and confidence, helping kids develop strength and coordination. It turns their room into a personal playground that encourages independence. Plus, it’s a fun way to inspire active play daily. Ready to elevate their room into an adventure hub?
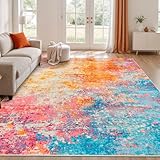
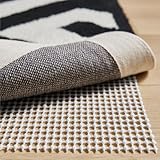
6. Patterned Area Rugs for Zone Definition
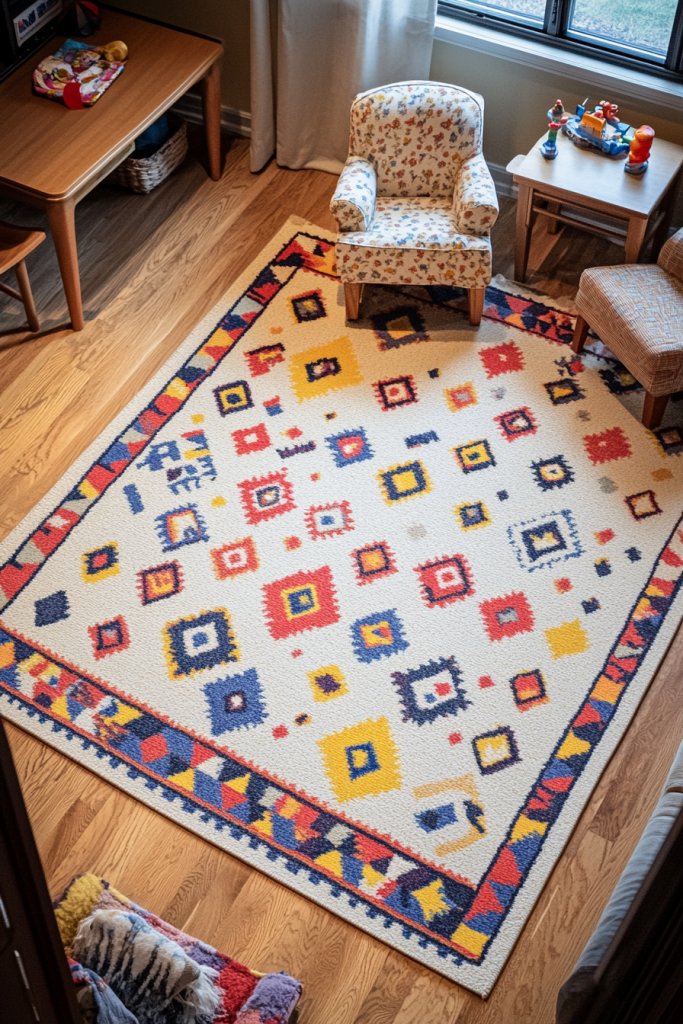
Open-concept kids’ rooms can feel scattered and lack defined spaces for play, study, or relaxation. Creating visual zones helps organize the room naturally without heavy furniture or partitions. The goal is to make each area inviting and functional while adding style.
Recommended Products to replicate this idea
| # | Preview | Product | |
|---|---|---|---|
| 1 |
|
Rugflix 8x10 Area Rugs for Living Room, Washable Large Multicolor Rug Stain-Resistant Low Pile,... | Check Latest Price |
| # | Preview | Product | |
|---|---|---|---|
| 1 |
|
GORILLA GRIP Strong Rug Pad Gripper, US Designed, Grips Help Keep Area Rugs Safe and in Place, Slip... | Check Latest Price |
Picture a bold, patterned rug delineating the play area from the reading corner. Bright geometric shapes or playful motifs like stars or animals add energy and personality. The rug’s texture underfoot invites kids to sit, crawl, or lie down comfortably. It anchors the space, making it clear where playtime begins and ends.
Select rugs with fun patterns that suit your child’s interests—such as jungle animals, space themes, or abstract designs. For small rooms, choose smaller rugs to avoid overwhelming the space. Layering different textures or combining rugs with different patterns can create a playful, eclectic look. Consider washable options for easy cleaning.
Measure the designated areas carefully to select appropriately sized rugs. Use rugs with non-slip backing or add rug pads for safety. Place the rug in the center of the play zone to define boundaries clearly. Keep the edges of the rug flat to prevent tripping hazards. Regularly vacuum or shake out to maintain freshness and safety.
Add small decorative pillows or stuffed animals on the rug to make it more inviting. Coordinate the rug colors with other room accessories for a cohesive look. Use stencils or fabric paint to add personal touches or initials. Rotate or swap rugs seasonally to keep the room fresh and exciting.
A well-chosen rug transforms open spaces into organized zones that encourage independent play. Kids feel more at ease when they know their designated areas are special. It also makes tidying up easier when play zones are visually distinct. Ready to define your child’s perfect play space?
7. Creative Light Fixtures: Fairy Lights & Colorful Lamps
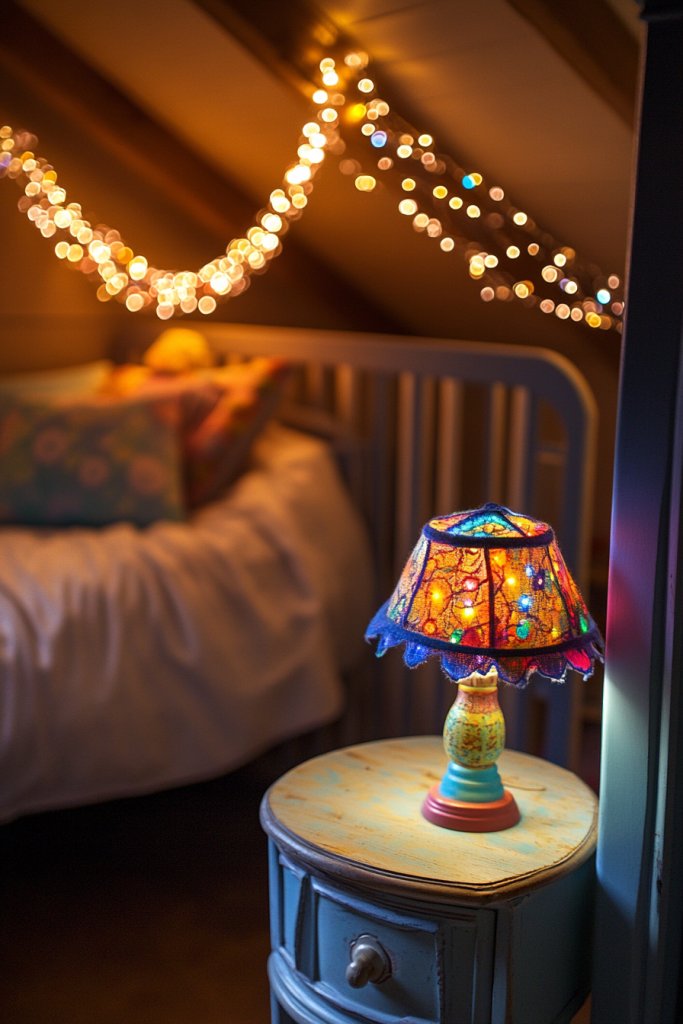
Kids’ rooms often feel dull or uninviting once the main lights go off, making bedtime less appealing. The right lighting can turn a basic space into a magical retreat that sparks imagination. The challenge is finding options that are safe, fun, and add ambiance.
Recommended Products to replicate this idea
| # | Preview | Product | |
|---|---|---|---|
| 1 |

|
Brightown 12 Pack LED Fairy Lights Battery Operated String Lights - 7ft 20LED Waterproof Silver Wire... | Check Latest Price |
| # | Preview | Product | |
|---|---|---|---|
| 1 |
![ROOTRO Table Lamp, [Advanced] Bedside Touch Control Lamp for Bedroom 3 Level Dimmable Warm White Lights with 256 RGB Color Mode Modern Deisgn Smart Nightstand Desktop LED Lamps Portable for Read](https://m.media-amazon.com/images/I/31fo0tT0lDL._SL160_.jpg)
|
ROOTRO Table Lamp, [Advanced] Bedside Touch Control Lamp for Bedroom 3 Level Dimmable Warm White... | Check Latest Price |
Imagine strings of tiny, colorful fairy lights draped across the ceiling or around window frames, casting a warm, twinkling glow. Bright, playful table lamps shaped like animals or stars sit on bedside tables, adding charm and function. The ambient lighting creates a cozy atmosphere perfect for bedtime stories or quiet play. Light patterns dance softly on the walls, making the room feel enchanting.
Use fairy lights in different colors or shapes to match the room’s theme or mood. For a calming effect, opt for warm white or soft pastel hues. Incorporate battery-powered LED lights for safety and ease of installation. For a more whimsical look, choose lamps with textured bases or fun characters. Consider dimmable fixtures to adjust brightness for different activities.
Secure fairy lights with adhesive hooks or clips, avoiding cords dangling where children might pull. Choose lamps with child-safe, low-wattage bulbs and stable bases. Position lighting to highlight reading nooks or wall art without glare. Use extension cords safely, ensuring they’re out of reach. Consider using timers or remote controls for convenience.
Let your child pick their favorite colors or shapes for lighting fixtures to boost their sense of ownership. Decorate lamp bases with stickers, fabric, or paint for a DIY touch. Create themed lighting zones—like star-shaped fairy lights over a reading corner. Incorporate glow-in-the-dark elements for extra nighttime magic.
Creative lighting transforms a child’s room into a dreamy haven that feels safe and special. It encourages winding down and makes bedtime something to look forward to. Plus, the right lighting can boost their confidence in choosing their own space. Ready to make their room glow with magic?
8. Personal Growth Wall with Customizable Growth Chart
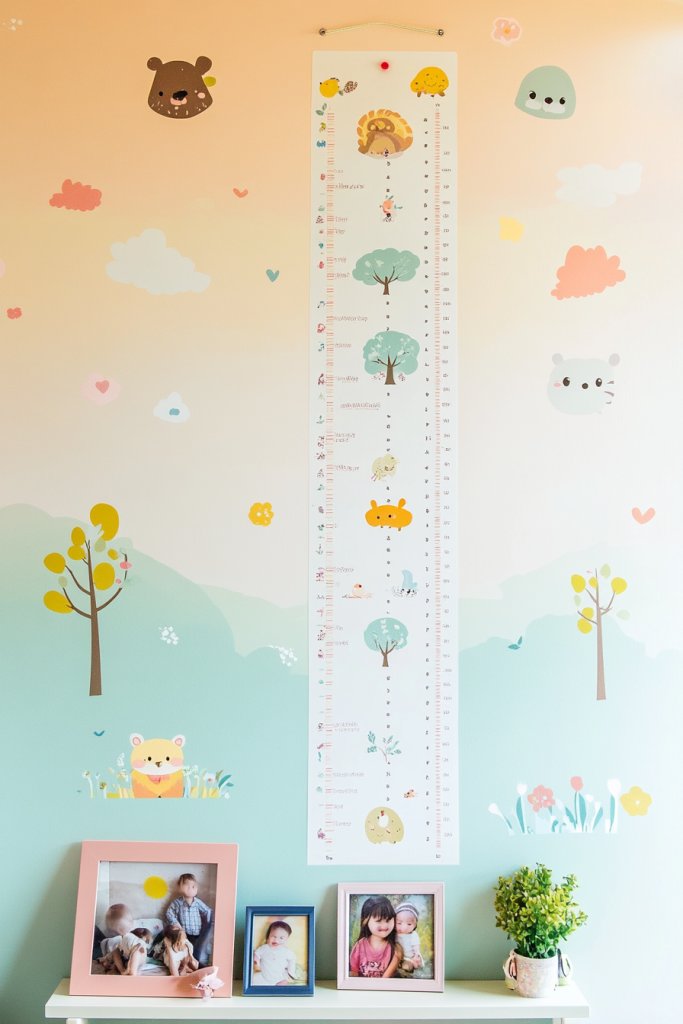
Parents love tracking milestones, but boring charts or taped-up paper don’t do justice to a child’s growth journey. Creating a dedicated wall for growth milestones makes it fun and visually appealing. It’s a charming way to celebrate progress without cluttering other areas.
Recommended Products to replicate this idea
| # | Preview | Product | |
|---|---|---|---|
| 1 |

|
Personalized Wooden Height Growth Chart Ruler for Kids, Boys & Girls w Name | 3 Designs, 5 Various... | Check Latest Price |
| # | Preview | Product | |
|---|---|---|---|
| 1 |

|
Modern White Growth Chart Peel and Stick Wall Decals by RoomMates, RMK5533GM | Check Latest Price |
Visualize a colorful, themed growth chart with space for stickers or removable markers. Incorporate playful elements like clouds, stars, or animals that match the room’s decor. As your child grows, they can add stickers or marks to record their height. The chart becomes a dynamic part of the room’s story, inspiring pride and motivation.
Choose themes that suit your child’s interests—space, jungle, fairy tale, or sports. Use fabric backgrounds or peel-and-stick decals for easy updates. For a more sophisticated look, opt for elegant wooden or metal frames with engraved markings. Seasonal or special milestone markers can be added to mark birthdays or achievements.
Select a prominent wall that is accessible at your child’s eye level. Attach a large fabric, wood panel, or a dedicated vinyl decal with measurement markings. Use removable stickers or clips to allow for easy updates. Encourage your child to participate in marking their growth, fostering a sense of accomplishment. Keep it updated regularly to maintain interest.
Add fun characters, their name, or favorite icons around the chart to make it more personalized. Incorporate framed photos or small mementos nearby to create a memory corner. Use themed stickers or paint to match the room’s overall decor. Make it a family project to celebrate milestones together.
A growth wall turns an ordinary measurement into an ongoing story of achievement. It boosts confidence and encourages kids to aim higher. Seeing their progress visually motivates them to try new things and celebrate their journey. Ready to inspire growth and confidence?
9. Upcycled Crates as Multi-Functional Furniture
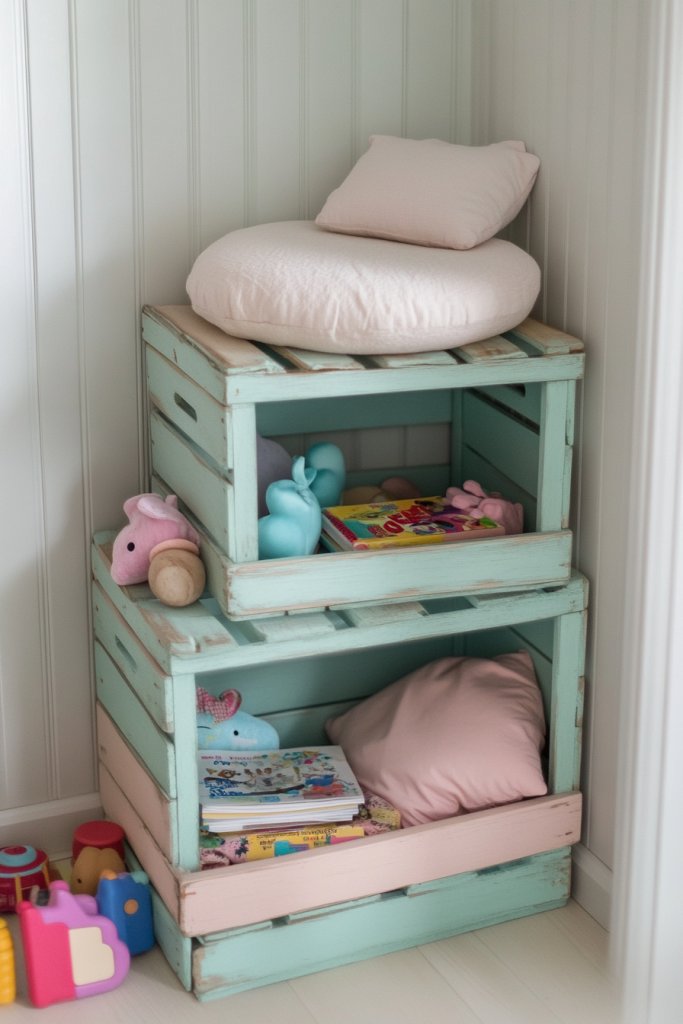
Kids’ rooms can quickly become cluttered and chaotic, especially when storage options are limited. Finding versatile furniture that’s both practical and stylish is a constant quest. Upcycled crates offer an eco-friendly, budget-friendly solution that does double duty as storage and seating.
Recommended Products to replicate this idea
| # | Preview | Product | |
|---|---|---|---|
| 1 |

|
LYDWOO8D Nested Wooden Storage Crates Set of 3 (L,M,S),Farmhouse Decorative Boxes with Handles for... | Check Latest Price |
| # | Preview | Product | |
|---|---|---|---|
| 1 |

|
MICUSHION Piano Bench Cushion for Indoor Shoe Storage Non Slip Picnic Bench Pad for Kitchen Dining... | Check Latest Price |
Picture sturdy wooden crates painted in cheerful colors stacked to create a fun, modular piece. They serve as seats, side tables, or even small shelves. The natural wood grain or bright finishes add warmth and character. Fill them with toys, books, or cozy blankets for a personalized touch. The crates’ rugged charm invites kids to get involved in organizing.
Mix different sizes and colors to match your decor or your child’s preferences. Use decorative stickers, stencils, or paint to customize each crate. For a cohesive look, coordinate with bedding or curtains. Stack or line them up for a flexible storage system that grows with your child. You can also add cushions on top for extra comfort.
Choose sturdy, untreated wood or repurpose old crates from markets or thrift stores. Sand rough edges and paint or stain in bright, washable finishes. Secure the crates together with brackets or stacking pins for stability. Use inside or outside, depending on your needs. Fill with toys, clothes, or use as a bench for reading or dressing.
Label each crate with custom tags or stickers indicating contents. Decorate with your child’s favorite themes or characters. Add fabric or cushion tops for comfort. Encourage your kid to help decorate and organize, making it a fun project. Change out decor seasonally or as preferences evolve.
Upcycled crates teach resourcefulness and responsibility. Kids learn to organize and care for their space, fostering independence. They also add charm and personality, making the room feel warm and inviting. Ready to give old crates new life and style?
10. DIY Wall Art with Kids’ Artwork and Crafts
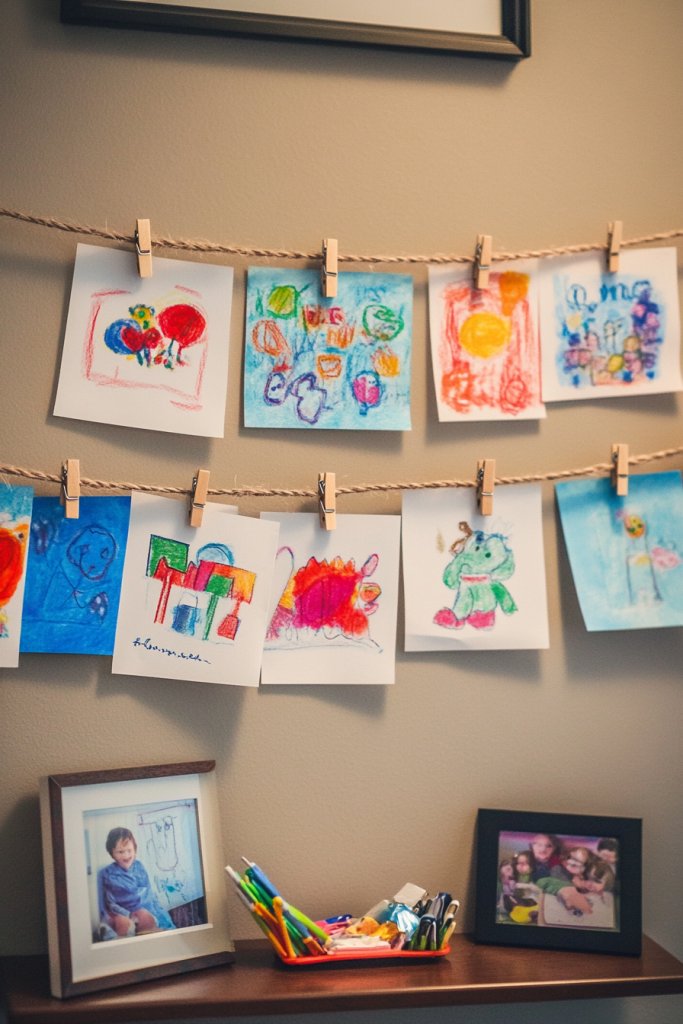
Kids produce endless drawings and crafts, but what’s the point if they just end up in drawers or on the floor? Displaying their art celebrates their creativity and makes the room more personal. It also encourages pride and motivation to keep creating.
Recommended Products to replicate this idea
| # | Preview | Product | |
|---|---|---|---|
| 1 |

|
Americanflat Kids Artwork Frame Changeable (Black) - Magnetic Door Holds 100 Art Pieces - 8.5x11... | Check Latest Price |
| # | Preview | Product | |
|---|---|---|---|
| 1 |
|
Ywlake Magnetic Poster Hanger, 12x18 12x16 12x24 Poster Frame Wood Wooden Magnet Print Posters Dowel... | Check Latest Price |
Envision a colorful gallery wall filled with framed or mounted kids’ art, arranged in playful patterns. Mix in craft projects like paper collages or painted handprints for added texture. Use vibrant frames or washi tape to highlight each piece, creating a lively, ever-changing display. The wall becomes a dynamic showcase of their talents.
Create a dedicated art corner with clipboards, wire hangers, or corkboards for easy rotation. Incorporate themed frames or mats that match the room decor. For a minimalist look, use uniform frames and neat arrangements. Seasonal or themed displays can keep it fresh and engaging.
Gather your child’s best pieces and choose a wall or section for display. Use frames with easy-open backs or clipboards for quick swaps. Arrange artwork at eye level for kids to see and feel proud. Rotate the pieces regularly, involving your child in the selection process. Keep extra supplies handy for new creations.
Add captions, dates, or titles to each piece for a storytelling effect. Use colorful washi tape or decorative mounts for a playful touch. Encourage your child to create themed displays for holidays or seasons. Incorporate their handwriting or favorite quotes to add personality.
A dedicated art wall boosts kids’ confidence and encourages ongoing creativity. It turns their room into a personal gallery that celebrates their growth. Seeing their work displayed makes them proud and motivates them to keep exploring their talents. Ready to showcase your child’s masterpieces?
11. Playful Canopy Tent or Teepee Corner
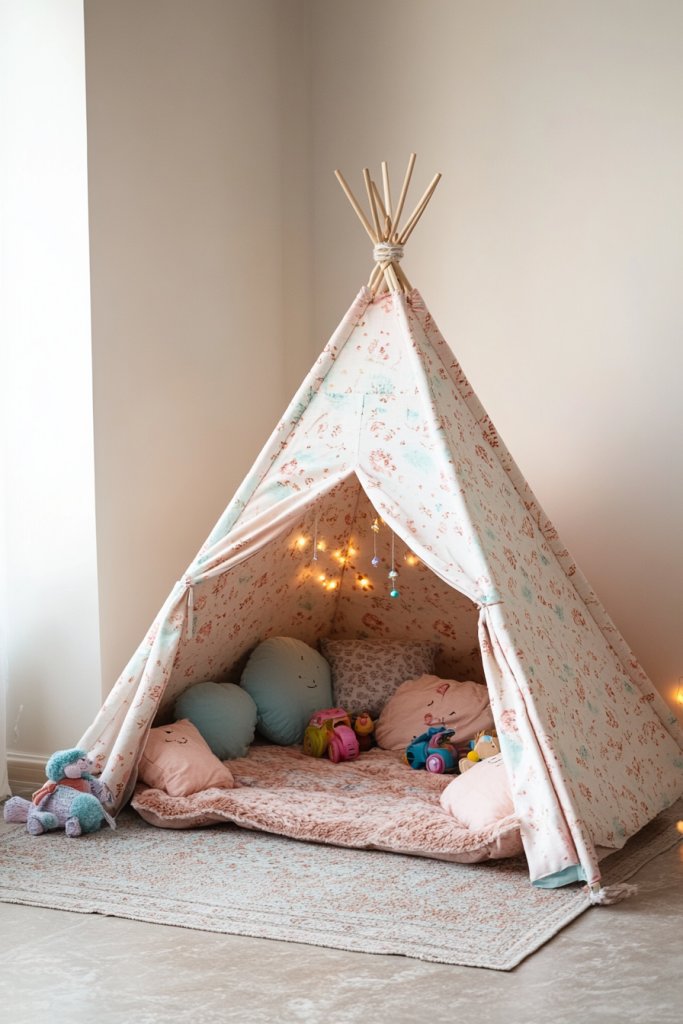
Every kid dreams of having their own special hideaway, but buying elaborate tents can be expensive and bulky. Creating a DIY canopy or teepee offers a cozy retreat that fosters imagination without breaking the bank. The challenge is making it functional, cute, and easy to set up.
Recommended Products to replicate this idea
| # | Preview | Product | |
|---|---|---|---|
| 1 |

|
Windyun 4 Pack Kids Teepee Tent for Slumber Party with Mattress and Lights, Sleepover Tents for... | Check Latest Price |
| # | Preview | Product | |
|---|---|---|---|
| 1 |
|
Akiky Princess Canopy Bed Curtains Set with Star Light Sheer Curtain for King Size Bed,8 Panels... | Check Latest Price |
Imagine a colorful fabric tent with whimsical patterns, nestled in a corner of the room. Soft cushions, fairy lights, or plush toys inside make it inviting. The fabric drapes gently, creating a sense of privacy and magic. This space becomes a fairy house, pirate ship, or secret hideout, sparking endless adventures.
Choose fabrics that match your child’s favorite themes or colors, like pastel florals or bold stripes. For a quick setup, use a simple wooden or metal frame with fabric draped over it. For winter, opt for thicker, warmer fabrics. Add decorative banners or hanging ornaments for extra charm.
Construct or purchase a basic frame—wooden dowels, metal poles, or even a tension rod. Drape fabric over the frame and secure with clips or ties. Anchor the base with cushions or rugs to keep it steady. Decorate the interior with pillows, fairy lights, or small themed accessories. Make sure the structure is stable and safe for active play.
Personalize with your child’s name or favorite characters on the fabric. Use themed fabrics to match their current interests and switch them out as tastes evolve. Add hanging decorations or small shelves inside for books or toys. Let your child help with decorating to build pride.
A DIY teepee or canopy creates a personal space that encourages independent play and storytelling. It helps children feel safe and imaginative, boosting confidence. Plus, it’s a fun project for parents and kids to do together. Ready to craft a magical retreat?
12. Statement Wall with Geometric or Abstract Vinyl Decals
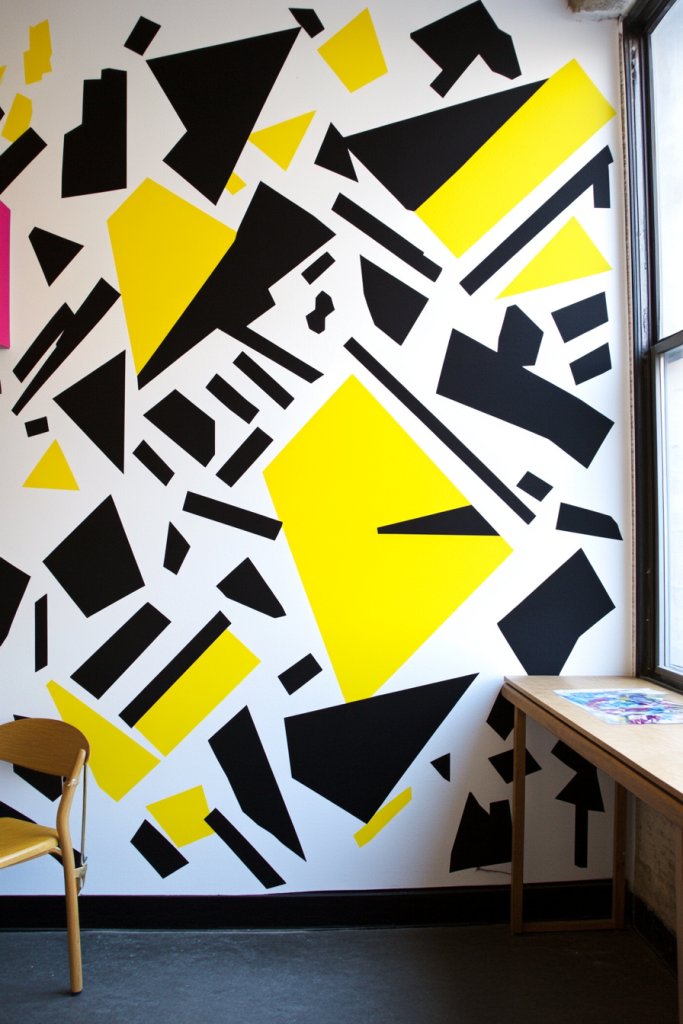
Plain walls can make a room feel dull or uninspired, especially in kids’ spaces that need a splash of personality. Adding a statement wall with bold decals turns a boring surface into a focal point. It’s an easy way to inject modern style and energy into the room.
Recommended Products to replicate this idea
| # | Preview | Product | |
|---|---|---|---|
| 1 |

|
Geometric Wall Decals Vinyl Black Wall Stickers Abstract Art Sticker Modern Stickers Irregular Half... | Check Latest Price |
| # | Preview | Product | |
|---|---|---|---|
| 1 |

|
Nordic Geometric Wall Stickers, Removable DIY Mountain Reflection Wall Decal Murals Peel and Stick... | Check Latest Price |
Imagine a wall adorned with large, contrasting geometric decals in vibrant colors like turquoise and coral. The shapes interlock and overlap, creating an eye-catching pattern. This adds depth and modern flair without overwhelming the space. The decals are removable, so you can change the look as your child’s tastes evolve.
Choose decals that match the room’s color palette or theme, from abstract art to playful shapes. For a softer look, opt for pastel or neutral tones with subtle patterns. Use a combination of decals and paint to create layered effects. For smaller walls, select smaller patterns or accents that don’t dominate the space.
Clean the wall thoroughly to ensure decals stick properly. Use a level and measuring tape to align decals evenly, creating a balanced composition. Carefully peel and stick each decal, smoothing out air bubbles. For larger designs, follow manufacturer instructions closely. Keep a small squeegee or credit card handy for perfect application.
Add personalized elements like initials, favorite symbols, or themed motifs to complement the decals. Incorporate metallic or textured decals for a luxe effect. Frame or paint around the decals for additional emphasis. Change or rearrange decals periodically to refresh the look.
A statement decal wall modernizes the room instantly and is a non-permanent way to express style. It makes the space feel fresh and current, boosting your child’s pride in their environment. Plus, it’s a simple project with a big visual payoff. Ready to make a bold statement?
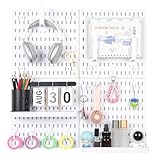
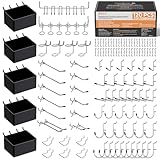
13. Interactive Pegboard Organizer for Toys and Art Supplies
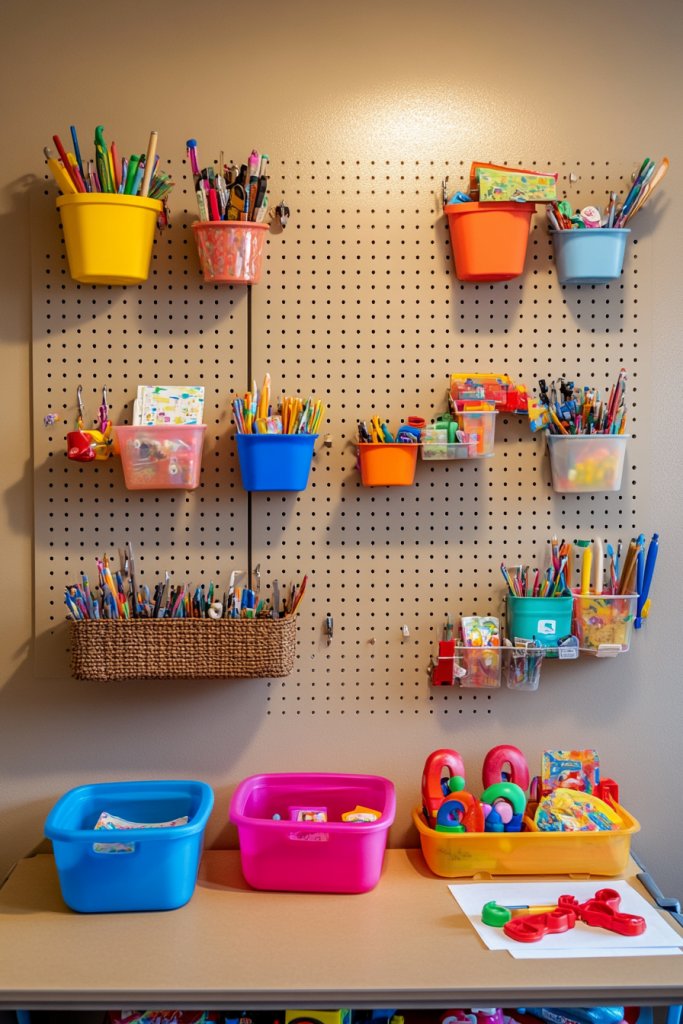
Toys, art supplies, and accessories often end up in a jumbled mess, making cleanup a nightmare. Parents want a way to organize everything efficiently without sacrificing style. An interactive pegboard offers a customizable, fun solution that keeps everything within reach.
Recommended Products to replicate this idea
| # | Preview | Product | |
|---|---|---|---|
| 1 |
|
Pegboard Wall Organizer Kit – Heavy Duty 20lbs Load Bearing, Easy Installation, 4 Peg Board Panels... | Check Latest Price |
| # | Preview | Product | |
|---|---|---|---|
| 1 |
|
INCLY 120PCS Pegboard Accessories Organizer Kit, Peg Board Hooks Assortment with Bins for Organizing... | Check Latest Price |
Picture a brightly colored pegboard mounted on the wall with hooks and baskets holding art tools, small toys, or costume accessories. You can customize the arrangement to suit your child’s needs, creating a vibrant, organized display. The open design encourages kids to participate in tidying up and accessing their belongings easily. It’s both functional and decorative.
Choose a pegboard color that complements the room’s theme or opt for a neutral shade for versatility. Mix and match hooks, shelves, and bins for different types of items. For older kids, add small containers for jewelry or tech accessories. For younger children, use larger bins and easier-to-reach heights. Incorporate decorative elements like themed decals or paint accents.
Securely mount the pegboard into wall studs or with appropriate anchors. Arrange hooks and baskets in a pattern that suits your storage needs. Label containers for quick identification, or let your child decorate them. Regularly rotate or update items to keep the system fresh. Encourage your child to put things back after play to foster responsibility.
Add special hooks for favorite items or themed decals to match current interests. Use colorful cords or ribbons to add visual interest. Incorporate a small chalkboard or whiteboard section for notes or quick drawings. Let your child help decorate the pegboard to build ownership.
An interactive pegboard teaches organizational skills and independence, making cleanup part of play. It transforms clutter into a colorful, accessible display that kids love to use. It’s a practical yet playful addition that adapts as your child’s needs change. Ready to organize with style?
14. Themed Bedding and Pillow Sets for Instant Style
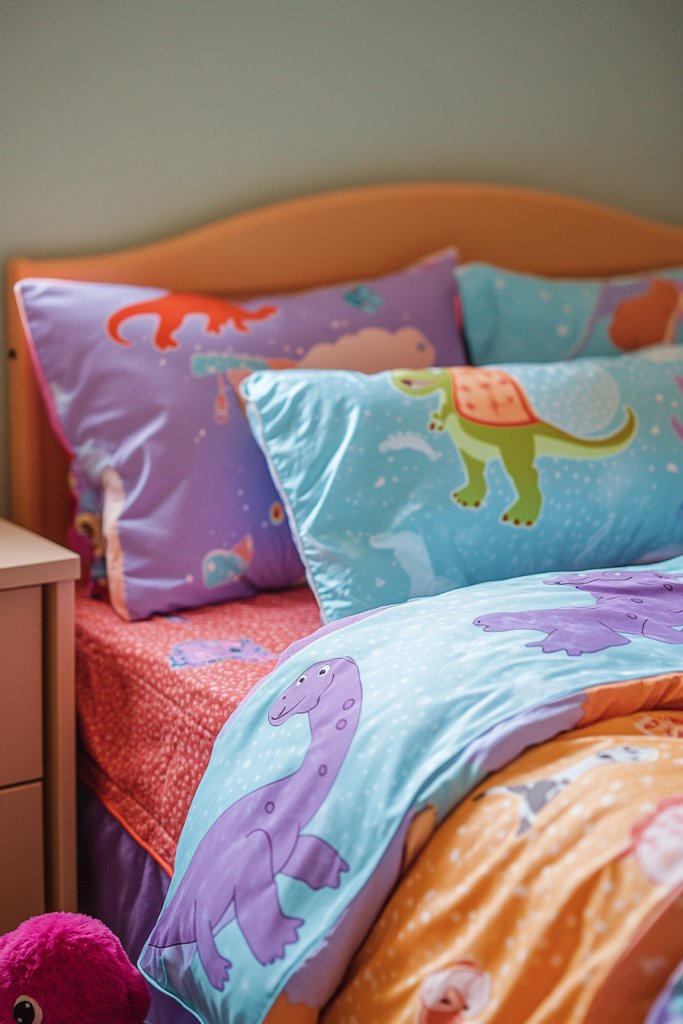
A room’s style can feel disjointed if bedding doesn’t match the decor or theme. Kids love bedding that reflects their favorite characters or motifs, making bedtime more exciting. The right bedding instantly elevates the room’s look and creates a cohesive aesthetic.
Recommended Products to replicate this idea
| # | Preview | Product | |
|---|---|---|---|
| 1 |

|
Jay Franco Bluey & Bingo Twin Comforter Set - 5 Piece Bed Set Includes Sheet Set & Pillow Covers -... | Check Latest Price |
| # | Preview | Product | |
|---|---|---|---|
| 1 |

|
Bedding Decorative Lumbar Pillowcases Sweet Dreams Good Night Cushion Covers Sleep Themed Decorative... | Check Latest Price |
Imagine a bedding set featuring playful patterns like rockets, animals, or fairy tales, layered with coordinating pillows. Bright colors and fun textures add to the visual appeal. Pile on plush pillows or themed cushions that complement the bedding for a cozy, inviting bed. The ensemble transforms a simple sleeping area into the room’s centerpiece.
Choose bedding sets that match the room’s color scheme or theme for a seamless look. For a versatile approach, opt for reversible or mix-and-match pillow sets. Incorporate textured fabrics like plush, corduroy, or quilted covers to add depth. Seasonal or holiday-themed bedding can be swapped out to keep the decor fresh.
Select bedding in durable, easy-care fabrics suitable for kids. Coordinate with curtains, rugs, or wall decals for a unified look. Use decorative pillows to add layers and comfort. Make bed-making a fun routine by involving your child in choosing and arranging their bedding. Keep extra sets on hand for quick swaps.
Add embroidered initials or custom patches to personalize the bedding. Incorporate themed or textured pillows for extra style points. Use removable covers or pillowcases with fun prints that can be changed seasonally. Let your child pick their favorite themes to encourage ownership.
Themed bedding makes the room feel complete and personalized, boosting your child’s happiness with their space. It encourages a positive bedtime routine and a sense of pride. Plus, a coordinated look can make the room appear larger and more polished. Ready to upgrade your kid’s sleep space?
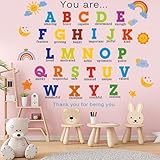
15. Customized Name or Alphabet Wall Decals
Personalization makes any space feel special, especially for kids who thrive on recognition and ownership. Generic decor can feel impersonal, but customized decals add a meaningful touch. They turn a blank wall into a vibrant display of identity and fun.
Recommended Products to replicate this idea
| # | Preview | Product | |
|---|---|---|---|
| 1 |

|
Boao Personalized Name Wall Decal Large Letter Stickers Alphabet Custom Name Stickers Nursery Wall... | Check Latest Price |
| # | Preview | Product | |
|---|---|---|---|
| 1 |
|
Wall Decals Alphabet Wall Stickers Removable ABC Wall Stickers Colorful Learning Educational Wall... | Check Latest Price |
Imagine colorful, removable letter decals spelling out your child’s name or favorite words in a playful font. Surround the name with themed icons like stars, hearts, or animals to add character. The decals can be arranged creatively—curved, stacked, or in a line—adding movement and energy to the room.
Choose decals in various styles—bold, script, or cartoonish—to match your decor. For a more sophisticated look, use metallic or neutral tones. Incorporate the alphabet in different colors or fonts to create a learning element. You can also arrange the letters into motivational words or favorite phrases.
Select high-quality, peel-and-stick decals that are easy to remove without damage. Measure and mark the placement to ensure straight and evenly spaced lettering. Stick the decals firmly, smoothing out air bubbles. Involve your child in the placement for a fun activity and sense of pride. Keep a small cloth nearby for quick adjustments.
Add small decorative icons or symbols that reflect your child’s interests around the name. Use glow-in-the-dark or metallic decals for extra visual impact. Change the words or names periodically to celebrate new milestones or interests. Frame or paint around the decals for a polished, finished look.
Personalized wall decals foster a sense of belonging and pride in your child’s space. They also serve as visual aids for learning the alphabet and spelling. Seeing their name on the wall encourages confidence and individuality. Ready to make their space uniquely theirs?
16. Creative Use of Wall Hooks and Hangers for Accessories
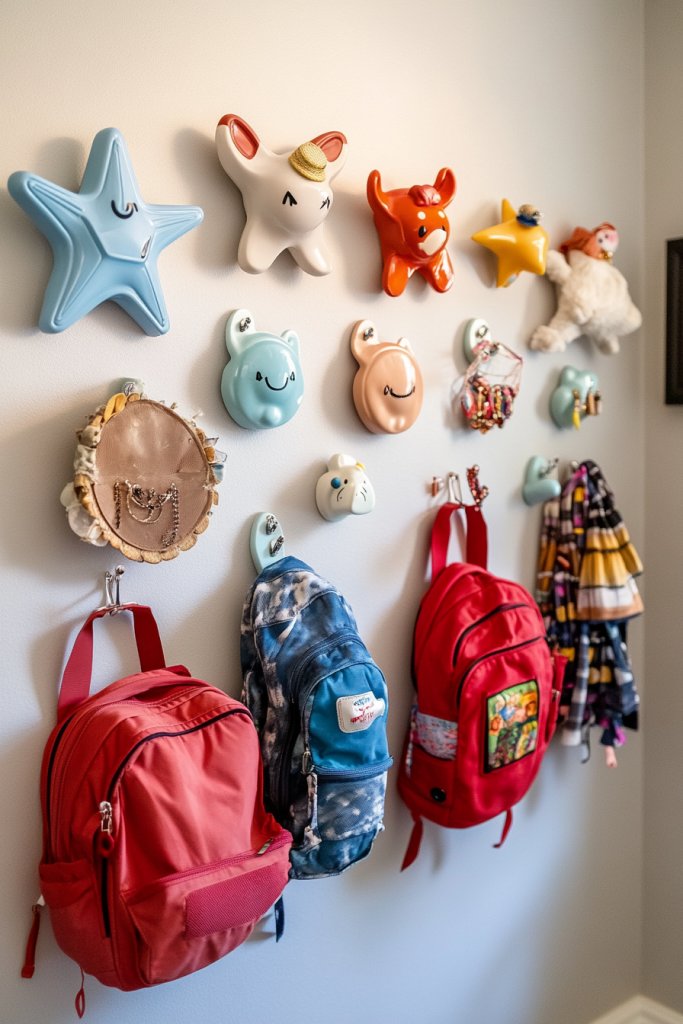
Hats, backpacks, costumes, and jewelry can clutter a room if not organized properly. Kids need a fun yet functional way to keep accessories accessible and tidy. Using whimsical hooks and hangers turns everyday storage into a decorative feature that also encourages responsibility.
Recommended Products to replicate this idea
| # | Preview | Product | |
|---|---|---|---|
| 1 |

|
Tatuo 4 Pcs Kids Wall Hooks Wooden Safari Animal Decorative Wall Mount Coat Hooks Jungle Animal... | Check Latest Price |
| # | Preview | Product | |
|---|---|---|---|
| 1 |

|
Optish Over The Door Hooks, Door Hanger Hooks for Hanging, Over The Doors Towel Racks for Bathroom... | Check Latest Price |
Visualize a wall decorated with hooks shaped like animals, clouds, or stars, each holding different accessories. Bright colors and playful shapes make the hooks a part of the decor, not an afterthought. Small baskets or clips can hold hats or small items, adding layers of organization. It’s both practical and playful, making tidying up feel like a game.
Pick hooks that match the room’s theme—wooden animals for a woodland look or metallic stars for a celestial vibe. Use themed hangers for special occasions or costumes. Arrange hooks in clusters or patterns for visual interest. For small spaces, vertical rows or multi-tiered hooks maximize utility.
Mount hooks securely into wall studs or with anchors, ensuring they hold weight well. Space them out based on what they’ll hold—larger hooks for backpacks, smaller for jewelry. Encourage your child to hang their accessories, fostering independence. Regularly check for loose hooks and replace worn or damaged ones.
Decorate hooks with paint, decals, or themed covers to match the room’s decor. Label sections or add fun tags to help your child remember where things go. Use matching color schemes or shapes to keep the look cohesive. Let your child choose their favorite shapes or characters for the hooks.
Creative hooks make organization an engaging activity rather than a chore. Kids learn to care for their belongings and develop responsibility. It also adds a playful, personalized touch to the room’s decor. Ready to hang up some fun?
Conclusion
This collection of creative decor ideas showcases a wide range of playful, functional, and inspiring options to elevate your child’s space. Don’t hesitate to try these ideas and make your child’s room a true reflection of their personality and interests. With a little imagination and effort, you can create a joyful environment that nurtures their imagination and happiness—start transforming today!