I have been, or can be if you click on a link and make a purchase, compensated via a cash payment, gift, or something else of value for writing this post. As an Amazon Associate, I earn from qualifying purchases. Please read my full Affiliate Disclosure for more information.
Imagine stepping into a bedroom where the ceiling isn’t just a boring, overlooked surface but a canvas of modern creativity that instantly sets the mood. Bedroom pop ceiling designs are gaining popularity for their ability to add personality, depth, and a touch of artistic flair to any space, transforming an ordinary room into a stylish retreat.
In this article, you’ll find a variety of innovative ideas that cater to different tastes and aesthetic preferences. From subtle accent colors to bold geometric patterns and unique lighting features, these modern ceiling designs will inspire you to elevate your bedroom’s style and make a lasting impression.
1. Floating Ceiling Panels with LED Backlighting

Does your room feel like it’s missing that sleek, modern vibe? Flat ceilings can make even the coolest decor seem dull. Floating ceiling panels with LED backlighting provide a futuristic upgrade, adding depth and atmosphere. If you want your bedroom to feel more luxurious and inviting, this is a game-changer.
Recommended Products to replicate this idea
| # | Preview | Product | |
|---|---|---|---|
| 1 |

|
VocgoUU 6 Pack 2x4 Surface Mount Kit for 2x4 LED Flat Panel Light - Aluminum 2'x4' ft Ceiling Frame... | Check Latest Price |
| # | Preview | Product | |
|---|---|---|---|
| 1 |

|
KSIPZE 100ft Led Strip Lights RGB Music Sync Color Changing Led Lights with Smart App Control Remote... | Check Latest Price |
Picture suspended panels hovering slightly below your main ceiling, with soft LED strips glowing behind them. The light casts a gentle, ambient glow, creating a layered effect that’s both stylish and calming. The panels can be rectangular, square, or even irregular shapes, adding a sculptural element. The glow’s color can be adjusted to match your mood, from warm white to cool blue.
Choose matte, textured, or glossy panels to match your decor style. For a minimalist look, stick to neutral tones like white or gray; for a more dramatic effect, go for darker shades or metallic finishes. You can install panels flush or at varying depths for a more dynamic look. This concept adapts well into small or large bedrooms—just scale the panels accordingly.
Begin by designing your layout—use a laser level to ensure symmetry. Secure the panels with sturdy mounting hardware, making sure they’re evenly spaced. Install LED strip lights behind each panel, connecting to a dimmer or smart lighting system for customization. Connect the wiring carefully and hide it within the ceiling cavity. Finish by sealing edges and testing the lighting effects. Hiring a professional electrician for wiring can save headaches.
Play with color-changing LEDs to match your mood or time of day—think relaxing pastel hues or vibrant party colors. Add textured or patterned panels for extra flair. For a cozy feel, pair the panels with plush textiles or layered curtains. You can also incorporate hidden speakers or diffusers for multi-sensory experiences.
Floating panels with LED backlighting redefine what a ceiling can be—more than just a surface, it becomes an artful statement. They work beautifully in contemporary, industrial, or modern bedrooms. Once installed, you’ll love how the space feels more open and sophisticated. Go ahead, elevate your ceiling—your room will thank you!
2. Metallic Accents in Ceiling Details

Feeling like your bedroom’s ceiling lacks that touch of luxe? Metallic accents are the perfect way to add a hint of glamour without going overboard. They catch the light and instantly elevate the entire room’s vibe. If subtle sophistication is what you’re after, metallic details are your new best friend.
Recommended Products to replicate this idea
| # | Preview | Product | |
|---|---|---|---|
| 1 |

|
KIOMIMI 24.4 inch Decorative Ceiling Medallion for light fixtures, Silver and Gold Finish | Check Latest Price |
| # | Preview | Product | |
|---|---|---|---|
| 1 |

|
Wadities Gold Leaf Gilding Adhesive Set, 100ml Water Based Glue and 100ml Varnish, Gold Leaf Sheets... | Check Latest Price |
Imagine a ceiling with delicate metallic filigree or subtle gold leafing along the edges. Or perhaps a brushed copper or silver paint finish that reflects ambient light. These accents can be incorporated into moldings, medallions, or even as a thin strip running across the ceiling. The reflective quality adds depth and a sense of richness.
Choose a warm gold or bronze for cozy, inviting moods, or opt for sleek silver or chrome for a modern, edgy look. Pair metallic accents with matte or textured wall surfaces for contrast. For smaller bedrooms, keep metallic details minimal—think a thin border or small medallion. Larger rooms can handle more elaborate patterns or ceiling medallions.
Start by selecting your metallic finish—paint, foil, or leafing options work well. Use painter’s tape to create clean lines or borders, and apply with a high-quality brush or roller. For intricate designs, a stencil or adhesive moldings can help. Seal the metallic surface with a clear protective topcoat to prevent tarnishing or scratches. For added luxury, consider LED uplighting to bounce off the metallic surfaces.
Add personalized touches such as initials, symbols, or abstract shapes in metallic finishes. Combine different metals for a layered, eclectic look. Incorporate textured metallic wallpapers or embossed panels for extra dimension. You can also add small decorative fixtures or sculptural elements made of metal to create focal points.
Metallic accents bring a high-end feel without the hefty price tag. They’re perfect for modern, glam, or industrial styles. Once they catch the light, your ceiling becomes a stunning feature. It’s a small detail that makes a big impression—go ahead, add some shine!
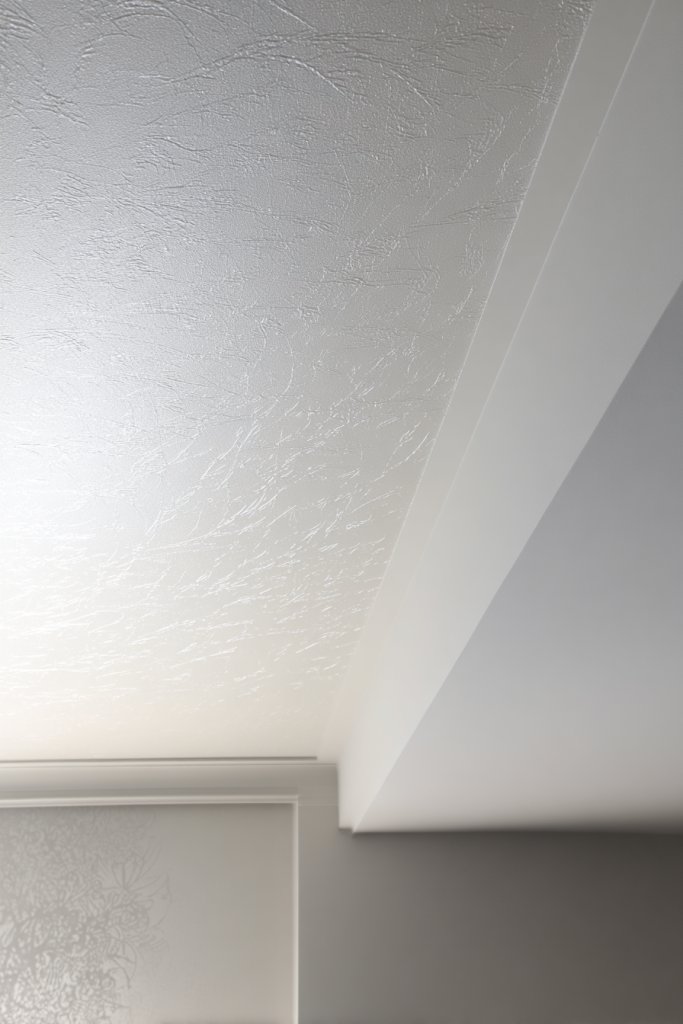
3. Textured Plaster or Stucco Finish for Visual Interest

Tired of flat, boring ceilings that do nothing for your decor? Textured plaster or stucco finishes add instant visual interest and a tactile dimension. They create depth and character, making your bedroom feel more inviting and sophisticated. If you crave a space that feels layered and rich, this is your go-to upgrade.
Recommended Products to replicate this idea
| # | Preview | Product | |
|---|---|---|---|
| 1 |

|
Violante Grassello Venetian Plaster – Authentic Italian Lime Plaster for Luxury Walls from Italy |... | Check Latest Price |
| # | Preview | Product | |
|---|---|---|---|
| 1 |

|
Threlaco Paint Roller Kit 3 Pcs Texture Sponge Paint Rollers 6 Inch Texture Pattern Roller Brush... | Check Latest Price |
Imagine running your hand over a subtle, uneven surface that catches light differently across the room. The texture could be a soft swirl, a rough matte, or a delicate stipple pattern. The finish adds a rustic or contemporary vibe, depending on the style you choose. It can also hide imperfections or uneven patches on the ceiling, making it both practical and aesthetic.
Opt for a smooth, subtle texture for a minimalist look, or go for bold, pronounced patterns for a statement ceiling. Lighter textures work well in small rooms, preventing them from feeling crowded. Darker or more intricate textures can add drama to larger spaces. Match the texture style to your wall finishes for a seamless, cohesive design.
Begin by preparing a clean, dry surface. Apply a base coat of plaster or stucco compound using a trowel or roller. Use textured tools—like sponges, brushes, or combs—to create your desired pattern. Once dry, sand lightly if needed and seal with a matte or satin clear coat. This finish can be DIY-friendly, but professional application ensures a more uniform and refined look. Consider hiring a plaster specialist for complex textures.
Enhance the texture by adding metallic or pearlized pigments during application for a subtle shimmer. Incorporate color washes or glazes for added depth. Textured surfaces can be paired with minimalist lighting fixtures that highlight the surface details. Decorative moldings or architectural details can frame the textured area for extra flair.
A textured plaster ceiling instantly adds personality and sophistication to any bedroom. It’s a timeless technique that complements both classic and modern styles. Once finished, you’ll love the tactile feel and visual richness it brings. Ready to turn your ceiling into a work of art? It’s more achievable than you think.
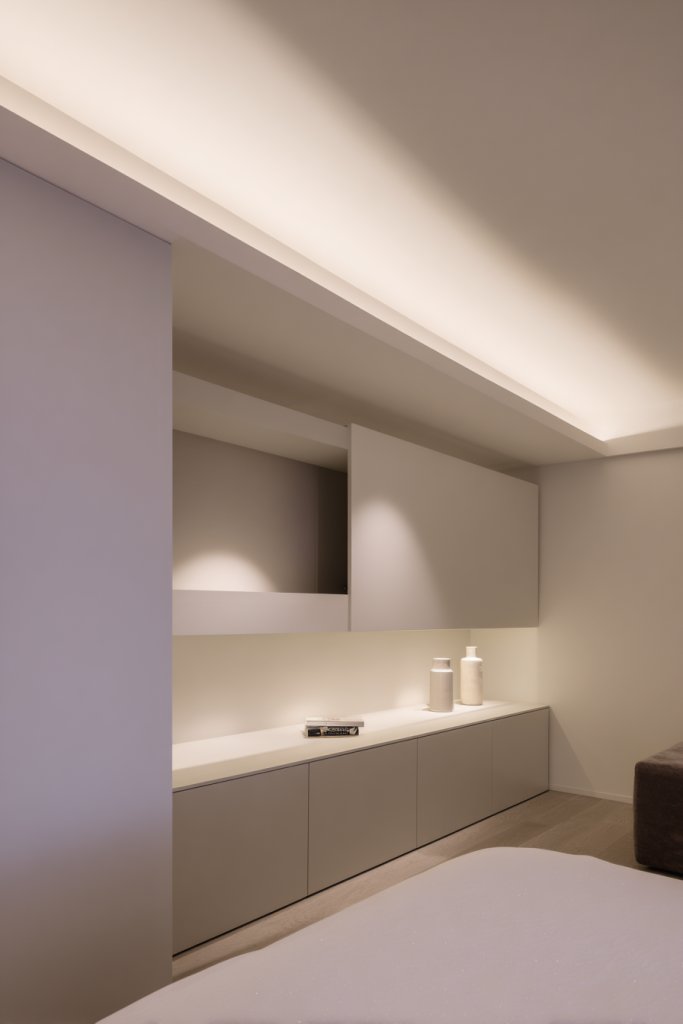
4. Recessed Ceiling with Cove Lighting
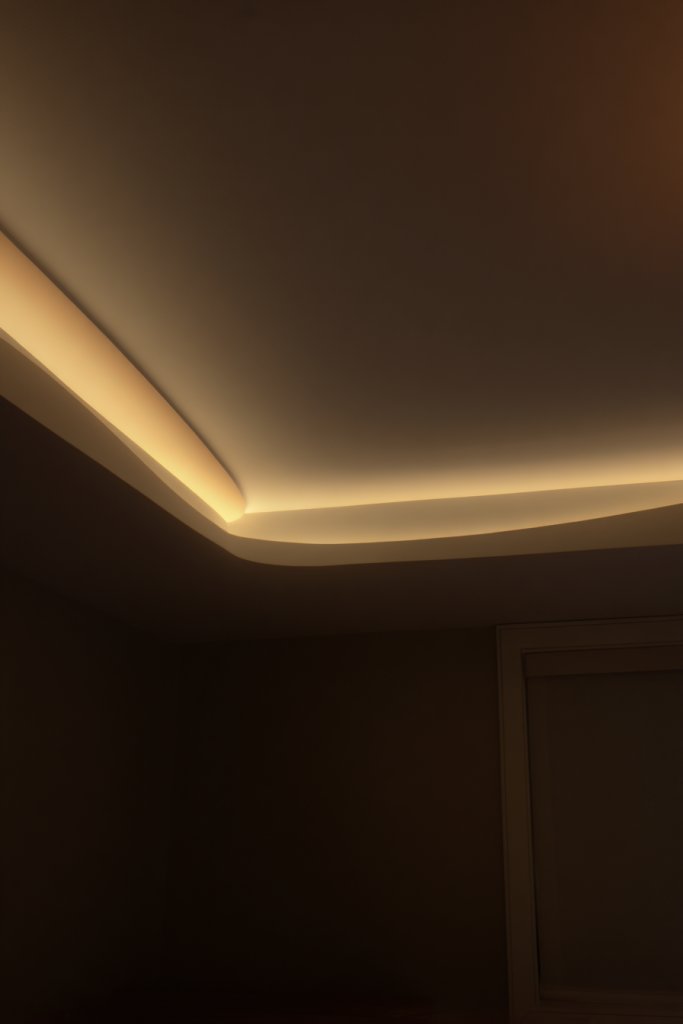
Does your room lack warmth or ambiance? A flat ceiling can make even a fabulous bedroom feel cold and impersonal. Recessed ceilings with cove lighting create a cozy, layered atmosphere that instantly elevates your space. If you want soft, diffuse light that sets the mood, this design is perfect.
Recommended Products to replicate this idea
| # | Preview | Product | |
|---|---|---|---|
| 1 |

|
Govee RGBIC LED Strip Lights, Smart LED Lights for Bedroom, Bluetooth LED Lights APP Control, DIY... | Check Latest Price |
| # | Preview | Product | |
|---|---|---|---|
| 1 |

|
Amico 12 Pack 6 Inch 5CCT Ultra-Thin LED Recessed Ceiling Light with Junction Box, 1050LM... | Check Latest Price |
Visualize a ceiling that steps inward to form a shallow, layered recess, with hidden LED strips tucked into the cove. The light softly radiates along the edges, casting a gentle glow that highlights architectural depth. This layered effect adds a sense of volume, making your room appear larger and more inviting. The warm glow feels like a constant hug for your bedroom.
Opt for warm white or amber LEDs for a relaxing vibe, or cooler tones for a modern, energizing feel. The cove can be narrow or wide, depending on your ceiling height and aesthetic preference. For a minimalist style, keep it simple with a single recessed layer; for more drama, stack multiple layers with varied lighting intensities.
Start by planning your ceiling’s new shape with precise measurements. Use a drywall saw or a specialized ceiling cutter to create the recess. Install LED strip lighting into the cove, securing it with clips. Connect the wiring to a dimmer switch or smart system for customizable ambiance. Finish the edges with a clean, smooth finish and paint to match your decor. Hiring a contractor ensures seamless execution.
Add dimmable or color-changing LED strips to tailor the mood for different occasions. Incorporate decorative moldings or architectural details around the recess for extra character. Pair with textured wall finishes or soft textiles to complement the layered lighting. A well-designed cove can become a signature feature of your bedroom, reflecting your style.
Recessed ceilings with cove lighting redefine cozy and modern. They bring warmth and depth, making your bedroom feel like a retreat. Once installed, the layered lighting creates an ambiance that’s both functional and beautiful. It’s an upgrade that pays off in comfort and style—go ahead, light up your life!
5. Painted Mural or Artistic Ceiling Feature
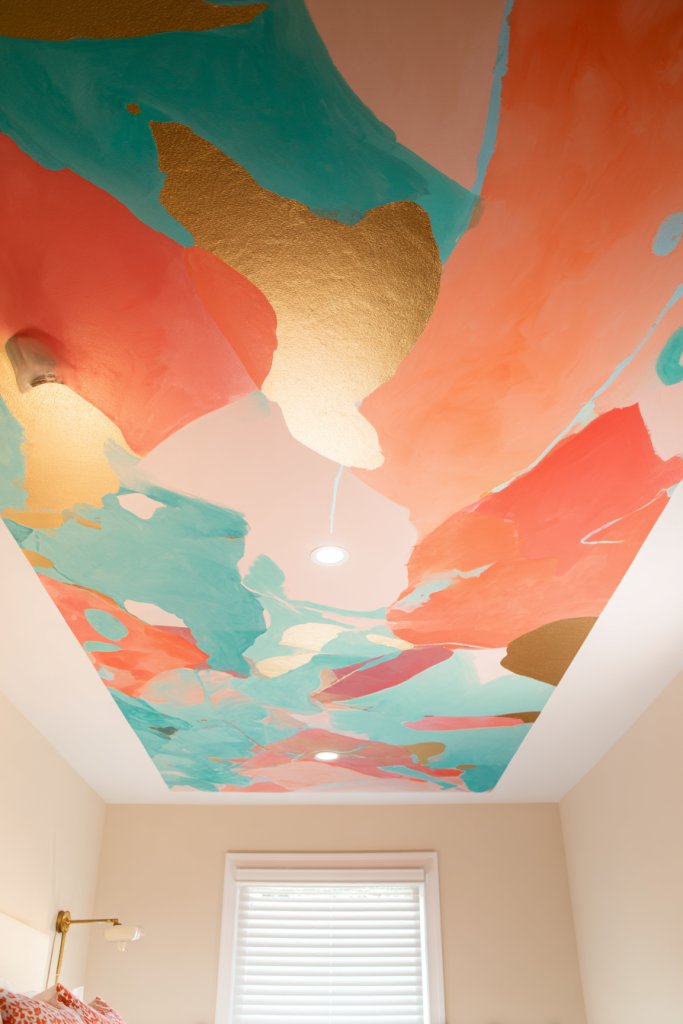
Bored with plain ceilings that do nothing for your personality? A painted mural or artistic feature transforms your ceiling into a personal canvas. It’s an unexpected way to add color, whimsy, or sophistication without cluttering your walls. If you crave a space that truly reflects your style, this is your chance.
Recommended Products to replicate this idea
| # | Preview | Product | |
|---|---|---|---|
| 1 |
|
Fuutreo Arched Border Wall Stencils Kit for Painting Large Pattern on Classroom Wall, Vinyl... | Check Latest Price |
| # | Preview | Product | |
|---|---|---|---|
| 1 |

|
Apple Barrel, Vibrant Spectrum Collection Acrylic Craft Paint, PROMOABIII, 2 fl oz each, 16 assorted... | Check Latest Price |
Imagine a soft, abstract watercolor splash, or a delicate floral motif stretching across the ceiling. Bright, bold designs can create a statement, while subtle, muted tones lend a calming effect. Artistic murals can be custom-designed to match your personality or theme—think celestial skies, botanical scenes, or geometric patterns. The surface becomes an immersive artwork that draws the eye upward.
Opt for hand-painted murals or wall decals for a DIY approach, or hire a professional artist for intricate designs. Keep the palette aligned with your room’s decor—pastels for a serene vibe, or vibrant hues for energy. Small rooms benefit from subtle patterns, while larger bedrooms can handle expansive murals. Seasonal themes or changing designs allow for easy updates.
Start by sketching your design or consulting with an artist. Prepare the ceiling surface by cleaning and priming it for paint adherence. Use high-quality interior paints suitable for ceilings, and apply with brushes or rollers for broad areas. For detailed work, small brushes or spray techniques work best. Seal the finished mural with a clear matte topcoat to protect it from dust and humidity. A professional muralist can ensure precision and longevity.
Add metallic or iridescent paints for extra shimmer or depth. Incorporate elements that reflect your personality, like initials or symbols. Pair your mural with matching wall art or textiles to create a cohesive look. Consider lighting options that highlight the artwork—recessed or directional lights can make your ceiling pop.
A painted ceiling mural turns an ordinary space into a personal gallery. It shows off your creativity and makes your bedroom uniquely yours. Once complete, you’ll feel inspired every time you look up. It’s a bold move that pays off with a truly one-of-a-kind environment—dare to dream big!
6. Wooden Beams or Slats for Warmth and Texture

Does your bedroom feel a little flat or cold? Adding warmth and texture can instantly make it cozier and more inviting. Wooden beams or slatted panels create that rustic yet modern charm many desire. If you want to introduce natural elements without sacrificing style, this is a fantastic solution.
Recommended Products to replicate this idea
| # | Preview | Product | |
|---|---|---|---|
| 1 |

|
Ekena Millwork 3 1/2"W x 5 1/2"H x 96"L 3-Sided (U-Beam) MENA HeritageTimber Faux Wood Ceiling Beam,... | Check Latest Price |
| # | Preview | Product | |
|---|---|---|---|
| 1 |

|
NeatiEase Wood Panels for Wall, 4-Piece 96" x 12.6" Soundproof Wood Slat Wall Panel for Interior... | Check Latest Price |
Visualize sleek, dark wood beams running across the ceiling or slender wooden slats spaced evenly apart. The natural grain and warm hues add depth and tactile appeal. When light hits these wood features, it creates shadows and highlights, enhancing the room’s dimensionality. The overall effect is a cozy, cabin-inspired vibe with a contemporary twist.
Choose from reclaimed wood for a rustic feel or smooth, painted wood for a modern look. Beams work well in larger bedrooms; in smaller spaces, slender slats can add texture without overwhelming. For seasonal variety, consider staining or painting the wood in different shades—whitewash for beachy vibes or deep stains for sophistication. Pair with textiles, rugs, and furniture that complement the warmth.
Begin by measuring your ceiling and deciding on the layout—beams or slats should be proportionate to the room size. Secure the beams with heavy-duty brackets or frame the slats with a lightweight backing. Use a level to ensure straight lines. Finish with a protective sealant or stain that enhances the wood’s natural beauty. For installation, it’s best to hire a carpenter or experienced handyman to ensure stability and precision.
Add decorative elements like small sconces, LED strip lighting behind slats, or painted accents for a personalized touch. Mix different wood tones or combine with other materials like metal for an eclectic look. Incorporate textiles such as a cozy throw blanket or cushions that complement the wood’s texture. These details amplify the warmth and make your bedroom uniquely yours.
Wooden beams and slats bring a timeless charm that never goes out of style. They evoke a cozy, inviting atmosphere perfect for relaxing. Once installed, it’s like bringing a piece of nature indoors, elevating your space effortlessly. If you love the idea of warm, natural textures, this is a must-try upgrade—your bedroom will thank you.
7. Matte Black Ceiling with Contrasting Wall Colors
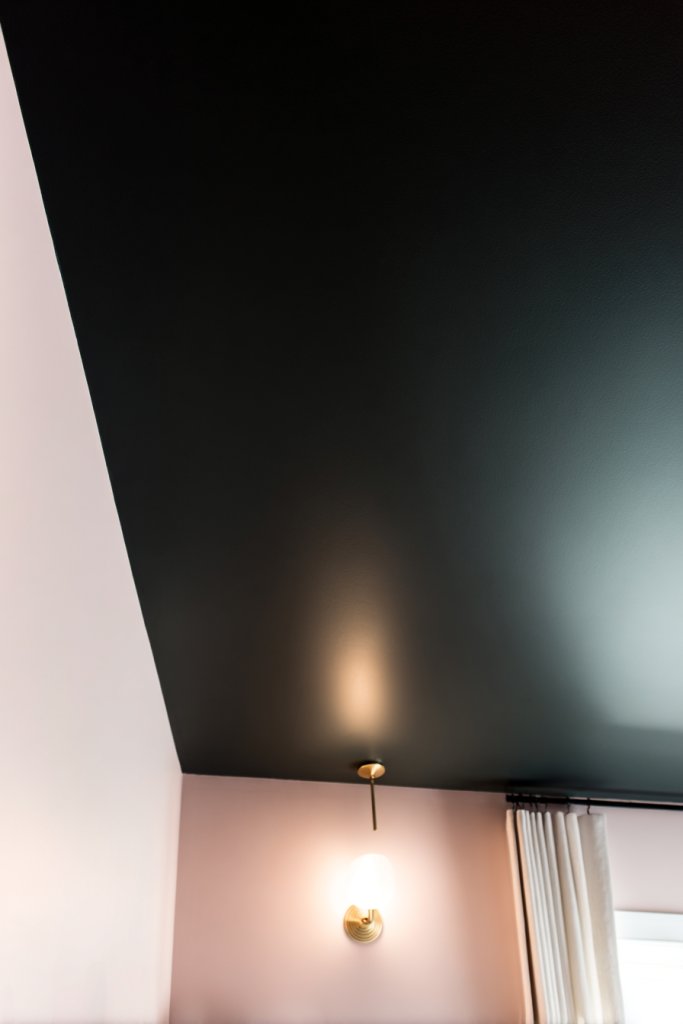
Feeling like your room needs a bold, modern statement? A matte black ceiling paired with light or contrasting walls creates instant drama and sophistication. It’s the kind of look that makes other decor elements pop without overwhelming. If you want style that’s sleek, edgy, and a little daring, this idea is for you.
Recommended Products to replicate this idea
| # | Preview | Product | |
|---|---|---|---|
| 1 |

|
Zinsser 293233 Dryfall Commercial & Industrial Waterborne Coating, 5 Gallon, Flat Black | Check Latest Price |
| # | Preview | Product | |
|---|---|---|---|
| 1 |

|
Duck Brand Clean Release Painter's Tape, 0.94 Inch x 60 Yards (240193) | Check Latest Price |
Imagine a deep, velvety black ceiling that recedes slightly, making your room feel intimate yet expansive. The matte finish absorbs light, reducing glare and adding a velvety texture. The walls, painted in crisp whites, soft creams, or muted pastels, stand out sharply against the dark ceiling. This contrast draws the eye upward, creating a dynamic, modern aesthetic.
Opt for a matte black ceiling in rooms with high ceilings for maximum impact. For smaller bedrooms, keep the walls light and bright to prevent the space from feeling closed in. You can also experiment with dark gray or charcoal tones for a softer, more nuanced effect. Add metallic or textured accents to keep the look layered and interesting.
Start by preparing your ceiling surface—clean, sand, and prime for the best paint adhesion. Use a high-quality matte paint designed for ceilings, applying multiple thin coats for even coverage. Ensure clean edges where the ceiling meets the walls. For a seamless look, consider taping off the edges and using a roller or sprayer for a smooth finish. If unsure, hiring a professional painter guarantees a flawless result.
Incorporate accent lighting—like wall sconces or uplights—to accentuate the ceiling’s depth. Use textiles and decor in warm or contrasting colors to balance the dark ceiling. Adding textured wall finishes or art can keep the room from feeling too stark. Personal touches like metallic trims or decorative moldings can soften the boldness.
A matte black ceiling turns your bedroom into a sleek sanctuary. It’s perfect for modern, industrial, or contemporary styles. Once you see how the dark ceiling elevates the entire room, you’ll wonder why you didn’t do it sooner. Bold but simple—that’s the vibe you’ll love.
8. Perforated Metal Ceiling Panels for a Contemporary Edge
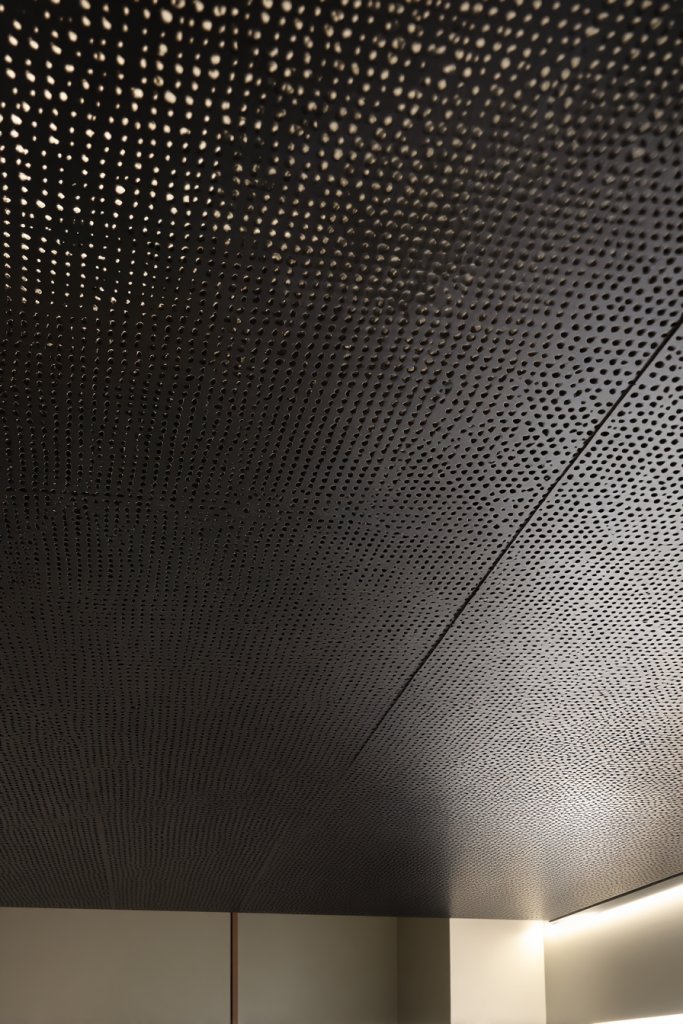
Looking for an industrial-chic upgrade that’s both stylish and functional? Perforated metal ceiling panels add texture, pattern, and a modern edge to your bedroom. They’re perfect for creating visual interest without clutter. If you want to make a bold statement, this is your go-to design.
Recommended Products to replicate this idea
| # | Preview | Product | |
|---|---|---|---|
| 1 |

|
Lianart 23.6"*47.2" Black Perforated Metal Sheets 2 Pieces 1/6" (4mm) Round Hole Sheet Panels... | Check Latest Price |
| # | Preview | Product | |
|---|---|---|---|
| 1 |

|
7RiversART Grid Wall Commercial Grade Gridwall Panels – Heavy Duty Grid Panel for Any Retail... | Check Latest Price |
Picture panels with geometric or abstract perforations, arranged in a grid or organic pattern. The metal surface catches light differently depending on the pattern and finish—brushed, matte, or shiny. When illuminated, the perforations cast delicate shadows, adding depth and intrigue. The metallic sheen brings a sleek, contemporary vibe, perfect for modern or loft-inspired decor.
Choose from various metals—steel, aluminum, or copper—for different color tones and finishes. For a softer look, opt for matte or brushed finishes; shiny metals add a futuristic touch. Panels can cover the entire ceiling or be used as accents. Pair with minimalist lighting fixtures to highlight the perforated details. This style complements both small and large bedrooms.
Begin by measuring your ceiling and selecting panel sizes and patterns. Secure panels with sturdy mounting clips or frames, ensuring they’re level and evenly spaced. Connect lighting behind or around the panels to enhance shadows and depth. Seal edges and seams for a clean look. Consider hiring a contractor experienced in metalwork for precise installation and safety.
Add LED backlighting behind panels for a dramatic glow or color-changing effects. Incorporate contrasting wall textures—such as concrete or brick—to enhance the industrial feel. Integrate decorative fixtures like pendant lights or sculptural elements that complement the panels. Personal touches like custom perforation patterns can make your ceiling uniquely yours.
Perforated metal ceiling panels bring an edgy, modern vibe that’s hard to ignore. They add texture, shine, and a touch of industrial chic to your bedroom. Once installed, they become a conversation piece that elevates your entire decor. Ready to add some metal magic? It’s a cutting-edge choice you won’t regret.
9. Layered Ceiling Design with Multiple Levels

Feeling like your bedroom’s ceiling needs more dimension? Flat ceilings can sometimes make a space feel confined or monotonous. Layered ceilings with multiple levels add architectural interest and a sense of grandeur. If you crave a room that feels both cozy and impressive, this is the upgrade for you.
Recommended Products to replicate this idea
| # | Preview | Product | |
|---|---|---|---|
| 1 |

|
3 Pack 16.4FT White Peel and Stick Crown Molding Trim Kit – Decorative Mirror Border, Flexible... | Check Latest Price |
| # | Preview | Product | |
|---|---|---|---|
| 1 |

|
Crapyt Ceiling Light Medallion PU Ceiling Medallion Ceiling Cover Plate for Ceiling Fans 12.01"OD x... | Check Latest Price |
Imagine a ceiling with a central, recessed area surrounded by a raised border or multiple tiers. The different levels create shadows and highlights, adding depth and visual intrigue. You can incorporate indirect lighting into the recesses or along the edges for a warm, floating effect. The layered design makes the ceiling appear taller and more sophisticated.
Design the layers to complement your room’s proportions—small bedrooms benefit from subtle, single-level recesses, while larger rooms can handle multiple tiers. Use contrasting colors or finishes—matte, gloss, or textured—on different levels to accentuate the layers. Incorporate decorative moldings or trims for a refined look. Seasonal or thematic variations can be achieved by changing lighting or paint colors.
Begin with precise measurements and a detailed plan. Use drywall or plasterboard to create the different levels, securing them with appropriate framing. Finish each level with sanding, priming, and painting, ensuring seamless transitions. Install indirect LED lighting in the recesses for a floating glow. It’s advisable to hire a skilled contractor for complex multi-tiered designs to ensure safety and precision.
Add decorative trims, painted accents, or textured finishes to individual layers for a personalized touch. Incorporate subtle lighting effects—such as color-changing LEDs or dimmable strips—to highlight the layers. Match the ceiling design with your wall decor through complementary colors or textures. This layered look can be a statement feature that reflects your taste.
Layered ceilings turn an ordinary room into an architectural masterpiece. They provide a sense of height and space while adding artistic flair. Once completed, your bedroom will feel more refined and luxurious. It’s a bold choice that elevates your entire decor—ready to layer up?
10. Embedded Skylights for Natural Light and Openness

Does your bedroom feel closed off or dim? Natural light can transform any space, making it feel more open and vibrant. Embedded skylights bring in abundant sunlight and a sense of connection with the outdoors. If you crave a bright, airy sanctuary, this upgrade is worth considering.
Recommended Products to replicate this idea
| # | Preview | Product | |
|---|---|---|---|
| 1 |

|
VELUX FCM Fixed Curb Mount Skylight | Check Latest Price |
| # | Preview | Product | |
|---|---|---|---|
| 1 |

|
100% Blackout Curtains for Bedroom, Portable DIY Window Blinds, No Drill Window Shades & Blackout... | Check Latest Price |
Visualize a sleek, flush-mounted skylight seamlessly integrated into your ceiling, letting sunlight pour in during the day. The natural light bounces off your walls and furniture, creating warmth and vitality. At night, you can add dimmable lighting to mimic the outdoors, or enjoy the starry sky if the skylight has a view. The effect is a dynamic, ever-changing ceiling that energizes your room.
Choose from fixed or operable skylights, depending on ventilation needs. For privacy, opt for tinted or frosted glass. The size and placement of the skylight can be customized—centered for maximum light, or off-center for visual interest. Complement the natural light with reflective surfaces or light-colored decor to enhance brightness. This concept suits both modern and minimalist bedroom styles.
Start by consulting a structural engineer or skylight specialist to ensure your roof can support the installation. Remove a section of your ceiling and frame the opening with sturdy materials. Install the skylight, sealing all edges to prevent leaks. Finish with drywall, paint, and trim around the opening for a clean look. Consider adding automated shades or blinds for control over sunlight. Professional installation is highly recommended for safety and durability.
Pair with reflective or glossy finishes inside the room to maximize daylight. Use light, airy textiles and furniture to keep the space open and fresh. Incorporate window treatments that allow for privacy without blocking light—think sheer curtains or motorized blinds. Seasonal decor can be adapted around the skylight to keep the room feeling lively year-round.
Skylights open up your room to the natural world, making it feel bigger and more serene. They add a luxurious, spa-like touch that’s hard to beat. Once your natural light flows in, you’ll wonder how you ever lived without it. Brighten up your life—literally—and transform your bedroom into a personal retreat.
11. Minimalist White Ceiling with Subtle Textural Details

Is your bedroom feeling a bit too sterile or plain? A clean white ceiling with subtle textures can add just enough visual interest without overwhelming the space. It’s the perfect backdrop for a minimalist aesthetic that feels calm, fresh, and elegant. If you love simplicity but want a touch of sophistication, this idea hits the sweet spot.
Recommended Products to replicate this idea
| # | Preview | Product | |
|---|---|---|---|
| 1 |

|
Zinnser 03688 Covers Up Stain Sealing Ceiling Paint, White | Check Latest Price |
| # | Preview | Product | |
|---|---|---|---|
| 1 |
|
9-inch Crow's Foot Pattern Wall & Ceiling Special Textured Roller, High-Adhesion Drywall Texturing... | Check Latest Price |
Imagine a crisp, matte white ceiling with delicate embossed patterns or gentle stippling. The texture catches light differently throughout the day, creating a soft play of shadows. This understated detail adds depth and interest, elevating a basic ceiling into a subtle design feature. The overall effect is a serene, uncluttered space that feels open and airy.
Keep textures very subtle—think fine stippling, crosshatching, or tiny embossed dots—to maintain a minimalist vibe. Larger patterns or strong textures can disrupt the calm, so moderation is key. Complement the ceiling with neutral-colored walls and simple decor. Seasonal updates can be as easy as changing textiles or accent colors to refresh the look.
Begin with a smooth, clean ceiling surface—patch and sand any imperfections. Use a high-quality primer to ensure the texture adheres well. Apply a base coat of matte white paint, then add the subtle textured layer using stencils, rollers, or textured brushes. Seal with a matte clear finish to protect the surface. This approach can be DIY-friendly if you keep textures light and simple.
Incorporate small metallic or matte accents in the form of trim or molding to add subtle contrast. Pair with natural textiles, like linen or cotton, to enhance the minimalist aesthetic. Use layered lighting—recessed or hidden—to emphasize the textures without adding clutter. Personal touches like monogrammed textiles or custom wall colors can bring harmony.
A white textured ceiling offers a timeless, versatile look that suits any decor style. It creates a peaceful atmosphere perfect for relaxation and sleep. Once finished, you’ll appreciate how the simple details elevate the overall room. It’s a subtle upgrade that makes a big difference—less is more, after all.
12. Color-Blocked Ceiling with Soft Pastels or Neutrals
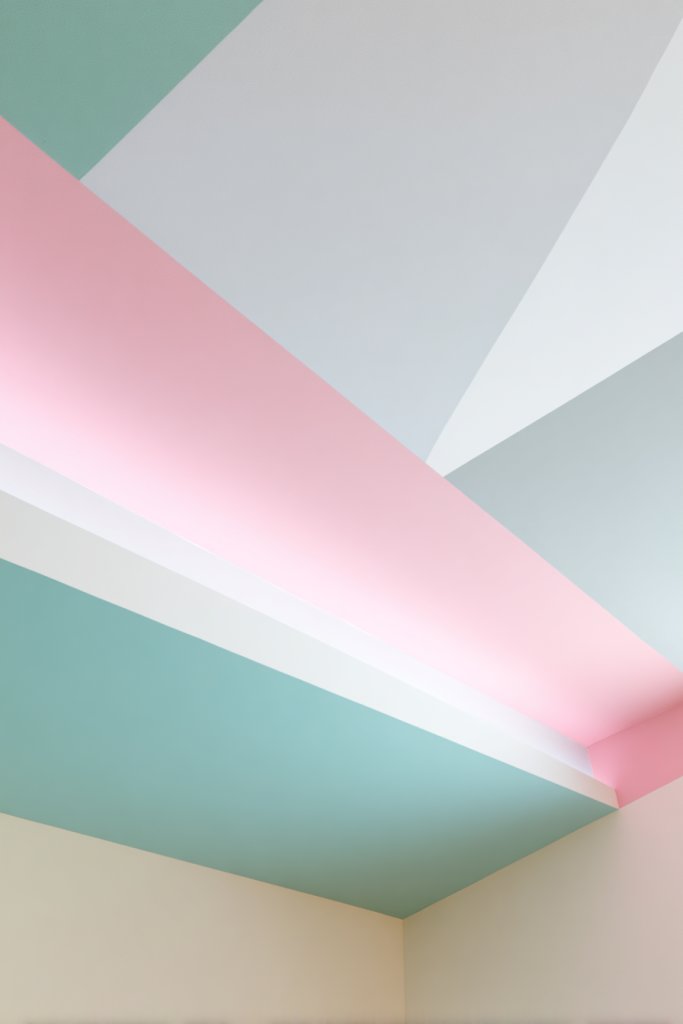
Feeling like your ceiling is just an afterthought? Color blocking isn’t just for walls—your ceiling can get in on the fun too. Using soft pastels or neutral tones to create bold blocks adds a modern twist and visual interest. If you want to make a subtle statement, this technique is both stylish and sophisticated.
Recommended Products to replicate this idea
| # | Preview | Product | |
|---|---|---|---|
| 1 |

|
Shuttle Art 40 Pack Pastel Acrylic Paint Set, 30 Colors, 60ml/2oz Bottles, High Viscosity,... | Check Latest Price |
| # | Preview | Product | |
|---|---|---|---|
| 1 |
|
FrogTape Multi-Surface Painters Tape with PAINTBLOCK, 1 Inch Wide (0.94 In. x 60 Yds), Medium... | Check Latest Price |
Picture a ceiling divided into sections—perhaps a large central rectangle in a blush pink or a muted gray, framed by contrasting bands. The color blocks define space and shape, making the room feel more dynamic. When light hits these blocks, they cast gentle shadows, enhancing the layered look. It’s like wearing a bold accessory for your ceiling.
Choose colors that complement your wall paint and decor—think soft blues, warm beiges, or cool taupes. For small rooms, keep the blocks narrow to avoid overwhelming the space; larger rooms can handle bigger sections. You can also add metallic or darker accents to some blocks for contrast. Seasonal updates can be achieved by swapping out colors or patterns.
Start by sketching your design and marking it on the ceiling with painter’s tape. Use a high-quality interior paint and carefully fill in each section with brushes or rollers. Keep the edges sharp with tape or a straightedge for clean lines. Multiple coats might be necessary for vivid colors. Finish with a clear matte or satin topcoat for durability. This project is DIY-friendly but requires patience for clean lines.
Incorporate decorative moldings along the color blocks for a layered, elegant look. Use textured or metallic paints within some sections for added interest. Keep the palette soft to maintain a calm atmosphere or go bold with contrasting shades for impact. Personal touches like initials or patterns can also be added within the color blocks.
A color-blocked ceiling adds a contemporary, artistic flair that’s perfect for modern bedrooms. It’s a subtle way to express personality without overwhelming the space. Once complete, your ceiling will be a conversation starter and a design highlight. It’s an easy, impactful way to refresh your entire room.
13. Faux Coffered Ceiling with Decorative Moldings

Want the grandeur of a coffered ceiling without the hefty price tag? Faux coffered designs with decorative moldings give you that classic architectural look on a budget. They add depth, elegance, and a touch of luxury, perfect for elevating your bedroom’s style. If you’re craving a layered, sophisticated ceiling, this idea delivers.
Recommended Products to replicate this idea
| # | Preview | Product | |
|---|---|---|---|
| 1 |

|
Ekena Millwork 5 1/2"W x 5 1/2"H x 192"L 3-Sided (U-Beam) MENA HeritageTimber Faux Wood Ceiling... | Check Latest Price |
| # | Preview | Product | |
|---|---|---|---|
| 1 |

|
Art3d 10-Pack 47Ft White Ceiling Crown Molding Trim, High Impact Polystyrene Decorative Ceiling... | Check Latest Price |
Imagine a grid of painted or wallpapered panels framed by decorative moldings that mimic the look of real coffered ceilings. The moldings can be ornate or simple, depending on your style. The effect creates a sense of height and dimension, making the room feel more spacious. The painted panels or wallpapers add visual interest, playing with patterns or textures.
Opt for painted moldings and panels for a sleek, modern look, or choose ornate trims for a traditional feel. Use contrasting colors—like white moldings with a darker ceiling or vice versa—to emphasize the grid pattern. For a more subtle approach, tone-on-tone colors work well. This technique suits both small and large bedrooms, adding architectural detail without overwhelming.
Start by measuring and marking your ceiling to create a grid pattern. Install lightweight trim or molding using construction adhesive or nails, ensuring they’re level. Fill gaps with caulk and sand smooth before painting or wallpapering. Paint the moldings in a contrasting or matching color, and fill panels with paint, wallpaper, or decorative finishes. For intricate designs, consider hiring a carpenter or decorator.
Add metallic or glossy finishes to moldings for extra elegance. Incorporate subtle patterns or textures within the panels for visual depth. Use LED strip lighting behind moldings for a soft glow. Personalize with initials, symbols, or custom paint patterns to make the ceiling truly unique.
A faux coffered ceiling elevates your room’s design instantly. It’s a timeless look that works in modern, traditional, or eclectic styles. Once completed, your bedroom will feel more refined and spacious. Ready to bring classic elegance home? It’s easier than you think and makes a lasting impression.
14. Neon or LED Strip Lighting for a Pop of Color
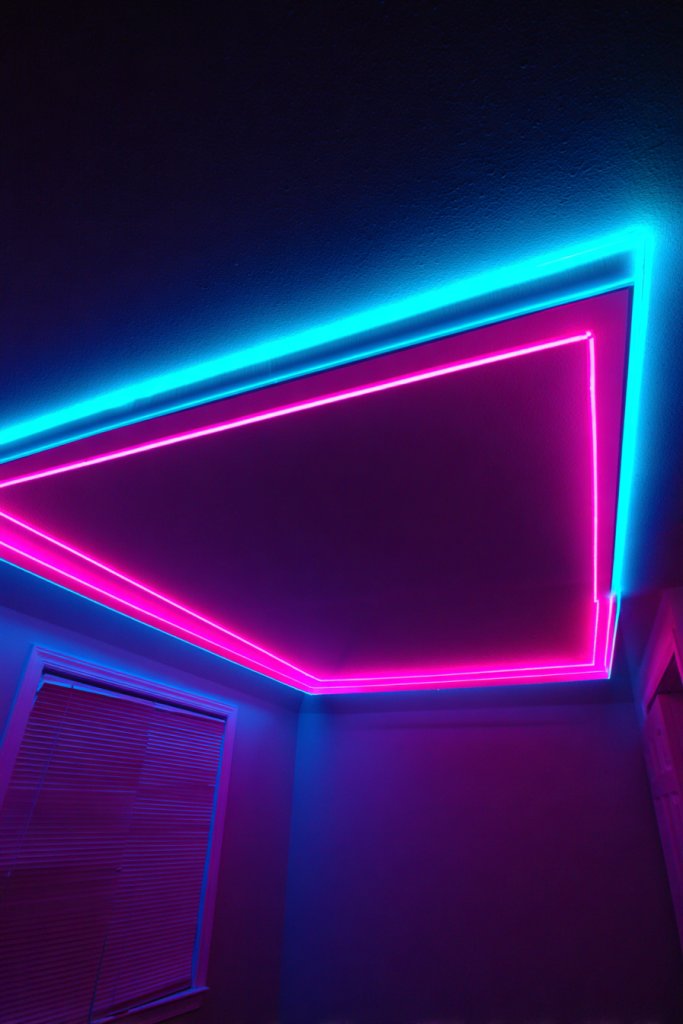
Bored with typical lighting that’s just functional? Neon or LED strip lighting adds a playful, energetic vibe to your bedroom. They’re perfect for creating a fun atmosphere or highlighting architectural features. If you want to inject some personality and color, this tech-savvy solution is your new best friend.
Recommended Products to replicate this idea
| # | Preview | Product | |
|---|---|---|---|
| 1 |
|
KSIPZE 100ft Led Strip Lights RGB Music Sync Color Changing Led Lights with Smart App Control Remote... | Check Latest Price |
| # | Preview | Product | |
|---|---|---|---|
| 1 |

|
AILBTON 20Ft Neon Rope Lights,Flexible Led Rope Lights Control with App/Remote,Multiple Modes Music... | Check Latest Price |
Picture soft neon or LED strips tracing along ceiling edges, hidden behind molding, or embedded into architectural details. The glow can be a vibrant pink, electric blue, or any hue you desire, changing colors with a remote or app. The light creates a vivid boundary, making your ceiling a bold visual element. It’s like adding a light show to your personal space.
Choose flexible LED strips that can bend and fit into tight corners or intricate shapes. Use RGB or color-changing options for versatility. Install strips along coves, beams, or around architectural niches for a layered look. Pair with minimal decor to keep the focus on the lighting. For a subtle glow, opt for warm white or amber tones.
Plan your layout—mark where the strips will go for even coverage. Attach the LED strips to a clean, dry surface with mounting clips or adhesive backing. Connect the wiring to a power source, and install a controller or remote system. Conceal wiring within coves or behind moldings for a clean finish. Test the system thoroughly before finalizing the setup.
Sync your lighting with music or set dynamic color modes for different moods. Pair with smart home systems for voice control. Use contrasting wall colors or reflective surfaces to amplify the glow. Incorporate dimming or flickering effects to mimic natural lighting or create a party atmosphere.
Neon and LED strip lighting turn your bedroom into a fun, personalized retreat. They’re easy to install and highly customizable, fitting any style from modern to eclectic. Once set up, you’ll love how they instantly change the room’s mood. Brighten your space—literally—and make your bedroom unforgettable.
15. Mirrored or Glossy Ceiling Surface for Reflective Brightness
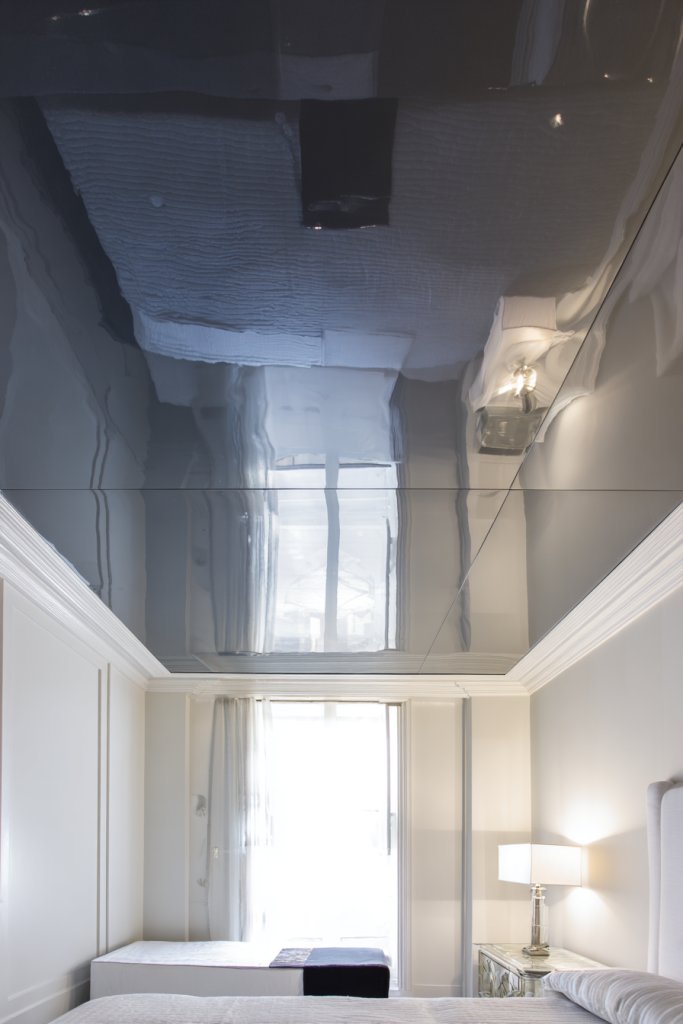
Want to make your bedroom feel more spacious and luminous? A mirrored or glossy ceiling surface reflects light and opens up the space. It’s a bold look that adds glamour and a modern edge. If you’re after a room that feels brighter and more expansive, this idea is worth exploring.
Recommended Products to replicate this idea
| # | Preview | Product | |
|---|---|---|---|
| 1 |

|
Ruomeng Home Gym Mirrors 12 Inch x 12Pcs Wall Mounted Mirror Glass Frameless Full Length Mirror... | Check Latest Price |
| # | Preview | Product | |
|---|---|---|---|
| 1 |

|
Rust-Oleum 1992502 Painter's Touch Latex Paint, Gloss White 32 Fl Oz, 1 Quarts (Pack of 1) | Check Latest Price |
Imagine a high-gloss, mirror-like ceiling that captures and reflects the room’s beauty. When natural or artificial light hits the surface, it bounces around, creating a luminous effect. The reflection can double the visual space, making your bedroom feel larger and more luxurious. It’s like having a giant piece of art in the sky.
Opt for a high-gloss paint, tempered glass, or acrylic panels for a reflective surface. For safety, ensure materials are securely mounted and rated for ceiling use. Pair with light-colored walls and minimal decor to maximize brightness. You can also incorporate subtle LED lighting around the edges to enhance the reflective effect.
Prepare the ceiling surface by cleaning thoroughly and repairing any imperfections. Install a sturdy backing or framing system, especially if using glass or panels. Seal the edges with specialized sealants or trims to create a seamless look. Apply the glossy paint or affix panels carefully, ensuring a flat, bubble-free finish. Professional installation is recommended for glass or acrylic surfaces.
Add accent lighting—like LED strips or spotlights—to emphasize the reflective surface. Pair with light-colored or metallic decor for a cohesive, luminous aesthetic. Use subtle textured wall finishes to complement the glossy ceiling without competing. Personalize with decals or etchings that catch the light for extra interest.
A mirrored or glossy ceiling elevates your bedroom into a sleek, modern retreat. It amplifies light and creates a sense of luxury and openness. Once installed, it’s a standout feature that will impress everyone. Brighten your life with reflective brilliance—your stylish upgrade awaits!
16. Textured Acoustic Ceiling Tiles with Stylish Patterns
Does your bedroom sound echo or feel a bit too noisy? Acoustic ceiling tiles not only absorb sound but can also add a stylish element. When chosen with pattern and texture, they turn a functional feature into a decorative statement. If you want better sound quality and visual appeal, this is a smart move.
Recommended Products to replicate this idea
| # | Preview | Product | |
|---|---|---|---|
| 1 |
|
Armstrong Ceiling Tiles; 2x2 Ceiling Tiles - 16 pc White; Acoustic Ceilings for Suspended Grid;... | Check Latest Price |
| # | Preview | Product | |
|---|---|---|---|
| 1 |

|
Art3d 12-Pack Slat Design 3D Wall Panels for Interior Wall Decor, 2x4 FT PVC Decorative Drop Ceiling... | Check Latest Price |
Visualize tiles with modern geometric patterns, wave textures, or intricate perforations. They come in a variety of colors and finishes, from matte to glossy. When installed, the textured surface creates shadows and depth, making the ceiling an interesting focal point. The sound-absorbing qualities improve comfort while enhancing style.
Select tiles that coordinate with your room’s decor—neutral tones for understated elegance or bold patterns for impact. Mix and match textures, or keep it uniform for a clean look. For a more subtle effect, choose tiles with small perforations or embossed patterns. These tiles work well in both modern and transitional bedrooms.
Begin by measuring your ceiling and choosing tiles suited for your space. Use compatible suspension systems or adhesive, depending on tile type. Install tiles in a grid pattern, ensuring even spacing. Seal the edges for a finished look, and consider adding lighting behind or around the tiles to highlight their patterns. Regular cleaning and maintenance keep them looking fresh.
Incorporate colored or patterned tiles to create a customized ceiling design. Use LED backlighting or spotlights to emphasize textures and patterns. Pair with sound-absorbing wall panels or textiles for a complete acoustic treatment. Personal touches like monograms or custom patterns can make your ceiling truly unique.
Textured acoustic tiles combine function and fashion, making your bedroom more comfortable and stylish. They’re a smart upgrade that improves sound quality while adding visual interest. Once done, you’ll love how the ceiling seamlessly blends aesthetics with practicality. Elevate your space—sound and style, sorted!
17. Monochrome Ceiling with Subtle Patterned Textures
Feeling overwhelmed by busy patterns or vibrant colors? A monochrome ceiling with subtle textures offers understated elegance and calm. It provides visual interest without clutter or distraction. If you seek a serene, cohesive look that still feels refined, this idea is perfect.
Recommended Products to replicate this idea
| # | Preview | Product | |
|---|---|---|---|
| 1 |

|
Teenyyou 3 Pcs 9 Inch Textured Paint Roller Set Small Textured Roller Brown for Painting Walls... | Check Latest Price |
| # | Preview | Product | |
|---|---|---|---|
| 1 |

|
Livelynine 17.5x276" Vintage 3D Floral Peel and Stick Wallpaper Faux Embossed Flower Cream White... | Check Latest Price |
Imagine a crisp, white or soft gray ceiling with faint embossed patterns or stippling. The textured surface catches light in gentle ways, creating depth and nuance. It’s like a whisper of design—noticeable enough to add character, but subtle enough to keep the room tranquil. This approach balances simplicity with sophistication.
Choose a single neutral color—white, beige, or slate gray—paired with barely-there textures. Keep patterns delicate and sparse to avoid visual clutter. This style works well with minimalist, Scandinavian, or modern decor. Seasonal shifts can be achieved with wall colors or textiles, maintaining the subtle theme.
Prepare your ceiling by patching imperfections and applying a primer. Use a high-quality flat or matte paint as your base. Add subtle textures with specialized rollers, brushes, or stencils—think stippling, crosshatching, or embossed patterns. Seal with a matte clear coat for durability. DIY application is feasible for simple textures, but professional help ensures precision.
Add metallic or gloss accents within the subtle textures for a hint of shine. Incorporate layered lighting—recessed or hidden—to highlight the surface details. Keep accessories minimalist: simple curtain rods, sleek furniture, and soft textiles. Personal touches like monograms or small motifs can add a hint of personality.
A monochrome textured ceiling offers timeless elegance and serenity. It’s a quiet luxury that suits any decor style. Once finished, your bedroom will feel more peaceful and refined. It’s an investment in subtle sophistication—less is more, and it pays off.
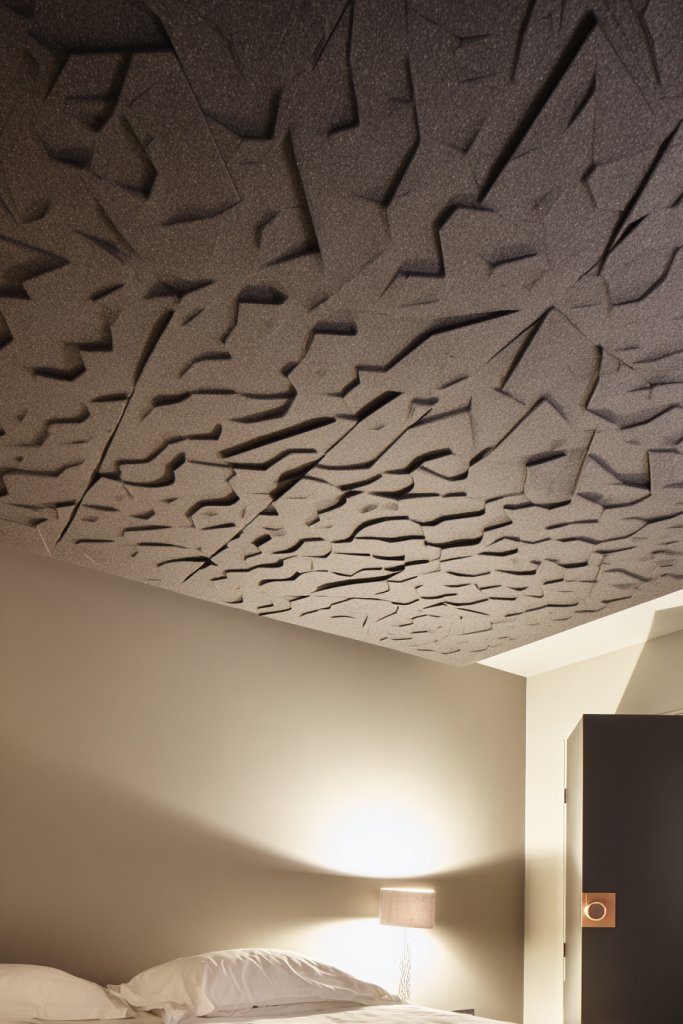
18. Abstract 3D Wall and Ceiling Panel Integration
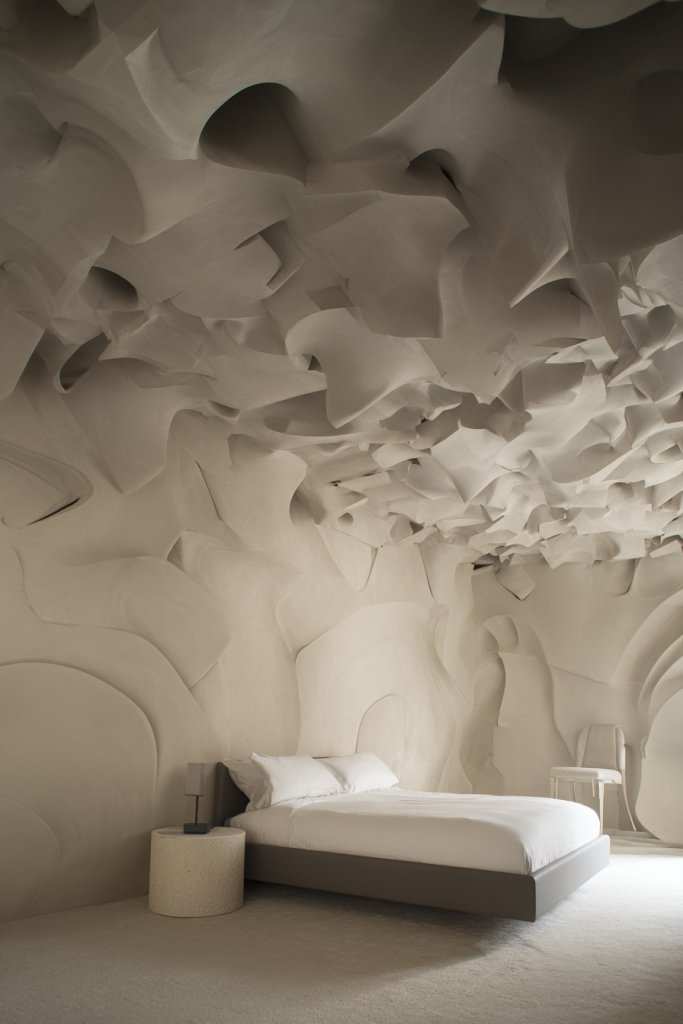
Looking to make a bold statement without overwhelming your space? Abstract 3D panels that extend from wall to ceiling create a seamless, modern art installation. They add depth, texture, and a wow factor that instantly elevates your bedroom’s style. If you’re craving a design that’s both unique and contemporary, this idea is for you.
Recommended Products to replicate this idea
| # | Preview | Product | |
|---|---|---|---|
| 1 |

|
Art3d 20 Pack Decorative 3D Wall Panels for Interior Wall Decor Living Room, 11.8"x11.8" Cover 19... | Check Latest Price |
| # | Preview | Product | |
|---|---|---|---|
| 1 |

|
Art3dwallpanels 33 Pack 3D Wall Panel Diamond for Interior Wall Décor, PVC Flower Textured Wall... | Check Latest Price |
Imagine geometric or organic-shaped 3D panels that flow across the ceiling and wall, forming an abstract landscape. The textured surfaces catch light at different angles, creating shadows and highlights throughout the day. The panels can be matte, gloss, or metallic, adding layers of visual richness. It’s like bringing a piece of modern sculpture into your personal space.
Choose panels with bold, angular shapes or softer, flowing forms depending on your aesthetic. Mix different materials—wood, MDF, or PVC—for varied textures and finishes. For a more subtle approach, paint the panels in muted tones; for high impact, go for metallic or contrasting colors. This design suits large, open bedrooms with high ceilings.
Start by selecting panels that fit your space and style. Use a strong adhesive or mounting system to secure them in place, ensuring they align perfectly. For seamless integration, plan the flow of panels from wall to ceiling, adjusting angles as needed. Finish with paint, stain, or lacquer to match your decor. For complex layouts, hiring a skilled installer or designer is recommended.
Incorporate LED lighting behind or around the panels to emphasize shadows and textures. Customize the design with painted motifs or metallic accents. Pair with minimalist furniture and textiles in neutral tones to keep the focus on the architectural feature. Personal touches like embedded initials or symbols can add exclusivity.
Abstract 3D panels create a statement that’s both artistic and modern. They transform your bedroom into a stylish retreat that feels curated and unique. Once installed, these panels become a conversation starter and a defining feature. Embrace innovation—your space’s new centerpiece awaits.
19. Colorful Pop Ceiling with Artistic Paint Techniques
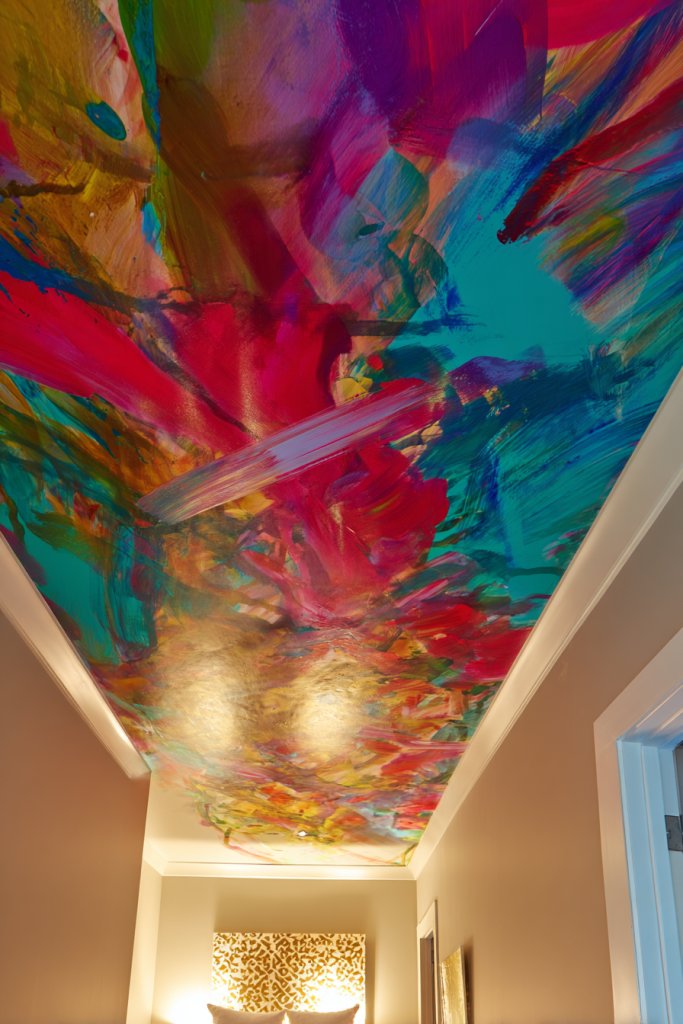
Tired of your ceiling blending into the background? A colorful pop ceiling using artistic paint techniques instantly energizes your bedroom. It adds personality, vibrancy, and a playful touch that reflects your style. If bold colors and creative flair appeal to you, this idea is a fun way to stand out.
Recommended Products to replicate this idea
| # | Preview | Product | |
|---|---|---|---|
| 1 |

|
Rhibak Paint Roller Kit with Extension Pole, 27 Piece Set, 2 to 4 Ft Pole, 4"9" Paint Rollers, Paint... | Check Latest Price |
| # | Preview | Product | |
|---|---|---|---|
| 1 |

|
ScotchBlue PROSharp Painter's Tape 2 Inch Wide (1.88 in x 60 yd) 1 Roll Blue Tape Protects Surfaces... | Check Latest Price |
Imagine a ceiling splattered with watercolor effects, or painted with bold brushstrokes and splashes of bright hues. Techniques like sponge painting, drip effects, or gradient blends create a dynamic, lively surface. The vibrant colors catch the light and add a sense of movement and spontaneity to your space. It’s like hanging a piece of abstract art directly overhead.
Choose colors that complement your room’s decor—neon, jewel tones, or pastel splashes. For smaller bedrooms, keep the design controlled with a single accent color or a subtle gradient. Larger rooms can accommodate more complex patterns or layered techniques. Pair with neutral walls and minimalist furniture to let the ceiling be the star.
Prepare the ceiling by cleaning and priming it. Use high-quality interior paints and various brushes, sponges, or spray tools to create your desired effects. Techniques like dripping or stippling add texture and depth. Protect adjacent walls with tape, and work in sections for precision. Seal with a clear matte or satin topcoat to protect the artwork.
Incorporate metallic or iridescent paints for extra shimmer. Use glow-in-the-dark or UV-reactive paints for night-time effects. Personalize the design with initials or symbols hidden within the splashes. Complement with colorful textiles and accessories that echo the ceiling’s palette for a cohesive look.
A vibrant, artistic ceiling defines your bedroom as a space of creativity and fun. It’s a bold move that shows off your personality and sense of style. Once finished, you’ll love how the ceiling becomes a focal point of the room. Dare to splash some color—your space will thank you!
20. Contemporary Ceiling with Hidden Storage or Shelves
Ever feel like your bedroom is cluttered, but you don’t want to hide your style behind traditional storage? A contemporary ceiling with hidden storage or floating shelves combines practicality with sleek design. It’s the perfect way to maximize space while keeping your bedroom looking clean and modern. If you love smart solutions, this idea is a must.
Recommended Products to replicate this idea
| # | Preview | Product | |
|---|---|---|---|
| 1 |

|
FLEXIMOUNTS 4x8 Overhead Garage Storage Rack, Adjustable Organization System, Heavy-Duty Metal... | Check Latest Price |
| # | Preview | Product | |
|---|---|---|---|
| 1 |

|
Starunder 6 Pack Floating Shelf Brackets, 6 Inch Heavy Duty Industrial Shelf Bracket, Black Metal L... | Check Latest Price |
Visualize a smooth, seamless ceiling with discreet, recessed shelves or compartments that blend into the design. These floating shelves can hold books, decor, or personal items, keeping everything within reach but out of sight. The hidden storage creates a minimalist vibe, while the shelves add visual interest and depth. When lit subtly, they become almost invisible from below, offering a clean, uncluttered ceiling.
Use sleek materials like lacquered wood, glass, or matte metal for the shelves. Keep the storage compartments flush with the ceiling surface for a streamlined look. Shelves can be arranged symmetrically or asymmetrically, based on your style. Incorporate lighting within or beneath the shelves for a dramatic effect or to highlight specific items.
Plan your storage layout carefully, considering what you want to store and how much space you need. Use a drywall or suspended ceiling system to create the recesses. Install the shelving with hidden brackets or supports, ensuring they’re securely anchored. Finish with paint or veneer that matches your ceiling or walls. For the best result, hire a contractor experienced in ceiling modifications.
Add LED lighting within the shelves to showcase decorative items or keep the space feeling bright and open. Personalize with custom-sized compartments for specific items—like a hidden jewelry drawer or tech nook. Keep the design cohesive with your overall decor theme—sleek and modern, industrial, or minimalist.
A ceiling with discreet storage elevates your bedroom’s functionality without sacrificing style. It’s a clever trick that keeps your space tidy and stylish at the same time. Once finished, you’ll enjoy a clutter-free sanctuary that’s both practical and beautiful. Smart storage solutions are the future—start planning yours today!
Conclusion
Exploring these diverse bedroom pop ceiling design ideas reveals endless ways to personalize and modernize your space. Whether you prefer understated elegance or vibrant statements, there’s a concept here to inspire your next home upgrade. Don’t hesitate to experiment and bring your vision to life—your perfect bedroom oasis is just a design away!