I have been, or can be if you click on a link and make a purchase, compensated via a cash payment, gift, or something else of value for writing this post. As an Amazon Associate, I earn from qualifying purchases. Please read my full Affiliate Disclosure for more information.
Transforming your bedroom into a personalized oasis has never been more exciting! DIY bedroom ideas are taking the design world by storm because they allow you to add a unique, heartfelt touch to your space without breaking the bank. From creative decor hacks to clever storage solutions, these projects empower you to craft a bedroom that truly reflects your personality and style.
In this article, you’ll discover a variety of inspiring DIY ideas—from decorative wall art and cozy headboards to smart organization tips and budget-friendly makeovers. Whether you’re a beginner or a seasoned DIY enthusiast, these ideas will help you create a bedroom that’s both beautiful and functional. Get ready to turn your space into your favorite retreat with simple, fun, and personalized projects!
1. Create a Custom Headboard Using Reclaimed Wood Planks
Ever feel like your bed is missing that wow factor? A generic headboard can make your entire bedroom look bland and uninspired. But investing in a fancy new one can be pricey and impersonal. So, why not craft your own unique piece that reflects your style and saves money?
Recommended Products to replicate this idea
| # | Preview | Product | |
|---|---|---|---|
| 1 |

|
Howjoe Linen Fabric Upholstered Headboard Queen Size, Modern Diamond Tufting Solid Wood Queen... | Check Latest Price |
| # | Preview | Product | |
|---|---|---|---|
| 1 |

|
NOVOSTELLA 20ft Tunable White LED Strip Light kit Dimmable 3000K-6500K 24V LED Tape Light with... | Check Latest Price |
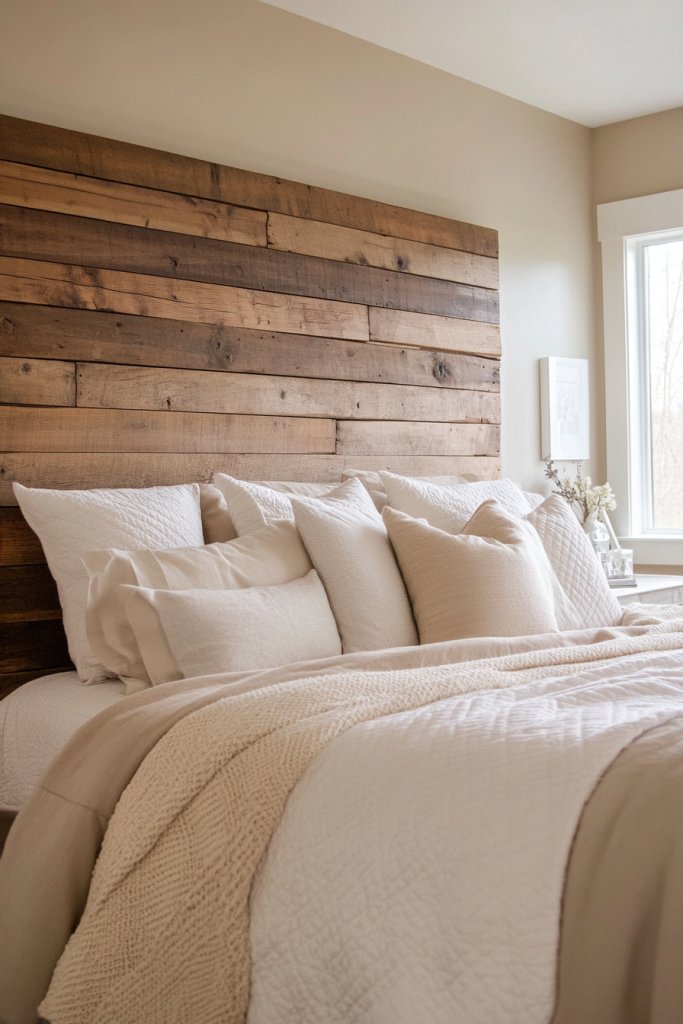
Imagine a headboard made of weathered, rich-toned reclaimed wood planks arranged horizontally behind your bed. The texture adds rustic charm, with knots and imperfections that tell a story. Soft ambient light reflects off the wood’s natural grain, creating a cozy and inviting focal point. It’s like bringing a piece of the countryside right into your bedroom.
You can paint or stain the wood for a more polished look, or leave it raw for a true rustic vibe. For a modern twist, install LED strip lighting behind the planks for a subtle glow. If space is tight, opt for a narrower panel that fits snugly behind your bed. Seasonal accents, like a cozy throw or decorative pillows, complement the wood’s natural warmth.
Start by sourcing reclaimed wood—check salvage yards or online marketplaces. Measure your bed width to determine plank length, then cut and sand each piece smooth. Arrange the planks on the floor first to plan your design, then attach them to a sturdy backing frame with nails or screws. Use a level to ensure straight alignment, and finish with a protective sealant if desired. Mount the entire assembly securely to the wall behind your bed.
Add personal touches by incorporating carved initials or decorative metal accents. Mix different wood tones for a patchwork effect, or use painted stencils to create patterns. For a softer look, add fabric panels or cushioning along the headboard’s edges. This project invites creativity—think beyond traditional wood and experiment with reclaimed pallet pieces or driftwood.
Building your own headboard not only upgrades your space but also boosts your DIY confidence. It’s a proud moment to see a piece you crafted hanging behind you. Plus, it’s a timeless look that can blend with farmhouse, rustic, or eclectic decor themes. Ready to turn scrap wood into a statement piece?
2. Make a Colorful Wall Tapestry from Fabric Scraps
Tired of plain walls and generic decor? A vibrant tapestry can instantly add personality and warmth to your bedroom. But buying expensive wall art might break the bank or feel impersonal. Why not create a colorful, textured piece yourself?
Recommended Products to replicate this idea
| # | Preview | Product | |
|---|---|---|---|
| 1 |
|
OROPY Industrial Pipe Clothing Rack, Wall Mounted Clothes Rack, Closet Rods For Hanging Clothes, 33"... | Check Latest Price |
| # | Preview | Product | |
|---|---|---|---|
| 1 |

|
30 PCS Push Pins Picture Hangers Wall Hooks, Double Headed Thumb Tacks for Wall Hangings, Renter... | Check Latest Price |
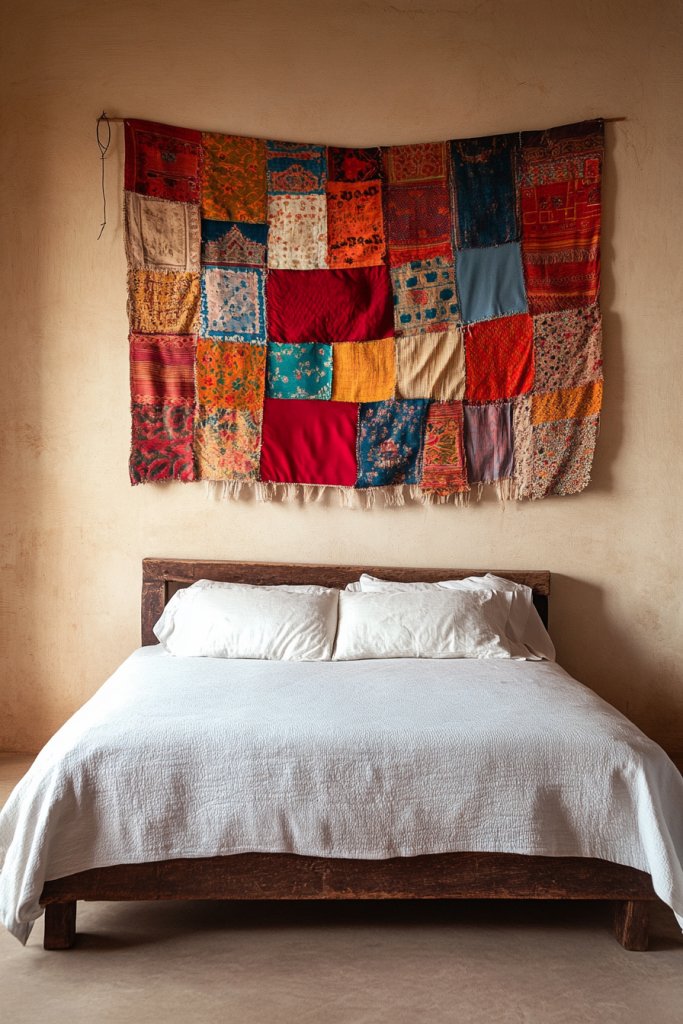
Picture a large fabric wall hanging bursting with color—layers of patterned textiles, fringes, and knots. Bright hues like coral, teal, and mustard clash and blend in an eye-catching mosaic. Textured fabrics like velvet, linen, and cotton are stitched or glued in abstract arrangements, creating a tactile masterpiece. It’s a lively, handcrafted focal point that invites touch and admiration.
Choose fabrics that match your mood or season—light and airy for summer, warm and plush for winter. Incorporate metallic threads or beads for a bit of shimmer, or keep it simple with monochrome textiles. Vary the size and shape of fabric pieces for a dynamic look. Hang it on a rod with decorative clips or sew directly onto a fabric backing for a more polished finish.
Start by collecting fabric scraps from old clothes, thrifted textiles, or craft stores. Cut into various shapes—rectangles, triangles, or freeform pieces. Arrange the fabrics on the floor until you’re happy with the layout, then sew or glue them onto a sturdy base like canvas or felt. Add decorative elements like tassels or embroidery for extra flair. Attach a hanging rod or a sleeve for wall mounting. Keep in mind, layering different textures enhances visual interest.
Personalize your tapestry with embroidered initials, meaningful symbols, or fabric paint. Use contrasting stitching to outline shapes or create borders. Incorporate sentimental fabrics like vintage shirts or favorite clothing items. Consider framing your tapestry with a decorative border or framing it with a simple wooden dowel for a clean look. It’s your canvas—let your personality shine.
Making your own textile art adds a personal touch that mass-produced pieces can’t match. It’s a fun, expressive project that transforms fabric scraps into a statement decor item. Once finished, you’ll feel proud of your creativity and resourcefulness. Plus, colorful tapestries energize any room and serve as a conversation starter. Go ahead—drape your space in personality!
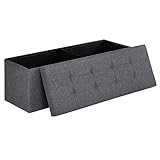
3. Craft a Unique Storage Ottoman with Upholstered Cans
Clutter piling up in your bedroom? A stylish storage solution can keep things tidy without sacrificing style. Ottomans are perfect, but store-bought options often look generic or cost a fortune. Why not repurpose everyday cans into a chic, functional piece?
Recommended Products to replicate this idea
| # | Preview | Product | |
|---|---|---|---|
| 1 |
|
SONGMICS MAZIE Collection - 43 Inches Folding Storage Ottoman Bench, Ottoman Foot Rest, End of Bed... | Check Latest Price |
| # | Preview | Product | |
|---|---|---|---|
| 1 |

|
Rustark 200-Pcs 3/4'' (19×21mm) Antique Upholstery Decorative Tacks Furniture Sofa Thumb Tacks... | Check Latest Price |
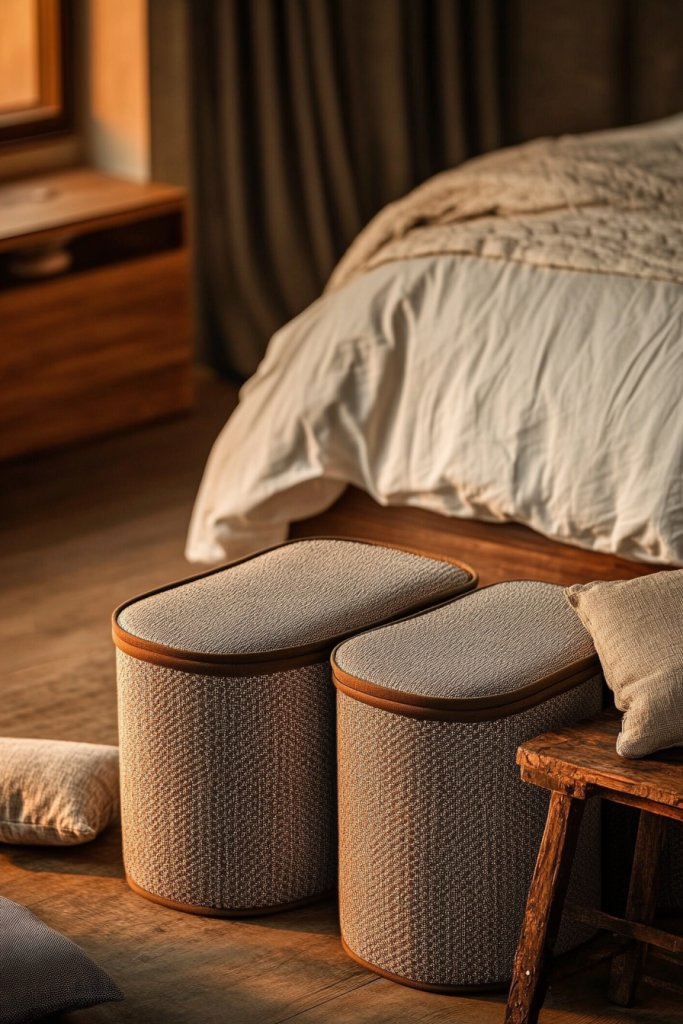
Visualize a row of large, painted cans upholstered with fabric, topped with a cushioned lid. The cans are in bold colors—maybe a mix of teal, mustard, and blush—wrapped in textured textiles like velvet or linen. The lid is padded with foam and covered in a coordinating fabric, turning ordinary cans into a cozy, eye-catching storage ottoman. It’s quirky, colorful, and highly functional.
Choose fabric that complements your room’s color scheme—neutral tones for subtlety, or bright patterns for a statement. Mix and match can sizes for visual interest. For a more refined look, add decorative trim or piping around the lid. Use different paint finishes—matte or glossy—to match your decor style. This project adapts well to small spaces by stacking or arranging cans in a corner.
Start by collecting cans—clean and dry them thoroughly. Paint or decorate the cans with chalkboard paint, metallic finishes, or solid colors. Cut foam to fit the lid, then cover it with fabric, securing with a hot glue gun. Wrap fabric around the cans, gluing edges underneath for a clean look. Attach the padded lid with hinges or velcro for easy access. Arrange the cans in your chosen shape and anchor them if needed.
Add labels or decorative tags to each can for organizational ease. Sew decorative trim or tassels onto the fabric for extra flair. Customize with initials or motifs painted directly on the cans. Use different fabric textures—smooth, boucle, or embroidered—for variety. This project is endlessly customizable to fit your personality and storage needs.
Creating your own upholstered cans turns simple household items into a fun DIY project. It’s satisfying to see everyday objects transformed into functional art. Plus, it keeps clutter hidden in style and adds a playful touch to your bedroom. Ready to give those cans a makeover?
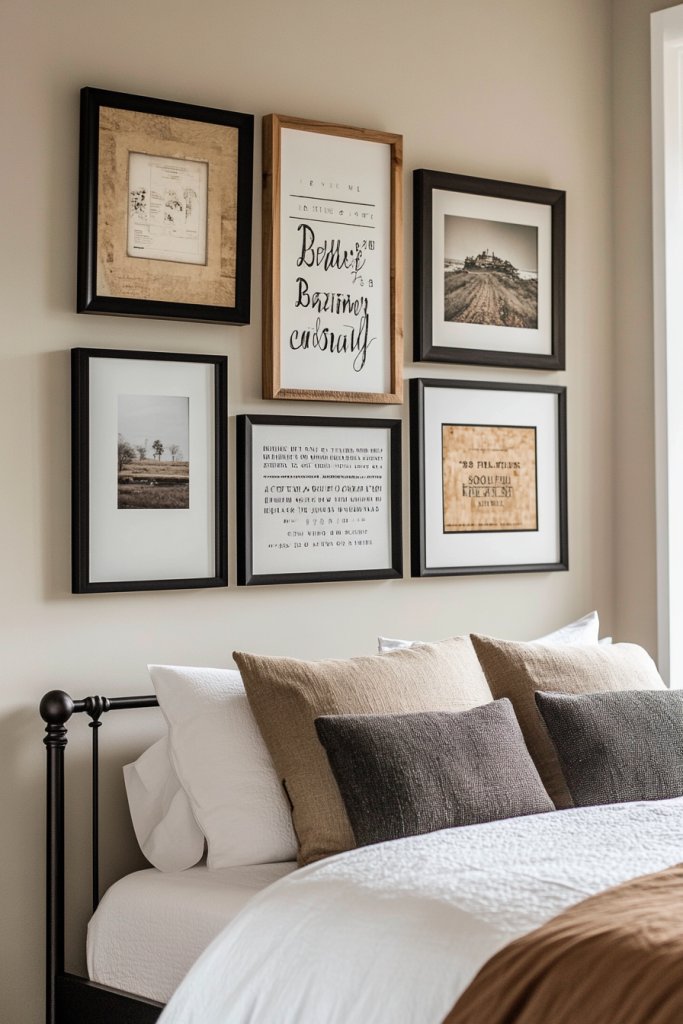
4. Design a Gallery Wall with DIY Frame Arrangements
Feeling like your walls are missing personality? A gallery wall is the perfect way to showcase your favorite photos, quotes, or artwork. But pre-made frames can be expensive or generic. Why not create your own DIY frames for a truly personalized display?
Recommended Products to replicate this idea
| # | Preview | Product | |
|---|---|---|---|
| 1 |

|
upsimples 11x14 Picture Frame, Display Pictures 8x10 with Mat or 11x14 Without Mat, Wall Hanging... | Check Latest Price |
| # | Preview | Product | |
|---|---|---|---|
| 1 |

|
KSIPZE 100ft Led Strip Lights RGB Music Sync Color Changing Led Lights with Smart App Control Remote... | Check Latest Price |
Imagine a wall filled with mismatched but harmonized frames—some painted in bold colors, others with a rustic wood finish. Inside, you have a mix of black and white photos, motivational quotes, and abstract prints. The frames are arranged in a grid or organic pattern, creating an eclectic yet cohesive look. The variety of textures and colors adds visual interest and tells your story.
You can craft frames from reclaimed wood, foam core, or even cardboard covered in fabric or paper. Paint or decorate the frames in colors that match your mood—metallics, pastels, or neutrals. For a modern vibe, stick to geometric arrangements; for boho, opt for a more freeform layout. Switch out artwork seasonally or for special occasions to keep the wall fresh.
Start by selecting your images and deciding on a layout—lay frames on the floor first. Create or buy frames in various sizes, then paint or decorate as desired. Mount the frames with nails, clips, or adhesive strips, spacing them evenly or in an irregular pattern. Use a level to keep everything straight, especially if you prefer a grid arrangement. Mix and match textures with options like metallic, distressed, or painted wood. Finish by inserting your chosen images or prints.
Add small decorative elements like washi tape borders or handwritten notes inside the frames. Incorporate mementos like ticket stubs or fabric swatches for a personal touch. You can even craft your own art pieces or quotes on canvases to fill gaps. Consider adding LED strip lights behind the wall for a subtle glow, avoiding traditional lighting fixtures. Make it a reflection of your personality.
A DIY gallery wall is a fantastic way to express your creativity and make your space uniquely yours. It’s a flexible project that evolves over time, so don’t stress about perfection. Once complete, it becomes a conversation starter and a reflection of your personal journey. Ready to turn your blank wall into a visual story?
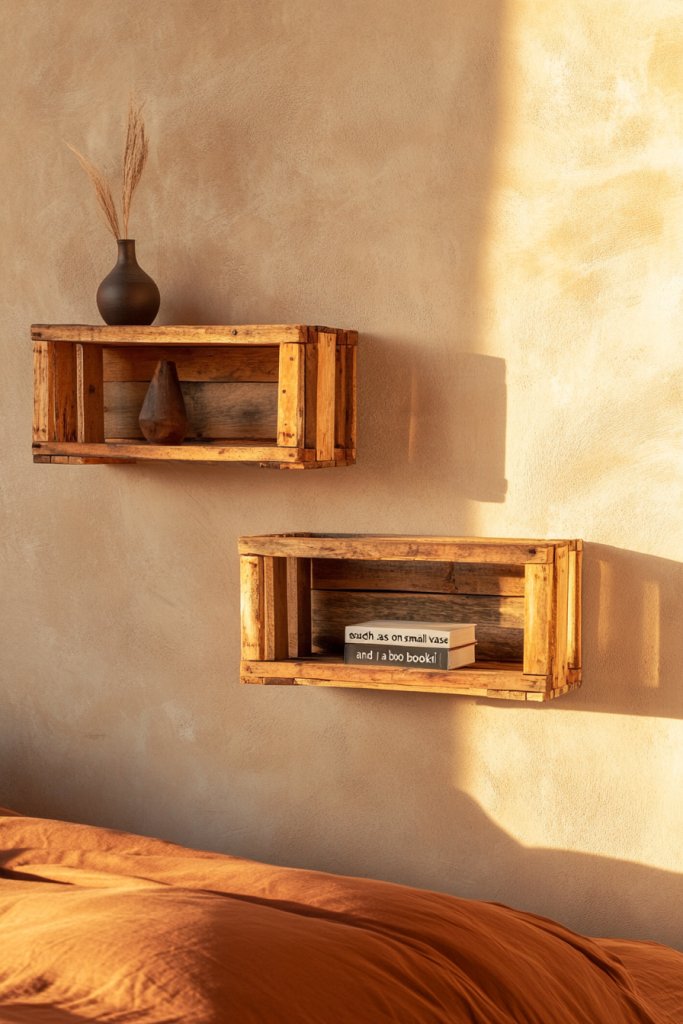
5. Build Floating Shelves with Wooden Crates or Pallets
Clutter can make a bedroom feel chaotic and small. Floating shelves are a sleek, space-saving way to display essentials or decor. But buying ready-made shelves can be costly and lack character. Why not craft your own from simple materials like crates or pallets?
Recommended Products to replicate this idea
| # | Preview | Product | |
|---|---|---|---|
| 1 |

|
BOY MCOWBOY Wooden Crates for Display 6 Pack Large Rustic Nesting Wooden Basket with Handle,... | Check Latest Price |
| # | Preview | Product | |
|---|---|---|---|
| 1 |

|
Goovilla Shelf Bracket, Heavy Duty Floating Shelf Brackets 6 inch Long, 6 Pack Brackets for Shelves,... | Check Latest Price |
Picture sturdy, rustic floating shelves made from lightweight wooden crates or repurposed pallets, mounted seamlessly on your wall. They hold books, plants, or decorative objects—arranged in a casual, layered style. The natural wood textures contrast beautifully with painted walls, adding warmth and personality. Smaller items sit comfortably on the shelves, creating an organized yet relaxed vibe.
Paint or stain the crates or pallets to match your decor—whitewashed for farmhouse, dark for industrial, or bright colors for playful spaces. Mount multiple shelves at varying heights for visual interest. For a Scandinavian look, keep finishes light and minimal. Use decorative brackets or hidden hardware to enhance the floating effect. Adjust shelf depth based on what you plan to display.
Start by selecting suitable crates or pallets—ensure they’re sturdy and free of splinters. Sand rough edges and paint or stain as desired. Find wall studs and mark mounting points. Attach brackets or cleats to the wall, then secure the crates or pallets on top. Use level tools to keep shelves straight. Arrange your items thoughtfully—layering books, small storage baskets, or art supplies—keeping things accessible yet tidy.
Add decorative touches like stenciled patterns or personalized labels. Incorporate small LED puck lights underneath for extra illumination. Use fabric-lined baskets on the shelves for hidden storage. Combine different wood finishes or add metallic accents for a modern twist. This DIY approach invites lots of customization for a truly personal look.
Building your own floating shelves boosts your confidence and adds character to your space. It’s a budget-friendly project that yields big visual impact. Once installed, they’ll serve as a functional gallery for your favorite belongings. Ready to bring some rustic charm to your bedroom?
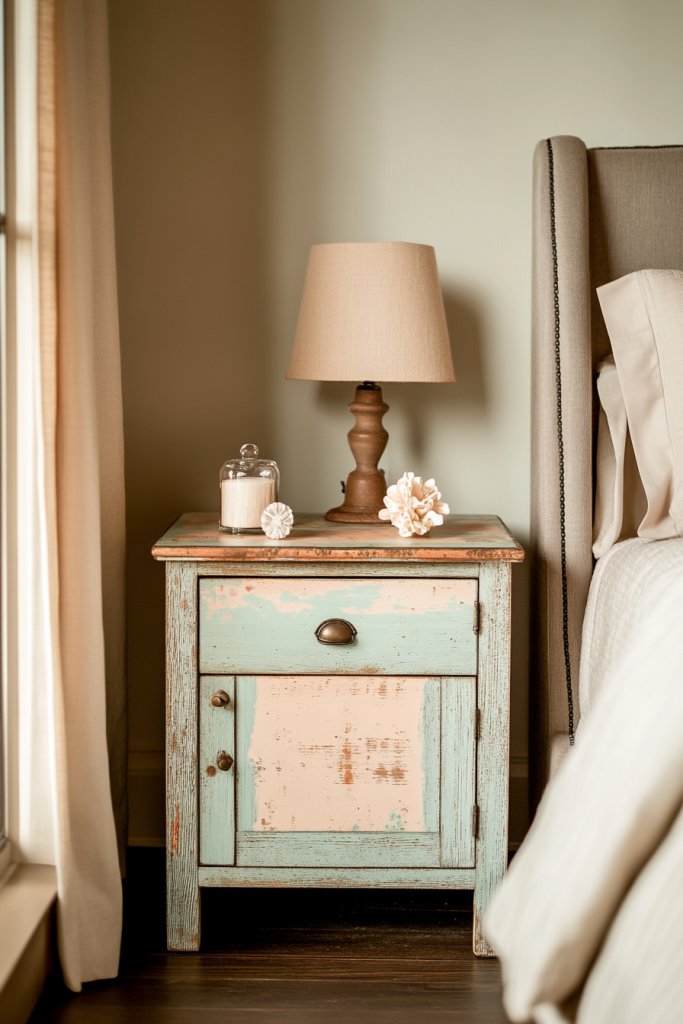
6. Personalize Nightstands with Decoupage or Paint
Your bedroom furniture feels bland and uninspired? Nightstands are often overlooked but can be a focal point with the right touch. Ready to give them a fresh look without buying new ones? Decoupage or paint offers a budget-friendly transformation.
Recommended Products to replicate this idea
| # | Preview | Product | |
|---|---|---|---|
| 1 |

|
FAPUAL 10 Pack Gold Cabinet Knobs for Kitchen Cabinets and Dresser Drawers,Zinc Alloy Brushed... | Check Latest Price |
| # | Preview | Product | |
|---|---|---|---|
| 1 |

|
PRSTINCOL Scrapbook Paper,24 Sheets 6x4.3 Inch Floral scrapbook supplies,Single-Sided Vivid Origami... | Check Latest Price |
Imagine a simple wooden nightstand transformed into a piece of art—covered in vintage map paper, floral patterns, or geometric designs. The surface is layered with colorful paper or bold paint, creating a statement piece. The hardware can be updated with metallic knobs or painted pulls, adding extra flair. The result is a charming, customized piece that matches your style.
Use decoupage with themed paper—botanical prints, abstract art, or family photos—for a personal touch. For a modern look, choose bold, monochrome paint with contrasting hardware. Vintage-inspired styles benefit from distressed finishes or antiqued hardware. You can also stencil patterns or add decorative accents like washi tape borders. Keep it consistent with your overall bedroom decor for harmony.
Start by cleaning and lightly sanding the nightstand surface. Choose your design—decoupage paper or paint—and gather your supplies. For decoupage, cut paper into desired shapes, apply a layer of decoupage glue, smooth out air bubbles, and seal with a topcoat. For painting, use painter’s tape for clean lines, or freehand with brushes or sponges. Attach new hardware if desired, and let everything dry thoroughly before use. Finishing with a clear sealant helps durability.
Personalize further with monograms, quotes, or decorative motifs using stencils or vinyl decals. Incorporate small ceramic or sculptural accents on top for added dimension. Use contrasting colors or metallic paints for a luxe effect. Keep a small tray or organizer on top to hold your nighttime essentials—making it functional as well as beautiful.
Customizing your nightstands adds a personal touch that elevates your entire bedroom aesthetic. It’s a simple project that delivers big visual payoff and pride of ownership. Plus, it’s a great way to experiment with colors and techniques—no fancy skills required. Go ahead, make your nightstands uniquely yours!
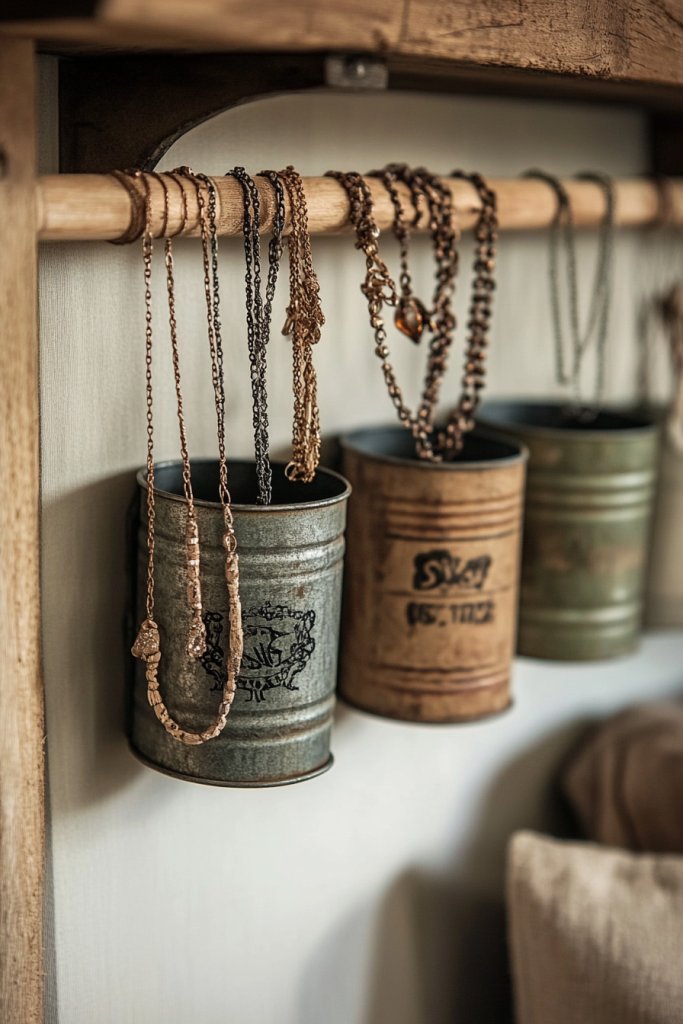
7. Assemble a DIY Jewelry or Accessories Organizer from Recycled Materials
Messy jewelry drawers and scattered accessories ruin your bedroom vibe? An organized space makes getting ready quicker and more enjoyable. But store-bought organizers can be expensive and uninspired. Why not craft your own stylish, eco-friendly solution?
Recommended Products to replicate this idea
| # | Preview | Product | |
|---|---|---|---|
| 1 |

|
SONGMICS 6 LEDs Mirror Jewelry Cabinet, 47.2-Inch Tall Lockable Wall or Door Mounted Jewelry Armoire... | Check Latest Price |
| # | Preview | Product | |
|---|---|---|---|
| 1 |

|
Kalalou NMCC1044 Set of Two Recycled Wooden Photo Frames, Brown | Check Latest Price |
Envision a wall-mounted organizer made from an old picture frame, with hooks and compartments crafted from repurposed materials. Necklaces hang in a cascading pattern, while earrings and rings are stored in small boxes or cups. The frame is painted a bold color or left rustic, fitting seamlessly into your decor. It’s a charming, functional display that doubles as wall art.
Use vintage trays, spice racks, or wood scraps to build your organizer. Paint or stain the materials to match your bedroom’s color palette. Incorporate fabric-lined compartments or small jars for tiny items. Hang hooks or strings for necklaces, and attach small shelves for bracelets or watches. Customize the layout to fit your collection and available space.
Start by sourcing recycled items—an old frame, a small wooden pallet, or a tin tray. Clean and prepare your materials, then assemble with nails, glue, or brackets. Attach hooks, small baskets, or wire for jewelry hanging. Mount the organizer on your wall at eye level for easy access. Organize your items by type and frequency of use, keeping it visually appealing. Regularly update your display as your collection grows.
Decorate the frame with stencils, decals, or paint splatters for a personalized look. Add labels or tags to different sections for organization. Incorporate sentimental charms or small decorative elements. Use colorful cords or fabric to hang items, matching your room’s decor. It’s a practical project that reflects your style and reduces clutter.
Creating a jewelry organizer from scratch proves you can craft beauty and function from recycled materials. It’s a sustainable choice that personalizes your space and keeps accessories tidy. Plus, it’s fun to see your collection beautifully displayed and easily accessible. Ready to start organizing in style?
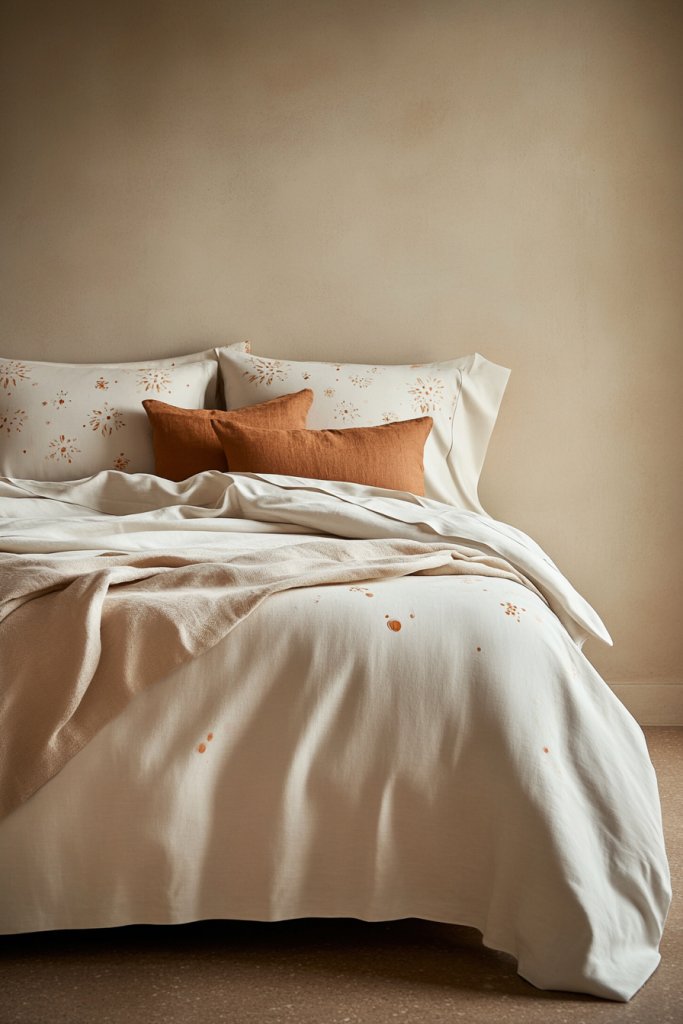
8. Design Custom Bed Linens with Fabric Paint or Stencils
Tired of plain, boring bedding? Custom linens inject personality into your bedroom and reflect your style. But high-end designer sheets can be pricey and cookie-cutter. Why not create your own personalized bed linens with fabric paint or stencils?
Recommended Products to replicate this idea
| # | Preview | Product | |
|---|---|---|---|
| 1 |

|
SONORO KATE 100% French Pure Linen Sheets, Breathable and Durable Linen King Size Sheets, Anti-Tear... | Check Latest Price |
| # | Preview | Product | |
|---|---|---|---|
| 1 |

|
Shuttle Art Fabric Paint, 18 Colors Permanent Soft Fabric Paint in Bottles (60ml/2oz) with Brushes,... | Check Latest Price |
Imagine a set of pillowcases and a duvet cover adorned with hand-painted motifs—floral patterns, abstract shapes, or inspiring quotes. Use vibrant colors or metallic accents for a luxe touch. The fabric feels soft and inviting, while the designs make a bold statement. It’s like having boutique-quality linens that are truly one-of-a-kind.
Pick fabrics like cotton, linen, or rayon for comfort and durability. Use stencils or freehand painting to create your designs—geometric, botanical, or whimsical. Mix and match patterns with solid colors for a layered look. For seasonal updates, switch out pillow covers or add embroidered accents. Keep the designs simple or elaborate depending on your skill level.
Start by washing and ironing your fabric to remove wrinkles. Secure your stencil with painter’s tape or use a brush for freehand painting. Use fabric paints that are washable and fade-resistant. Practice on scrap fabric first to perfect your technique. Carefully apply paint to avoid bleeding, then let everything dry completely. Consider sealing with a fabric medium for extra durability. Finish by sewing or attaching your linens to fit your bed dimensions.
Add monograms, initials, or meaningful symbols to your linens. Incorporate metallic or glow-in-the-dark paints for fun effects. Use contrasting colors to make your designs pop. Embroider or appliqué fabric patches for added texture. Keep your DIY linens stored separately for easy seasonal swaps or gifting.
Designing your own bed linens is a chance to showcase your artistic side and create something uniquely yours. It’s a satisfying project that upgrades your sleep space and boosts confidence in your crafting skills. Now, every night feels like a special occasion. Ready to paint your way to dreamy bedding?
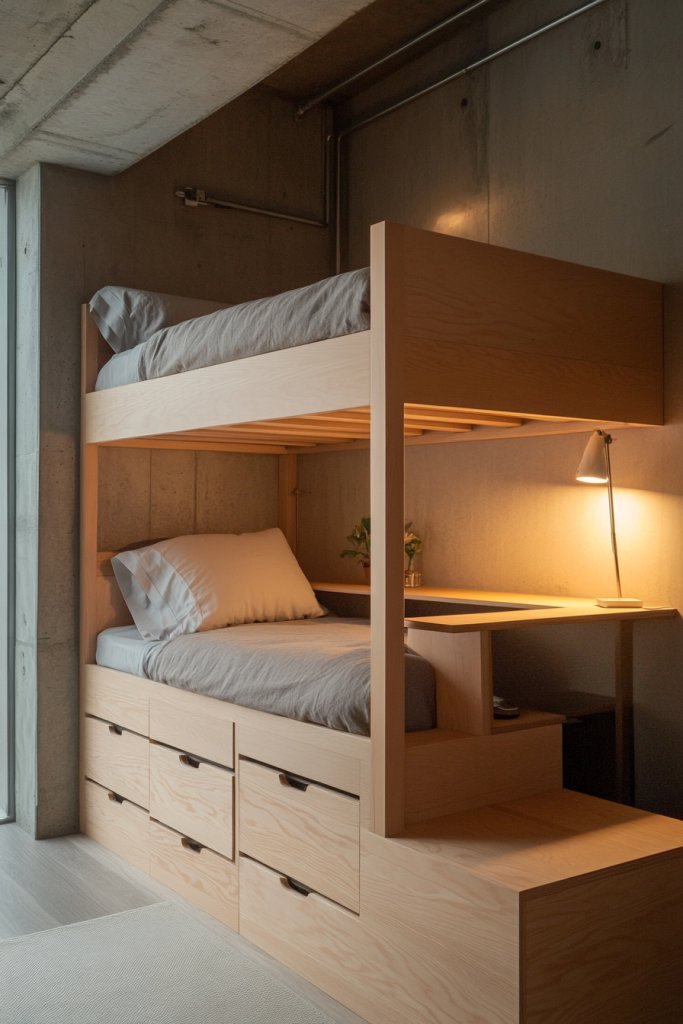
9. Build a Multi-Purpose Loft Bed with Built-In Desk and Storage
Struggling with limited space in your bedroom? A loft bed frees up precious floor area, but standard models can be expensive or uninspiring. Why not build your own versatile, space-saving masterpiece that includes a desk and storage?
Recommended Products to replicate this idea
| # | Preview | Product | |
|---|---|---|---|
| 1 |

|
ADORNEVE Loft Bed Full Size with U-Shaped Desk, 6 Storage Drawers, Power Outlet, LED Metal Loft Bed... | Check Latest Price |
| # | Preview | Product | |
|---|---|---|---|
| 1 |

|
IRIS USA 22 Qt Under Bed Storage, Stackable Organizer Bin Plastic Container with Sliding Drawer, 2... | Check Latest Price |
Imagine a sturdy wooden loft with a cozy sleeping nook perched above a compact workspace. Underneath, open shelves and drawers hold books, clothes, or accessories. The design maximizes vertical space while maintaining a clean, modern look. Soft lighting and personal touches turn it into your personalized retreat—perfect for studying, working, or relaxing.
Choose light-colored wood or paint for a bright, airy feel. Incorporate a desk with adjustable height or add a ladder with storage compartments. For a minimalist style, keep lines simple and avoid excess decoration. In smaller rooms, opt for a single bed platform with a pull-out desk. Seasonal accessories like cozy blankets or fairy lights can make it inviting year-round.
Start with precise measurements of your space and bed size. Build a sturdy frame with strong wood or metal, ensuring safety and stability. Attach a built-in desk or shelves underneath, secured with brackets. Use a ladder or stairs with handrails for safety. Finish with paint, stain, or sealant for durability. Assemble in manageable steps, and anchor the structure securely to the wall if necessary. Add personal touches like a corkboard or hooks for accessories.
Paint the bed and desk in your favorite colors or add decals for personality. Incorporate LED strip lighting under the bed or around the desk for ambience. Use decorative storage bins or baskets to organize belongings. Hang curtains or install a privacy panel if shared space needs separation. It’s a multifunctional, stylish upgrade tailored to your lifestyle.
Building a custom loft bed shows you can maximize your space with creativity and effort. It’s a centerpiece that combines function and style, making your room more efficient and fun. Plus, it’s a project you can be proud of for years to come. Ready to elevate your bedroom game?
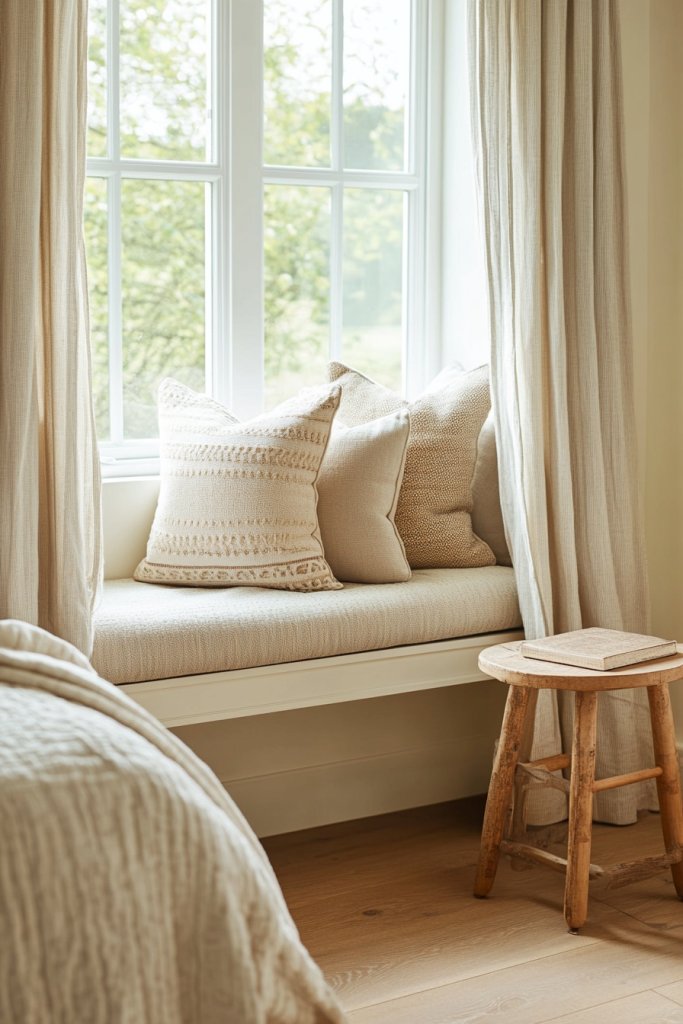
10. Create a Cozy Reading Nook with DIY Cushions and Curtains
Do you crave a peaceful corner to unwind with a book? A reading nook transforms a simple space into your personal escape. But many off-the-shelf cushions and curtains lack personality or comfort. Why not craft your own cozy retreat that invites you to curl up and relax?
Recommended Products to replicate this idea
| # | Preview | Product | |
|---|---|---|---|
| 1 |

|
Intelligent Design Azza Floor Pillow, Large Cushions Sitting for Adults, Floor Pillow for Meditation... | Check Latest Price |
| # | Preview | Product | |
|---|---|---|---|
| 1 |

|
5/8” Diameter Curtain Rods 30-90 Inch, for 30-84 Inch Windows, Adjustable Splicing Black Curtain... | Check Latest Price |
Picture a small nook nestled next to a window, draped with soft, layered curtains in your favorite fabric. On the floor, plush cushions and a throw blanket in inviting textures beckon you. String lights or fairy lights add a gentle glow, making it perfect for evenings. The space feels warm, inviting, and totally personalized—your favorite spot to escape from the world.
Choose fabrics that match your decor—flannel, velvet, or linen—for comfort and style. Add decorative pillows with different shapes and textures for variety. For a seasonal update, swap out light fabrics for heavier, warmer ones in winter. Incorporate a small side table or storage ottoman for books and snacks. Keep it simple or go all out with a canopy or wall-mounted shelves.
Start by measuring your space and selecting comfortable cushions or foam pads. Sew or buy covers in your chosen fabrics, adding ties or buttons for a neat finish. Hang lightweight curtains from a tension rod or install a few hooks for a layered effect. Add string lights or lanterns for soft lighting. Arrange cushions and throws to create a welcoming, layered look. Keep the setup flexible for easy changes.
Personalize with embroidered patches, monograms, or applique designs on cushions. Use decorative trims or tassels to add flair. Incorporate a small bookshelf or hanging pockets for your favorite reads. Add a scented candle or essential oil diffuser nearby for sensory comfort. This nook becomes your sanctuary for reading, meditation, or daydreaming.
Creating your own reading nook is a simple project that offers a big mental and emotional payoff. It encourages you to carve out a dedicated space for relaxation and self-care. Plus, it’s a perfect way to showcase your style and creativity. Ready to turn a corner into your personal escape?
11. Design a Functional Wall Organizer with Wooden Pegs or Baskets
Cluttered surfaces and scattered accessories can make your bedroom feel chaotic. A wall organizer keeps essentials within reach and your space tidy. But store-bought options often lack charm or are pricey. Why not build a simple, stylish organizer yourself?
Recommended Products to replicate this idea
| # | Preview | Product | |
|---|---|---|---|
| 1 |

|
HOMEBROS Coat Rack Wall Mount, Wooden Coat Hanger with 5 Hooks, Heavy Duty, Natural, 1 Pcs | Check Latest Price |
| # | Preview | Product | |
|---|---|---|---|
| 1 |
![Joben Oligey 3 Set [Extra Large] Hanging Wall Baskets ,Wire Basket For Storage Pantry, Farmhouse Food Storage Kitchen Pantry Laundry Closet Garage RV ,Black](https://m.media-amazon.com/images/I/51Dr1ysZVEL._SL160_.jpg)
|
Joben Oligey 3 Set [Extra Large] Hanging Wall Baskets ,Wire Basket For Storage Pantry, Farmhouse... | Check Latest Price |
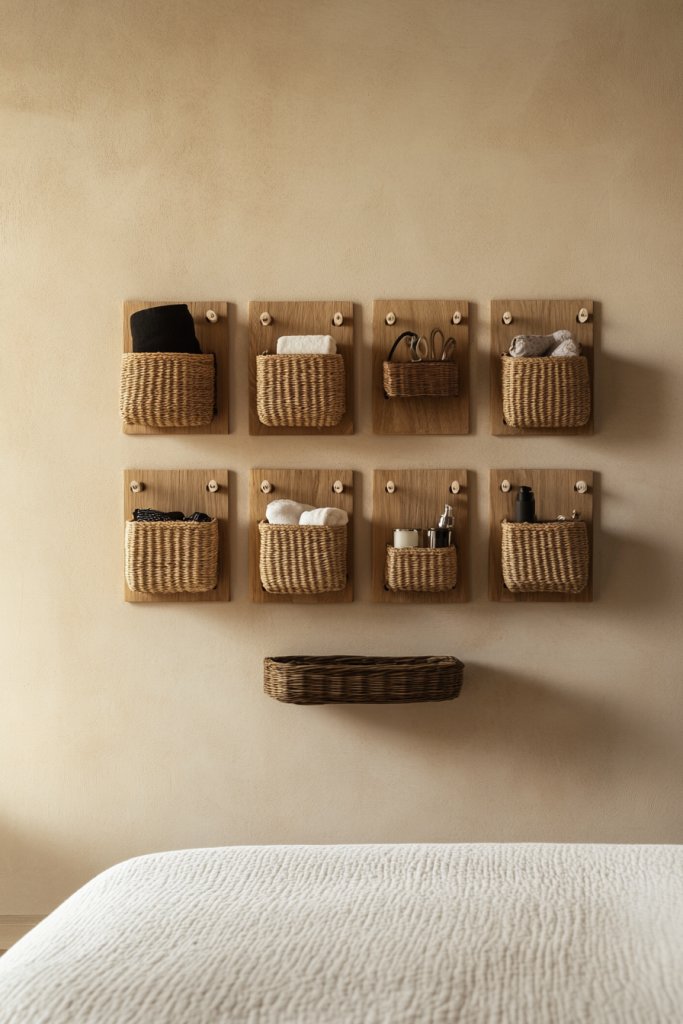
Picture a wall-mounted panel with evenly spaced wooden pegs or small woven baskets. Keys hang from decorative hooks, while jewelry, sunglasses, or small accessories sit neatly in baskets. The natural wood finish or painted colors add warmth and personality. This setup makes your room more functional and visually appealing.
Use reclaimed wood or craft a panel from painted plywood for a budget-friendly option. Decorate with stencils or decals to match your decor theme. Vary the size and shape of baskets or choose different peg styles—metal, wood, or acrylic. Install at different heights for an eclectic look or in a uniform grid for a minimalist aesthetic.
Start by measuring your wall space and selecting materials—wood, fabric, or metal. Cut or buy panels in the desired size. Attach pegs or baskets securely with screws or strong adhesive. Mount the organizer at a convenient height, ensuring it’s level. Organize your accessories thoughtfully, grouping similar items together. Regularly update the layout as your collection evolves.
Decorate the panel with paint, stencils, or decals to match your style. Label baskets with handwritten tags or paint words directly onto the wood. Add small decorative elements like charms or ribbons. Keep it functional by choosing durable, easy-to-clean materials. It’s a simple yet effective way to keep your bedroom neat.
Designing your own wall organizer demonstrates practicality and creativity. It makes daily routines smoother and your space more organized. Plus, it’s a satisfying project that leaves you with a useful piece you crafted yourself. Ready to hang your own functional art?
12. Make a DIY Headboard Using Fabric-Covered Foam Panels
Your bed looks incomplete or uninspired? An upholstered headboard adds softness and personality to your bedroom. Buying a custom one can be costly, but DIY fabric-covered foam panels are a budget-friendly alternative. Ready to craft a plush, stylish headboard?
Recommended Products to replicate this idea
| # | Preview | Product | |
|---|---|---|---|
| 1 |

|
Marine Vinyl Fabric, Upholstery Faux Leather, Outdoor Boat Automotive, DIY and Crafting Pleather -... | Check Latest Price |
| # | Preview | Product | |
|---|---|---|---|
| 1 |

|
Focusound 52 Pack Acoustic Foam Panels 1" x 12" x 12" Sound Proof Foam Panles Soundproofing Noise... | Check Latest Price |
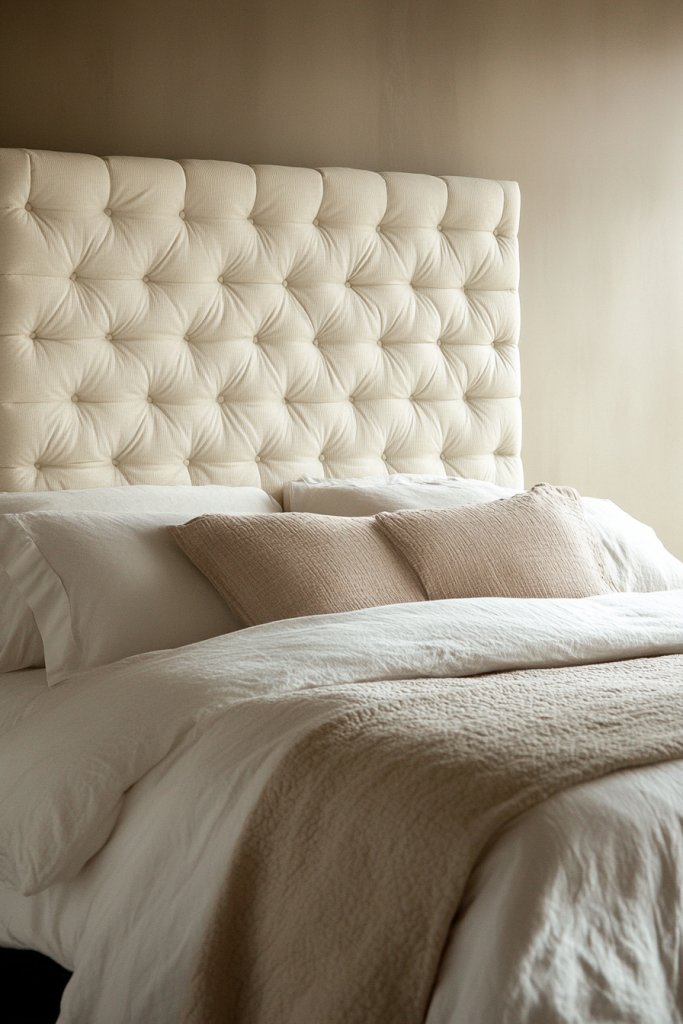
Imagine a large, cushioned headboard upholstered in soft fabric—perhaps a velvet or linen in your favorite color. The foam panels are attached to a wooden frame or directly to the wall, creating a plush, inviting backdrop. The fabric’s texture contrasts beautifully with smooth sheets and decorative pillows, turning your bed into a cozy sanctuary.
Choose fabric that complements your decor—rich textures for luxury, patterned or textured textiles for visual interest. Keep the panels uniform for a modern look, or mix different shapes and sizes for a boho vibe. For seasonal updates, switch out covers or add decorative trims. Attach the panels with removable hooks or velcro, making cleaning and swapping easy.
Start by measuring your bed width and cut foam panels to size. Cover each with batting for extra softness, then wrap with your chosen fabric, securing with a staple gun or adhesive. Attach the panels to a wooden frame or directly to the wall using hooks or brackets. Ensure the panels are evenly spaced and firmly secured. Add decorative elements like piping or buttons if desired. Finish by cleaning and smoothing the fabric for a polished look.
Add decorative buttons, embroidery, or contrasting piping for detail. Incorporate different fabric textures or patterns for a layered effect. Use fabric dye or paint to customize colors or patterns further. Pair with matching pillows or throws to complete your cozy bedroom aesthetic. It’s your chance to create a personalized, plush headboard.
Making your own fabric headboard proves your ability to combine comfort and style affordably. It’s a luxurious upgrade that instantly elevates your space. Plus, it’s a project that reflects your taste and craftsmanship. Ready to craft your dream headboard?
13. Build a Custom Under-Bed Storage Solution with Wooden Drawers
Under the bed is often just wasted space filled with random clutter. A custom storage solution can keep your room tidy and maximize your space. Off-the-shelf drawers are often bulky or expensive. Why not build your own sleek, practical drawers that fit perfectly?
Recommended Products to replicate this idea
| # | Preview | Product | |
|---|---|---|---|
| 1 |

|
LONTAN Soft Close Drawer Slides 22 Inch Side Mount Heavy Duty Cabinet Drawer Glides 10 Pairs - Ball... | Check Latest Price |
| # | Preview | Product | |
|---|---|---|---|
| 1 |

|
Luomorgo 6 Pcs Wooden File Handle with Metal Collars, Dia. 6mm Wood Handle for 10"-12" File Handles... | Check Latest Price |
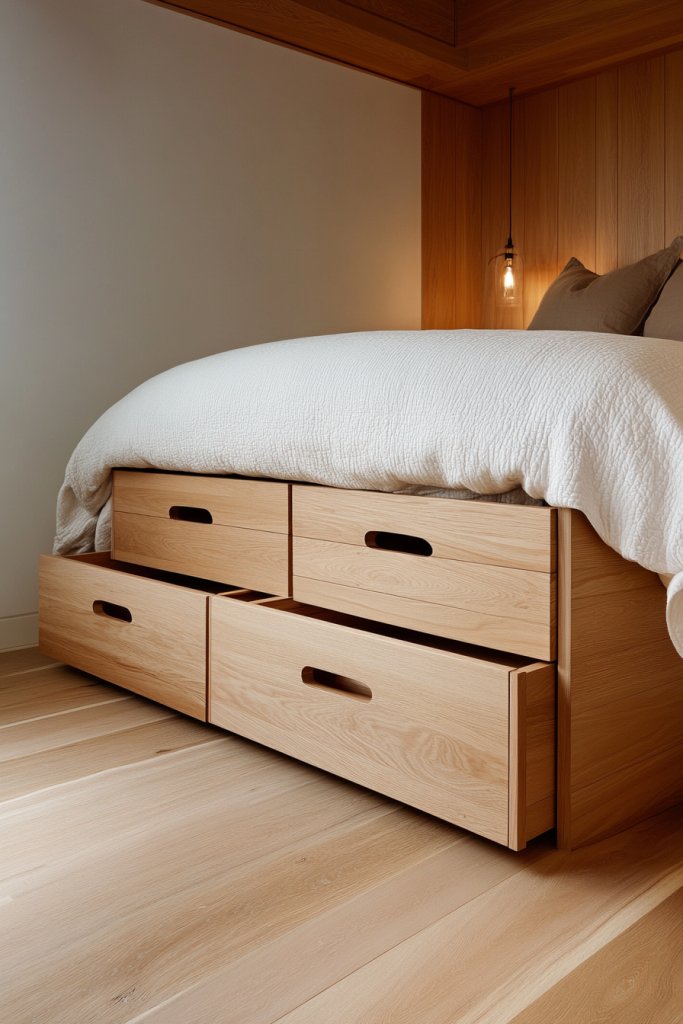
Picture a set of wooden drawers tucked neatly beneath your bed frame, painted in a color that matches your room’s palette. Handles or knobs are simple but stylish, and the drawers slide smoothly on homemade tracks. You can store clothes, shoes, or bedding inside, keeping everything organized and out of sight. It’s a clean, streamlined look that makes your bedroom feel more spacious.
Use plywood, reclaimed wood, or MDF for affordability. Paint or stain the drawers for a coordinated look. Incorporate caster wheels for easy sliding or build a frame for added stability. Adjust the size of the drawers depending on your needs—long and shallow or deep for bulkier storage. Consider adding labels or color-coded handles for quick access.
Measure the under-bed space, then cut your wood to size for the drawers. Assemble the sides and bottom with nails or screws, ensuring a sturdy box. Attach handles or knobs, and install slides or caster wheels on the sides for smooth operation. Fit the drawers underneath your bed, securing them if necessary. Finish with paint, stain, or sealer to protect against moisture and wear. Organize your items inside for easy access.
Decorate the drawers with stencils, decals, or contrasting colors for a personalized touch. Add labels or tags to identify contents. Incorporate soft-close mechanisms or drawer stops for extra convenience. Use fabric-lined interiors or small baskets for smaller items. It’s a customized, practical upgrade that keeps your bedroom neat and stylish.
Building your own under-bed drawers demonstrates your DIY skills and ability to optimize space. It transforms a hidden area into a functional storage zone that keeps your room clutter-free. Once complete, you’ll feel proud of your project and enjoy a tidier, more organized bedroom. Ready to start building?
Conclusion
With a diverse range of DIY ideas—from stylish decor and innovative storage solutions to cozy accents—this collection offers something for everyone looking to personalize their bedroom. These projects are easy to tackle and designed to inspire your creativity, whether you want a quick update or a complete overhaul. Don’t hesitate—start experimenting and infuse your space with your own unique flair. Your perfect, personalized bedroom is just a project away!