Ever wondered how to transform a blank wall into a stunning focal point without breaking the bank? DIY wall art decor has become wildly popular because it allows you to add personalized, meaningful touches to your home while showcasing your creativity. From handcrafted textures to upcycled treasures, these projects offer a fun, budget-friendly way to elevate your space and reflect your unique style.
In this article, you’ll find a treasure trove of inspiring ideas and practical tips to help you get started on your DIY wall art journey. Whether you love boho vibes, rustic charm, modern geometric designs, or nostalgic touches, there’s something here for every taste. Get ready to unleash your creativity and turn plain walls into eye-catching masterpieces!
1. Macramé Wall Hangings for Boho Charm
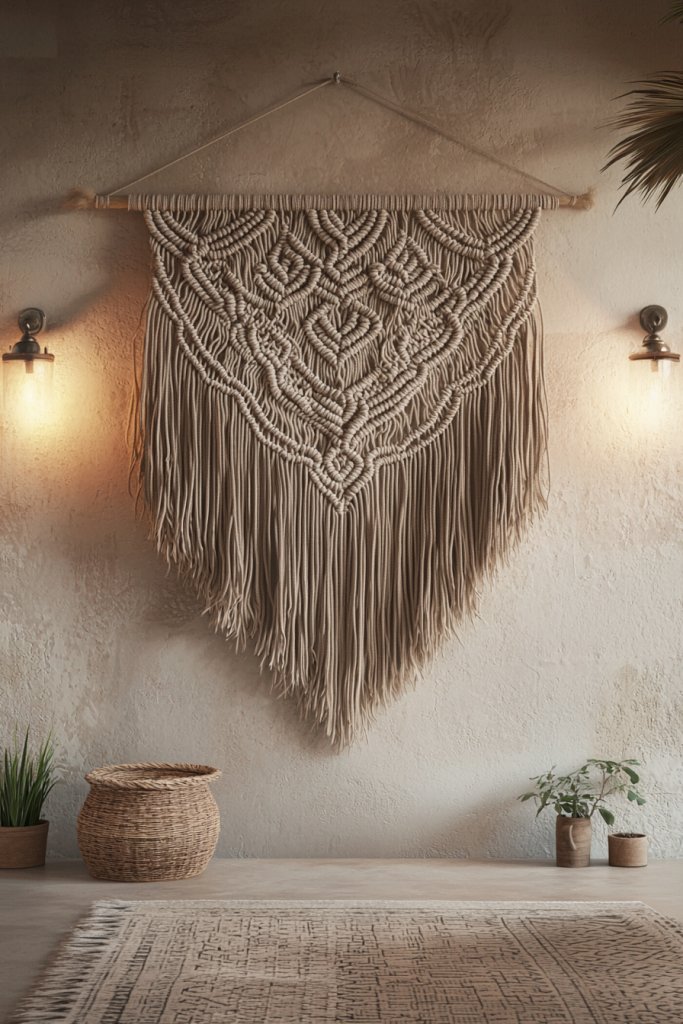
Transform your space with the cozy, textured appeal of macramé wall hangings—perfect for adding a relaxed, boho vibe to any room. These handcrafted pieces are like wearable art that brings warmth and personality to your walls, making your home feel inviting and unique.
Imagine a large, intricate macramé piece with knotted tassels and geometric patterns in soft neutral shades like cream, taupe, or blush. The thick, tactile cords cascade down a wooden dowel, creating a layered, fringe effect that invites touch.
The tactile fibers add a natural, earthy feel, while the handcrafted knots and patterns lend a sense of artisanal charm. When lit with warm ambient lighting, the textures pop, casting soft shadows that enhance the cozy atmosphere.
To create your own macramé wall hanging, start with cotton or jute cords in your chosen color—about 50-100 feet, depending on size. Attach the cords to a wooden dowel or a metal rod using simple lark’s head knots.
Follow online tutorials or pattern guides to learn various knots like square, half hitch, or spiral knots. Finish with tassels or fringe, and hang your piece on a sturdy hook or nail at eye level. For a more polished look, experiment with different knot patterns and incorporate beads or shells for extra flair.
2. Framed Fabric Art for a Cozy Touch

Adding framed fabric art is an effortless way to introduce color, pattern, and softness into your home decor. This DIY project transforms simple textiles into eye-catching wall accents that evoke warmth and personality.
Picture a vibrant, patterned fabric—perhaps a floral print in rich reds and greens or a subtle textured linen in muted pastels—carefully stretched within a sleek or vintage-inspired frame. The fabric is pulled taut and secured behind the glass or within a matte border, creating a neat, gallery-style display.
The combination of the tactile textile and the clean frame elevates the look, making it both modern and nostalgic. When placed above a cozy sofa or bed, it instantly softens the space and invites a sense of comfort.
To create your own framed fabric art, choose a piece of fabric or textile with a pattern or texture you love, such as linen, velvet, or cotton. Cut it to fit your chosen frame—usually 8×10 or 11×14 inches.
Secure the fabric with double-sided tape or staples at the back of the frame or use a fabric-hugging mat for a cleaner look. You can mix and match different prints or solids for an eclectic gallery wall. Hang your finished piece with wall hooks or picture hangers, and enjoy a personalized, cozy touch that’s easy to update seasonally.
3. DIY Mirror Collages for Light and Space
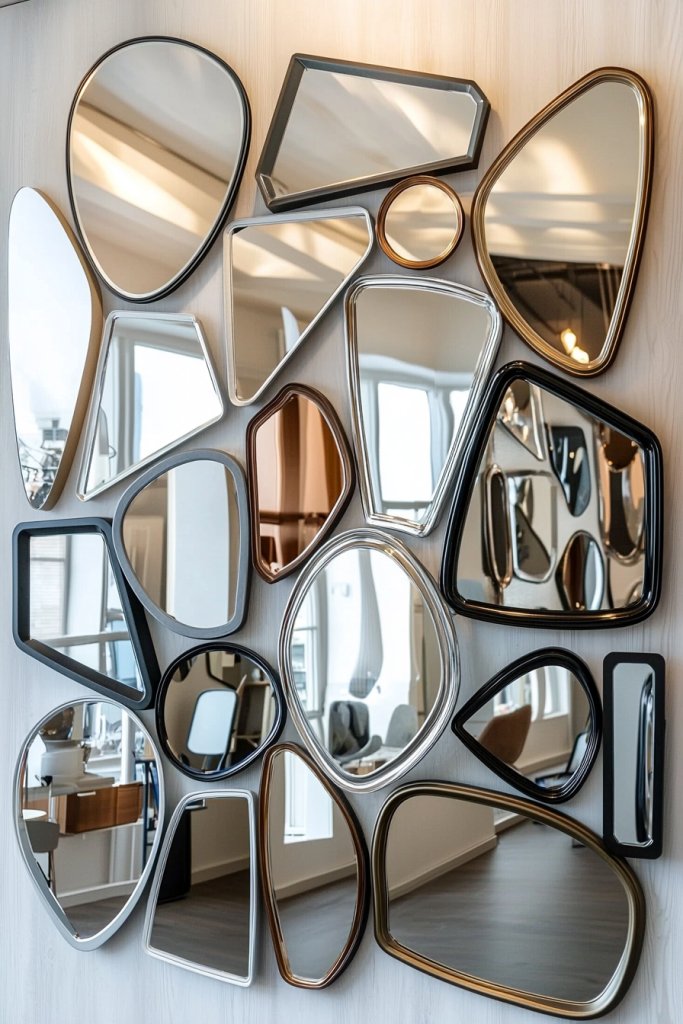
A mirror collage is a stunning way to amplify light and create a visually dynamic feature wall. By arranging various sizes and shapes of mirrors, you’ll reflect natural sunlight and add a sense of openness to any room.
Visualize a collection of round, rectangular, and irregularly shaped mirrors clustered together in a cohesive arrangement. The frames could be sleek metal, rustic wood, or even frameless for a minimalist look.
As you step back, the mirrors create a mosaic-like effect that catches and bounces light across the space, making the room feel larger and more luminous. The reflective surfaces add sparkle and depth, while the varied shapes keep the display interesting.
The overall effect is both modern and eclectic, perfect for living rooms, hallways, or bedrooms. To assemble your own mirror collage, gather different sizes of mirrors—you can find affordable options at home improvement stores or repurpose vintage finds.
Use heavy-duty picture-hanging strips or hooks and plan your layout on the floor first for best spacing. Attach the mirrors securely to the wall, starting from the center and working outward for balance.
Consider adding decorative elements like LED strip lights behind the mirrors for extra glow, and adjust the arrangement until it feels harmonious. This DIY is simple yet powerful in transforming an ordinary wall into a luminous focal point.
4. Upcycled Wooden Pallet Wall Art
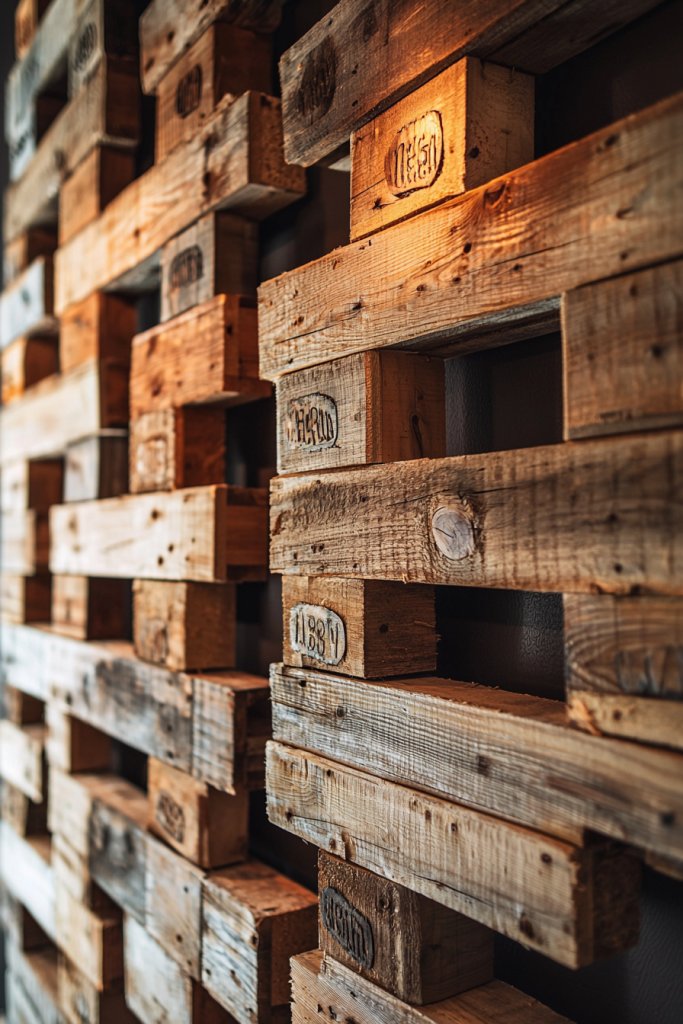
Turning rustic wooden pallets into wall art combines sustainability with a cozy, farmhouse aesthetic. This DIY project lets you craft unique, textured pieces that add warmth and character to your home.
Picture a large wooden panel with a weathered finish, either left natural or painted with subtle shades like soft gray or pastel hues. You can cut the pallet into geometric shapes, create a layered effect, or carve out words or patterns using stencils.
Add dimension by attaching wooden or metal accents, or by painting over the surface to highlight details. The rough texture and natural grain of the wood lend a rustic charm, making your wall a conversation piece that feels both handcrafted and inviting.
To make your own pallet wall art, start with an old wooden pallet or reclaimed wood pieces. Remove the nails and sand the surfaces lightly to smooth rough edges but keep the natural texture intact.
Decide on your design—whether a simple plank, a monogram, or a geometric pattern—and cut or arrange the wood accordingly. Use wood glue or nails to assemble your piece, then paint or stain as desired. Hang your creation with sturdy hooks, and enjoy a piece that’s eco-friendly, budget-conscious, and full of rustic character.
5. String Light and Photo Wall Displays
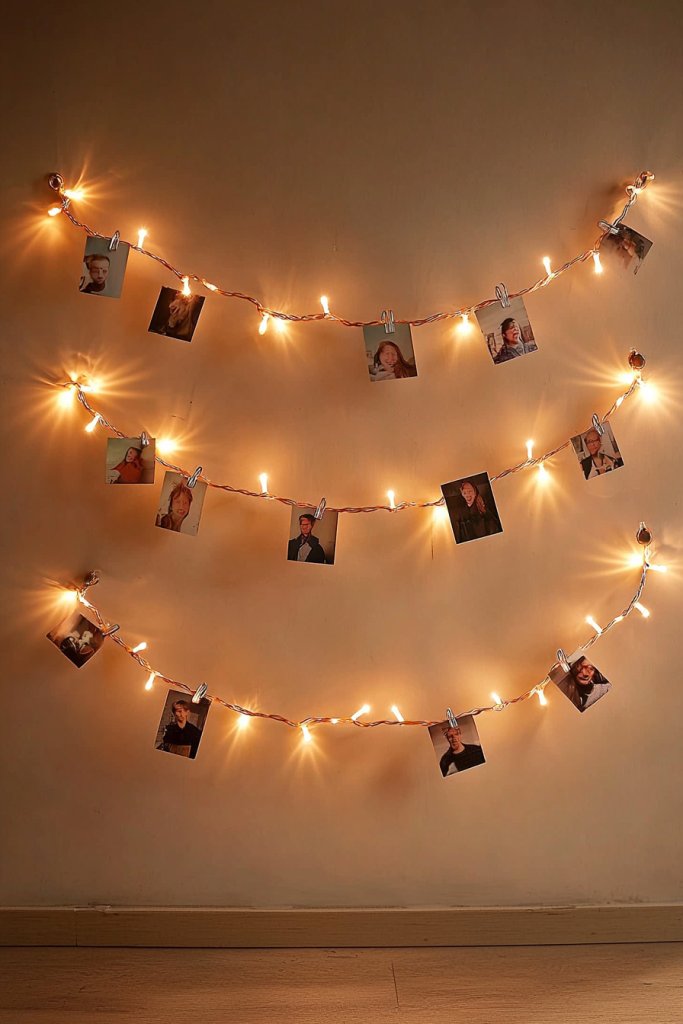
This charming DIY combines the cozy glow of fairy lights with the personal touch of photos or small decorative objects, creating a warm and inviting focal point. Imagine a wall softly lit by a string of warm white fairy lights, with small clips or clothespins holding photos, postcards, or tiny artworks along the length.
The lights cast a gentle, ambient glow that enhances the visual appeal, especially in the evenings. Interspersed with small decorative objects like mini planters, charms, or quotes, the display feels personal and dynamic.
Whether in a bedroom, living room, or hallway, this setup creates a relaxed, nostalgic atmosphere that’s perfect for everyday inspiration or special memories. To create your own string light display, start with a length of fairy lights—battery-operated or plug-in—and attach small clips or clothespins at intervals along the wire.
Use command hooks or nails to secure the lights to your wall, arranging them in a gentle curve or straight line. Clip your favorite photos or mementos, and add small decorative items for extra personality.
You can customize the look by choosing different light colors, clip styles, or adding a fabric backdrop behind the display for a more polished appearance. This simple setup is highly adaptable and perfect for showcasing your personal story in a charming, illuminated way.
6. Botanical Wall Decals and Vinyl Art
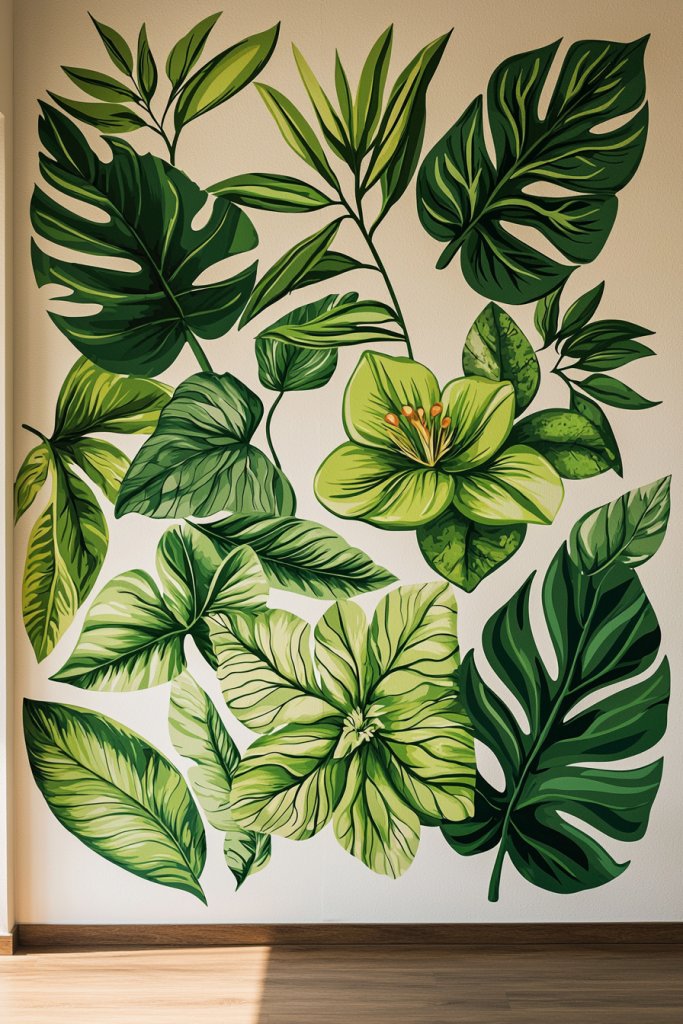
Adding botanical wall decals or vinyl art is a quick, versatile way to bring a touch of nature into your home without the maintenance of real plants. These decals come in a wide array of designs—ranging from delicate fern fronds to bold tropical leaves—that instantly add pattern and life to plain walls.
They’re perfect for creating a fresh, calming atmosphere and can be easily customized to match your color scheme, whether you prefer soft pastels or vibrant hues. Plus, since they’re removable, you can update your decor as often as your style evolves.
Imagine a wall adorned with large, lush botanical decals in shades of forest green and soft cream, arranged to mimic a natural jungle scene. The vinyl stickers have a matte finish that mimics the texture of real leaves, adding depth and realism to your space.
These decals can be placed above a sofa to create a feature wall, or in a nursery for a whimsical, serene vibe. They’re lightweight, easy to peel and reposition, and won’t damage your paint or wallpaper, making them an ideal DIY project for renters and homeowners alike.
Getting started is simple: choose your favorite botanical designs from online shops or craft stores, then clean your wall surface thoroughly. Carefully peel the decals from their backing and apply them, starting from one corner and smoothing outward to eliminate bubbles.
For a seamless look, use a squeegee or credit card to press out air pockets. You can layer different sizes and shapes for a dynamic look, or keep it minimal with just a few statement pieces. With minimal tools and a little patience, you’ll have a nature-inspired wall that feels like an indoor garden in no time.
7. Woven Wall Art with Natural Fibers
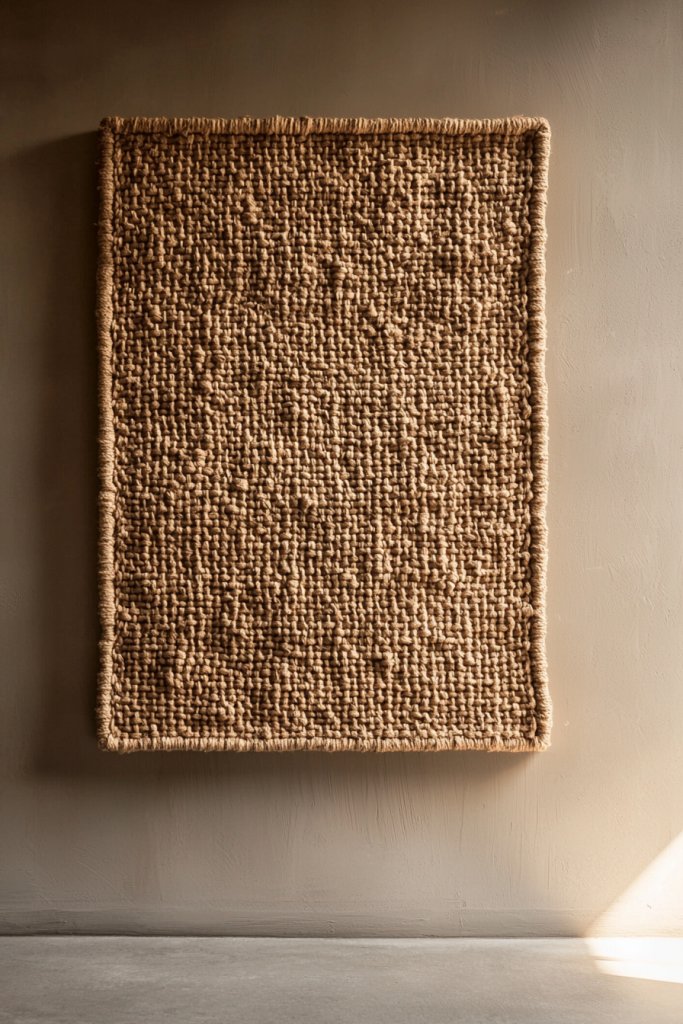
Woven wall art made from natural fibers like jute, hemp, or thick yarn adds a warm, earthy touch to your decor, bringing texture and a handcrafted feel to any space. These pieces can range from simple woven mats to intricate geometric patterns, making them suitable for both modern and boho interiors.
Their tactile quality invites touch and adds a layer of visual interest that elevates your wall from flat to fabulous, creating a cozy, inviting atmosphere. Visualize a large, circular woven piece in shades of tan and cream hanging prominently on a neutral-colored wall.
The fibers are thick and slightly rough to the touch, with a natural sheen that catches the light softly. You might see a pattern of concentric circles, chevron stripes, or a fringed edge that adds movement.
The overall effect is earthy and organic, with the fibers subtly absorbing ambient sounds, making your room feel quieter and more intimate. This kind of wall art pairs beautifully with wooden furniture and neutral textiles.
Creating your own woven wall art is surprisingly straightforward. Gather jute, hemp, or thick yarn—alternatively, you can use recycled fabrics or rope—and a simple frame or embroidery hoop.
Start by wrapping and knotting the fibers in your chosen pattern, working from the center outward or vice versa. For a more complex design, follow online tutorials that break down weaving techniques into manageable steps.
Finish with a secure knot or glue, and hang your masterpiece using a sturdy hook or nail. With a little patience, you’ll craft a unique piece that adds texture and warmth to your home.
8. Geometric Wall Shelves as Functional Decor
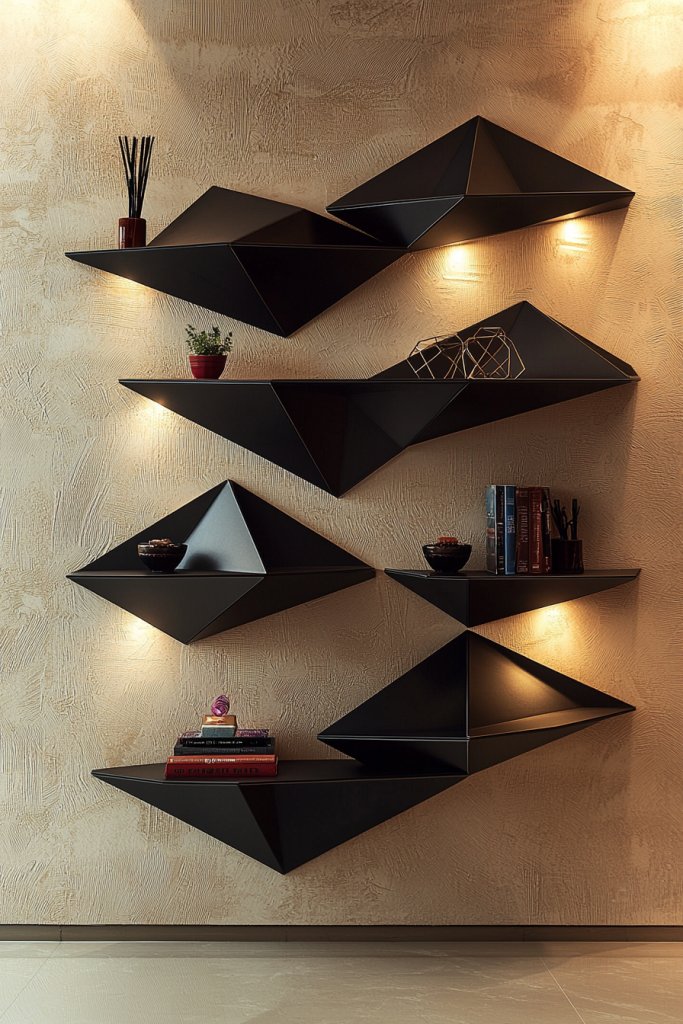
Geometric wall shelves combine style and functionality, offering a modern way to display decorative objects, books, or plants while enhancing your wall’s visual appeal. Their sleek, angular shapes—such as hexagons, triangles, or asymmetrical forms—add a contemporary touch that complements minimalist, industrial, or eclectic decor styles.
These shelves serve as both art and storage, making your space more organized and visually interesting. Picture a set of matte black or brushed gold geometric shelves arranged in a staggered pattern on a blank wall.
Each shelf holds a small potted succulent, a framed photo, or a decorative sculpture, creating a layered, three-dimensional effect. The sharp lines and bold shapes contrast beautifully with soft textiles and organic elements in the room.
The shelves’ open design allows light to pass through, casting interesting shadows that change throughout the day, adding dynamic movement to your decor. They’re perfect for small spaces or as a focal point in living rooms or bedrooms.
Installing these shelves is straightforward. First, select a set of pre-made geometric shelves from a craft store or make your own using wood or sturdy cardboard cut into your desired shapes.
Use a level and appropriate anchors to securely mount each shelf on your wall. For added stability, measure carefully and mark the placement with a pencil before drilling.
Finish by arranging your favorite decorative objects on the shelves and stepping back to enjoy your blend of form and function. With simple tools and a little planning, you’ll create a stylish display that elevates your home’s aesthetic.
9. Painted Wooden Signs with Inspirational Quotes
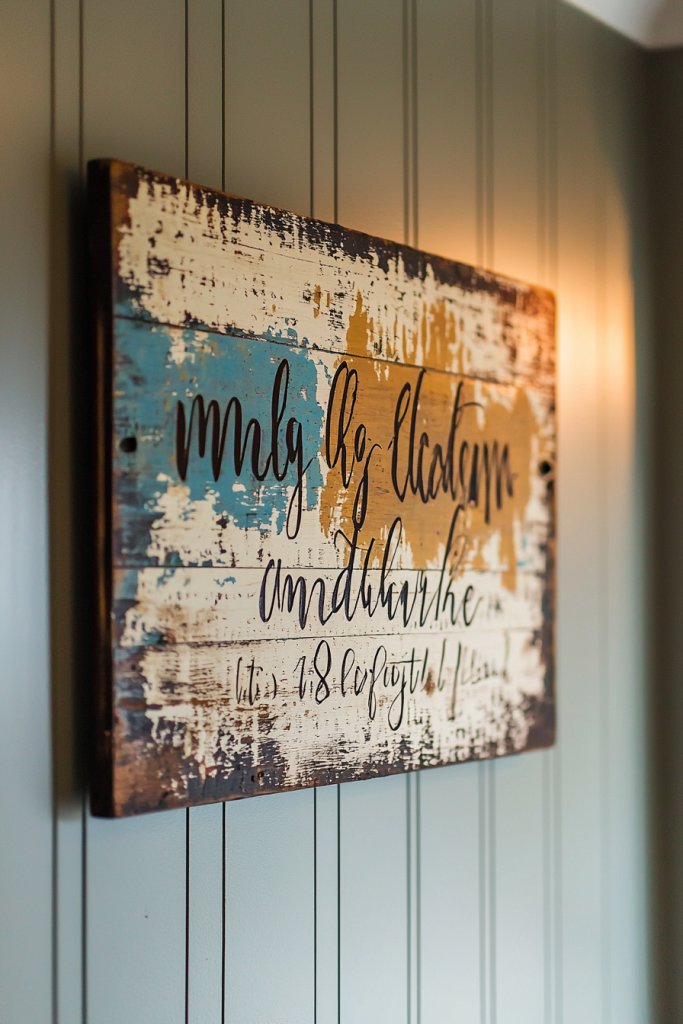
Personalized painted wooden signs featuring inspirational quotes or meaningful words are a charming way to infuse your home with positivity and personality. These signs can be rustic, modern, or shabby chic, depending on your choice of paint, fonts, and framing.
They serve as daily reminders of your values, goals, or favorite sayings, making your decor both beautiful and motivational. Envision a weathered wooden plank painted in soft white or muted pastel, with a bold, hand-painted quote like “Dream Big” or “Love Lives Here” in elegant script or playful lettering.
The paint may be slightly distressed for a vintage look, or crisp and vibrant for a more contemporary vibe. You can add decorative elements like floral motifs, borders, or metallic accents to enhance the design.
These signs look great above a fireplace, on a gallery wall, or as a standalone statement piece. They create a warm, welcoming atmosphere and are perfect for gifting or personalizing your space.
Creating your own painted wooden sign is simple and budget-friendly. Start with a piece of wood, such as a scrap pallet board or a cut-to-size plank.
Sand the surface smoothly, then paint the background in your chosen color and let it dry. Use painter’s tape to outline your quote or stencil it freehand with a brush and acrylic paint.
For a professional finish, seal the sign with a clear matte or gloss spray. Attach a sawtooth hanger or picture wire on the back, and hang your custom art where it will inspire daily. With a few supplies and some creative flair, you’ll have a meaningful piece that adds character to your home.
10. DIY Tapestry with Embroidery or Weaving Techniques
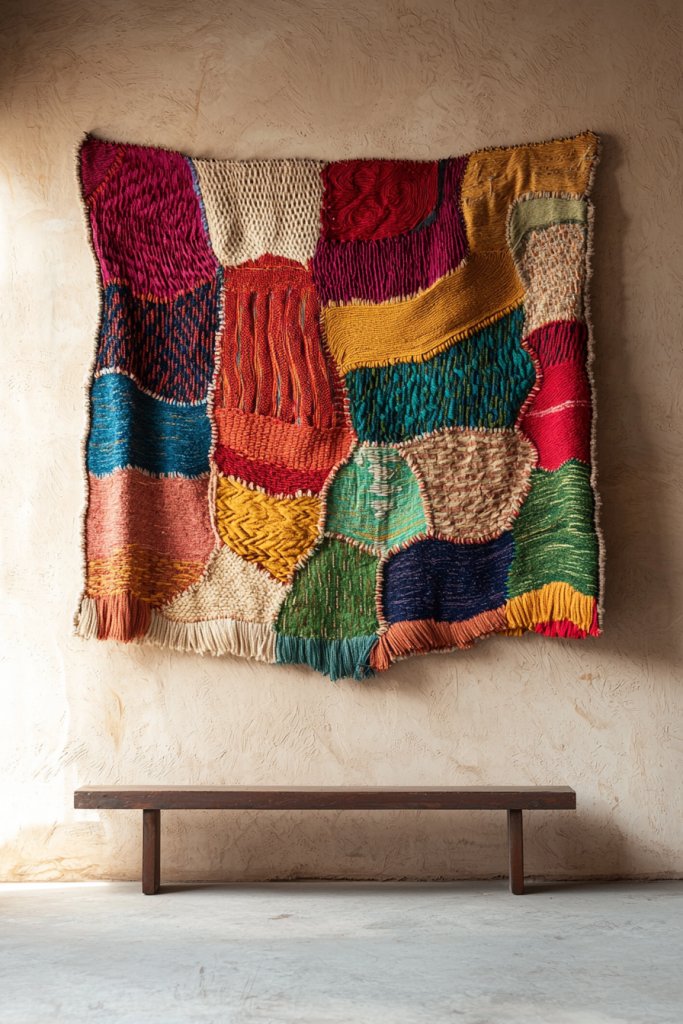
Creating a DIY tapestry using embroidery or weaving techniques offers a vibrant, textured focal point that can dramatically transform a plain wall. These textile art pieces are highly customizable, allowing you to incorporate your favorite colors, patterns, and textures—think bold stripes, intricate geometric designs, or freeform abstract art.
They introduce warmth, softness, and personality, perfect for boho, eclectic, or modern interiors. Imagine a rectangular woven tapestry featuring a mix of bright reds, deep blues, and soft creams, with fringed edges that sway gently with air movement.
The textured yarns and embroidered accents add depth and tactile interest, inviting you to touch and explore the surface. The piece is large enough to command attention but versatile enough to complement other decor elements, such as wooden furniture or metal accents.
Its handmade quality lends a cozy, inviting vibe, making your space feel more personal and artistic. To craft your own tapestry, gather supplies like embroidery hoops, weaving looms, or a simple cardboard frame.
Use acrylic yarn, wool, or even recycled fabric strips to weave or embroider your design. Beginners can follow online tutorials that break down basic weaving or embroidery stitches, while more experienced crafters can experiment with complex patterns.
Finish your piece with a secure knot or glue and add loops or rings for hanging. With a little patience and creativity, you’ll produce a stunning textile art piece that elevates your wall and showcases your personal style.
11. Faux Taxidermy or Sculptural Wall Decor
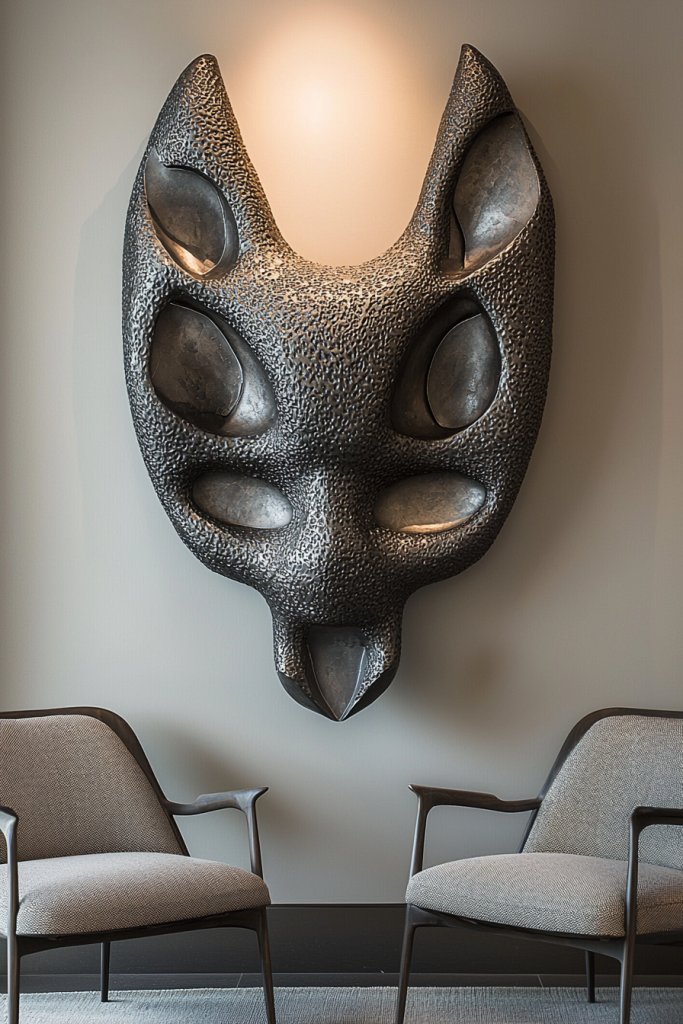
Faux taxidermy and sculptural wall decor are fantastic ways to add a bold, artistic statement to your space without the ethical concerns or maintenance of real taxidermy. These pieces bring a touch of wilderness or modern sculpture, elevating your wall with texture and intrigue.
Imagine a sleek, lightweight sculpture resembling a majestic animal head crafted from lightweight resin or foam, painted in matte black, metallic gold, or vibrant colors. Alternatively, textured faux taxidermy displays feature detailed, realistic textures but are made from soft fabric, felt, or papier-mâché, giving a tactile, layered appearance.
These elements often have a three-dimensional quality, protruding from the wall to create shadows and depth. They can be minimalist geometric shapes or highly detailed replicas, depending on your style.
The overall look is striking and can evoke a sense of adventure, sophistication, or modern art, depending on your choice of material and finish. To recreate this look, choose a lightweight material such as foam, resin, or papier-mâché for the main sculpture.
Start by sketching your desired shape or animal form on paper, then transfer it onto your chosen material, cutting and shaping it accordingly. Paint or finish your piece with metallic, matte, or textured paint for added visual interest.
Secure it to the wall with strong adhesive or mounting brackets, making sure it’s level. For a more polished appearance, consider adding a backdrop, like a framed shadow box or painted wall accent, to highlight your sculptural decor.
12. String Art with Nails and Colored Thread
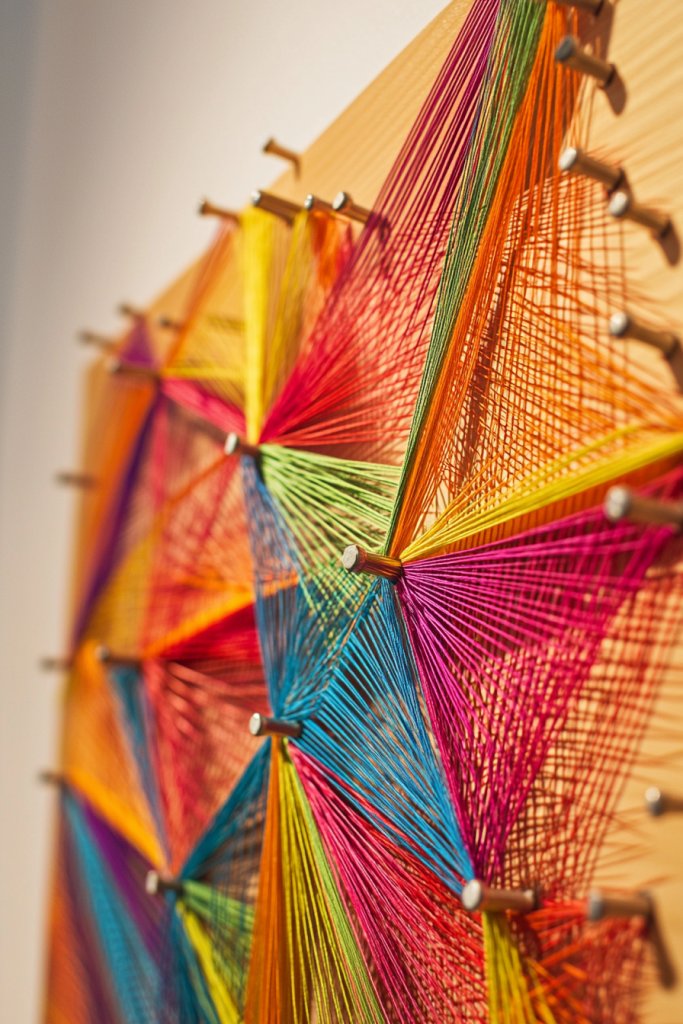
String art is a mesmerizing way to create intricate, geometric, and nature-inspired designs that serve as eye-catching wall decor. This craft combines craftsmanship with visual impact, transforming a simple concept into a stunning focal point.
Picture a wall decorated with a large, symmetrical string art piece—perhaps a series of overlapping circles or a stylized tree—using bright, contrasting thread. The design is anchored by evenly spaced nails or pins hammered into the wall or a sturdy wooden board.
Colored thread, such as vibrant red, soft pastel, or metallic gold, is woven around the nails in precise, repetitive patterns, creating a textured, layered effect. The result is a bold, graphic piece that plays with light and shadow, adding depth and sophistication.
The overall aesthetic can be minimalist or elaborate, depending on your color choices and complexity. To make your own, gather a wooden board or thick cork wall panel, nails or pins, and colored embroidery thread or craft yarn.
Start by sketching your design lightly with pencil or chalk on the surface. Hammer the nails into the marked points, ensuring they are evenly spaced and aligned.
Then, weave the thread around the nails following your pattern, keeping tension consistent for a clean finish. Finish by tying off the thread securely and trimming excess. For a simpler approach, you can use pre-made templates or stencils to guide your design, making this craft accessible for beginners.
13. Patterned Washi Tape Wall Art
Washi tape offers a fun, versatile, and damage-free way to create vibrant wall art with endless patterns and color combinations. It’s perfect for adding a pop of personality to any space without the permanence of paint or wallpaper.
Visualize a wall where bold geometric shapes, stripes, or abstract patterns are formed entirely from colorful washi tape. The tapes come in a variety of patterns—floral, polka dots, chevrons—and shades, from soft pastels to bold primaries.
They are applied directly onto the wall or onto a large sheet of paper or canvas mounted on the wall, creating a layered, textured look. The tape’s matte finish and crisp edges give the design a modern, graphic appeal.
This method is easy to update or change, making it ideal for renters or those who love experimenting with color and shape. To create your own, start with a blank wall or a canvas surface.
Select your washi tapes in complementary colors and patterns. Use painter’s tape or a ruler to create clean lines and shapes, then carefully apply the washi tape along your guides.
Overlap and layer different patterns for visual interest. For added durability, press down firmly at the edges, and consider sealing the design with a clear spray if desired. This approach allows for a highly personalized, vibrant statement piece that can be easily modified or removed without damage.
14. Repurposed Frame Gallery Wall
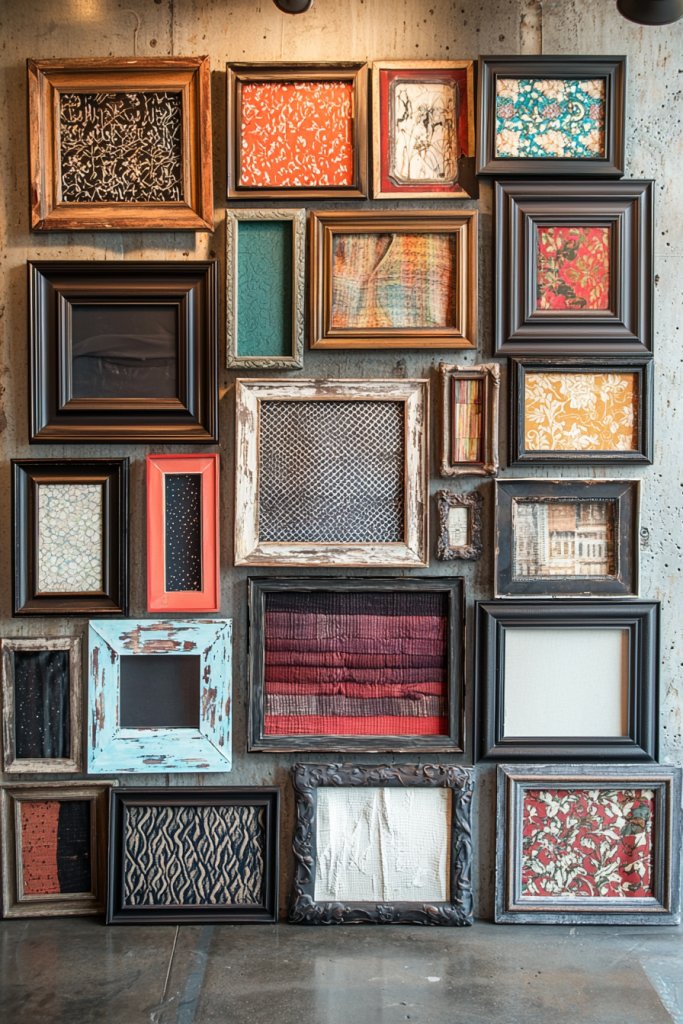
A gallery wall made from repurposed frames is a charming, eclectic way to showcase your favorite textiles, photographs, or decorative papers. It combines vintage charm with creative expression, making your wall a personalized focal point.
Envision a collection of mismatched frames—some vintage, some modern—filled with colorful patterned fabrics, textured papers, or small decorative objects. These frames can be painted in coordinating colors or left their original distressed finishes for a shabby-chic look.
Arrange them in a balanced, yet playful layout on your wall, creating a layered, dynamic display. The varied sizes and styles add visual interest and allow for easy customization as your taste evolves.
This setup lends a cozy, curated vibe, perfect for living rooms, bedrooms, or hallways. To craft your gallery wall, gather a selection of frames in different sizes and styles, preferably from thrift stores or your own collection.
Fill them with decorative papers, fabric swatches, or photos, securing the contents with glue or double-sided tape. Arrange the frames on the floor first to plan your layout, then hang them carefully on the wall, starting from the center or a corner for balance.
Use picture-hanging hooks, nails, or adhesive strips to secure each frame, ensuring they are level and evenly spaced. This approach makes for an easy, budget-friendly way to showcase your personality and update your decor regularly.
15. DIY Metal Wall Art with Wire and Sheet Metal
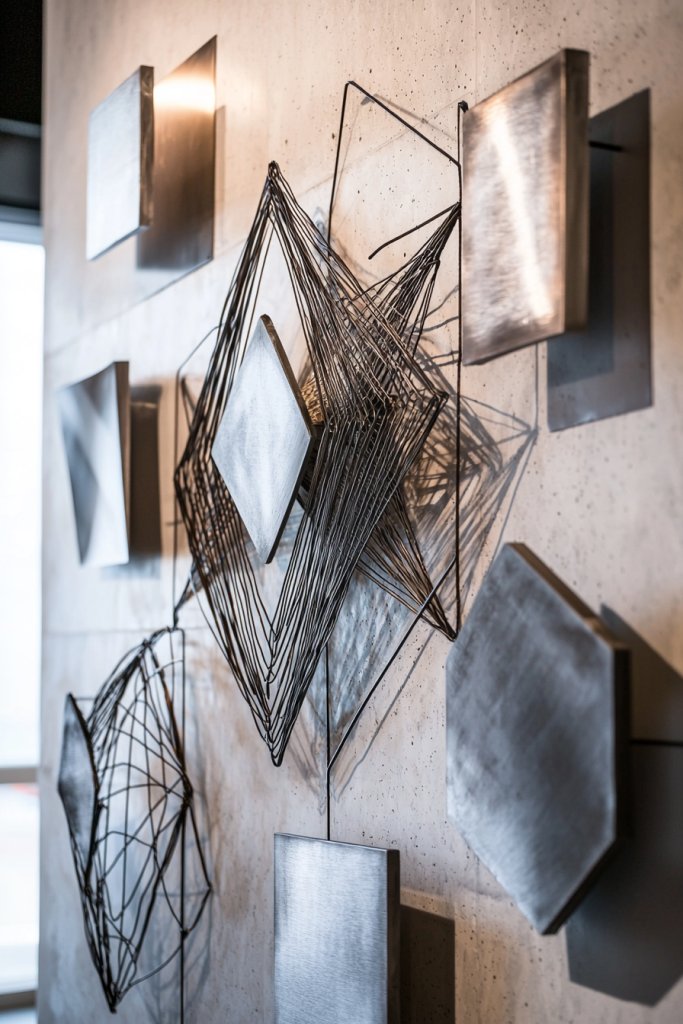
Creating DIY metal wall art with wire and sheet metal offers a sleek, modern aesthetic that adds an industrial or contemporary touch to your home. It combines craftsmanship with bold, geometric design elements that stand out.
Imagine abstract, angular shapes or intricate wire sculptures mounted directly onto your wall, crafted from thin gauge wire, stainless steel sheets, or copper. These pieces can be simple geometric patterns like triangles or circles, or more complex designs like stylized florals or cityscapes.
The metal has a matte or polished finish, catching the light and creating eye-catching shadows. The overall effect is a minimalist yet striking installation that complements modern or industrial decor styles, adding texture and depth to your space.
To DIY, gather metal wire, sheet metal, or metal rods, along with basic tools like pliers, metal cutters, and a strong adhesive or mounting brackets. Sketch your design on paper first, then shape your wire into the desired forms, twisting and bending carefully.
If working with sheet metal, cut out shapes with metal shears and smooth edges with a file. Mount your finished pieces on the wall using heavy-duty anchors or mounting strips, making sure they are securely fastened. For added variety, combine different metal finishes or incorporate small decorative elements like rivets or beads for a personalized touch.
16. Textile Art Using Felt or Quilted Pieces
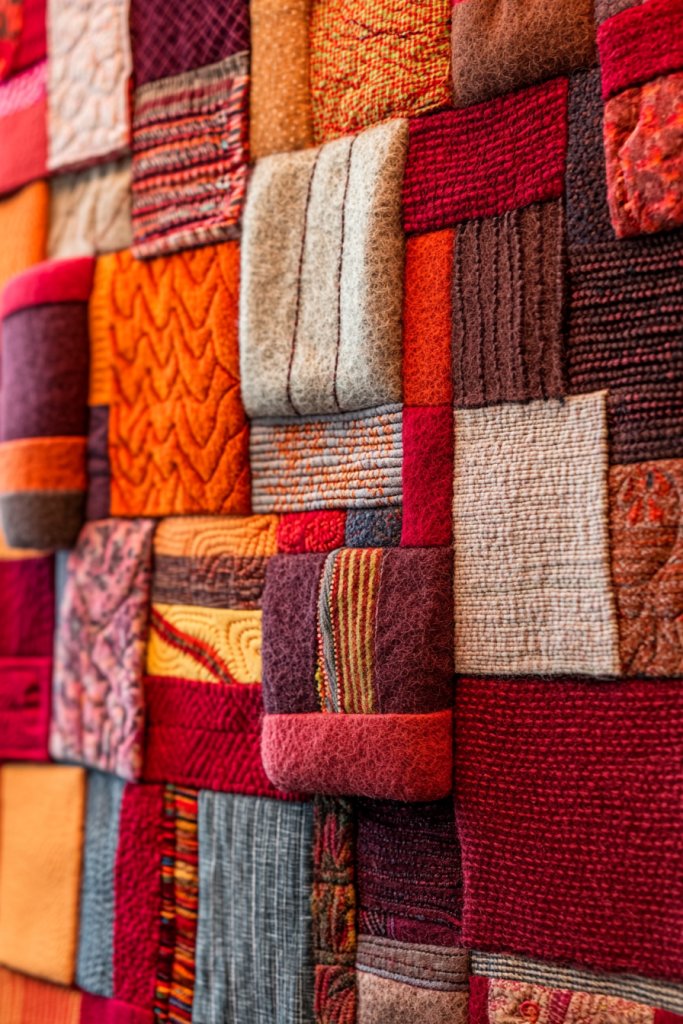
Transform your wall into a vibrant textile masterpiece by crafting bold, textured art using felt or quilted fabric sections. This approach adds a cozy, tactile dimension to your space, with layers of soft, plush felt or intricate quilted patterns creating a dynamic visual effect.
Think of a patchwork of bright colors—deep reds, sunny yellows, calming blues—stitched together with visible, decorative seams that invite touch. The textures can range from smooth and flat to raised and puffy, offering a rich sensory experience.
These pieces can be arranged in geometric shapes or freeform layouts, giving your wall a personal, handcrafted vibe that instantly warms up any room. Creating this textile art begins with selecting your fabrics—vivid felt sheets or quilted fabric remnants work well—and cutting them into various shapes or panels.
Sew or glue these pieces onto a sturdy backing fabric or a canvas, layering and overlapping for depth. For a more polished look, add decorative stitches or embroidery to enhance the visual texture.
Once assembled, hang your textile art using simple wall hooks or a tension rod for an easy, damage-free display. This DIY project is perfect for adding a splash of color and coziness to your living room, bedroom, or even a hallway, with endless possibilities for customization.
To keep the process beginner-friendly, opt for pre-cut felt sheets or quilted fabric squares, which are widely available at craft stores. Use hot glue or fabric glue for quick assembly, or sew for a more durable finish.
Measure your wall space and plan your layout beforehand, whether you prefer a grid pattern or a more organic, freeform arrangement. Finish with a simple frame or let the edges hang loose for a relaxed look. This project is budget-friendly, highly customizable, and a wonderful way to showcase your personality through textured, colorful wall art.
17. Chalkboard or Whiteboard Wall Panels

Turn an empty wall into a functional, ever-changing canvas with chalkboard or whiteboard panels, merging practicality with creative expression. These surfaces allow you to jot down daily reminders, inspirational quotes, or doodle to your heart’s content, making your space uniquely interactive.
Whether used in the kitchen for meal planning, in a home office for brainstorming, or in a children’s playroom for creative messes, these panels bring versatility and charm. The sleek black or bright white surfaces create a modern vibe, while also serving as a bold statement piece that transforms your wall from static to dynamic.
Imagine a large, smooth chalkboard or whiteboard panel mounted on your wall, framed with simple wooden trim or sleek metal edges for a polished look. The surface is perfectly flat, inviting you to write or draw with colorful chalk or dry-erase markers—think vibrant notes, playful sketches, or motivational quotes.
The surrounding wall can be painted in a coordinating hue or kept neutral to let the panels stand out. When not in use, these panels can be erased cleanly, maintaining a fresh, clutter-free appearance that adapts to your mood or needs.
Getting started is straightforward: purchase a large chalkboard or whiteboard panel, or DIY one by applying special paint to a section of your wall for a seamless look. Secure the panel with mounting hardware, ensuring it’s sturdy and level.
Keep chalk, markers, and erasers nearby for easy access, and consider adding small shelves or ledges to store supplies. This project is ideal for a quick upgrade that combines function with style, giving your home a creative, organized touch that’s easy to change as your needs evolve.
18. Decorative Wall Hooks with Artistic Arrangements
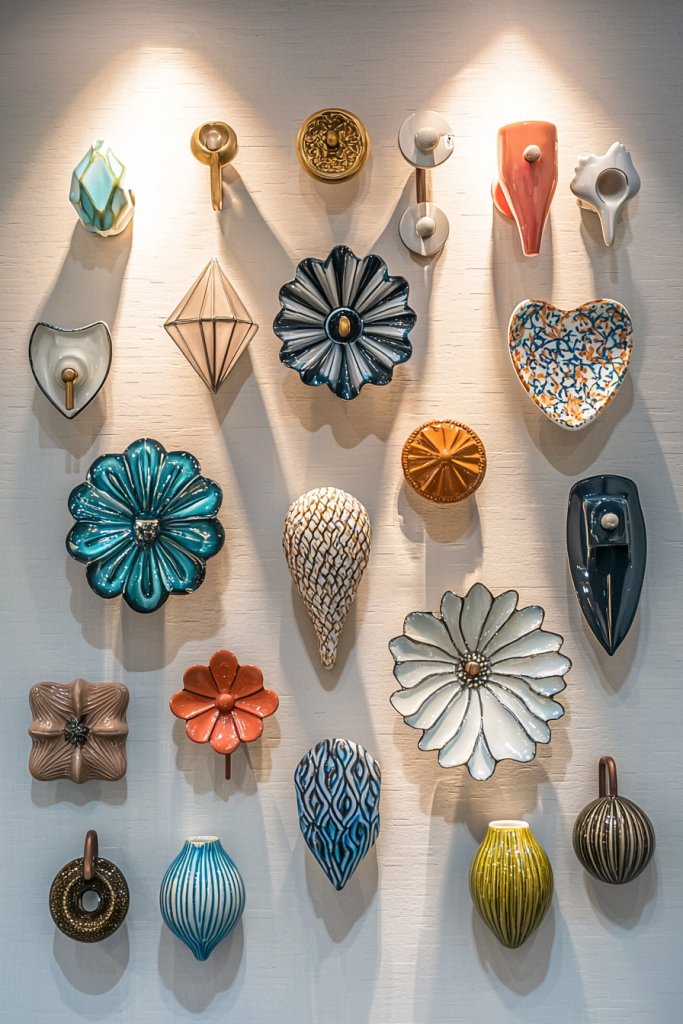
Elevate your wall decor by integrating decorative hooks or knobs that double as artful accents, turning a simple organizational element into a stylish focal point. These hooks come in various shapes—floral motifs, geometric designs, vintage-inspired metals—and can be arranged in eye-catching patterns like clusters, grids, or organic layouts.
They’re perfect for hanging jewelry, scarves, lightweight bags, or even small decorative items, adding a layer of visual interest while serving a practical purpose. When thoughtfully arranged, these hooks transform an everyday necessity into a curated piece of wall art.
Visualize a wall adorned with a mix of ornate brass hooks, matte black industrial designs, or colorful ceramic knobs, each contributing texture and character. The hooks can be clustered into a shape—such as a sunburst, a tree silhouette, or an abstract pattern—or evenly spaced for a more minimalist look.
The background can be painted in a complementary color or left neutral to highlight the hooks’ design. The overall effect is a lively, functional display that combines utility with artistic flair, perfect for entryways, bedrooms, or bathrooms.
To create this arrangement, select your decorative hooks based on your style and the weight of items you plan to hang. Mount them securely into wall studs or use appropriate anchors for drywall to ensure safety.
Play around with the layout on the floor first to visualize the pattern before marking your wall. Keep the hooks accessible and organized, and consider adding small decorative elements—like mini planters or art pieces—on the hooks for an extra personalized touch. This project is simple, inexpensive, and instantly adds personality to any space.
19. Layered Paper or Cardboard Art for Depth
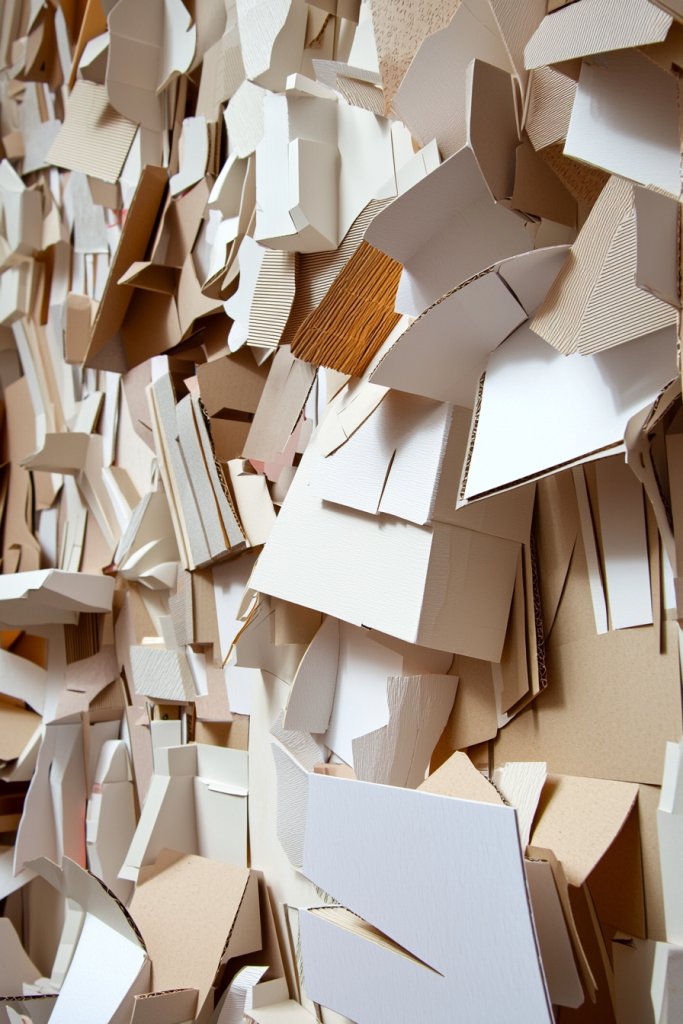
Add visual intrigue and a sense of depth to your walls by creating layered paper or cardboard art, turning flat surfaces into dynamic, three-dimensional displays. This technique involves cutting shapes—such as geometric patterns, abstract forms, or nature-inspired silhouettes—from colorful or neutral-toned paper or cardboard.
These pieces are then layered at varying heights using foam pads, glue, or small spacers, resulting in a textured collage that pops off the wall. The layered effect creates shadows and highlights that change with the light, giving your space a lively, engaging aesthetic.
Imagine a wall covered with overlapping shapes—circles, triangles, or organic forms—that cast subtle shadows, adding dimension and movement. You might choose a monochromatic palette for a minimalist look or a bright mix of colors for boldness.
The materials are lightweight and inexpensive, making this a highly accessible project. You can arrange the layers in a symmetrical pattern for a modern feel or a more organic, freeform layout for a boho vibe.
The finished piece can be framed or mounted directly on the wall, offering endless opportunities for customization. Start by sketching your design on paper, then cut out your chosen shapes from colored paper or cardboard sheets.
Use double-sided tape, foam dots, or glue dots to attach the layers at different depths. Experiment with arrangement on the floor before committing to the wall, ensuring balance and visual interest. This DIY art is quick to assemble, budget-friendly, and provides a striking focal point that adds depth and personality to any room.
20. Fabric or Rope Wall Baskets for Storage & Style
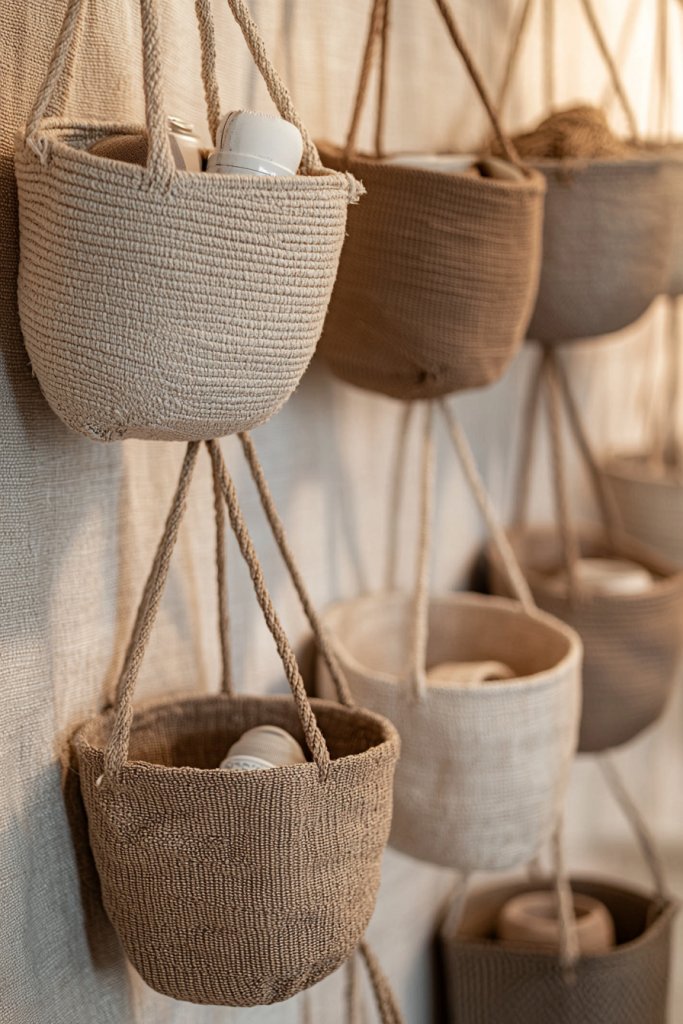
Combine practicality and style by hanging handmade fabric or rope baskets on your wall, creating a chic storage solution that doubles as decorative art. These baskets are crafted from natural fibers like jute, hemp, or cotton, woven into textured, sturdy containers.
They can be used to hold small plants, books, accessories, or miscellaneous household items, helping to declutter while adding a cozy, artisanal touch to your decor. Their soft, organic appearance complements boho, rustic, or coastal interiors, turning functional storage into a focal point.
Picture a series of woven baskets in neutral tones—beige, taupe, or soft grey—mounted at different heights on a wall, forming a rhythmic, textured display. Some baskets are open at the top for easy access, while others may have decorative flaps or fringed edges.
The tactile quality of the fibers invites touch, and the irregular weaving patterns add visual interest. These baskets can be hung from decorative hooks, wooden dowels, or mounted directly with sturdy hardware, creating an inviting and organized visual.
To create your own, select your materials—natural fiber ropes or fabric strips—and choose your basket style. Follow simple weaving or knotting tutorials suited for beginners, or repurpose existing baskets by adding decorative loops or handles.
Mount each basket securely on your wall using appropriate anchors or hooks, spacing them to create a balanced, cohesive display. These handmade wall baskets are an easy, customizable way to bring texture, warmth, and functional storage to any room.
21. DIY Tile or Mosaic Wall Decor
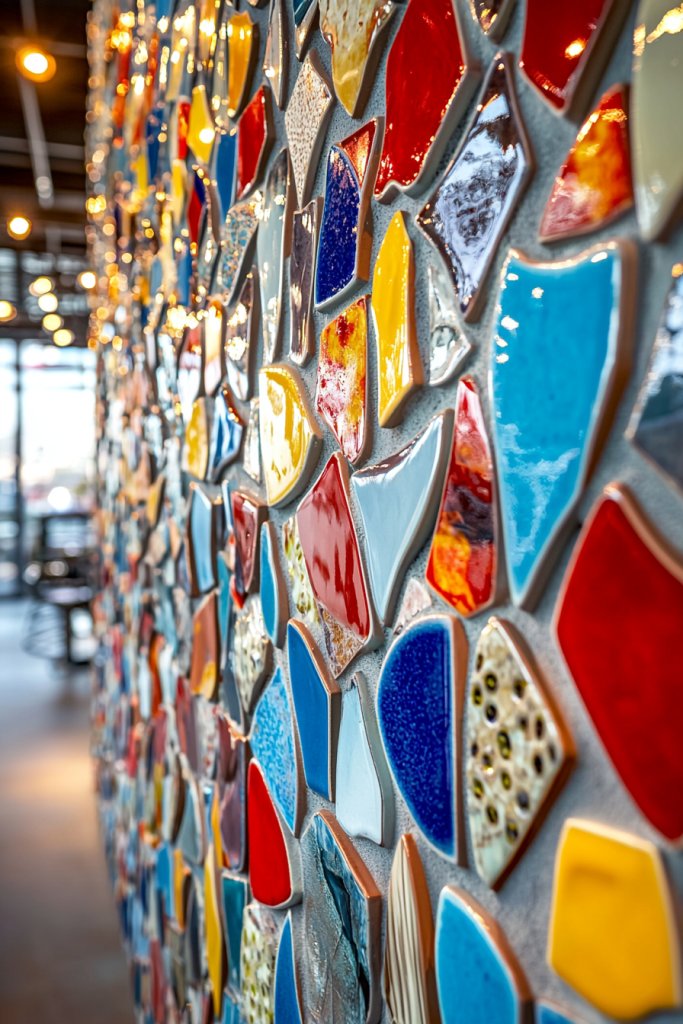
Transforming your wall with colorful tiles or mosaics is a fantastic way to add vibrant texture and a handcrafted touch to your space. This idea appeals to those who love bold, artistic statements and enjoy working with small, detailed elements.
It’s perfect for creating a focal point in kitchens, bathrooms, or entryways, turning a plain wall into a piece of art. Imagine a wall covered with tiny, glossy ceramic tiles arranged in intricate geometric patterns or abstract designs.
You could incorporate a mix of bright blues, earthy terracottas, or shimmering glass pieces that catch the light with every glance. The textured surface creates a dynamic visual effect that invites touch and curiosity, while the vivid colors energize the room.
The finished mosaic might have a slightly raised surface, giving it depth and dimension that makes it stand out even more. Getting started is easier than you think.
First, gather ceramic tiles, glass pieces, or broken china, and choose a design or pattern. Use adhesive tile mortar or a heavy-duty glue suitable for your materials to attach pieces onto a sturdy backing—such as plywood or a pre-made mosaic board.
Once set, seal the surface with a clear grout or sealant to protect your artwork. For a more budget-friendly option, you could repurpose broken plates or tiles from old projects and focus on simple, repetitive patterns to build your mosaic with confidence.
22. Vintage Doilies or Lace Wall Accents
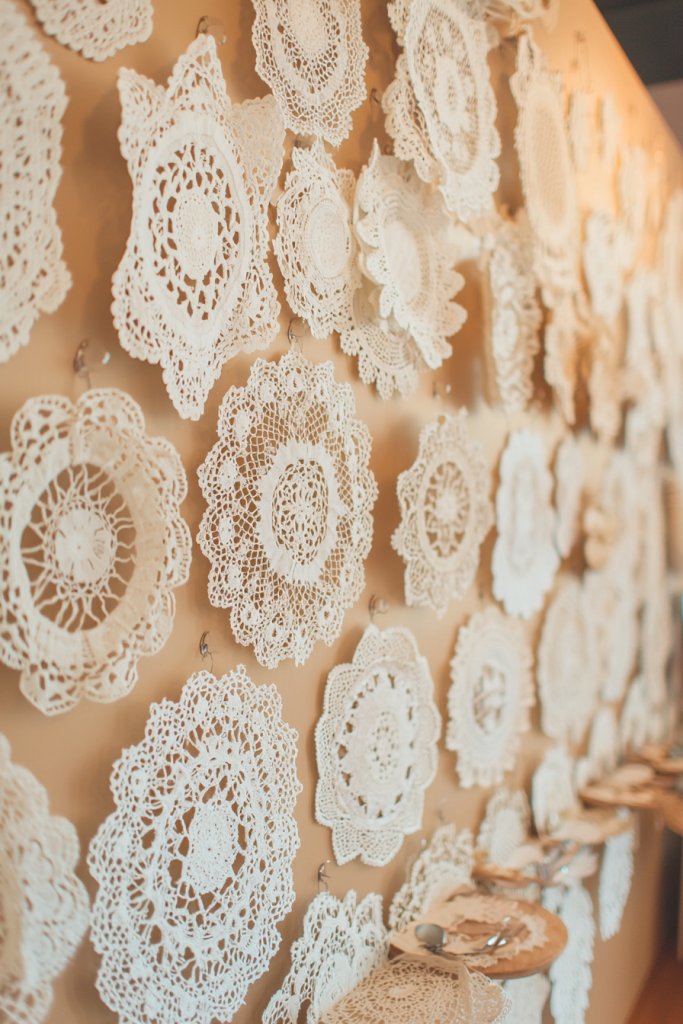
Arranging vintage lace or doilies on your wall instantly adds a delicate, nostalgic charm that feels both cozy and timeless. This idea is ideal for those who love a touch of femininity or want to introduce a handcrafted, heirloom feel into their modern decor.
It works beautifully in shabby chic, cottage, or eclectic interiors. Picture a soft, neutral-toned wall decorated with an array of intricate doilies in various shapes and sizes.
Their delicate patterns—featuring floral motifs, scalloped edges, and fine embroidery—create a textured, layered effect. The lace’s soft whites, creams, or pastels contrast gently against the wall, adding visual interest without overwhelming the space.
The subtle textures evoke a gentle, almost whisper-like quality, inviting viewers to appreciate the craftsmanship and history embedded in each piece. To create this charming display, start by collecting vintage doilies or lace pieces from thrift stores, flea markets, or family heirlooms.
Arrange them in a balanced yet organic layout on your wall using double-sided tape or small pins—just enough to hold them securely without damaging the fabric. For added cohesiveness, you could mount each doily onto a slightly larger backing, like a piece of cardboard or fabric, before hanging. This simple project transforms a plain wall into a gallery of delicate, nostalgic artistry.
23. Customizable Canvas or Peel-and-Stick Wall Decals
Personalized wall decals or peel-and-stick designs are a super easy way to refresh your space with minimal effort. This idea is perfect for renters, busy homeowners, or anyone who loves quick updates, offering a customizable, removable solution that doesn’t damage walls.
It taps into current trends for personalized decor and allows for endless creativity. Imagine a wall adorned with bold, colorful decals that spell out your favorite quote or feature playful patterns like stars, geometric shapes, or abstract designs.
These decals come in vibrant shades—deep navy, soft blush, or metallic gold—and are made from durable vinyl that clings easily to walls. They can be arranged in clusters or as a single statement piece, giving your space a modern, personalized vibe.
The peel-and-stick method ensures that you can change your design as often as you like, keeping your decor fresh and exciting. Getting started is straightforward.
Choose your design—either custom-made via online decal services or pre-made decals from home decor stores. Clean the wall surface thoroughly before peeling off the backing of your decals and carefully applying them, smoothing out air bubbles with a credit card or squeegee.
For added personalization, you can combine different shapes, colors, and sizes, creating a unique mural. With these simple tools and a little patience, you’ll have a stylish, personalized wall display in no time.
Conclusion
With so many creative DIY wall art decor ideas—from textured macramé and woven fibers to upcycled pallets, geometric shelves, and vibrant mosaics—there’s endless potential to personalize and elevate your home style. Whether you prefer bold statements, cozy accents, or functional art, these projects invite you to unleash your creativity and transform your space.
Dive into these ideas and make your walls a true reflection of your unique personality. Start crafting today and turn your home into a stunning, inspiring sanctuary!
Leave a Reply