Ever wonder how to make low ceilings feel taller and more stylish without a major renovation? Pop groove ceiling designs have become a favorite among interior enthusiasts because they add texture, depth, and a touch of modern flair—transforming even the most modest spaces into stunning showstoppers. Their versatility allows for endless customization, from sleek minimalism to bold, vibrant statements, making them a perfect choice for anyone looking to elevate their home’s aesthetic.
In this article, you’ll discover a wealth of creative ideas and practical tips to reinvent your ceilings with pop groove designs. Whether you’re drawn to sophisticated metallic finishes, playful multicolored patterns, or subtle monochrome textures, there’s something here to inspire every style.
Get ready to explore innovative ways to enhance your space—turning a low ceiling into a captivating focal point that reflects your personality and elevates your home’s overall vibe. A bold paint color on the ceiling can instantly transform a low-ceilinged room into a striking, eye-catching space.
When paired with contrasting accents, it creates a lively visual impact that draws the eye upward and adds personality to your decor. Imagine a ceiling painted in a rich, deep navy or vibrant emerald green, with sharp white or metallic accents highlighting the grooves and edges of the pop design.
The contrasting colors emphasize the textured pattern, giving depth and dimension to the ceiling. The bold hues make the space feel more dynamic, while smooth, matte finishes keep the look modern and sophisticated.
Soft lighting, like warm LED strips, can enhance the vivid color palette, casting gentle shadows that accentuate the grooves and create a cozy yet energetic atmosphere. To achieve this look, start by selecting a vibrant or contrasting paint color that complements your room’s overall palette—think jewel tones, bold primaries, or crisp whites.
Use painter’s tape and a steady hand to carefully define the groove areas, ensuring clean lines and sharp accents. For a more polished finish, consider applying a semi-gloss or matte enamel for durability and visual contrast.
If you prefer a less permanent approach, peel-and-stick wallpaper in bold colors or textured decals can provide a similar effect without the commitment. With a little patience and creativity, you can turn your ceiling into a captivating focal point that energizes your entire space.
2. Textured Pop Groove Paneling for Depth

Elevate your low ceilings with textured pop groove paneling to create a sense of depth and sophistication that transforms the entire room. This design trick not only adds visual interest but also makes your space feel more layered and inviting.
Imagine a ceiling adorned with deeply carved, tactile grooves arranged in a rhythmic pattern, painted in soft matte shades like warm beige or cool charcoal. The textured panels boast a mix of smooth and rough finishes, inviting your fingertips to explore their surface.
When illuminated by subtle lighting, these grooves cast gentle shadows, enhancing the three-dimensional effect. The tactile quality of the textured paneling adds a cozy, inviting feel, making the ceiling a true design feature that draws the eye upward and adds dimension to an otherwise flat space.
To recreate this look, start with lightweight pop groove panels made from MDF or PVC for easy installation. Choose textured finishes—such as stucco-like surfaces or embossed patterns—that suit your style.
Use adhesive and nails to secure the panels onto your ceiling, ensuring the grooves align seamlessly. For added visual interest, consider painting the panels in a monochrome palette or applying a contrasting stain to highlight the textures. Simple tools like a saw, level, and measuring tape will help ensure precise placement, making this a DIY-friendly project that instantly elevates your ceiling’s style.
3. Metallic Finishes for a Luxe Look

Transforming a low ceiling into a stunning focal point is easier than you might think, especially with the luxurious touch of metallic finishes on your pop groove ceiling. This technique instantly elevates the space, adding a sophisticated shimmer that catches the eye and creates an upscale ambiance.
Imagine a ceiling adorned with sleek, metallic-coated grooves in shades like brushed gold, silver, or rose gold. The reflective surfaces catch and bounce light from nearby fixtures, casting subtle glimmers across the room and making the space feel brighter and more expansive.
The grooves themselves have a smooth, polished texture that contrasts beautifully with matte walls, adding depth and a modern edge. The shimmering metal accents bring a sense of glamour and opulence, transforming an ordinary ceiling into a statement piece that radiates luxury and style.
To recreate this look, start by selecting your preferred metallic finish—options include metallic paint, foil wraps, or adhesive metallic films designed for interior use. Carefully apply the finish to your existing pop groove panels, ensuring even coverage for a seamless look.
For an easier approach, you can opt for pre-finished metallic panels or contact a professional for precise installation. Pair your metallic grooves with warm or neutral wall tones to highlight the shimmer, and incorporate soft, ambient lighting—like LED strip lights—to amplify the reflective effect and create a truly mesmerizing ceiling that oozes elegance.
4. Multi-Colored Groove Patterns for Visual Drama
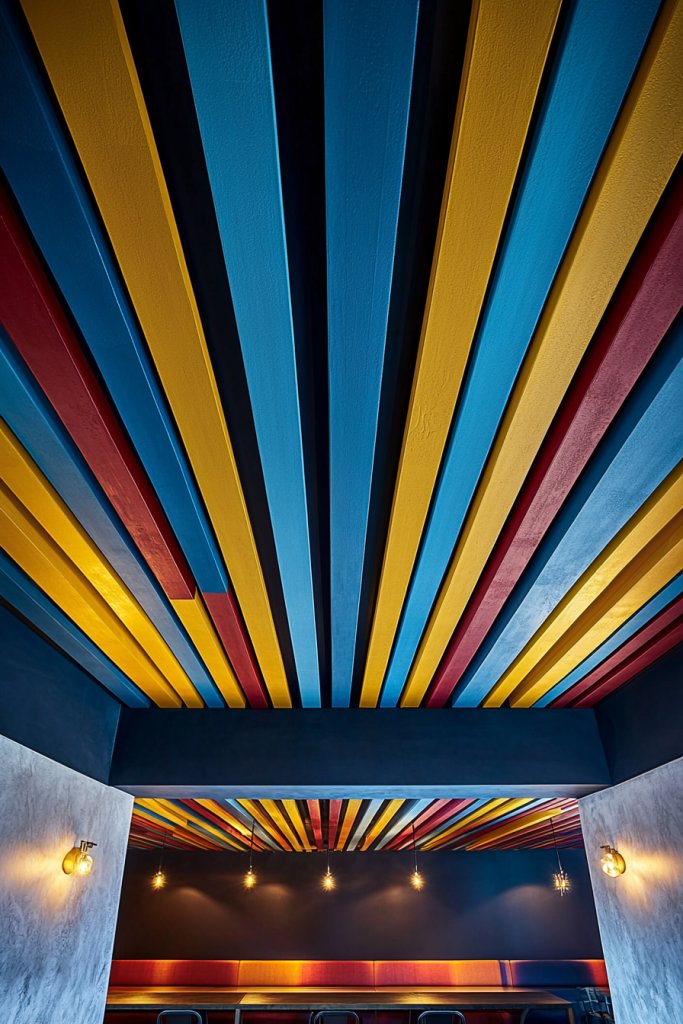
Transform your ceiling into a captivating focal point by incorporating multi-colored groove patterns that add instant drama and personality to any room. This bold approach breaks away from traditional monochrome designs, injecting vibrancy and energy that truly elevates your space.
Imagine a ceiling adorned with evenly spaced grooves painted in a spectrum of lively hues such as deep blues, fiery oranges, emerald greens, and soft pinks. The multi-colored stripes create a playful, rhythmic pattern that draws the eye upward, while the textured grooves add depth and tactile interest.
The vivid colors contrast beautifully against a neutral or white background, making the whole room feel lively and inviting. Soft lighting enhances the color variations, casting subtle shadows that emphasize the grooves’ dimensionality, creating a lively visual dance overhead.
Getting started is simpler than you might think. First, choose your palette of 3-5 colors that complement your room’s decor.
Then, install textured pop groove panels or create your own painted grooves using painter’s tape and high-quality paint in bold shades. For a more refined look, consider using pre-colored groove panels or adding a clear protective coat for durability. Finish by adding warm lighting, such as LED strips or spotlights, to highlight the vibrant colors and textured patterns — transforming your ceiling into a stunning, energetic feature that sparks joy every time you look up.
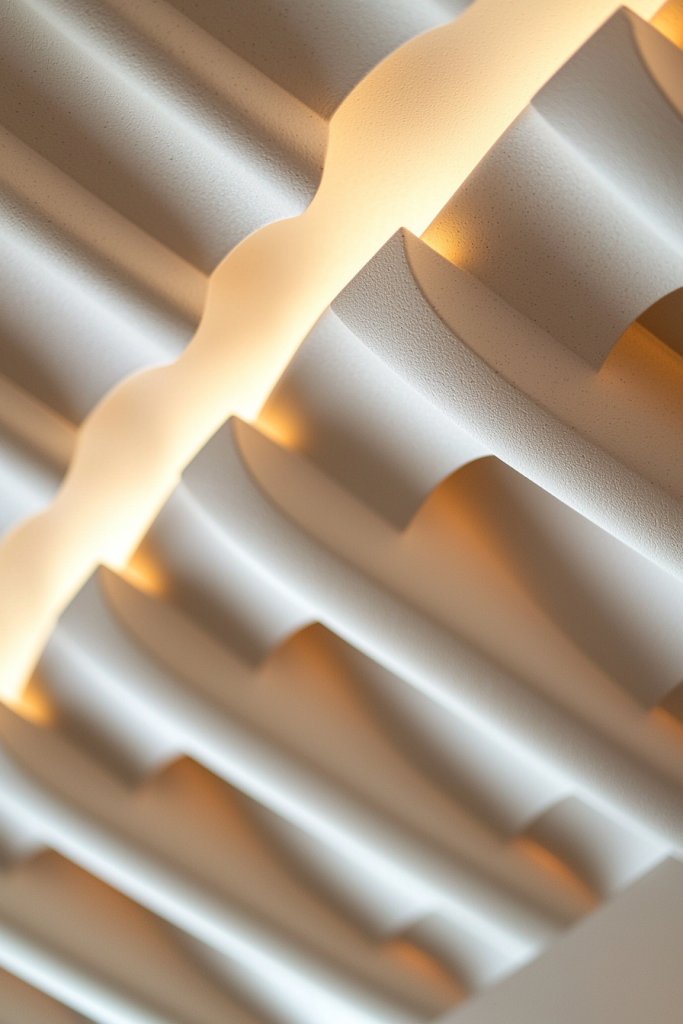
5. Incorporating LED Lighting into Groove Designs

Transform your low ceiling into a stunning focal point by seamlessly integrating LED lighting within your pop groove design, adding both ambiance and a touch of modern sophistication. This clever combination not only elevates the aesthetic appeal but also creates a warm, inviting atmosphere that transforms the entire room.
Imagine a ceiling adorned with evenly spaced, sleek grooves painted in a crisp matte white or a soft neutral tone, accentuated by embedded LED strip lights nestled within each channel. When lit, these LEDs cast a gentle, diffuse glow that highlights the textured pattern and adds depth to the space.
The combination of soft lighting and textured grooves creates a dynamic visual effect, making the ceiling appear more expansive and lively. The subtle gleam of the LED lights enhances the tactile quality of the grooves, inviting you to reach up and feel the textured surface, while the overall look remains sleek and contemporary.
To bring this idea to life, start by choosing your groove pattern—straight, angled, or curved—based on your style preference. You’ll need LED strip lights, which are flexible and easy to install, along with painter’s tape, a measuring tape, and possibly a dimmer switch for adjustable lighting.
Carefully plan the groove layout and mark the positions before installing the LED strips inside each channel. If LED strips aren’t your thing, consider using battery-operated puck lights for a simpler, cordless option. With a bit of patience and some basic tools, you can create a stunning, illuminated ceiling that transforms your space into a modern retreat.
6. Combining Pop Groove Ceilings with Crown Molding
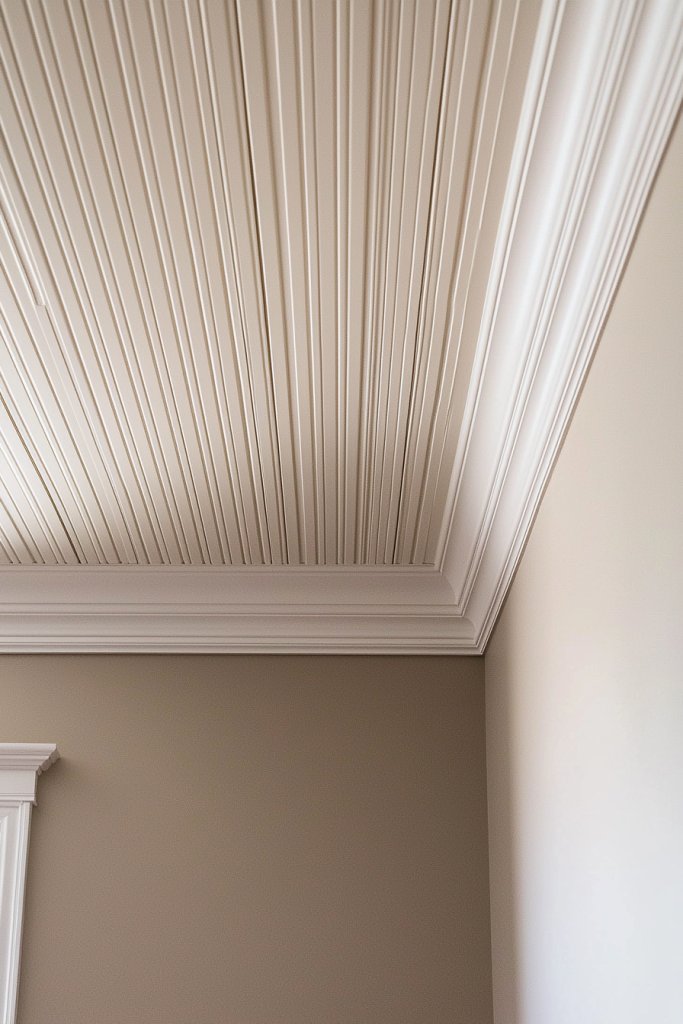
Blending modern pop groove ceilings with traditional crown molding creates a stunning contrast that elevates any room’s aesthetic. This combination brings together the sleek texture of the grooves with the classic elegance of crown molding, offering a sophisticated design that appeals to both contemporary and timeless tastes.
Imagine a ceiling where the textured pop groove pattern runs seamlessly around the perimeter, with a crisp, white crown molding framing the space. The grooves might be painted in a soft matte gray or pale pastel to enhance depth, while the crown molding remains pristine white, adding a refined border.
The interplay of these elements creates visual interest and a sense of height, especially when complemented by subtle lighting. The overall effect is a balanced fusion of modern texture and traditional detail, making the ceiling a focal point without overwhelming the room.
To implement this look, start by installing your pop groove panels or creating the pattern directly on your ceiling. Choose a simple, elegant crown molding—either pre-made or custom-cut—to fit around the perimeter.
Paint the grooves in your preferred color, and then attach the crown molding with a strong adhesive or nails. Finish with a fresh coat of paint, and add discreet LED strip lighting along the edges for a luminous contrast. This approach is beginner-friendly and allows for plenty of customization to suit your style and space.
7. Monochrome Minimalist Groove Designs
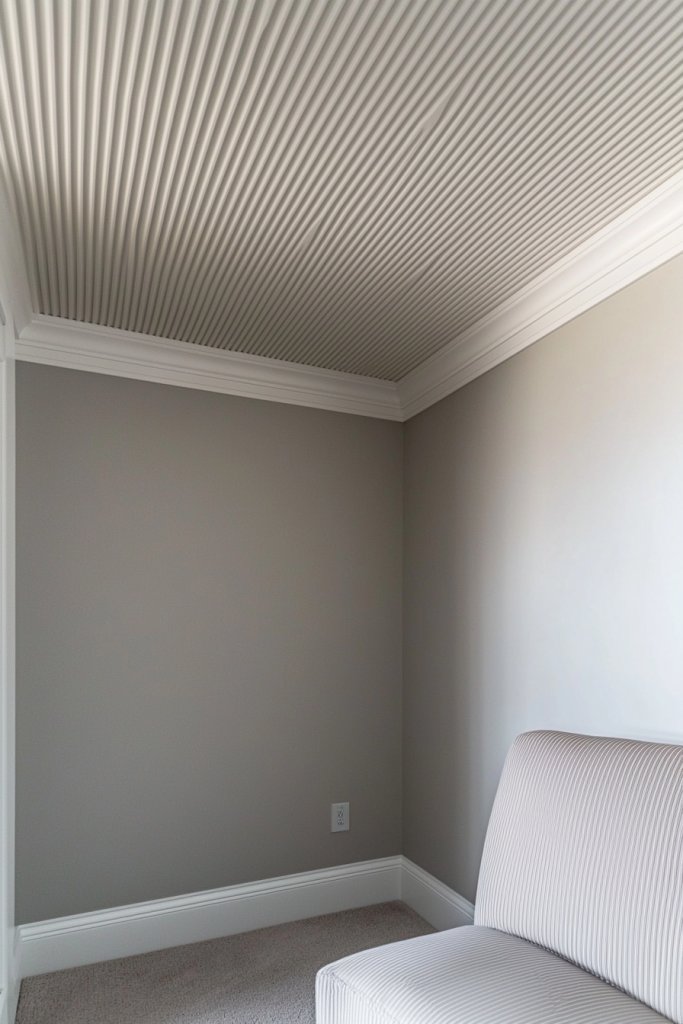
A monochrome minimalist approach to pop groove ceilings offers a sleek, understated elegance that subtly enhances a space’s architecture. This design emphasizes clean lines, uniform color palettes, and simple textures, making it perfect for modern interiors that favor understated sophistication.
Visualize a ceiling painted entirely in a soft, matte white or a muted gray, with the grooves subtly carved or installed to create a linear pattern. The uniform color enhances the texture’s depth without adding visual clutter, allowing the grooves to catch light and shadows naturally.
The tactile surface invites gentle touch, while the overall look remains calm and cohesive. This minimalist style feels airy and open, ideal for spaces aiming for a streamlined, contemporary vibe.
To achieve this look, select a high-quality ceiling paint in your preferred monochrome shade—matte finishes work best for a smooth, non-reflective surface. Use pre-made pop groove panels or carve the pattern directly into drywall using simple tools like a saw or groove cutter.
Keep the design linear and evenly spaced for a harmonious appearance. Finish with a coat of paint and optionally install subtle LED lighting to emphasize the grooves’ shadows. This approach requires minimal embellishment, making it accessible for DIY enthusiasts seeking a polished, modern ceiling.
8. Installing Recessed Shelves or Niches in the Ceiling
Integrating recessed shelves or niches within a pop groove ceiling transforms a decorative feature into functional storage or display space. This clever combination adds visual interest and practicality, especially in rooms where space is limited but style is essential.
Picture a ceiling with a textured pop groove pattern, featuring one or two small rectangular or circular niches carved into the design. These niches can be framed with the same material as the grooves or finished with a contrasting color or material, such as dark wood or metallic accents.
Inside, you could place small decorative objects, candles, or lighting elements to create focal points. The textured background enhances the depth of the niches, making them stand out as purposeful design features rather than just storage.
To implement this idea, start by marking the positions of your shelves or niches within the ceiling design. Use a saw or rotary tool to carefully carve out the spaces, ensuring clean edges.
Reinforce the cutouts with framing if needed, then finish with drywall compound or filler to smooth the surfaces. Install the grooves around the openings, then paint or finish the entire ceiling as desired.
Insert your chosen objects or lighting fixtures into the niches. This project is manageable for DIYers with basic carpentry skills and adds both style and function to your ceiling.
9. Using Wood Grain or Faux Wood Finishes
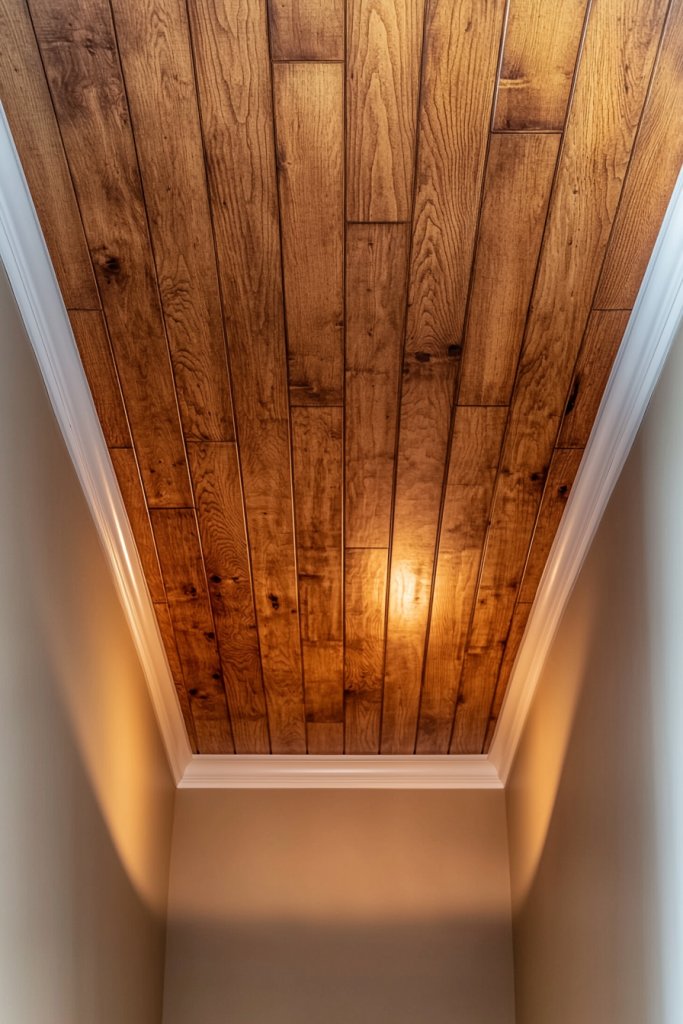
Applying wood grain or faux wood finishes to pop groove ceilings introduces warmth and natural texture, transforming a simple ceiling into a cozy, inviting focal point. This approach blends rustic charm with modern detail, perfect for homes seeking a balance between contemporary and organic aesthetics.
Envision a ceiling where each groove features a rich, walnut or oak veneer, or a faux wood laminate with visible grain patterns. The natural hues—warm browns, amber, or soft taupe—add depth and tactile richness, making the space feel grounded and welcoming.
The textured wood grain complements other natural elements, like stone or textiles, creating a harmonious, earthy atmosphere. This look enhances both traditional and modern interiors, bringing a sense of craftsmanship and comfort.
To achieve this effect, choose either real wood veneer sheets or high-quality faux wood laminate designed for ceilings. Attach the material to your pop groove panels or directly to the ceiling with adhesive, ensuring the grain runs consistently for visual coherence.
Seal the surface with a clear protective finish if using veneer, or choose a pre-finished laminate. Finish the edges smoothly and consider adding warm lighting to highlight the natural textures. This project is accessible with basic tools and offers a stunning, durable upgrade that adds character and coziness.
10. Creating a Ceiling Murals with Groove Borders
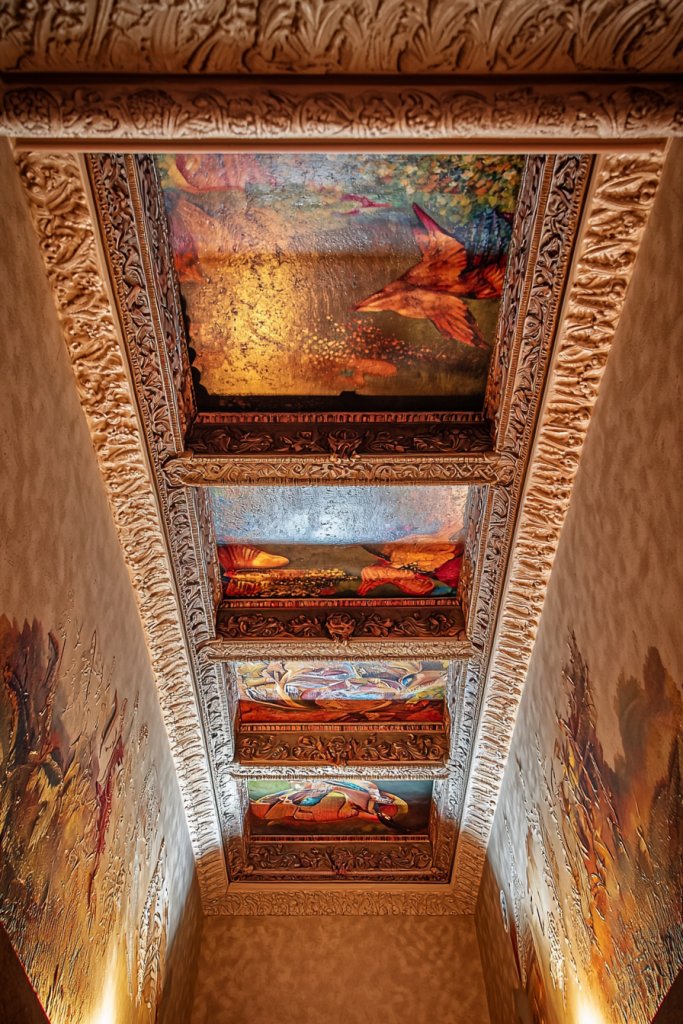
Transforming a pop groove ceiling into a work of art with murals and groove borders turns an ordinary space into a captivating visual masterpiece. This design idea combines detailed mural art with textured framing, making the ceiling a striking focal point in any room.
Imagine a ceiling featuring a large, hand-painted or wallpaper mural—such as a celestial sky, abstract patterns, or serene landscapes—outlined by a border of grooves that create a geometric frame. The grooves act as a subtle boundary, drawing the eye inward and emphasizing the artwork.
The textured border adds depth and dimension, while the mural brings personality and visual intrigue. The overall effect is both artistic and architectural, elevating the room’s style and ambiance.
To bring this idea to life, start by selecting a mural design that suits your space, size, and style. Paint or wallpaper the mural directly on the ceiling, then carve or install groove panels around the perimeter to form a border.
Use a template or painter’s tape for clean, precise lines. Finish by painting the grooves in a complementary color or applying a contrasting finish for added depth.
Lighting can be directed to highlight the mural and grooves, creating a dramatic, gallery-like atmosphere. This project is ideal for DIY enthusiasts eager to add a personalized, artistic touch to their ceilings.
11. Combining Pop Groove with Fabric Ceiling Panels
Creating a luxurious, soft ambiance in your space can be effortlessly achieved by combining pop groove ceiling patterns with fabric panels. This approach transforms a simple textured ceiling into a plush, inviting feature, perfect for bedrooms or cozy living rooms.
The fabric adds a tactile softness that contrasts beautifully with the structured grooves, elevating the overall aesthetic. Imagine a ceiling where the classic pop groove pattern is overlaid with smooth, velvety fabric panels in muted tones like blush pink, deep navy, or warm beige.
The fabric is stretched tightly within the grooves, providing a gentle, cushioned surface that absorbs sound and creates a whisper-soft visual effect. The combination results in a layered look, where the textured grooves peek through the fabric, adding depth and sophistication.
When lit with warm LED lighting, the textured fabric emits a subtle glow, making the room feel both refined and cozy. Getting this look is straightforward.
First, install the pop groove panels using lightweight fiberboard or MDF as the base. Then, attach stretchable fabric—such as linen, velvet, or heavy-weight cotton—using an adhesive or tensioning system designed for ceilings.
For added durability, choose fabric with a slight stretch and a dense weave to prevent sagging. Finish by adding soft LED strip lights along the edges or within the grooves to highlight the textured fabric and create a warm, ambient glow. This DIY-friendly project elevates your ceiling with minimal effort and maximum impact.
12. Bright White Pop Groove Ceilings for Airy Feelings
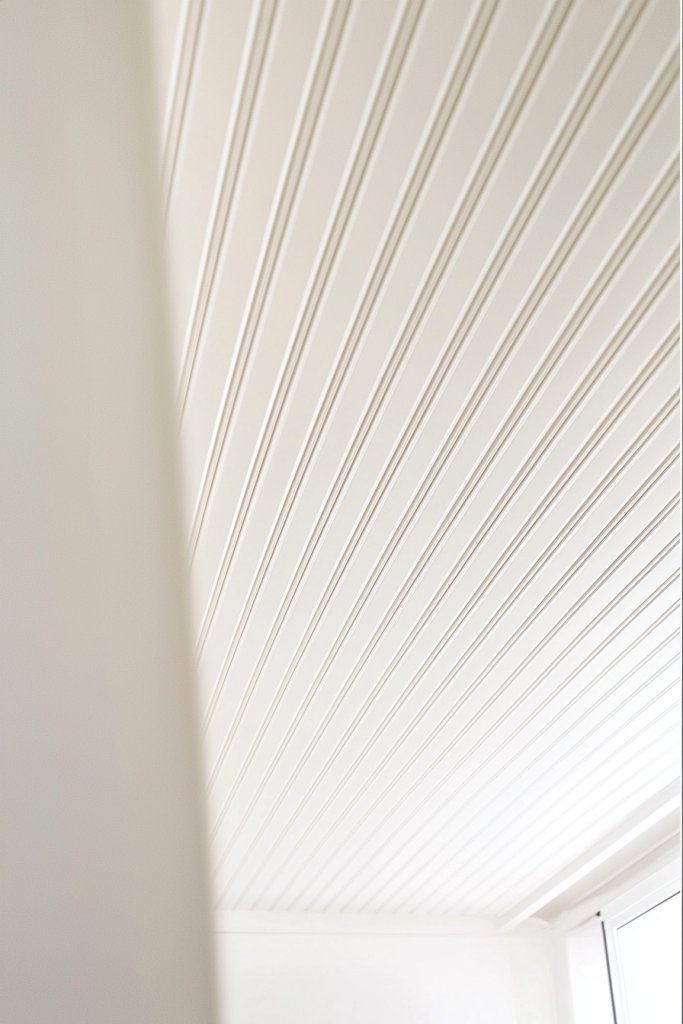
A bright white pop groove ceiling is a game-changer when it comes to making low ceilings appear taller and more spacious. The crisp whiteness reflects light beautifully, instantly opening up the room and creating an airy, fresh atmosphere that feels clean and modern.
This approach is ideal for small apartments, studios, or any space where maximizing light and openness is a priority. Picture a ceiling painted in pure, matte white, with perfectly aligned grooves that run uniformly across the surface.
The clean lines catch and diffuse light, making the ceiling seem higher and the room more expansive. The grooves add subtle texture without overwhelming the space, while the white finish enhances the reflective quality, bouncing natural daylight from windows and artificial light from fixtures.
The overall effect feels bright, uplifting, and uncluttered—perfect for creating a calm, minimalist vibe that works year-round. To achieve this look, start with a high-quality matte white ceiling paint—preferably a durable, low-VOC formula for safety and longevity.
Use painter’s tape to mark out the grooves and ensure they’re evenly spaced before painting. For the grooves, consider using paintable caulk or joint compound to define the patterns clearly, then fill in with white paint.
Finish with LED recessed lighting or flush-mount fixtures to enhance brightness. This simple, cost-effective update transforms a dull ceiling into a luminous focal point that amplifies your space’s sense of height and airiness.
13. Installing Pendant Lights or Chandeliers with Groove Accents
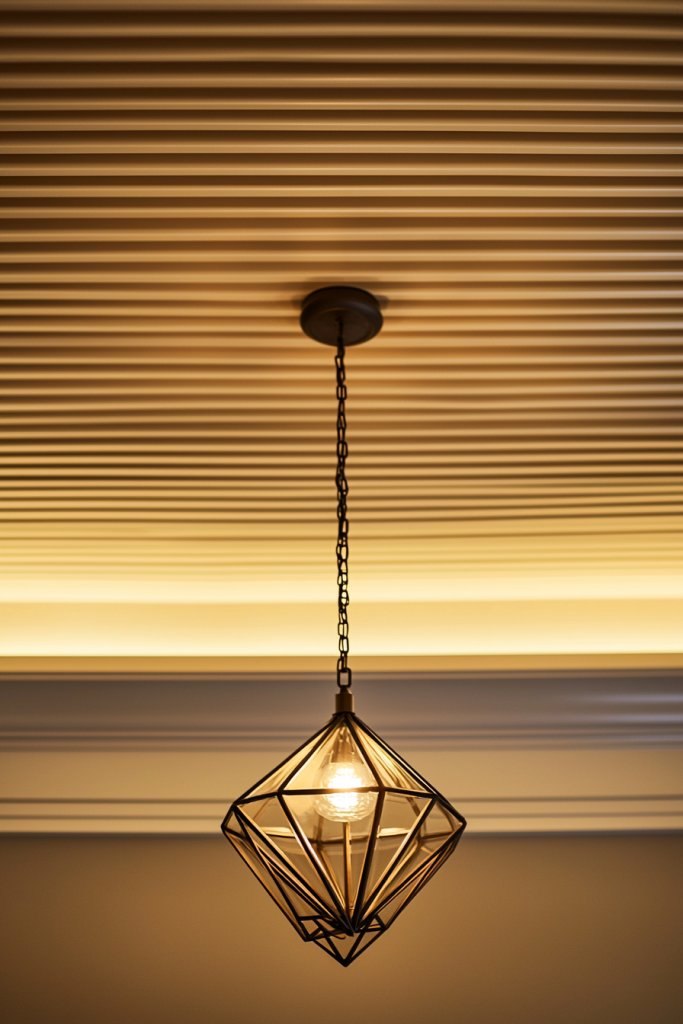
Adding statement lighting fixtures to a pop groove ceiling instantly elevates the room’s style and function, especially when paired with well-designed groove patterns. Pendant lights or chandeliers that complement the textured ceiling serve as focal points, drawing the eye upward and highlighting the ceiling’s architectural details.
This combination creates a harmonious blend of modern elegance and visual interest. Visualize a sleek, geometric chandelier or a cluster of pendant lights hanging at varying heights, suspended just below a textured ceiling with deep, well-defined grooves.
The fixtures might feature metallic finishes like brushed gold, matte black, or polished chrome, which contrast beautifully against the textured surface. When lit, the lights cast subtle shadows across the grooves, emphasizing the pattern’s depth and adding a dynamic glow to the space.
The interplay of light and texture creates a sophisticated, layered look that enhances the room’s overall ambiance. To implement this, select fixtures that align with your room’s style—whether minimalist pendants or ornate chandeliers.
Install the grooves first using MDF or wood panels, then hang your chosen lighting with appropriate ceiling hooks and adjustable cords or chains. Ensure the wiring is concealed for a clean look.
For added accent, incorporate dimmable bulbs to tailor the mood from bright and lively to soft and intimate. This approach is accessible for DIY enthusiasts with basic electrical skills and results in a stunning, functional upgrade that makes your ceiling a true design statement.
14. Adding Colorful Ceiling Medallions within Groove Patterns
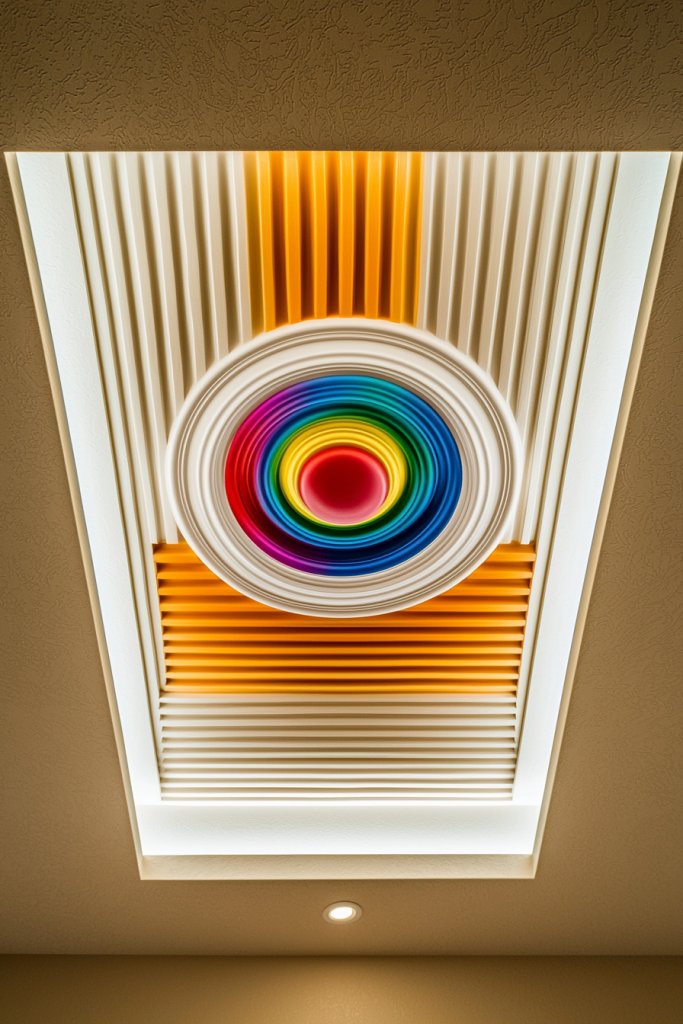
Incorporating vibrant ceiling medallions into a pop groove ceiling design introduces a striking focal point that captures attention and adds a splash of color. This decorative element works especially well in rooms where bold accents or eclectic styles are desired.
The medallion acts as a centerpiece, framing a chandelier or pendant light, and elevates the overall visual impact of the textured ceiling. Imagine a subtle, monochrome groove pattern in shades of white, gray, or soft pastel, with a large, ornate medallion in a rich hue like deep teal, gold, or crimson at its center.
The medallion’s intricate details—such as floral motifs or geometric patterns—contrast beautifully against the linear grooves, creating a layered, vibrant effect. When illuminated, the colorful medallion pops against the textured background, offering a refined yet playful aesthetic that energizes the space.
This combination adds personality and sophistication, making the ceiling a true statement piece. To create this look, first install your pop groove panels using MDF or lightweight wood.
Then, select a decorative medallion made from plaster, resin, or lightweight foam, choosing a color that complements your decor. Secure it in the center of the ceiling using strong adhesive or mounting hardware.
Paint or finish the medallion in your chosen bold color, and consider adding a coordinating chandelier or pendant light for extra flair. This simple DIY project transforms a basic textured ceiling into an eye-catching artful feature, perfect for adding character to any room.
15. Combining Different Groove Angles for a Dynamic Look
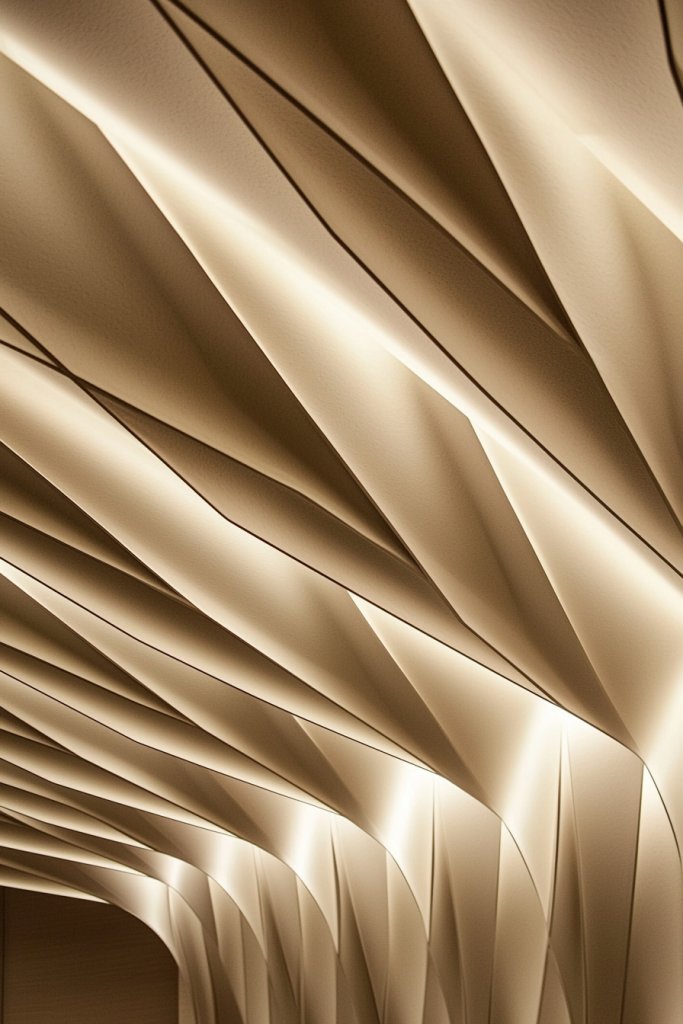
Varying the angles and depths of the grooves in a ceiling design creates a lively, modern pattern that adds energy and movement to low ceilings. This technique breaks away from traditional uniform patterns, resulting in a visually stimulating surface that feels both contemporary and artistic.
It’s perfect for those looking to add a unique, customized touch to their interiors. Picture a ceiling where some grooves run horizontally, others diagonally, and a few are set at sharp angles, with varying depths to create shadows and highlights.
The mix of angles and depths produces a dynamic, almost sculptural effect that catches the light differently throughout the day. The unconventional pattern can be designed in neutral tones or bold contrasting colors, depending on your style.
The overall result is an engaging ceiling that acts as a conversation starter and adds a sense of movement to a space, making it feel more expansive despite the low ceiling height. Start by sketching your pattern on paper, then use a combination of wood, MDF, or plaster to carve or build the different groove angles.
Use painter’s tape to mark the angles on the ceiling before installation for precision. For a seamless look, paint or stain the entire surface in a uniform color, or experiment with contrasting shades to emphasize the angles.
Incorporate directional lighting—such as adjustable spotlights—to accentuate the varied depths and angles, enhancing the overall visual impact. This approach invites creativity and results in a truly distinctive ceiling design that energizes your room.
16. Incorporating Textured Plaster or Stucco in the Grooves
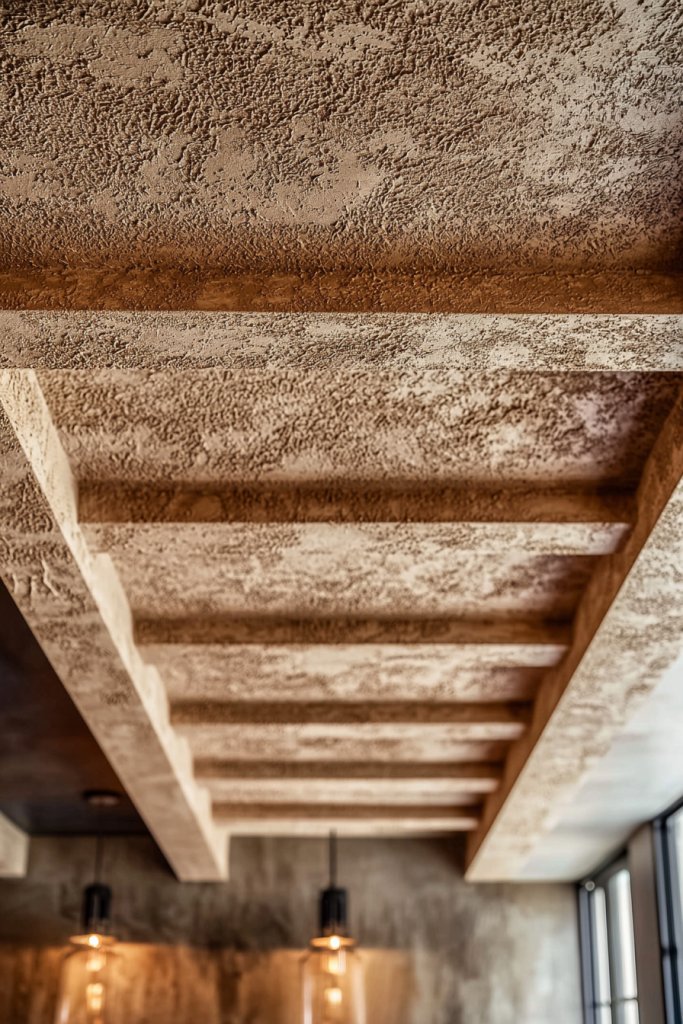
Adding textured plaster or stucco within your pop groove ceiling is a fantastic way to introduce rustic charm or vintage appeal to your space. This technique elevates the tactile experience, making the ceiling not just a visual feature but also a sensory delight.
When done right, it creates a beautifully uneven, artisanal surface that catches light in intriguing ways, adding depth and character—perfect for cozy, eclectic, or traditional interiors. Imagine running your hand over a ceiling with gentle undulations of textured plaster, where the grooves are filled with a slightly rough, matte finish that resembles aged stucco or artisan plaster.
The colors can range from soft, earthy tones like warm beige, terracotta, or muted gray, enhancing the natural, organic vibe. The textured surface adds a rustic or vintage feel, and the irregularities in the plaster can evoke the warmth of old-world craftsmanship, making the room feel inviting and historic.
The overall look pairs well with exposed wooden beams or vintage light fixtures, creating a warm, inviting atmosphere. To implement this look, start by preparing your ceiling surface, ensuring it’s clean and smooth.
Use a specialized textured plaster or stucco mix—these are widely available at hardware stores—and apply it with a trowel or spatula, working into the grooves and creating textured patterns like swirls, stipples, or random roughness. For a more authentic aged appearance, you can add subtle color washes or antiquing glazes once the plaster dries.
If DIY isn’t your thing, consider hiring a professional to achieve a consistent, high-quality textured finish. Finish with a matte or satin sealant to protect the surface and enhance the textured effect.
17. Applying Matte vs. Glossy Finishes for Contrast
Playing with different finishes on your pop groove ceiling can dramatically influence the room’s mood and visual interest. A combination of matte and glossy finishes adds subtle contrast, emphasizing the grooves and creating a sophisticated, layered look.
This approach is especially effective in modern or minimalist interiors, where the interplay of light and texture becomes a focal point. Visualize a ceiling where the grooves are painted in a soft matte gray or beige, absorbing light and adding depth, while the ridges or border accents are finished in a glossy white or metallic sheen.
The matte areas diffuse light softly, reducing glare, while the glossy parts reflect light, drawing the eye to specific design details. The contrast can be subtle or bold depending on your color choices, enhancing the overall aesthetic without overwhelming the space.
This finish combination also helps in hiding minor imperfections and adds a tactile richness that invites touch. To achieve this, start by selecting your base paint—either matte or eggshell—and carefully paint the entire ceiling.
Once dry, use painter’s tape or stencils to mask off the grooves or designated areas where you want the glossy finish. Apply your chosen gloss or semi-gloss paint with a high-quality brush or roller, ensuring clean lines for a professional look.
For a seamless effect, consider using paints with similar base tones but different sheens. This simple yet impactful technique can be completed in a day and requires only basic painting supplies, making it accessible for DIY enthusiasts.
18. Using Geometric Shapes for a Modern Twist
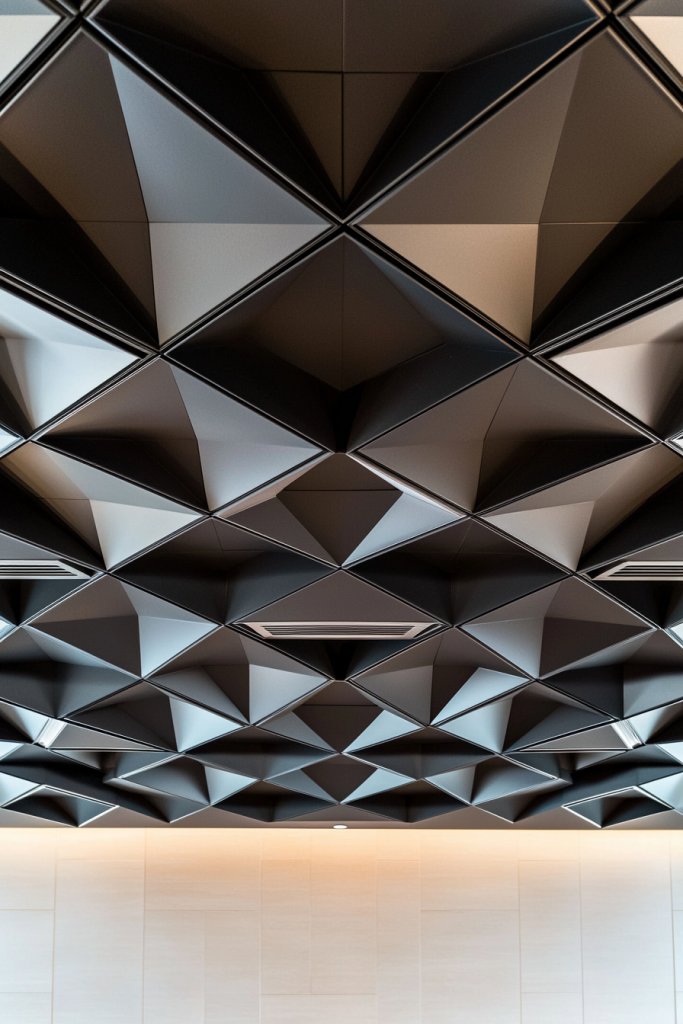
Transforming your ceiling with geometric groove patterns introduces a contemporary edge that instantly modernizes any low-ceilinged space. This approach combines clean lines, sharp angles, and bold shapes like hexagons, triangles, or diamonds, creating a striking visual rhythm that captures attention and adds a dynamic sense of movement.
Picture a ceiling where the grooves are arranged in a repeating hexagonal grid or intersecting triangles, painted in a monochrome palette of blacks, whites, or metallics. The geometric shapes create a sense of order and precision, while the varied depths and angles of the grooves introduce an element of three-dimensionality.
This modern pattern can be scaled to fit different room sizes—large, bold shapes for expansive spaces, or smaller, intricate patterns for more intimate settings. The overall effect is a sleek, architectural statement that complements minimalist, industrial, or contemporary decor.
To implement this, plan your pattern carefully using stencils or digital designs to map out the shapes before cutting or carving the grooves. Use painter’s tape to mark the edges, then carve or install the grooves accordingly with precision tools or pre-made panels.
Paint or finish the grooves in contrasting tones for added depth or keep it monochrome for a more understated look. This creative approach requires some planning and craftsmanship but results in a ceiling that feels like a piece of modern art, elevating your entire room’s aesthetic.
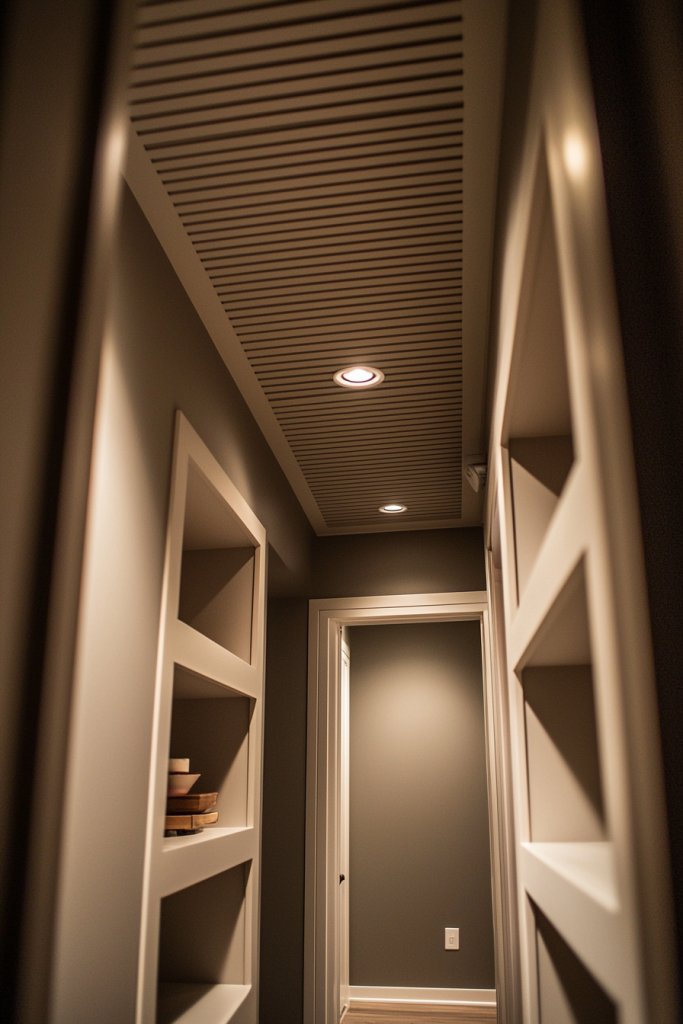
19. Integrating Hidden Speakers or Technology in Groove Designs
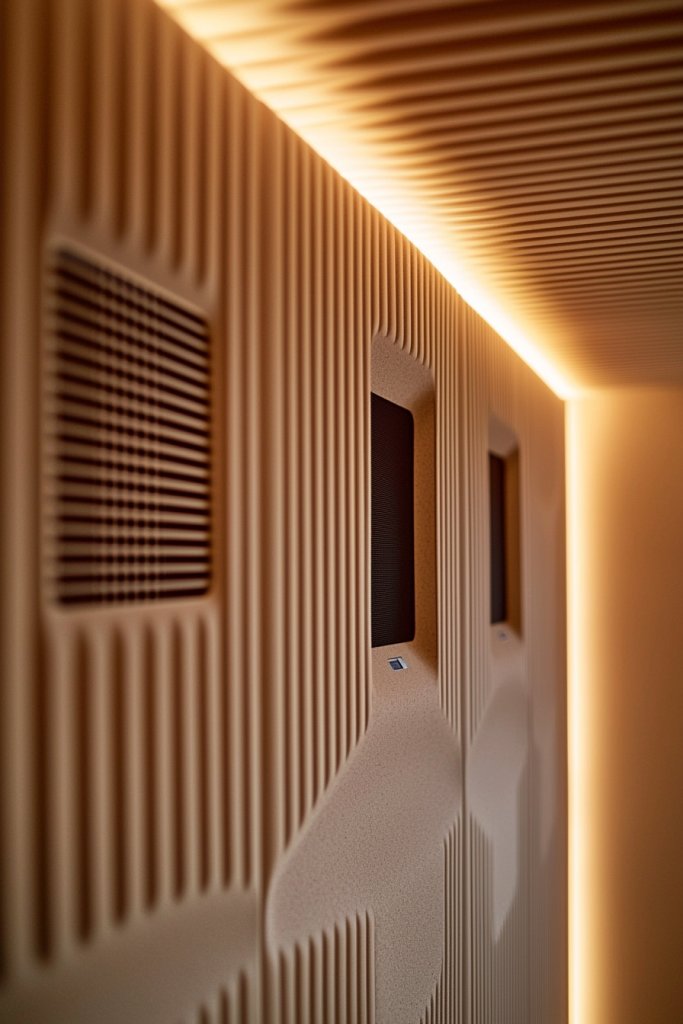
Embedding hidden speakers or smart home technology within your pop groove ceiling merges sleek design with modern functionality. This innovative approach ensures your ceiling remains visually uncluttered while offering high-tech convenience, perfect for audiophiles or smart home enthusiasts looking for a seamless integration of technology and décor.
Visualize a ceiling where the grooves are subtly designed to conceal high-quality speakers or sensors, with discreet grilles or covers that blend into the textured pattern. The grooves can be arranged in a symmetrical or asymmetrical pattern, with the technology integrated into specific sections to avoid disrupting the visual flow.
The overall look remains clean and contemporary, while the hidden tech provides immersive sound, climate control, or lighting automation at your fingertips. This creates a futuristic, high-end vibe that elevates your space’s sophistication.
To execute this, start by selecting compatible in-ceiling speakers or smart devices designed for flush installation. Carefully plan the placement within the grooves, ensuring easy access for maintenance.
Use a template or stencil to cut precise openings in the plaster or drywall, then install the devices according to manufacturer instructions. Finish the surface with textured plaster or paint that matches the rest of the ceiling, concealing the technology. This project might require some electrical knowledge or professional help but ultimately results in a seamless, tech-savvy ceiling that combines form and function effortlessly.
Conclusion
With so many creative Pop groove ceiling design ideas—from bold colors and textured panels to metallic finishes and integrated lighting—there’s a perfect solution to elevate any low ceiling space. Whether you prefer a sleek, minimalist look or a vibrant, eye-catching focal point, these ideas empower you to transform your ceilings into stunning architectural features.
Don’t be afraid to experiment and personalize your design—your dream ceiling is within reach. Start exploring these concepts today and turn your ceiling into a masterpiece that reflects your style and enhances your home’s character.
Leave a Reply